创建对应的登陆界面
 <body>
      <form action="login"  method="post">
                   姓名:  <input type="text" name="userName"/>
       <input type="submit" value="新增"/>
      </form>
  </body>
创建对应的controller
@Controller
public class LoginController  {

    /**
     * 默认用户登录时候的方法
     */
    @RequestMapping("/login")
    public String  addStudent(String userName,HttpSession session) {
        System.out.println("进入了  login");
        session.setAttribute("name", userName);
       return   "/user/list";  //转发
    }

}
@Controller
@RequestMapping("/user")
public class UserController {


    @RequestMapping("/list")
    public ModelAndView list(){
        System.out.println("进入了List");
          ModelAndView  mv=new ModelAndView();
          mv.addObject("name", "大家辛苦了!").setViewName("/success.jsp");
        return  mv;
    }
}
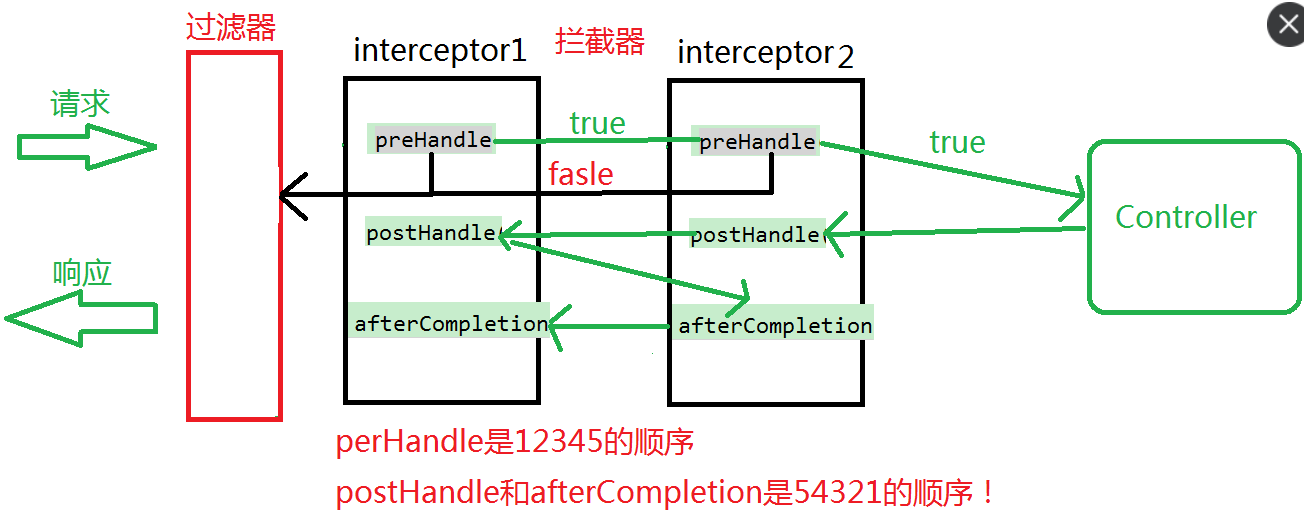
创建对应的拦截器
public class MyInterceptor implements HandlerInterceptor {

    /**
     * 在处理器映射器 映射出所要执行的处理器类时,已经将拦截器和处理器组合成一个处理器执行链!并返回给了中央调度器!
     *
     * preHandle:预处理
     * request:请求
     * response:响应
     * handler:即将执行的controller
     *
     * 01.preHandle  return是false的时候 不会执行后续的操作   只有一个拦截器的时候
     * 02.有两个拦截器   而且两个preHandle都是return===false
     *     只输出第一个拦截器中的语句!后续不会执行
     * 03.有两个拦截器  第一个拦截器中preHandle的return===true
     *      执行的方法:
     *         001.第1个拦截器的preHandle
     *         002.第2个拦截器的preHandle
     *         003.第1个拦截器的afterCompletion
     *         004.没有执行controller
     * 04.有两个拦截器  两个拦截器中preHandle的return===true
     *         001.第1个拦截器的preHandle
     *         002.第2个拦截器的preHandle
     *         003.执行controller
     *         004.第2个拦截器的postHandle
     *         005.第1个拦截器的postHandle
     *         006.第2个拦截器的afterCompletion
     *         007.第1个拦截器的afterCompletion
     */
    @Override
    public boolean preHandle(HttpServletRequest request,
            HttpServletResponse response, Object handler) throws Exception {
        System.out.println("进入了 MyInterceptor1的   preHandle=====》");
        return true;
    }

    /**
     * Controller执行之后的方法
     * 如果有多个拦截器
     * 那么  执行顺序和 perHandle相反!
     *
     * ModelAndView:就是从controller中返回的数据!
     * 我们可以操作!
     */
    @Override
    public void postHandle(HttpServletRequest request,
            HttpServletResponse response, Object handler,
            ModelAndView modelAndView) throws Exception {
        System.out.println("进入了 MyInterceptor1的   postHandle=====》");
        System.out.println(modelAndView.getViewName());
    }

    /**
     * afterCompletion:后处理
     * 想要执行必须满足一个条件!  本类中的perHandle  执行并且返回true!
     */
    @Override
    public void afterCompletion(HttpServletRequest request,
            HttpServletResponse response, Object handler, Exception ex)
            throws Exception {
        System.out.println("进入了 MyInterceptor1的   afterCompletion=====》");

    }


}
public class MyInterceptor2 implements HandlerInterceptor {

    @Override
    public boolean preHandle(HttpServletRequest request,
            HttpServletResponse response, Object handler) throws Exception {
        System.out.println("进入了 MyInterceptor2的   preHandle=====》");
        return true;
    }

    @Override
    public void postHandle(HttpServletRequest request,
            HttpServletResponse response, Object handler,
            ModelAndView modelAndView) throws Exception {
        System.out.println("进入了 MyInterceptor2的   postHandle=====》");

    }


    @Override
    public void afterCompletion(HttpServletRequest request,
            HttpServletResponse response, Object handler, Exception ex)
            throws Exception {
        System.out.println("进入了 MyInterceptor2的   afterCompletion=====》");

    }


}
在xml文件中配置
<?xml version="1.0" encoding="UTF-8"?>
<beans xmlns="http://www.springframework.org/schema/beans"
    xmlns:xsi="http://www.w3.org/2001/XMLSchema-instance"
    xmlns:context="http://www.springframework.org/schema/context"
    xmlns:aop="http://www.springframework.org/schema/aop"
    xmlns:tx="http://www.springframework.org/schema/tx"
    xmlns:mvc="http://www.springframework.org/schema/mvc"
    xsi:schemaLocation="
        http://www.springframework.org/schema/beans
        http://www.springframework.org/schema/beans/spring-beans.xsd
        http://www.springframework.org/schema/context
        http://www.springframework.org/schema/context/spring-context.xsd
        http://www.springframework.org/schema/tx
        http://www.springframework.org/schema/tx/spring-tx.xsd
        http://www.springframework.org/schema/aop
        http://www.springframework.org/schema/aop/spring-aop.xsd
        http://www.springframework.org/schema/mvc
        http://www.springframework.org/schema/mvc/spring-mvc.xsd
        ">
  <!-- 配置springmvc的组件  -->
  <context:component-scan base-package="cn.bdqn.controller"/>
  <!-- 开启 注解的方式-->
  <mvc:annotation-driven/>

  <!-- 配置拦截器     拦截  user/下面的请求-->
  <mvc:interceptors>
       <mvc:interceptor>
           <mvc:mapping path="/user/**"/>
           <bean  class="cn.bdqn.interceptor.MyInterceptor"/>
       </mvc:interceptor>
       <mvc:interceptor>
           <mvc:mapping path="/user/**"/>
           <bean  class="cn.bdqn.interceptor.MyInterceptor2"/>
       </mvc:interceptor>
  </mvc:interceptors>

</beans>