Fragment的产生:
为了适应各种尺寸的屏幕,谷歌推出Fragment,可以把Fragment成Activity的一个组成部分,它拥有自己的生命周期、可以接收并处理用户的各种事件,还可以动态的增删改某个Fragment
Fragment的使用
可以把Fragment当成普通的控件使用,直接写在布局文件中,然后新建一个继承自Fragment的类加载这个布局,然后在Activity的布局文件中直接引用这个Fragment,就是这么简单:
MainActivity.java
package com.example.fragmentdemo;

import android.app.Activity;
import android.os.Bundle;
import android.view.Window;

public class MainActivity extends Activity {

    @Override
    public void onCreate(Bundle savedInstanceState) {
        super.onCreate(savedInstanceState);
        requestWindowFeature(Window.FEATURE_NO_TITLE);
        setContentView(R.layout.activity_main);

    }
}
activity_main.xml
<LinearLayout xmlns:android="http://schemas.android.com/apk/res/android"
    xmlns:tools="http://schemas.android.com/tools"
    android:layout_width="match_parent"
    android:layout_height="match_parent"
    android:orientation="horizontal"
    tools:context="com.example.fragmentdemo.MainActivity" >

    <fragment
        android:id="@+id/fragment1"
        android:name="com.example.fragmentdemo.fragment.Fragment1"
        android:layout_width="wrap_content"
        android:layout_height="match_parent"
        android:layout_weight="1" />

    <fragment
        android:id="@+id/fragment2"
        android:name="com.example.fragmentdemo.fragment.Fragment2"
        android:layout_width="wrap_content"
        android:layout_height="match_parent"
        android:layout_weight="1" />

</LinearLayout>
Fragment1.java
package com.example.fragmentdemo.fragment;

import com.example.fragmentdemo.R;

import android.app.Fragment;
import android.os.Bundle;
import android.view.LayoutInflater;
import android.view.View;
import android.view.ViewGroup;

public class Fragment1 extends Fragment {

    @Override
    public View onCreateView(LayoutInflater inflater, ViewGroup container, Bundle savedInstanceState) {

        View view = inflater.inflate(R.layout.fragment1, container, false);

        return view;
    }

}
fragment1.xml
<?xml version="1.0" encoding="utf-8"?>
<LinearLayout xmlns:android="http://schemas.android.com/apk/res/android"
    android:layout_width="match_parent"
    android:layout_height="match_parent"
    android:orientation="vertical" >

    <TextView
        android:id="@+id/text1"
        android:layout_width="match_parent"
        android:layout_height="match_parent"
        android:background="#DDA0DD"
        android:text="这是Fragment1" />

</LinearLayout>
Fragment2.java
package com.example.fragmentdemo.fragment;

import com.example.fragmentdemo.R;

import android.app.Fragment;
import android.os.Bundle;
import android.view.LayoutInflater;
import android.view.View;
import android.view.ViewGroup;

public class Fragment2 extends Fragment {

    @Override
    public View onCreateView(LayoutInflater inflater, ViewGroup container, Bundle savedInstanceState) {
        // TODO Auto-generated method stub
        return inflater.inflate(R.layout.fragment2, container, false);
    }

}
fragment2.xml
<?xml version="1.0" encoding="utf-8"?>
<LinearLayout xmlns:android="http://schemas.android.com/apk/res/android"
    android:layout_width="match_parent"
    android:layout_height="match_parent"
    android:background="#7B68EE"
    android:orientation="vertical" >

    <Button
        android:layout_width="match_parent"
        android:layout_height="wrap_content"
        android:text="这是Fragment2" />

</LinearLayout>
运行结果:

动态使用Fragment
动态使用Fragment需要以下几个步骤:
1.获取到FragmentManager,在Activity中可以直接通过getFragmentManager得到。
2.开启一个事务,通过调用beginTransaction方法开启。
3.使用add(),replace(),remove(),hide(),show(),detach(),attach()等方法编辑Fragment
add()——往Activity中添加一个Fragment
replace()——使用另外一个Fragment替换当前的Fragment
remove()——移除一个Fragment
hide()——隐藏一个Fragment
show()——将隐藏的Fragment显示
detach()——会将view从UI中移除,和remove()不同,此时fragment的状态依然由FragmentManager维护。
attach()——重建View视图,附加到UI上并显示
4.提交事务,调用commit方法提交。
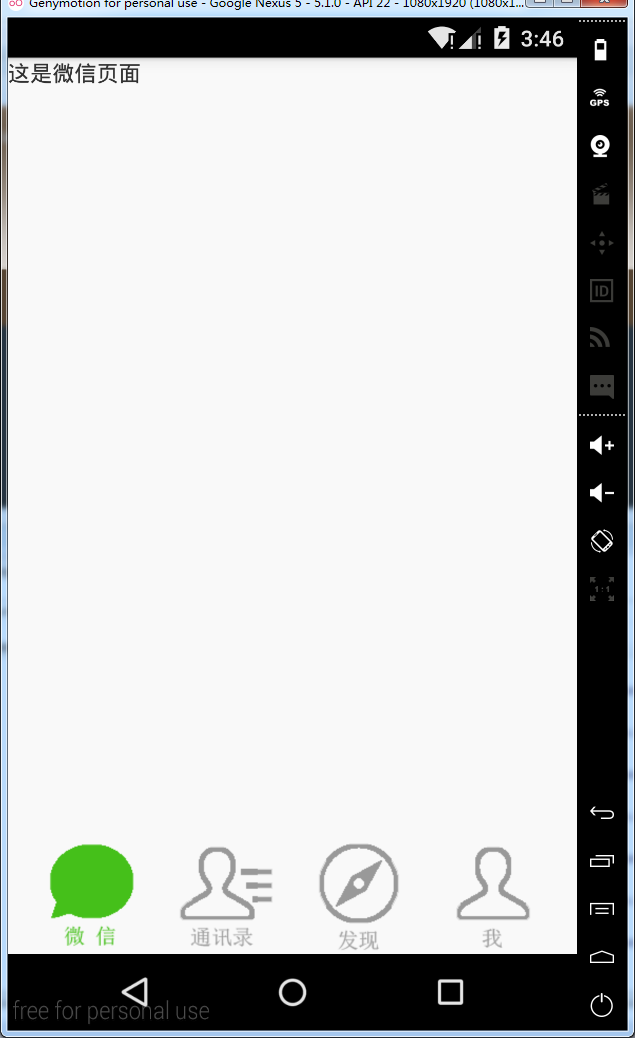
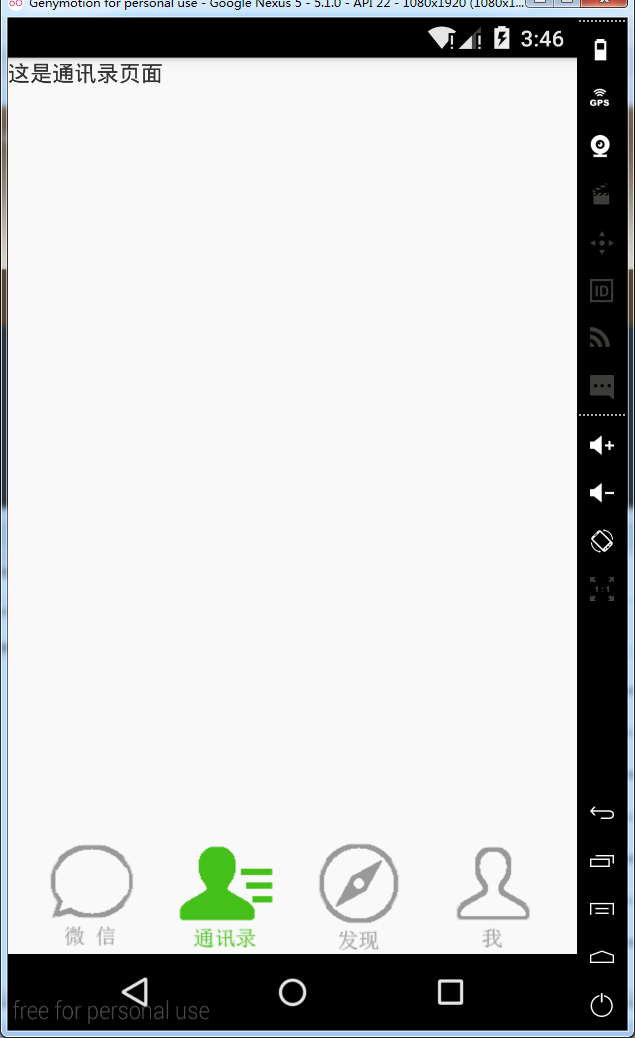
实现微信地步菜单:
MainActivity.java
package cn.lixyz.test;

import android.app.Activity;
import android.os.Bundle;
import android.view.Window;
import android.widget.RadioGroup;
import android.widget.RadioGroup.OnCheckedChangeListener;
import cn.lixyz.test.fragment.DiscoverFragment;
import cn.lixyz.test.fragment.MeFragment;
import cn.lixyz.test.fragment.TXLFragment;
import cn.lixyz.test.fragment.WeChatFragment;

public class MainActivity extends Activity implements OnCheckedChangeListener {

    private RadioGroup rg_tab_buttons;

    @Override
    protected void onCreate(Bundle savedInstanceState) {
        super.onCreate(savedInstanceState);
        requestWindowFeature(Window.FEATURE_NO_TITLE);
        setContentView(R.layout.activity_main);

        getFragmentManager().beginTransaction().add(R.id.layout, new WeChatFragment(), "wechat").commit();
        rg_tab_buttons = (RadioGroup) findViewById(R.id.rg_tab_buttons);
        rg_tab_buttons.setOnCheckedChangeListener(this);

    }

    @Override
    public void onCheckedChanged(RadioGroup group, int checkedId) {
        switch (checkedId) {
        case R.id.rb_wechat:
            getFragmentManager().beginTransaction().replace(R.id.layout, new WeChatFragment(), "wechat").commit();
            break;
        case R.id.rb_txl:
            getFragmentManager().beginTransaction().replace(R.id.layout, new TXLFragment(), "txl").commit();
            break;
        case R.id.rb_discover:
            getFragmentManager().beginTransaction().replace(R.id.layout, new DiscoverFragment(), "discover").commit();
            break;
        case R.id.rb_me:
            getFragmentManager().beginTransaction().replace(R.id.layout, new MeFragment(), "me").commit();
            break;
        }
    }

}
activity_main.xml
<?xml version="1.0" encoding="utf-8"?>
<LinearLayout xmlns:android="http://schemas.android.com/apk/res/android"
    android:layout_width="match_parent"
    android:layout_height="match_parent"
    android:background="#f9f9f9"
    android:orientation="vertical" >

    <LinearLayout
        android:id="@+id/layout"
        android:layout_width="wrap_content"
        android:layout_height="wrap_content"
        android:layout_weight="1"
        android:orientation="vertical" >
    </LinearLayout>

    <RadioGroup
        android:id="@+id/rg_tab_buttons"
        android:layout_width="match_parent"
        android:layout_height="wrap_content"
        android:orientation="horizontal" >

        <TextView
            android:layout_width="wrap_content"
            android:layout_height="wrap_content"
            android:layout_weight="1" />

        <RadioButton
            android:id="@+id/rb_wechat"
            android:layout_width="wrap_content"
            android:layout_height="wrap_content"
            android:background="@drawable/wechat_icon"
            android:button="@null" />

        <TextView
            android:layout_width="wrap_content"
            android:layout_height="wrap_content"
            android:layout_weight="1" />

        <RadioButton
            android:id="@+id/rb_txl"
            android:layout_width="wrap_content"
            android:layout_height="wrap_content"
            android:background="@drawable/txl_icon"
            android:button="@null" />

        <TextView
            android:layout_width="wrap_content"
            android:layout_height="wrap_content"
            android:layout_weight="1" />

        <RadioButton
            android:id="@+id/rb_discover"
            android:layout_width="wrap_content"
            android:layout_height="wrap_content"
            android:background="@drawable/discover_icon"
            android:button="@null" />

        <TextView
            android:layout_width="wrap_content"
            android:layout_height="wrap_content"
            android:layout_weight="1" />

        <RadioButton
            android:id="@+id/rb_me"
            android:layout_width="wrap_content"
            android:layout_height="wrap_content"
            android:background="@drawable/me_icon"
            android:button="@null" />

        <TextView
            android:layout_width="wrap_content"
            android:layout_height="wrap_content"
            android:layout_weight="1" />
    </RadioGroup>

</LinearLayout>
DiscoverFragment.java
package cn.lixyz.test.fragment;

import android.app.Fragment;
import android.os.Bundle;
import android.view.LayoutInflater;
import android.view.View;
import android.view.ViewGroup;
import cn.lixyz.test.R;

public class DiscoverFragment extends Fragment {

    @Override
    public View onCreateView(LayoutInflater inflater, ViewGroup container, Bundle savedInstanceState) {
        return inflater.inflate(R.layout.discover_fragment, container, false);
    }

}
discover_fragment.xml
<?xml version="1.0" encoding="utf-8"?>
<LinearLayout xmlns:android="http://schemas.android.com/apk/res/android"
    android:layout_width="match_parent"
    android:layout_height="match_parent"
    android:orientation="vertical" >

    <TextView
        android:layout_width="wrap_content"
        android:layout_height="wrap_content"
        android:text="这是发现页面" />

</LinearLayout>
MeFragment.java
package cn.lixyz.test.fragment;

import android.app.Fragment;
import android.os.Bundle;
import android.view.LayoutInflater;
import android.view.View;
import android.view.ViewGroup;
import cn.lixyz.test.R;

public class MeFragment extends Fragment {

    @Override
    public View onCreateView(LayoutInflater inflater, ViewGroup container, Bundle savedInstanceState) {
        return inflater.inflate(R.layout.me_fragment, container, false);
    }

}
me_fragment.xml
<?xml version="1.0" encoding="utf-8"?>
<LinearLayout xmlns:android="http://schemas.android.com/apk/res/android"
    android:layout_width="match_parent"
    android:layout_height="match_parent"
    android:orientation="vertical" >

    <TextView
        android:layout_width="wrap_content"
        android:layout_height="wrap_content"
        android:text="这是我页面" />

</LinearLayout>
TXLFragment.java
package cn.lixyz.test.fragment;

import android.app.Fragment;
import android.os.Bundle;
import android.view.LayoutInflater;
import android.view.View;
import android.view.ViewGroup;
import cn.lixyz.test.R;

public class TXLFragment extends Fragment {

    @Override
    public View onCreateView(LayoutInflater inflater, ViewGroup container, Bundle savedInstanceState) {
        return inflater.inflate(R.layout.txl_fragment, container, false);
    }

}
txl_fragment.xml
<?xml version="1.0" encoding="utf-8"?>
<LinearLayout xmlns:android="http://schemas.android.com/apk/res/android"
    android:layout_width="match_parent"
    android:layout_height="match_parent"
    android:orientation="vertical" >

    <TextView
        android:layout_width="wrap_content"
        android:layout_height="wrap_content"
        android:text="这是通讯录页面" />

</LinearLayout>
WeChatFragment.java
package cn.lixyz.test.fragment;

import android.app.Fragment;
import android.os.Bundle;
import android.view.LayoutInflater;
import android.view.View;
import android.view.ViewGroup;
import cn.lixyz.test.R;

public class WeChatFragment extends Fragment {

    @Override
    public View onCreateView(LayoutInflater inflater, ViewGroup container, Bundle savedInstanceState) {
        return inflater.inflate(R.layout.wechat_fragment, container, false);
    }

}
wechat_fragment.xml
<?xml version="1.0" encoding="utf-8"?>
<LinearLayout xmlns:android="http://schemas.android.com/apk/res/android"
    android:layout_width="match_parent"
    android:layout_height="match_parent"
    android:orientation="vertical" >

    <TextView
        android:layout_width="wrap_content"
        android:layout_height="wrap_content"
        android:text="这是微信页面" />

</LinearLayout>
运行结果:


Fragment的生命周期
和Activity一样,Fragment同样也拥有自己的生命周期
package com.example.fragmentdemo.fragment;

import com.example.fragmentdemo.R;

import android.app.Activity;
import android.app.Fragment;
import android.os.Bundle;
import android.util.Log;
import android.view.LayoutInflater;
import android.view.View;
import android.view.ViewGroup;

public class Fragment1 extends Fragment {

    @Override
    public View onCreateView(LayoutInflater inflater, ViewGroup container, Bundle savedInstanceState) {

        Log.d("TTTT", "onCreateView方法运行了...");
        return inflater.inflate(R.layout.fragment1, container, false);
    }

    @Override
    public void onAttach(Activity activity) {
        super.onAttach(activity);
        Log.d("TTTT", "onAttach方法运行了...");
    }

    @Override
    public void onCreate(Bundle savedInstanceState) {
        super.onCreate(savedInstanceState);
        Log.d("TTTT", "onCreate方法运行了...");
    }

    @Override
    public void onActivityCreated(Bundle savedInstanceState) {
        super.onActivityCreated(savedInstanceState);
        Log.d("TTTT", "onActivityCreated方法运行了...");
    }

    @Override
    public void onStart() {
        super.onStart();
        Log.d("TTTT", "onStart方法运行了...");
    }

    @Override
    public void onResume() {
        super.onResume();
        Log.d("TTTT", "onResume方法运行了...");
    }

    @Override
    public void onPause() {
        super.onPause();
        Log.d("TTTT", "onPause方法运行了...");
    }

    @Override
    public void onStop() {
        super.onStop();
        Log.d("TTTT", "onStop方法运行了...");
    }

    @Override
    public void onDestroyView() {
        super.onDestroyView();
        Log.d("TTTT", "onDestroyView方法运行了...");
    }

    @Override
    public void onDestroy() {
        super.onDestroy();
        Log.d("TTTT", "onDestroy方法运行了...");
    }

    @Override
    public void onDetach() {
        super.onDetach();
        Log.d("TTTT", "onDetach方法运行了...");
    }

}
运行程序
12-29 12:12:29.490: D/TTTT(8133): onAttach方法运行了...
12-29 12:12:29.490: D/TTTT(8133): onCreate方法运行了...
12-29 12:12:29.490: D/TTTT(8133): onCreateView方法运行了...
12-29 12:12:29.490: D/TTTT(8133): onActivityCreated方法运行了...
12-29 12:12:29.491: D/TTTT(8133): onStart方法运行了...
12-29 12:12:29.491: D/TTTT(8133): onResume方法运行了...
按HOME键回到桌面
12-29 12:13:17.164: D/TTTT(8133): onPause方法运行了...
12-29 12:13:17.793: D/TTTT(8133): onStop方法运行了...
再次进入程序
12-29 12:13:38.604: D/TTTT(8133): onStart方法运行了...
12-29 12:13:38.604: D/TTTT(8133): onResume方法运行了...
退出程序
12-29 12:13:55.785: D/TTTT(8133): onPause方法运行了...
12-29 12:13:56.464: D/TTTT(8133): onStop方法运行了...
12-29 12:13:56.464: D/TTTT(8133): onDestroyView方法运行了...
12-29 12:13:56.464: D/TTTT(8133): onDestroy方法运行了...
12-29 12:13:56.464: D/TTTT(8133): onDetach方法运行了...
看到这里,我相信大多数朋友已经非常明白了,因为这和Activity的生命周期太相似了。只是有几个Activity中没有的新方法,这里需要重点介绍一下:
onAttach方法:Fragment和Activity建立关联的时候调用。
onCreateView方法:为Fragment加载布局时调用。
onActivityCreated方法:当Activity中的onCreate方法执行完后调用。
onDestroyView方法:Fragment中的布局被移除时调用。
onDetach方法:Fragment和Activity解除关联的时候调用。