实际编程中,系统提供的控件往往无法满足我们的需求,一来是样子丑陋,二来是一些复杂的组合需要多次使用的话,每次都写一堆控件的组合会很耗费时间,所以我们将这些组件的组合自定义为一个新的控件,以后使用的时候直接用该控件,方便又简单。最常见的例子就是软件中的titleTar

实现自定义控件的步骤:
1.设置控件的属性
2.实现我们的View
3.引用我们自定的View
官方文档:http://developer.android.com/training/custom-views/create-view.html
下面开始:
设置控件的属性:
分析一下上面四个titleBar,都是由一个居中的文本和一个右边一个图片按钮组成,只不过后面两个没有按钮而已
那么我们自定义的这个组件就得包含一下几个基本属性:文本内容,文本大小,文本颜色,按钮路径
在value中新建一个xml文件attrs.xml,把这些属性创建出来
<?xml version="1.0" encoding="utf-8"?>
<resources>
    <declare-styleable name="MyCustomTitleBar">
        <attr name="titleText" format="string"/>
        <attr name="titleTextSize" format="dimension"/>
        <attr name="titleTextColor" format="color"/>
        <attr name="titleButtonImage" format="reference"/>
    </declare-styleable>
</resources>
declare-styleable标签是用来定义自定义控件的属性的,我们的控件属性都以attr形式存放在declare-styleable标签中,format是用来形容该属性的类型,有如下值可选:string,color,dimension,integer,enum,reference,float,boolean,fraction,flag
实现我们的View
定义一个继承自RelativeLayout的类MyCustomTitltBar,然后在他的构造方法中获取我们自定义的控件样式
package cn.lixyz.customviewdemo;

import android.annotation.SuppressLint;
import android.content.Context;
import android.content.res.TypedArray;
import android.graphics.drawable.Drawable;
import android.util.AttributeSet;
import android.widget.ImageButton;
import android.widget.RelativeLayout;
import android.widget.TextView;

@SuppressLint("NewApi")
public class MyCustomTitleBar extends RelativeLayout {

    // 定义自定义控件包含的组件
    private TextView title;
    private ImageButton button;

    // 定义控件的属性
    private String titleText;
    private float titleTextSize;
    private int titleTextColor;
    private Drawable titleButtonImage;

    // 为每个控件定义LayoutParams
    private LayoutParams textLayoutParams;
    private LayoutParams buttonLayoutParams;

    public MyCustomTitleBar(Context context, AttributeSet attrs) {
        super(context, attrs);

        // 获取我们定义的属性
        TypedArray array = context.obtainStyledAttributes(attrs, R.styleable.MyCustomTitleBar);

        titleText = array.getString(R.styleable.MyCustomTitleBar_titleText);
        titleTextColor = array.getColor(R.styleable.MyCustomTitleBar_titleTextColor, 0);
        titleTextSize = array.getDimension(R.styleable.MyCustomTitleBar_titleTextSize, 10);
        titleButtonImage = array.getDrawable(R.styleable.MyCustomTitleBar_titleButtonImage);

        // 回收,以防出错
        array.recycle();

        // 新建包含的子组件
        title = new TextView(context);
        button = new ImageButton(context);

        // 为子组件赋值
        title.setText(titleText);
        title.setTextColor(titleTextColor);
        title.setTextSize(titleTextSize);
        button.setBackground(titleButtonImage);

        // 设置背景色
        setBackgroundColor(0xFF38373c);

        // 设置包含控件的属性并添加到view中
        textLayoutParams = new LayoutParams(LayoutParams.WRAP_CONTENT, LayoutParams.WRAP_CONTENT);
        textLayoutParams.addRule(RelativeLayout.CENTER_IN_PARENT);
        addView(title, textLayoutParams);
        buttonLayoutParams = new LayoutParams(LayoutParams.WRAP_CONTENT, LayoutParams.WRAP_CONTENT);
        buttonLayoutParams.addRule(RelativeLayout.ALIGN_PARENT_RIGHT);
        addView(button, buttonLayoutParams);
    }
}
其中LayoutParams是用于child view(子视图) 向 parent view(父视图)传达自己的意愿的一个东西
在获取属性的时候,android定义的格式为控件名_属性名 例如上面的MyCustomTitleBar_titleText、MyCustomTitleBar_titleTextSize
LayoutParams继承于Android.View.ViewGroup.LayoutParams.
LayoutParams相当于一个Layout的信息包,它封装了Layout的位置、高、宽等信息。假设在屏幕上一块区域是由一个Layout占领的,如果将一个View添加到一个Layout中,最好告诉Layout用户期望的布局方式,也就是将一个认可的layoutParams传递进去。
可以这样去形容LayoutParams,在象棋的棋盘上,每个棋子都占据一个位置,也就是每个棋子都有一个位置的信息,如这个棋子在4行4列,这里的“4行4列”就是棋子的LayoutParams。
但LayoutParams类也只是简单的描述了宽高,宽和高都可以设置成三种值:
1,一个确定的值;
2,FILL_PARENT,即填满(和父容器一样大小);
3,WRAP_CONTENT,即包裹住组件就好。
http://byandby.iteye.com/blog/816718
TypedArray实例是个属性的容器,通过context.obtainStyledAttributes()方法返回得到
引用我们自定的View
在布局文件中引入我们自定义的控件
<LinearLayout xmlns:android="http://schemas.android.com/apk/res/android"
    xmlns:custom="http://schemas.android.com/apk/res/cn.lixyz.customviewdemo"
    xmlns:tools="http://schemas.android.com/tools"
    android:layout_width="match_parent"
    android:layout_height="match_parent"
    android:orientation="vertical"
    android:paddingBottom="@dimen/activity_vertical_margin"
    android:paddingLeft="@dimen/activity_horizontal_margin"
    android:paddingRight="@dimen/activity_horizontal_margin"
    android:paddingTop="@dimen/activity_vertical_margin"
    tools:context="cn.lixyz.customviewdemo.MainActivity" >

    <cn.lixyz.customviewdemo.MyCustomTitleBar
        android:layout_width="wrap_content"
        android:layout_height="wrap_content"
        custom:titleButtonImage="@drawable/image"
        custom:titleText="通讯录"
        custom:titleTextColor="#ffffff"
        custom:titleTextSize="5dp" >
    </cn.lixyz.customviewdemo.MyCustomTitleBar>

    <cn.lixyz.customviewdemo.MyCustomTitleBar
        android:layout_width="wrap_content"
        android:layout_height="wrap_content"
        android:layout_marginTop="10dp"
        custom:titleButtonImage="@drawable/plus"
        custom:titleText="微信"
        custom:titleTextColor="#ffffff"
        custom:titleTextSize="5dp" >
    </cn.lixyz.customviewdemo.MyCustomTitleBar>

    <cn.lixyz.customviewdemo.MyCustomTitleBar
        android:layout_width="wrap_content"
        android:layout_height="30dp"
        android:layout_marginTop="10dp"
        custom:titleText="发现"
        custom:titleTextColor="#ffffff"
        custom:titleTextSize="5dp" >
    </cn.lixyz.customviewdemo.MyCustomTitleBar>

    <cn.lixyz.customviewdemo.MyCustomTitleBar
        android:layout_width="wrap_content"
        android:layout_height="30dp"
        android:layout_marginTop="10dp"
        custom:titleText="我"
        custom:titleTextColor="#ffffff"
        custom:titleTextSize="5dp" >
    </cn.lixyz.customviewdemo.MyCustomTitleBar>

</LinearLayout>
一定要在布局中引入我们的命名空间
格式为:xmlns:自定义名称="http://schemas.android.com/apk/res/包名"
因为只有引入了我们的命名空间,才可以使用xxx:xxx格式来设置我们定义的属性,我们平时使用的android:xx也是因为上面的xmlns:android="http://schemas.android.com/apk/res/android"
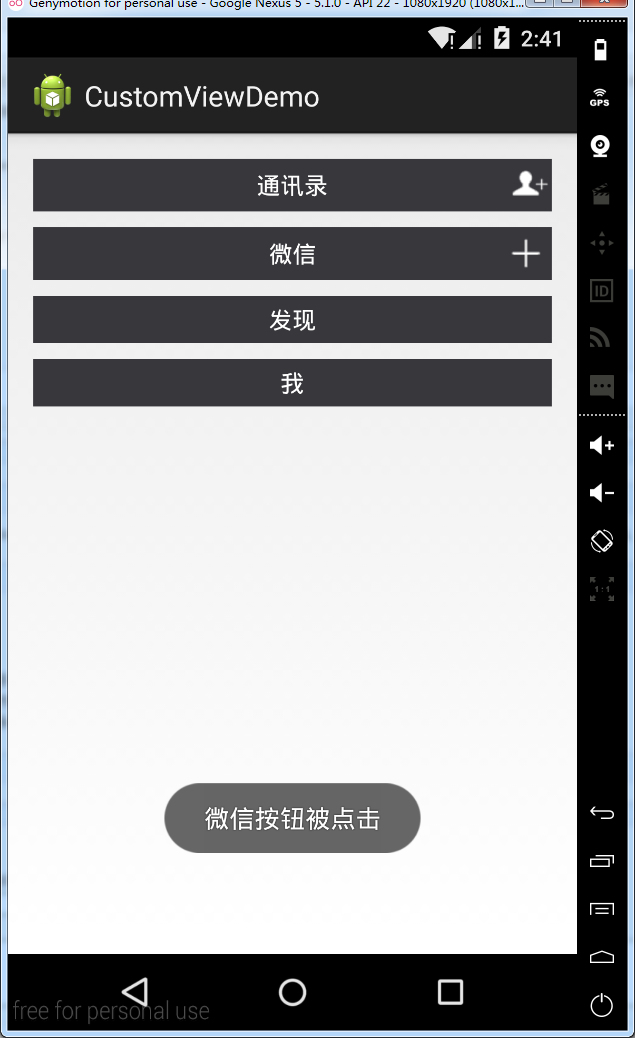
这样运行一下软件查看效果

为按钮设置点击事件
观察我们平时为按钮设置点击事件时候的方法:
bt.setOnClickListener(new View.OnClickListener() {

            @Override
            public void onClick(View v) {
                // TODO Auto-generated method stub

            }
        });
我们通过按钮的setOnClickListener方法传入一个匿名内部类OnClickListener为按钮设置点击事件,我们查看OnClickListener的介绍
    /**
     * Interface definition for a callback to be invoked when a view is clicked.
     */
    public interface OnClickListener {
        /**
         * Called when a view has been clicked.
         *
         * @param v The view that was clicked.
         */
        void onClick(View v);
    }
我们也可以仿照这个形式,为我们的MyCustomTieleBar设置一个setCustomTitleBarListener,然后传入一个内部类来让这个按钮的点击调用这个类的click方法
修改MyCustomTitleBar:
package cn.lixyz.customviewdemo;

import android.annotation.SuppressLint;
import android.content.Context;
import android.content.res.TypedArray;
import android.graphics.drawable.Drawable;
import android.util.AttributeSet;
import android.view.View;
import android.widget.ImageButton;
import android.widget.RelativeLayout;
import android.widget.TextView;

@SuppressLint("NewApi")
public class MyCustomTitleBar extends RelativeLayout {

    // 定义自定义控件包含的组件
    private TextView title;
    private ImageButton button;

    // 定义控件的属性
    private String titleText;
    private float titleTextSize;
    private int titleTextColor;
    private Drawable titleButtonImage;

    // 为每个控件定义LayoutParams
    private LayoutParams textLayoutParams;
    private LayoutParams buttonLayoutParams;

    private customTitleBarListener listener;

    public interface customTitleBarListener {
        public void click();
    }

    public void setCustomTitleBarListener(customTitleBarListener listener) {
        this.listener = listener;
    }

    public MyCustomTitleBar(Context context, AttributeSet attrs) {
        super(context, attrs);

        // 获取我们定义的属性
        TypedArray array = context.obtainStyledAttributes(attrs, R.styleable.MyCustomTitleBar);

        titleText = array.getString(R.styleable.MyCustomTitleBar_titleText);
        titleTextColor = array.getColor(R.styleable.MyCustomTitleBar_titleTextColor, 0);
        titleTextSize = array.getDimension(R.styleable.MyCustomTitleBar_titleTextSize, 10);
        titleButtonImage = array.getDrawable(R.styleable.MyCustomTitleBar_titleButtonImage);

        // 回收,以防出错
        array.recycle();

        // 新建包含的子组件
        title = new TextView(context);
        button = new ImageButton(context);

        // 为子组件赋值
        title.setText(titleText);
        title.setTextColor(titleTextColor);
        title.setTextSize(titleTextSize);
        button.setBackground(titleButtonImage);

        // 设置背景色
        setBackgroundColor(0xFF38373c);

        // 设置包含控件的属性并添加到view中
        textLayoutParams = new LayoutParams(LayoutParams.WRAP_CONTENT, LayoutParams.WRAP_CONTENT);
        textLayoutParams.addRule(RelativeLayout.CENTER_IN_PARENT);
        addView(title, textLayoutParams);
        buttonLayoutParams = new LayoutParams(LayoutParams.WRAP_CONTENT, LayoutParams.WRAP_CONTENT);
        buttonLayoutParams.addRule(RelativeLayout.ALIGN_PARENT_RIGHT);
        addView(button, buttonLayoutParams);

        button.setOnClickListener(new View.OnClickListener() {

            @Override
            public void onClick(View v) {
                listener.click();
            }
        });

    }
}
这样我们在MainActivity中就可以为按钮设置点击事件了
package cn.lixyz.customviewdemo;

import android.app.Activity;
import android.os.Bundle;
import android.view.View;
import android.widget.Button;
import android.widget.Toast;

public class MainActivity extends Activity {

    private MyCustomTitleBar addressListBar, wechatBar;

    @Override
    protected void onCreate(Bundle savedInstanceState) {
        super.onCreate(savedInstanceState);
        setContentView(R.layout.activity_main);

        Button bt = new Button(this);
        bt.setOnClickListener(new View.OnClickListener() {

            @Override
            public void onClick(View v) {
                // TODO Auto-generated method stub

            }
        });

        addressListBar = (MyCustomTitleBar) findViewById(R.id.addressListBar);
        wechatBar = (MyCustomTitleBar) findViewById(R.id.wechatBar);

        addressListBar.setCustomTitleBarListener(new MyCustomTitleBar.customTitleBarListener() {

            @Override
            public void click() {
                Toast.makeText(MainActivity.this, "通讯录按钮被点击", Toast.LENGTH_SHORT).show();
            }
        });
        wechatBar.setCustomTitleBarListener(new MyCustomTitleBar.customTitleBarListener() {

            @Override
            public void click() {
                Toast.makeText(MainActivity.this, "微信按钮被点击", Toast.LENGTH_SHORT).show();
            }
        });

    }

}