1.数据链路层 (2层 Data Link Layer)
1.1 属于2层
1.2 传输单元:帧
1.3 帧结构:请参见图片
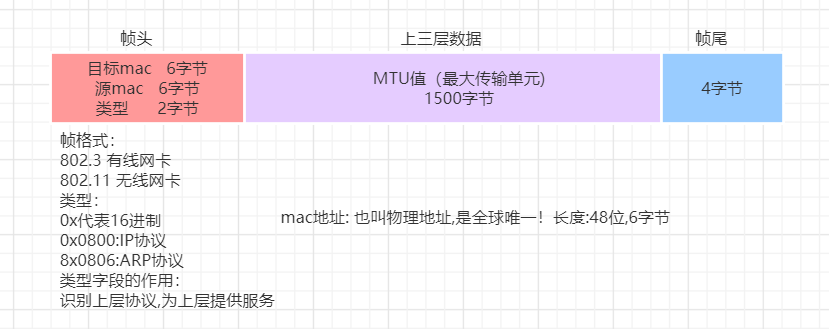
帧头: 6+6+2=14字节
MTU值: 1500字节
帧尾: 4字节
2. 工作在数据链路层的设备
交换机/网卡
3.交换机工作原理
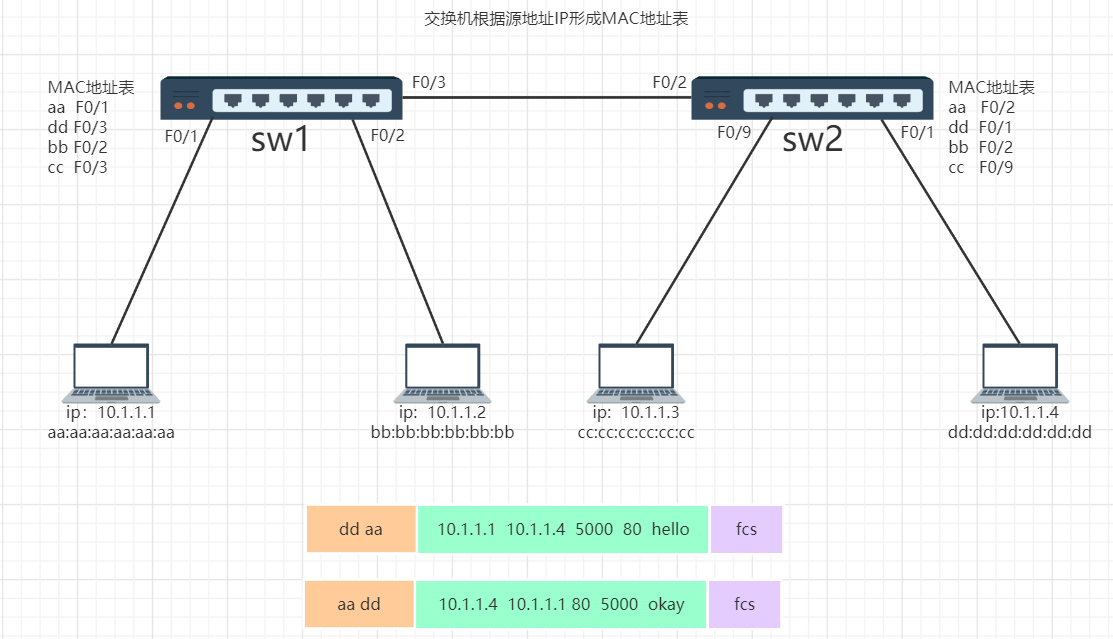
交换机收到一个数据帧后:
1) 先检查数据帧源MAC地址在MAC地址表中有么有
如果有,看看表中的MAC地址对应的接口和当前收到这个数据的接口是否一样,如果一样就忽略,不一样就更新
如果没有,学习
2) 然后检查帧中的目标MAC地址,并匹配MAC地址表
如表中有匹配项,则单播转发
如表中无匹配项,则除接受端口外广播
3) MAC地址表的老化时间默认是300秒(可修改)
4.交换机端口状态: up/down
4.1 down的3种可能:
1) 人工down掉
2) 速率不匹配
3) 双工模式不匹配(双工duplex)
双工模式: 单工、半双工、全双工
4.2 交换机以太网接口双工模式:
单工
数据只能单向传输
半双工
数据双向传输,但不能同时进行
全双工
双向传输且同时进行
4.3交换机接口速率
Ethernet 10Mb/s
FastEthernet 100Mb/s
GigabitEthernet 1000M/s
TenGigabitEthernet 10000Mb/s
g 0/3
0: 模块号
3:接口号
5.交换机基本工作模式
第一次配置网络设备,需要使用console线。在PC需要使用"超级终端"或其他软件
1) 用户模式:

可以查看交换机的基本简单信息,且不能做任何修改配置!
2) 特权模式:
        switch> enable   //在用户模式下,输入enable命令进入特权模式
        switch#
可以查看所有配置,且不能修改配置,但可以做测试、保存、初始化等操作
3) 全局配置模式
        Switch#configure terminal  //在特权模式下,输入configure terminal进入全局配置模式
        Switch(config)#
默认不能查看配置!可以修改配置,且全局生效!
4) 接口配置模式
        Switch(config)#interface f0/1 //在全局配置模式下,输入interface+"交换机端口号"进入接口配置模式
        Switch(config-if)#
默认不能查看配置!可以修改配置,且对该端口生效!
5) cconsole口/线/控制台模式
        Switch(config)#line console 0 //在全局配置模式下,输入"line console 0"进入console口配置模式
        Switch(config-line)#
默认不能查看配置!可以修改配置,且对该console口生效!
6.Cisco交换机命令
exit                                                          //退出上一级
end                                                            //end直接退至用户模式
Switch(config)#hostname 设备名                                  //修改交换机主机名
sw-bj-01-02(config-line)#password 123.com                     //设置用户密码
sw-bj-01-02(config-line)#login                                 //验证
Switch#copy running-config startup-config 或 write memory     //保存交换机的配置
Switch#reload                                                 //重启
stain#show running-config                                     //查看running-config的配置文件
stain#show startup-config                                     //查看startup-config的配置文件
Switch(config)#enable password 123456                         //设置特权用户密码(明文)
stain(config)#enable secret 654321                            //设置特权用户密码(密文)
stain#erase startup-config                                    //清空startup-config配置文件,恢复出厂设置(初始化),需重启生效
stain#show  mac-address-table                                 //查看mac地址表
stain#show ip interface brief                                 //列出交换机的所有接口的简要信息
快捷键:
crtl + u                     //快速删除光标前所有字符
crtl + a                     //快速定位光标到行首
ctrl + e                     //快速定位光标到行尾
支持命令缩写,tab补全命令,且可使用“?”查询某条命令
如:

7.交换机开机动作
先去硬盘中查找startup-config是否存在
如果不存在,在内存中创建一个新的running-config
如果存在,则复制到内存中并改名成running-config
running-config是内存中的运行配置, startup-config 是保存在硬盘中的启动配置。
8.对交换机的接口进行管理
交换机的端口出厂默认开启状态
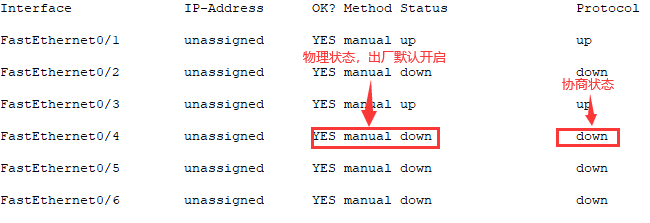
每个接口都有两个状态列:
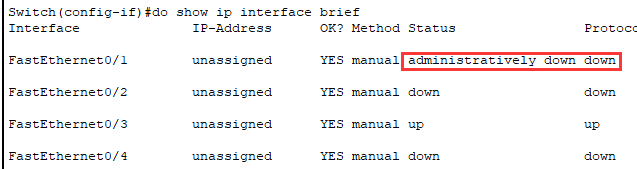
(1)物理状态(物理层):administratively down 表示人工down掉,down表示该接口已经人工开启了只是没插网线即没连设备,up表示开启;
(2)协商状态(数据链路层):down表示网线两端的设备没有协商成功(可能是速率协商失败或双工协商失败),up表示连接成功已正常开启。
当交换机的f0/1与f/03均在默认配置连接状态下,有物理机能正常通信的接口信息状态

人为关闭f0/1的物理接口状态
Switch(config)#interface fastEthernet 0/1
Switch(config-if)#shutdown
人为开启f0/1的交换机接口
Switch(config)#interface fastEthernet 0/1
Switch(config-if)#no shutdown
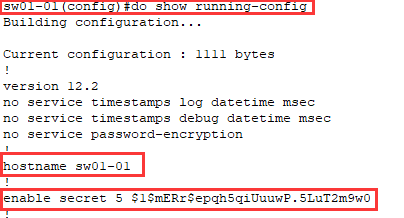
9. do命令的用法
其他模式加do空格可以强制使用特权用户下的命令, 这样就不需要回到特权模式就看查看信息,缺点是没有补全功能。
如:
    do show running-config
    do write
    do show ip interface biref
10.删除配置 no
1) 在哪配置的,就在哪删除!
2) 命令前加no空格
3) 原命令中有参数,并且参数具有唯一性,则不需要加参数
    如:
        configure terminal
        hostname stain

        configure terminal
        no hostname
小练习
1.开启一台交换机
Switch>
2.配置主机名为sw01-01
Switch>enable
Switch#configure terminal
Enter configuration commands, one per line.  End with CNTL/Z.
Switch(config)#hostname sw01-01
sw01-01(config)#
3.配置用户密码为123.com
sw01-01(config)#line console 0
sw01-01(config-line)#password 123.com
4.配置特权密码为456.com
sw01-01(config-line)#exit
sw01-01(config)#enable secret 456.com
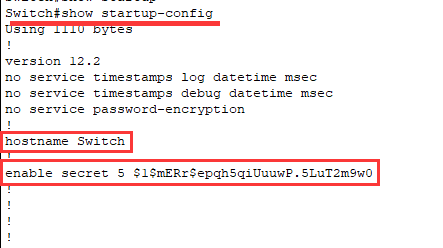
5.通过show命令验证以上配置是否生效
    sw01-01#show startup-config
    startup-config is not present
6.重启验证配置是否存在

未生效
7.重新做2-4操作,保存配置,并重启,验证是否生效
Switch>enable
Switch#configure terminal
Enter configuration commands, one per line.  End with CNTL/Z.
Switch(config)#line console 0
Switch(config-line)#password 123.com
Switch(config-line)#exit
Switch(config)#enable secret 456.com
Switch(config)#exit
Switch#
%SYS-5-CONFIG_I: Configured from console by console

Switch#copy running-config startup-config
Destination filename [startup-config]?
Building configuration...
[OK]
Switch#show startup-config
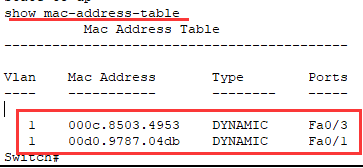
9.连接2台PC,并观察MAC地址是否有记录
实验:

要求:
1.成功实现在pc上telnet或ssh远程连接到路由器上,其中只做login验证
2.成功实现在pc上telnet或ssh远程连接到路由器上,其中要求做login local验证
为3层路由器端口f0/0配置IP
Router>enable
Router#configure terminal
Enter configuration commands, one per line.  End with CNTL/Z.

Router(config)#interface f0/0
Router(config-if)#ip address 192.168.1.254 255.255.255.0
由于路由器默认接口的状态是关闭的,需要手动开启

开启远程控制,配置虚拟终端
Router(config)#hostname r1
r1(config)#enable password 456.com
r1(config)#ip domain-name r1.xiao.com // 给该主机配置域名为r1.xiao.com。这个域名没有是在意义,只是个名称而已。

-----以上两条主机名和域名配置是下面配置生成公私钥加密传输必须要求的,否则无法进行生成公私钥操作。------------
r1(config)#crypto key generate rsa
The name for the keys will be: r1.r1.xiao.com
Choose the size of the key modulus in the range of 360 to 2048 for your
  General Purpose Keys. Choosing a key modulus greater than 512 may take
  a few minutes.

How many bits in the modulus [512]:
% Generating 512 bit RSA keys, keys will be non-exportable...[OK]

r1(config)#
需求1:
Router(config)#line vty 0 4    //进入虚拟终端,其中4为最大连接数
Router(config-line)#password 123.com
Router(config-line)#login
Router(config-line)#transport  input  all  //该命令后可跟的选项有:all(22/23端口全部打开并监听)、none(一个远程端口都不开)、ssh(打开22端口号)、telnet(打开23端口号))
需求2:
r1(config)#line vty 0 4
r1(config-line)#login local //开启登录本地验证,local表示本地数据库,远程登录时让登录者的账号和密码同本地数据库中的账号和密码做匹配。
r1(config-line)#transport input all
r1(config-line)#exit
r1(config)#username xx password 123.com //配置用户名和密码(存储在本地数据库),可以多次执行此命令创建多个账号