CNN:
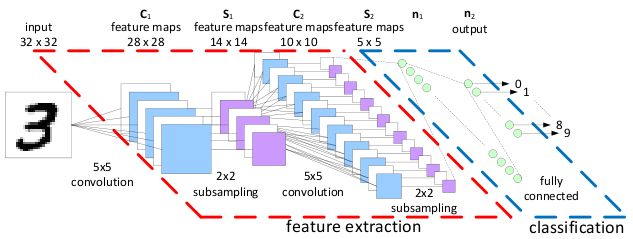
一张概览图可以很清楚的展示出CNN一步步学习的步骤:
#!/usr/bin/env python2
# -*- coding: utf-8 -*-
"""
tensorflow编写cnn
"""

import tensorflow as tf
#导入手写数据集
from tensorflow.examples.tutorials.mnist import input_data

mnist = input_data.read_data_sets('MNIST_data', one_hot=True)

def weight_variable(shape):
    #tf.truncated_normal(shape, mean, stddev) :shape表示生成张量的维度,mean是均值,stddev是标准差。
    #这是一个截断的产生正太分布的函数,就是说产生正太分布的值如果与均值的差值大于两倍的标准差,那就重新生成。
    initial = tf.truncated_normal(shape, stddev=0.1)
    return tf.Variable(initial)

def bias_variable(shape):
    initial = tf.constant(0.1, shape=shape)
    return tf.Variable(initial)

#定义卷积层
#x为输入数据
#W为过滤窗口的大小,及卷积核
def conv2d(x,W):
    #stride [1, x_movement, y_movement, 1] 为过滤窗口每次移动的步长
    #其中第一个参数和最后一个参数必须为1
    #
    #padding的方式在tensorflow里分两种,一种是VALID,一种是SAME,
    #padding表示通俗的说就是是否在图片周围添加0
    #same比较常用就是添加0,然后抽取出的图片和原来图片大小相等, valid不添加0,抽取的图片比原图片小
    return tf.nn.conv2d(x, W, strides=[1, 1, 1, 1], padding='SAME')

#定义池化层,一般有两种,取最大值,获取平均值,进一步提取最重要的特征,属于subsampling,下采样
#窗口大小定义为2X2
def max_pool_2X2(x):
    #ksize就是定义窗口大小
    return tf.nn.max_pool(x,ksize=[1,2,2,1],strides=[1,2,2,1], padding='SAME')

def compute_accuracy(v_xs, v_ys):
    global prediction
    y_pre = sess.run(prediction, feed_dict={xs: v_xs, keep_prob: 1})
    correct_prediction = tf.equal(tf.argmax(y_pre,1), tf.argmax(v_ys,1))
    accuracy = tf.reduce_mean(tf.cast(correct_prediction, tf.float32))
    result = sess.run(accuracy, feed_dict={xs: v_xs, ys: v_ys, keep_prob: 1})
    return result


xs = tf.placeholder(tf.float32, [None, 784]) # 28x28
ys = tf.placeholder(tf.float32, [None, 10])
keep_prob = tf.placeholder(tf.float32)
#输入图片的大小为28X28
#-1表示不考虑样本的维度,即样本的数量,1表示channel,黑白只有一个,RGB有多个
x_image = tf.reshape(xs,[-1, 28, 28, 1])

"""
定义层1
conv1
"""
#过滤窗口大小为 5X5 ,输入的高度为1, 输出高度为32
W_conv1 = weight_variable([5, 5, 1, 32])
b_conv1 = bias_variable([32])
#试用relu做激活函数
#输出大小为28X28X32
h_conv1 = tf.nn.relu(conv2d(x_image, W_conv1)+ b_conv1)
#输出大小为14X14X32
h_pool1 = max_pool_2X2(h_conv1)


"""
定义层2
conv2
不断缩小拉长
"""
#过滤窗口大小为 5X5 ,输入的高度为32, 输出高度为64
W_conv2 = weight_variable([5, 5, 32, 64])
b_conv2 = bias_variable([64])
#试用relu做激活函数
#输出大小为14X14X64
h_conv2 = tf.nn.relu(conv2d(h_pool1, W_conv2)+ b_conv2)
#输出大小为7X7X64
h_pool2 = max_pool_2X2(h_conv2)

"""
定义全连接层fully connected layer,神经网络中隐藏层,将卷积后的结果按普通神经网络求结果
func1 layer
"""
# 数据由[n_samples, 7, 7, 64] 压扁为一维 [n_samples, 7*7*64]
h_pool2_flat = tf.reshape(h_pool2, [-1, 7*7*64])
##函数层,将数据由高维变成1维数据##
W_fc1 = weight_variable([7*7*64,1024])
b_fc1 = bias_variable([1024])
h_fc1 = tf.nn.relu(tf.matmul(h_pool2_flat, W_fc1)+ b_fc1)
h_fc1_drop = tf.nn.dropout(h_fc1, keep_prob)

"""
定义全连接层,输出结果为要预测数字的概率,所有输出为10
func2 layer
"""
W_fc2 = weight_variable([1024, 10])
b_fc2 = bias_variable([10])
prediction = tf.nn.softmax(tf.matmul(h_fc1_drop,W_fc2)+b_fc2)

#定义损失函数
cross_entropy = tf.reduce_mean(-tf.reduce_sum(ys * tf.log(prediction),
                                              reduction_indices=[1]))       # loss

#添加训练步骤, 优化方法用adam优化器
train_step = tf.train.AdamOptimizer(1e-4).minimize(cross_entropy)

sess = tf.Session()
sess.run(tf.initialize_all_variables())

for i in range(1000):
    batch_xs, batch_ys = mnist.train.next_batch(100)
    sess.run(train_step, feed_dict={xs: batch_xs, ys: batch_ys, keep_prob: 0.5})
    if i % 50 == 0:
        print(compute_accuracy(
            mnist.test.images, mnist.test.labels))