试过很多方法都失败,打算用命令行方式安装。
准备工作:
从 https://github.com/appium/appium下载appium版本的源码(.tar)
0. 安装brew(如果已经安装可以跳过这步)
ruby -e "$(curl -fsSL https://raw.github.com/mxcl/homebrew/go/install)"
https://brew.sh/index_zh-cn.html: 按照官网提示在命令行执行ruby脚本(mac自带ruby)
1. 命令行安装node:
brew install node
2. cd 到 appium.tar的解压后的路径
3. 安装appium
npm install -g ./appium
安装后界面:
nalideMacBook-Pro:appium-1.6.5 nali$ npm install -g appium
npm WARN deprecated babel-core@5.8.24: Babel 5 is no longer being maintained. Upgrade to Babel 6.
npm WARN deprecated minimatch@2.0.10: Please update to minimatch 3.0.2 or higher to avoid a RegExp DoS issue
npm WARN deprecated line-numbers@0.2.0: Copy its ~20 LOC directly into your code instead.
/usr/local/bin/appium -> /usr/local/lib/node_modules/appium/build/lib/main.js

> appium-chromedriver@2.11.2 install /usr/local/lib/node_modules/appium/node_modules/appium-chromedriver
> node install-npm.js

info Chromedriver Install Installing Chromedriver version '2.28' for platform 'mac' and architecture '64'
info Chromedriver Install Opening temp file to write chromedriver_mac64 to...
info Chromedriver Install Downloading https://chromedriver.storage.googleapis.com/2.28/chromedriver_mac64.zip...
info Chromedriver Install Writing binary content to /var/folders/gs/1rvd4dj94gn10btdfzmq50680000gn/T/201787-9541-1hmuws9.6gxs/chromedriver_mac64.zip...
info Chromedriver Install Extracting /var/folders/gs/1rvd4dj94gn10btdfzmq50680000gn/T/201787-9541-1hmuws9.6gxs/chromedriver_mac64.zip to /var/folders/gs/1rvd4dj94gn10btdfzmq50680000gn/T/201787-9541-1hmuws9.6gxs/chromedriver_mac64
info Chromedriver Install Creating /usr/local/lib/node_modules/appium/node_modules/appium-chromedriver/chromedriver/mac...
info Chromedriver Install Copying unzipped binary, reading from /var/folders/gs/1rvd4dj94gn10btdfzmq50680000gn/T/201787-9541-1hmuws9.6gxs/chromedriver_mac64/chromedriver...
info Chromedriver Install Writing to /usr/local/lib/node_modules/appium/node_modules/appium-chromedriver/chromedriver/mac/chromedriver...
info Chromedriver Install /usr/local/lib/node_modules/appium/node_modules/appium-chromedriver/chromedriver/mac/chromedriver successfully put in place

> appium-selendroid-driver@1.6.2 install /usr/local/lib/node_modules/appium/node_modules/appium-selendroid-driver
> node ./bin/install.js

dbug AndroidDriver Getting Java version
info AndroidDriver Java version is: 1.8.0_144
info Selendroid Ensuring /usr/local/lib/node_modules/appium/node_modules/appium-selendroid-driver/selendroid/download exists

……
4. 命令行运行appium 检查是否能够启动
nalideMacBook-Pro:appium-1.6.5 nali$ appium
[Appium] Welcome to Appium v1.6.5
[Appium] Appium REST http interface listener started on 0.0.0.0:4723
5. 验证的第二种方式,安装appium-doctor.
Appium 安装过程中也会遇到下面的error问题,但是不影响。后续解决
切换到appium-doctor的目录

npm install -g appium-doctor

# 装好之后 检测一下iOS的环境有没有配置好 如果不加--ios 则检测Android和iOS
appium-doctor --ios

# 它提示我缺少Xcode Command Line Tools和Carthage,那就补上
xcode-select --install
brew install carthage
7. 其他库:
brew install libimobiledevice --HEAD npm install -g ios-deploy # for iOS 10+gem install xcpretty #对真机需要xcpretty
gem 安装速度慢可以更换镜像源gem sources --add https://gems.ruby-china.org/ --remove https://rubygems.org/
第一次运行配置
不配置会出现xcodebuild exited with code '65' and signal 'null'错误
8. WebDriverAgent相关(大坑)【dmg 模式适用】
iOS 10+使用的是XCUITest,Appium使用的模块是appium-xcuitest-driver,其中引用了Facebook提供的WDA方案来驱动iOS的测试。
装Appium Desktop的时候,它里面带了一个WebDriverAgent,但是这个自带的是有问题的!会造成不能使用Inspector,卡了很久!从Facebook那里自己clone一份才是王道:
cd ~
git clone https://github.com/facebook/WebDriverAgent.git
cd WebDriverAgent
mkdir -p Resources/WebDriverAgent.bundle
./Scripts/bootstrap.sh    # 开始下载并编译 编译不应该报错


cd /Applications/Appium.app/Contents/Resources/app/node_modules/appium/node_modules/appium-xcuitest-driver/
rm -rf WebDriverAgent   # 把自带的删掉
ln -s ~/WebDriverAgent WebDriverAgent  # 用facebook的原版替换回去
经过了baidu和google,用以上方法解决了不能Inspect的问题。
在使用Appium时,需要把WDA装到真机上,然后又会遇到证书的问题,我也不是很明白,总之跟provisioning profile有关。
用Xcode打开目录下的WebDriverAgent.xcodeproj,对于WebDriverAgentLib 和 WebDriverAgentRunner,勾选“Automatically manage signing”,把Team改成公司的,Bundle Identifier改成公司的证书可以接受的名字,具体可以参考官方文档操作,不懂的找开发同学协助。
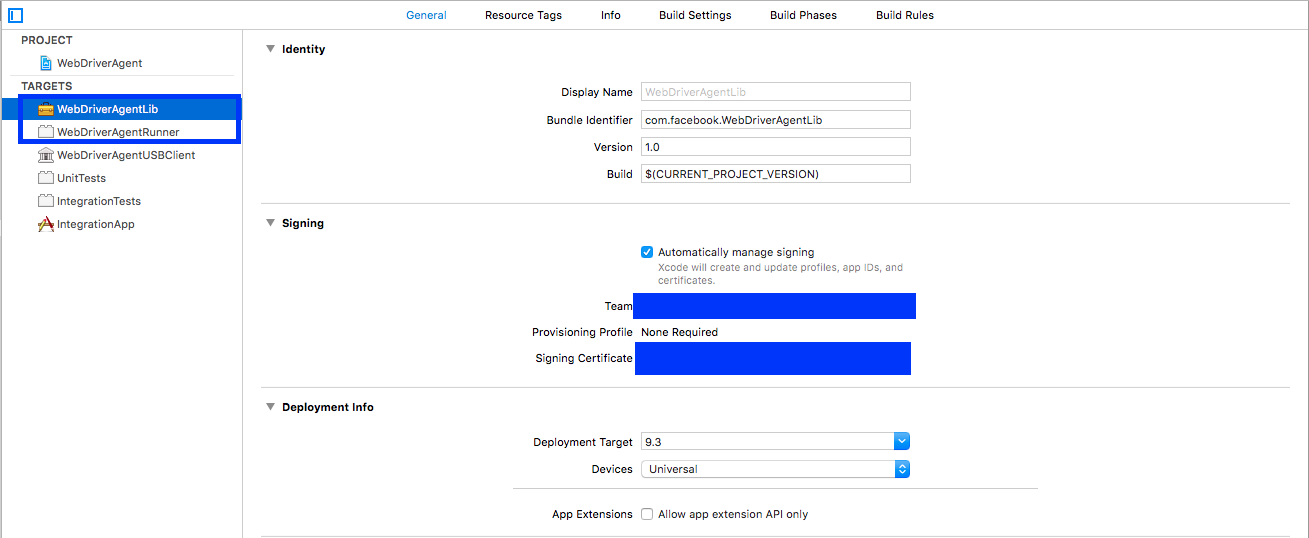
然后就可以把WebDriverAgentLib和WebDriverAgentRunner都编译到真机运行一下了。正常来说,会在桌面生成一个没图标的WebDriverAgentRunner,点开之后不会有什么反应,这就对了。
终于把环境搭好了,感动啊。
写测试脚本
1. Appium server capabilities
要让App跑起来,还需要了解Appium server capabilities,它告诉Appium服务器很多信息,例如开哪个App、手机的系统/版本、在哪台设备上跑(真机还是模拟器等)等。
给出我用到的一些参数(in Python),其他capabilities请参考官方文档。
|
1
2
3
4
5
6
7
8
9
10
11
12
13
14
15
16
17
18
|
# -*- coding: utf-8 -*-
from time import sleep
from appium import webdriver
desired_caps = {}
desired_caps['automationName'] = 'XCUITest' # Xcode8.2以上无UIAutomation,需使用XCUITest
desired_caps['platformName'] = 'iOS'
desired_caps['platformVersion'] = '10.3.2'
desired_caps['deviceName'] = 'iPhone 7 Plus'
desired_caps['bundleId'] = '需要启动的bundle id, 去问开发者'
desired_caps['udid'] = '真机的udid 可在Xcode或iTunes里查看'
desired_caps['newCommandTimeout'] = 3600 # 1 hour
# 打开Appium服务器,start server后,尝试启动被测App
driver = webdriver.Remote('http://127.0.0.1:4723/wd/hub', desired_caps)
sleep(60)
driver.quit()
|
如果能跑起来,就是正常的,不然看一下报什么错。
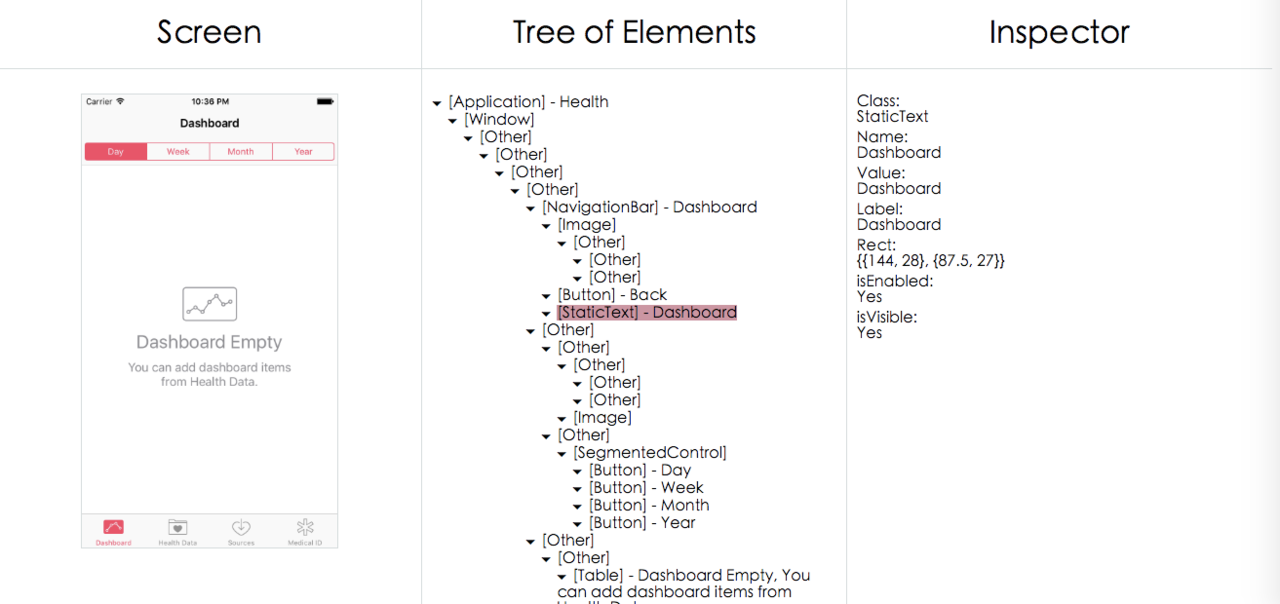
2. Inspector
能跑起来只是第一步,更重要的是如何定位元素。
Inspector的使用方法很简单,之前运行driver = webdriver.Remote(‘http://127.0.0.1:4723/wd/hub’, desired_caps)之后,连接就已经建立好了,只需在浏览器进入http://localhost:8100/inspector即可,之后就可以使用熟悉的driver.find_element_by_xxx方法来定位元素啦。
后记
Selenium的坑
后来又遇到了一点坑,例如使用send_keys方法时,报
Message: Parameters were incorrect. We wanted {“required”:[“value”]} and you sent [“text”,”sessionId”,”id”,”value”]
错误,google了一下发现是selenium新版导致的问题,降级后解决:
|
1
2
|
pip uninstall selenium
pip install selenium==3.3.1
|
手势操作
由于XCUI的原因,之前的一些手势操作如swipe、pinch、TouchAction等都不能用了,可以参考这篇官方文档,使用driver.execute_script方法代替。如
|
1
2
|
driver.execute_script('mobile: scroll', {'direction': 'down'}) # 向下滚动
driver.execute_script('mobile: dragFromToForDuration', {'duration': 0, 'fromX': 374, 'fromY': 115, 'toX': 200, 'toY': 100}) # 从右往左拖
|
对于直接用坐标的,还要注意逻辑分辨率的问题,如iPhone 7 Plus的逻辑分辨率是414×736。
最后
刚接触iOS的Appium,之后肯定还会遇到问题,会继续更新本文。
更新,最近更新到了Appium Desktop 1.1,里面带了1.6.5的Appium,使用起来暂时未发现明显区别。
附上一些参考:
1. http://www.cocoachina.com/ios/20170112/18518.html
2. http://blog.sina.com.cn/s/blog_b5a76ebd0102wuce.html
3. https://github.com/appium/appium/blob/master/docs/en/appium-setup/real-devices-ios.md
4. http://blog.csdn.net/achang21/article/details/70877583
5. https://github.com/appium/appium/blob/master/docs/en/writing-running-appium/caps.md
6. https://github.com/appium/python-client
7. https://github.com/appium/appium/blob/master/docs/en/writing-running-appium/appium-bindings.md
8. https://github.com/facebook/WebDriverAgent/issues/537
9. https://github.com/facebook/WebDriverAgent/wiki/Using-the-Inspector