题目
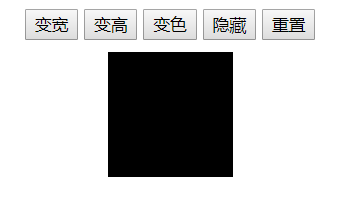
要实现的效果如图所示:查看演示
分析
乍一看还以为十分简单,就是简单的点击button时触发的函数来改变样式值,不过做到后面就开始打脸了——“重置”功能。其实要实现重置功能,硬做还是可以的,就是cssText=“整个style表”,但是这么做太暴力了,十分不优雅,结果看了人家的源码真的是佩服的五体投地。
首先注意CSS的三种创建方式
- 内联样式/行内样式(inline style)
- 内部样式表(internal style sheet)
- 外部样式表(external style sheet)
JS如何获取CSS样式
-
获取内联样式
<div id ="myDiv" style="100px;height:100px;background-color:red; border:1px solid black;"></div>
<script>
    var myDiv = document.getElementById("myDiv");

    alert(myDiv.style.width);//100px

    alert(myDiv.style['height']);//100px

    var style=myDiv.style;
    alert(style.backgroundColor);//red

    myDiv.style.backgroundColor='green';//myDiv背景色变为绿色
</script>
这种情况下,获取和设置样式靠style属性就可以了,有ele.style.属性名称和ele.style[“属性名称”]两种方式。
要注意的是,对于CSS样式中的background-color等短杠连接的属性名称,在使用style获取属性设置样式的时候名称要改成驼峰式,即ele.style.backgroundColor或者ele.style[‘backgroundColor’]。 -
获取外联样式(内部/外部样式表)(待更新)
也就是说,一般情况下,我们都只能访问和设置行内样式!访问外联样式需要其他方法实现。
cssText的用法
用来设置行内样式。
ele.style.cssText="CSS样式表";//添加行内样式
ele.style.cssText="";//可以清除行内样式
这次的小练习中用到了ele.style.cssText=""的用法来实现重置功能,这条语句只会清除行内样式,对样式表中设置的内容没有改动。
window.onload的使用方法
window.onload加载事件在页面内容加载完成之后立即执行相应的函数。
使用方法:

onclick有相同用法:
- obj.onclick = function() {//function body//}
- function func() {//function body//}
obj.oncllick = func();
&& 和 || 的特殊用法
a() && b() :如果执行a()后返回true,则执行b()并返回b的值;如果执行a()后返回false,则整个表达式返回a()的值,b()不执行;
a() || b() :如果执行a()后返回true,则整个表达式返回a()的值,b()不执行;如果执行a()后返回false,则执行b()并返回b()的值;
&& 优先级高于 ||。
alert((1 && 3 || 0) && 4); //结果4
alert(1 && 3 || 0 && 4); //结果3
alert(0 && 3 || 1 && 4); //结果4
代码
我的代码:
<!DOCTYPE html>
<html>
<head>
	<title>JavaScript Reading Test</title>
	<style type="text/css">
		.main {
			margin: 30px;
			text-align: center;
		}
		#rectangle {
			width: 100px;
			height: 100px;
			margin: 20px auto;
			background: red;
		}
	</style>
</head>
<body>
	<div class="main">
		<button>变宽</button>
		<button>变高</button>
		<button>变色</button>
		<button>隐藏</button>
		<button>重置</button>
		<p id="rectangle"></p>
	</div>
	<script>
		function changeCss(oDiv, oAttr, oVal) {
			oDiv.style[oAttr] = oVal; //变量访问样式属性,用ele.style['oAttr']
		}
		window.onload = function() {
			var oBtn = document.getElementsByTagName("button");
			var oDiv = document.getElementById("rectangle");
			var oAttr = ["width", "height", "backgroundColor", "display", "display"];
			var oVal = ["200px", "200px", "blue", "none", "block"];
			alert()
			for(var i = 0; i < oBtn.length; ++ i) {
				oBtn[i].index = i;//注意!!
				oBtn[i].onclick = function() {
				//这里绑定的回调函数是匿名函数,不会执行,但是当事件发生调用函数时,循环已经结束了
					if (this.index == 4) { //内部引用自己用this,用oBtn[i]会报错
						oDiv.style.cssText = "";
					}
					//简洁用法:
					// this.index == oBtn.length - 1 && (oDiv.style.cssText = "");
					changeCss(oDiv, oAttr[this.index], oVal[this.index]);
				}
			}
		}
	</script>
</body>
</html>
必须使用oBtn[i].index = i,原因见代码注释。
源代码
<!DOCTYPE html>
<html lang="en">
<head>
    <meta charset="UTF-8">
    <title>Document</title>
</head>
<style>
body{
    text-align: center;
}
div{
    width: 100px;
    height: 100px;
    background: black;
    margin:20px auto;
}
</style>
<body>
    <input type="button" value="变宽" />
    <input type="button" value="变高" />
    <input type="button" value="变色" />
    <input type="button" value="隐藏" />
    <input type="button" value="重置" />
    <div id="div1"></div>
    <script>
        var changeStyle = function (elem, attr, value){
            elem.style[attr] = value;
        };
        window.onload = function (){
            var oBtn = document.getElementsByTagName("input");
            var oDiv = document.getElementById("div1");
            var oAtt = ["width","height","background","display","display"];
            var oVal = ["200px","200px","red","none","block"];

            for (var i = 0; i < oBtn.length; i++){
                oBtn[i].index = i;
                oBtn[i].onclick = function (){
                    this.index == oBtn.length - 1 && (oDiv.style.cssText = "");
                    changeStyle(oDiv, oAtt[this.index], oVal[this.index])
                }
            }
        }
    </script>
</body>
</html>
总结
这一次的小练习提升的知识点:
- 使用对象/数组遍历访问的思想;
- cssText用法,内联样式的访问和设置;
- && 和 || 的特殊用法;
- window.function(){};
- this初步了解;
- 闭包和作用域的初步接触;