首先springcloud_bus原理:
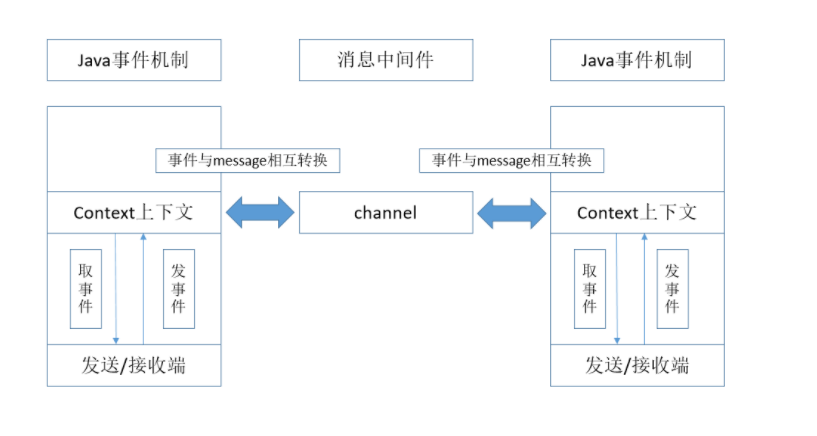
(1)完整流程:发送端(endpoint)构造事件event,将其publish到context上下文中(spring cloud bus有一个父上下文,bootstrap),然后将事件发送到channel中(json串message),接收端从channel中获取到message,将message转为事件event(转换过程这一块没有深究),然后将event事件publish到context上下文中,最后接收端(Listener)收到event,调用服务进行处理。整个流程中,只有发送/接收端从context上下文中取事件和发送事件是需要我们在代码中明确写出来的,其它部分都由框架封装完成。
(2)先大致描述了一下流程,关于封装的部分流程,我们基本上可以在BusAutoConfiguration.class中找到,下面的代码都是这个类中的代码
  @EventListener(classes = RemoteApplicationEvent.class)
    public void acceptLocal(RemoteApplicationEvent event) {
        if (this.serviceMatcher.isFromSelf(event)
                && !(event instanceof AckRemoteApplicationEvent)) {
            this.cloudBusOutboundChannel.send(MessageBuilder.withPayload(event).build());
        }
    }
这是封装了java事件处理机制,当收到RemoteApplicationEvent时,如果这个event是从这个服务发出的,而且不是ack事件,那么就会把这个事件发送到channel中。
  @StreamListener(SpringCloudBusClient.INPUT)
    public void acceptRemote(RemoteApplicationEvent event) {
        if (event instanceof AckRemoteApplicationEvent) {
            if (this.bus.getTrace().isEnabled() && !this.serviceMatcher.isFromSelf(event)
                    && this.applicationEventPublisher != null) {
                this.applicationEventPublisher.publishEvent(event);
            }
            // If it's an ACK we are finished processing at this point
            return;
        }
        if (this.serviceMatcher.isForSelf(event)
                && this.applicationEventPublisher != null) {
            if (!this.serviceMatcher.isFromSelf(event)) {
                this.applicationEventPublisher.publishEvent(event);
            }
            if (this.bus.getAck().isEnabled()) {
                AckRemoteApplicationEvent ack = new AckRemoteApplicationEvent(this,
                        this.serviceMatcher.getServiceId(),
                        this.bus.getAck().getDestinationService(),
                        event.getDestinationService(), event.getId(), event.getClass());
                this.cloudBusOutboundChannel
                        .send(MessageBuilder.withPayload(ack).build());
                this.applicationEventPublisher.publishEvent(ack);
            }
        }
        if (this.bus.getTrace().isEnabled() && this.applicationEventPublisher != null) {
            // We are set to register sent events so publish it for local consumption,
            // irrespective of the origin
            this.applicationEventPublisher.publishEvent(new SentApplicationEvent(this,
                    event.getOriginService(), event.getDestinationService(),
                    event.getId(), event.getClass()));
        }
    }
@StreamListener这个标签有兴趣的可以去了解一下。这个方法就是从channel中取出事件进行处理的过程(message转事件部分需要自行了解,我没有深入研究),根据事件的类型、发送方和接收方来处理这个事件:如果是ack事件,发送到context上下文中;如果自己是接收端且不是发送端,就会将事件发送到context上下文。
(3)消息中间件可以采用rabbitmq、kafka之类的
(4)说两个比较有意思的问题
1)自定义事件时,我们需要添加无参构造方法:目的在于,在message转事件时,会调用这个无参构造方法,具体情况可以去参考源码看看
2)自定义事件时,事件的参数需要用final修饰,这个一直没有找到合理的解释,有兴趣可以去研究研究
使用:
引入rabbitmq依赖:
<?xml version="1.0" encoding="UTF-8"?>
<project xmlns="http://maven.apache.org/POM/4.0.0" xmlns:xsi="http://www.w3.org/2001/XMLSchema-instance"
         xsi:schemaLocation="http://maven.apache.org/POM/4.0.0 http://maven.apache.org/xsd/maven-4.0.0.xsd">
    <modelVersion>4.0.0</modelVersion>
    <parent>
        <groupId>org.springframework.boot</groupId>
        <artifactId>spring-boot-starter-parent</artifactId>
        <version>2.1.2.RELEASE</version>
        <relativePath/> <!-- lookup parent from repository -->
    </parent>
    <groupId>com.cxy</groupId>
    <artifactId>person</artifactId>
    <version>0.0.1-SNAPSHOT</version>
    <name>person</name>
    <description>Demo project for Spring Boot</description>

    <properties>
        <java.version>1.8</java.version>
        <spring-cloud.version>Greenwich.RELEASE</spring-cloud.version>
    </properties>

    <dependencies>
        <dependency>
            <groupId>org.springframework.boot</groupId>
            <artifactId>spring-boot-starter-amqp</artifactId>
        </dependency>
        <dependency>
            <groupId>org.springframework.boot</groupId>
            <artifactId>spring-boot-starter-web</artifactId>
        </dependency>
        <dependency>
            <groupId>org.mybatis.spring.boot</groupId>
            <artifactId>mybatis-spring-boot-starter</artifactId>
            <version>2.1.0</version>
        </dependency>
        <dependency>
            <groupId>org.springframework.cloud</groupId>
            <artifactId>spring-cloud-config-client</artifactId>
        </dependency>
        <dependency>
            <groupId>org.springframework.cloud</groupId>
            <artifactId>spring-cloud-starter-netflix-eureka-client</artifactId>
        </dependency>
        <dependency>
            <groupId>org.springframework.cloud</groupId>
            <artifactId>spring-cloud-starter-netflix-ribbon</artifactId>
        </dependency>
        <dependency>
            <groupId>org.springframework.cloud</groupId>
            <artifactId>spring-cloud-starter-openfeign</artifactId>
        </dependency>
        <dependency>
            <groupId>org.mybatis.spring.boot</groupId>
            <artifactId>mybatis-spring-boot-starter</artifactId>
            <version>2.0.0</version>
        </dependency>
        <dependency>
            <groupId>mysql</groupId>
            <artifactId>mysql-connector-java</artifactId>
            <version>5.1.41</version>
        </dependency>
        <dependency>
            <groupId>org.springframework.boot</groupId>
            <artifactId>spring-boot-starter-actuator</artifactId>
        </dependency>
        <dependency>
            <groupId>org.springframework.boot</groupId>
            <artifactId>spring-boot-starter-test</artifactId>
            <scope>test</scope>
        </dependency>
    </dependencies>

    <dependencyManagement>
        <dependencies>
            <dependency>
                <groupId>org.springframework.cloud</groupId>
                <artifactId>spring-cloud-dependencies</artifactId>
                <version>${spring-cloud.version}</version>
                <type>pom</type>
                <scope>import</scope>
            </dependency>
        </dependencies>
    </dependencyManagement>

    <build>
        <plugins>
            <plugin>
                <groupId>org.springframework.boot</groupId>
                <artifactId>spring-boot-maven-plugin</artifactId>
            </plugin>
        </plugins>
    </build>

</project>
然后配置:
bootstrap.yml
spring:
  cloud:
    config:
      profile: dev
      discovery:
        service-id: config
        enabled: true
  rabbitmq:
    host: 192.168.230.134
  application:
    name: person
线上配置文件:
https://gitee.com/chenxiufen/springcloudconfig/blob/master/person-dev.yml
然后启动就可以了.