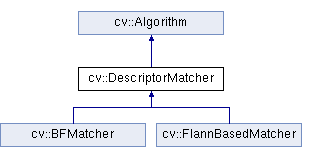
OpenCV 中有两种特征匹配方法:暴力匹配 (Brute force matching) 和 最近邻匹配 (Nearest Neighbors matching)
它们都继承自 DescriptorMatcher,是基于特征描述符距离的匹配,根据描述符的不同,距离可以是 欧氏距离,也可以是 汉明距
1 暴力匹配
首先,任取图像 A 的一个特征描述符,计算它到图像 B 中所有特征描述符的距离;然后,将所得到的距离进行排序;最后,选择距离最短的特征,作为 A-B 的匹配点
1.1 BFMatcher
BFMatcher 属于 features2d 模块,继承自 DescriptorMatcher,其 create() 函数如下:
    static Ptr<BFMatcher> create(
        int normType = NORM_L2,    // normType, One of NORM_L1, NORM_L2, NORM_HAMMING, NORM_HAMMING2.
        bool crossCheck = false    // crossCheck
    );
1) normType 距离类型
SIFT和SURF 的 HOG 描述符,对应欧氏距离 L1 和 L2;ORB 和 BRISK 的 BRIEF 描述符,对应汉明距 HAMMING;HAMMING2 则对应当 WTA_K = 3或4 时的 ORB 算法
- 欧氏距离:最常用的一种距离定义,指的是 n 维空间中,两点之间的实际距离
$L1 = sum_I | exttt{src1} (I) - exttt{src2}|$
$L2 = sqrt{sum_I ( exttt{src1}(I) - exttt{src2}(I))^2}$
- 汉明距离:计算机的异或操作,适用于二进制串描述符,如 BRIEF 描述符,定义如下:
$ Hamming left ( a,b ight ) = sumlimits_{i=0}^{n-1} left ( a_i oplus b_i ight ) $
2) crossCheck 交叉核对
- 如果在图像 B 中,特征 $f_{b}$ 是特征 $f_{a}$ 的最佳匹配,并且在图像 A 中,特征 $f_{a}$ 也是特征 $f_{b}$ 的最佳匹配,则称 $(f_{a}, f_{b})$ 为 "good match"
1.2 代码示例
特征匹配步骤如下:读图 -> 提取特征 -> 计算特征描述符 -> 暴力匹配 -> 显示匹配结果
#include "opencv2/highgui.hpp"
#include "opencv2/features2d.hpp"

using namespace cv;

int main()
{
    // 1) read
    Mat img1 = imread("box.png", IMREAD_GRAYSCALE);
    Mat img2 = imread("box_in_scene.png", IMREAD_GRAYSCALE);
    if (img1.empty() || img2.empty())
        return -1;

    // 2) detect and compute
    Ptr<SIFT> sift = SIFT::create();
    std::vector<KeyPoint>  kps1, kps2;
    Mat desc1, desc2;
    sift->detectAndCompute(img1, Mat(), kps1, desc1);
    sift->detectAndCompute(img2, Mat(), kps2, desc2);

    // 3) match
    Ptr<BFMatcher> bfmatcher = BFMatcher::create(NORM_L2, true);
    std::vector<DMatch> matches;
    bfmatcher->match(desc1, desc2, matches);

    // 4) draw and show
    Mat img_matches;
    drawMatches(img1, kps1, img2, kps2, matches, img_matches);
    imshow("BFMatcher", img_matches);

    waitKey();
}
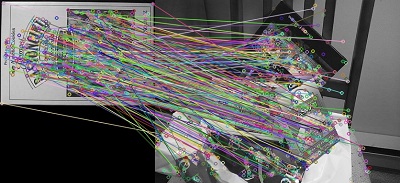
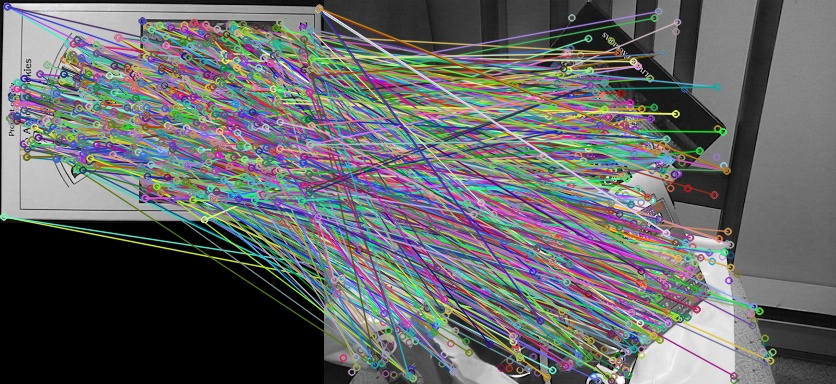
crosscheck 分别为 true 和 false:
2 最近邻匹配
FLANN 是一个开源库,全称 Fast Library for Approximate Nearest Neighbors,它实现了一系列高维向量的近似最近邻搜索算法
基于 FLANN 库的最近邻匹配算子 FlannBasedMatcher,在特征数据集较大或一些实时处理领域,其运行效率要远高于 BFMatcher
OpenCV 中 FlannBasedMatcher 的定义如下:
// This matcher trains cv::flann::Index on a train descriptor collection and calls its nearest search methods to find the best matches.
// So, this matcher may be faster when matching a large train collection than the brute force matcher.
class FlannBasedMatcher : public DescriptorMatcher
{
public:
    FlannBasedMatcher( const Ptr<flann::IndexParams>& indexParams=makePtr<flann::KDTreeIndexParams>(),
                       const Ptr<flann::SearchParams>& searchParams=makePtr<flann::SearchParams>() );

    static Ptr<FlannBasedMatcher> create();
2.1 距离比
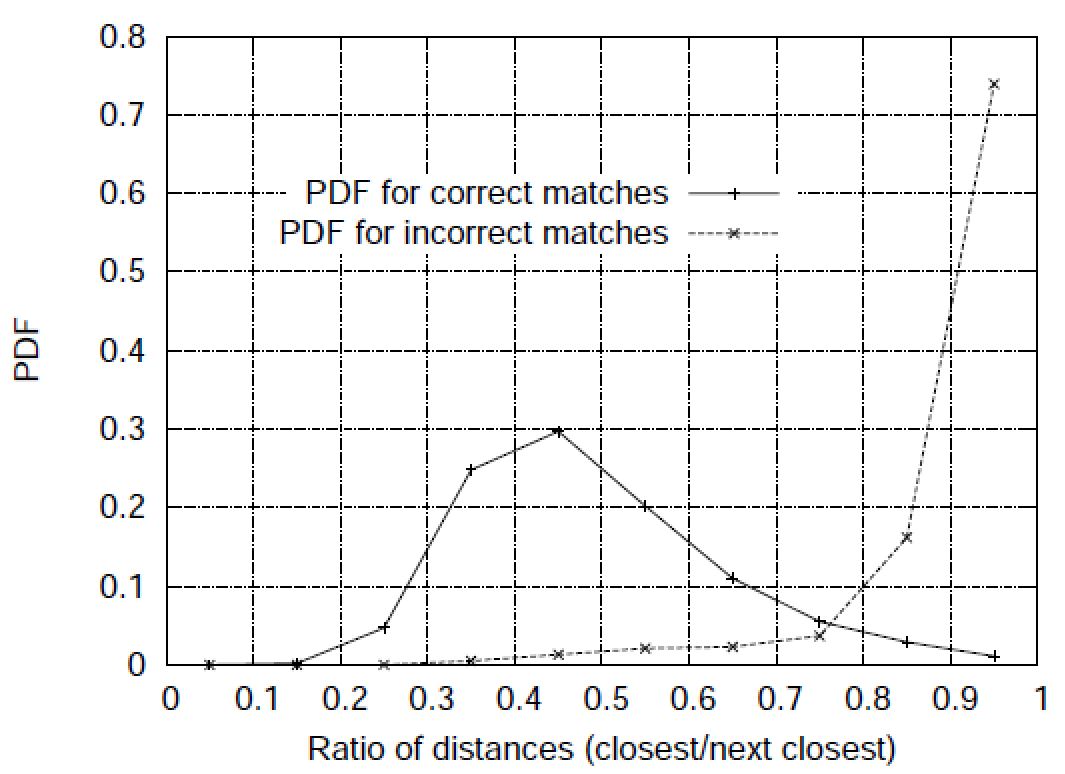
为了进一步提高特征匹配精度,David Lowe 提出了一种最近邻次近邻距离比的方法:
- 取图像 A 的一个特征,搜索它到图像 B 距离最近的两个特征,距离分别记为 $d_{1}$ 和 $d_{2}$,只有当 $displaystyle{frac{d_{1}}{d_{2}}}$ 小于某个阈值时,才认为是 "good match"
"good match" 的概率密度函数 PDF (Probability Density Function) 与最近邻次近邻距离比的关系,如下:
2.2 代码示例
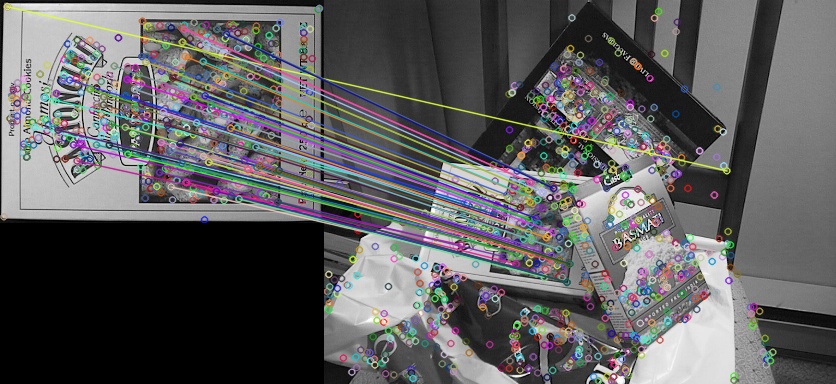
取 distance ratio = 0.7,对比使用和不使用距离比滤波的匹配效果,代码如下:
#include "opencv2/highgui.hpp"
#include "opencv2/features2d.hpp"

using namespace cv;

const float kRatioThresh = 0.7f;

int main()
{
    // 1) read
    Mat img1 = imread("box.png", IMREAD_GRAYSCALE);
    Mat img2 = imread("box_in_scene.png", IMREAD_GRAYSCALE);
    if (img1.empty() || img2.empty())
        return -1;

    // 2) detect feature and compute descriptor
    Ptr<SIFT> sift = SIFT::create();
    std::vector<KeyPoint>  kps1, kps2;
    Mat desc1, desc2;
    sift->detectAndCompute(img1, Mat(), kps1, desc1);
    sift->detectAndCompute(img2, Mat(), kps2, desc2);

    // 3) FLANN based matcher
    Ptr<FlannBasedMatcher> knnmatcher = FlannBasedMatcher::create();
    std::vector<std::vector<DMatch> > matches;
    knnmatcher->knnMatch(desc1, desc2, matches, 2);

    // 4) filter matches using Lowe's distance ratio test
    std::vector<DMatch> good_matches;
    for (size_t i = 0; i < matches.size(); i++)
    {
        if (matches[i][0].distance < kRatioThresh*matches[i][1].distance)
        {
            good_matches.push_back(matches[i][0]);
        }
    }
    // 5) draw and show matches
    Mat img_matches;
    drawMatches(img1, kps1, img2, kps2, good_matches, img_matches);
    imshow("Good Matches", img_matches);

    waitKey();
}
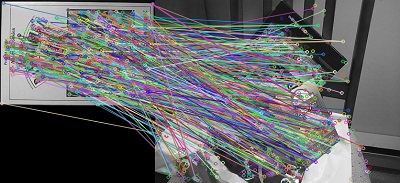
匹配效果对比如下:
3 应用示例
特征匹配 + 平面单应性,在计算机视觉中有很多应用,如:透视校正,目标定位等
3.1 透视校正
OpenCV 之 平面单应性 4.1 中的示例,并不是标准的透视校正,因为是人拿着标定板旋转不同角度,使相机和标定板产生了相对的视角变换,而不是相机和整个场景之间
多视图几何中,严格意思的透视校正,是指相机在不同的视角下,对同一场景成不同的像而进行的视角校正,如下图:

在得到匹配点对 good_matches 之后,再执行如下代码,便可用于透视校正
    // Localize the object
    std::vector<Point2f> obj;
    std::vector<Point2f> scene;
    for (size_t i = 0; i < good_matches.size(); i++)
    {
        // Get the keypoints from the good matches
        obj.push_back(kps1[good_matches[i].queryIdx].pt);
        scene.push_back(kps2[good_matches[i].trainIdx].pt);
    }

    // estimate H
    Mat H = findHomography(scene, obj, RANSAC);

    // warp scene
    Mat scene_warp;
    warpPerspective(img2, scene_warp, H, Size(1.35*img2.cols, img2.rows));

    // show
    imshow("scene_warp", scene_warp);
校正前后的结果如下:


3.2 目标定位
得到匹配点对 good_matches 后,再执行如下代码,便可用于目标定位
  // Localize the object
    std::vector<Point2f> obj;
    std::vector<Point2f> scene;
    for (size_t i = 0; i < good_matches.size(); i++)
    {
        // Get the keypoints from the good matches
        obj.push_back(kps1[good_matches[i].queryIdx].pt);
        scene.push_back(kps2[good_matches[i].trainIdx].pt);
    }
    // estimate H
    Mat H = findHomography(obj,scene, RANSAC);

    // get the corners from the image_1 ( the object to be "detected" )
    std::vector<Point2f> obj_corners(4);
    obj_corners[0] = Point2f(0, 0);
    obj_corners[1] = Point2f((float)img1.cols, 0);
    obj_corners[2] = Point2f((float)img1.cols, (float)img1.rows);
    obj_corners[3] = Point2f(0, (float)img1.rows);

    std::vector<Point2f> scene_corners(4);
    perspectiveTransform(obj_corners, scene_corners, H);

    // draw lines between the corners (the mapped object in the scene - image_2 )
    line(img_matches, scene_corners[0] + Point2f((float)img1.cols, 0), scene_corners[1] + Point2f((float)img1.cols, 0), Scalar(0,255,0));
    line(img_matches, scene_corners[1] + Point2f((float)img1.cols, 0), scene_corners[2] + Point2f((float)img1.cols, 0), Scalar(0,255,0));
    line(img_matches, scene_corners[2] + Point2f((float)img1.cols, 0), scene_corners[3] + Point2f((float)img1.cols, 0), Scalar(0,255,0));
    line(img_matches, scene_corners[3] + Point2f((float)img1.cols, 0), scene_corners[0] + Point2f((float)img1.cols, 0), Scalar(0,255,0));

    // show detected matches
    imshow("Object detection", img_matches);
目标定位结果如下:

参考资料
OpenCV-Python Tutorials / Feature Detection and Description / Feature Matching
OpenCV Tutorials / 2D Features framework (feature2d module) / Feature Matching with FLANN
OpenCV Tutorials / 2D Features framework (feature2d module) / Features2D + Homography to find a known object