https://www.cnblogs.com/xinxihua/p/14552105.html 前端04测试一个的项目
https://www.cnblogs.com/xinxihua/p/14551901.html 前端3vue+mysql连接实例
https://www.cnblogs.com/xinxihua/p/14551802.html 前端01前端模块化IIFE,commonjs,AMD,UMD,ES6 Module规范超详细讲解
https://www.cnblogs.com/xinxihua/p/14551691.html 前端02vue+vscode+nodejs webpack开发环境搭建
nodejs安装配置1.下载地址:https://nodejs.org/en/
VSCode安装配置1.下载地址:https://code.visualstudio.com/Download
文档 : https://cn.vuejs.org/v2/cookbook/using-axios-to-consume-apis.html
1.下载地址:http://nodejs.cn/;windows一路next安装完成即可。
2.检查nodejs安装是否成功,打开cmd输入命令node -v;能正常输出版本号说明安装成功。
1.安装最新的 vscode ,这个很容易安装。安装完以后 CTRL+SHIFT+X用来安装 中文语言包环境,安装完语言包后,修改设置
安装后,在 locale.json 中添加 "locale": "zh-cn",即可载入中文(简体)语言包。要修改 locale.json,你可以同时按下 Ctrl+Shift+P 打开命令面板,之后输入 "config" 筛选可用命令列表,最后选择配置语言命令。请参阅文档并获取更多信息。"locale":"zh-cn" // 修改完后重新启动
2.要在机器上开发 vue.js 有两种模式,一种直接用 .js ,这种方式不用 安装.node 环境,另一种用 webpack,
3.在机器安装 node node-v10.8.0-x64.msi,在安装过程中可能会出现权限问题, 这样安装:
+以管理员的方式启动 CMD
+用命令:msiexec /package node-v10.8.0-x64.msi 方式来安装后,不会有 2053,2052错误。
4. 项目运行方式。
4.1 npm install vue-cli -g 安装 vue-cli 这个工具。
安装了这个工具以后,就可以在目录中运行
cd 目录路径(项目路径)
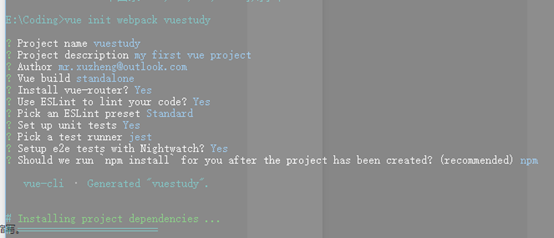
vue init webpack-simple first-vue 用来初始化一个项目
注意这里不能用 -simple 如果用simple builder 与 config 目录则没有。
npm install 再运行 这个命令 构造项目,得到需要的包
可以用 npm run dev 来测下这个构造是否成功。
4.2下载一个 vue.项目 在 目录中执行:
$ npm install //用来重新得到本项目中用得到的 node .包
$ npm run dev //用来执行项目运行。
5.在vscode 中直接 打开 调试工具,看能不能运行, 可以运行表示,已经安装好,这时弹出的窗口为系统默认的浏览器。IE
6.修改dev-server.js 这个文件 让 node 运行时,可以直接打开chrome
opn(uri) 修改为
opn(uri,{ app: ['chrome', '--incognito'] })
这样在VSCODE 与 NODE的开发环境,就建立好了。
上面第6点过时了,在vue的官网上找到一个办法启动:
1. 用 在控制台 进入项目页 用 npm run dev 启动 node的这个项目
打开 config/index.js 并找到 devtool 属性。将其更新为:
devtool: 'source-map',
把下面一段加到launch.json里面
{
"version": "0.2.0",
"configurations": [
{
"type": "chrome",
"request": "launch",
"name": "vuejs: chrome",
"url": "http://localhost:8080",
"webRoot": "${workspaceFolder}/src",
"breakOnLoad": true,
"sourceMapPathOverrides": {
"webpack:///src/*": "${webRoot}/*"
}
}
]
}
https://cn.vuejs.org/v2/cookbook/using-axios-to-consume-apis.html 这里找到的方法
nodejs安装配置
1.下载
2.默认安装
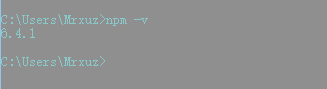
安装完成后,执行npm -v 出现版本号则表示安装成功。
3.配置
- 在node安装目录下新建两个文件夹node_global和node_cache
- 配置npm全局模块的存放路径以及cache的存放路径,执行如下命令:
npm config set prefix "D:Program Files odejs ode_global"
npm config set prefix "D:Program Files odejs ode_cache"
- 配置环境变量,增加变量
NODE_PATH D:Program Files odejs ode_global ode_modules
NODEJS_PATH D:Program Files odejs
PATH 追加%NODEJS_PATH%;%NODEJS_PATH% ode_global
- 安装cnpm,执行如下命令:
npm install -g cnpm --registry=https://registry.npm.taobao.org
- 安装js格式校验插件eslint
cnpm install eslint -g
VSCode安装配置
1.下载
地址:https://code.visualstudio.com/Download
2.默认安装
3.插件安装
- Auto Close Tag
- Auto Rename Tag
- Beautify
- Chinese
- CSS peek
- Document This
- ESlint
- filesize
- Gitlens-Git supercharged
- HTML CSS support
- HTML snippets
- Java Server pages
- Language Support for Java
- Live server
- open in browser
- Path Autocomplete
- Path Intellisense
- PostCSS syntax
- postcss-sugarss-language
- Vetur
- VS Code CSS Comments
- vscode-icons
- Vue 2 Snippets
- VueHelper
3.配置
修改配置如下:
{
"css.validate": false,
// "files.associations": {
// "*.css": "postcss"
// },
"emmet.includeLanguages": {
"vue-html": "html",
"javascript": "javascriptreact",
"postcss": "css"
},
"git.path":"E:/Program Files/Git/bin/git.exe",
"git.autoRepositoryDetection": false,
"workbench.iconTheme": "vscode-icons",
//自动补齐文件路径时,带入扩展名
"path-autocomplete.extensionOnImport": true,
// 每次保存文件(ctrl+s)时,eslint插件会自动对当前文件进行eslint语法修正!
"eslint.validate": [
"javascript",
"javascriptreact",
"html",
{
"language": "vue",
"autoFix": true
}
],
"eslint.options": {
"plugins": [
"html"
]
},
//为了符合eslint的两个空格间隔原则
"editor.tabSize": 2,
// 启用/禁用 HTML 标记的自动关闭。
"html.autoClosingTags": true,
// 启用后,按下 TAB 键,将展开 Emmet 缩写。
"emmet.triggerExpansionOnTab": true,
// 以像素为单位控制字号。
"editor.fontSize": 16,
"[postcss]": {},
"git.enableSmartCommit": true,
"liveServer.settings.host": "172.30.201.16",
"liveServer.settings.donotShowInfoMsg": true,
"gitlens.advanced.messages": {
"suppressShowKeyBindingsNotice": true
},
"explorer.confirmDelete": false,
"vsicons.dontShowNewVersionMessage": true
}
vue安装和初始化
1.安装
执行命令:cnpm install -g vue-cli
2.搭建vue项目并初始化
- 执行命令:vue init webpack my-project
- 根据提示输入内容
- 使用vscode打开项目

- 右键项目,在终端中打开
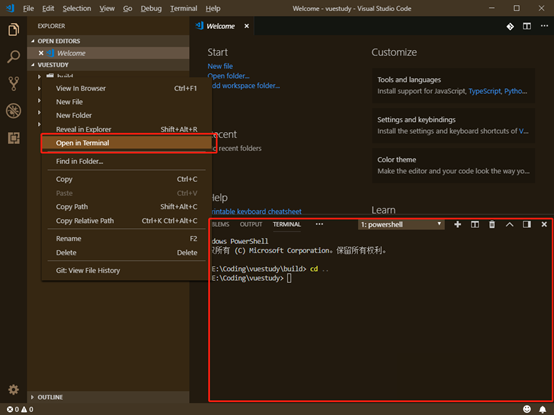
- 移动到项目根目录
cd ..
- 安装依赖
cnpm install
- 启动项目
cnpm run dev
0. 背景
所谓 “工欲善其事,必先利其器”,读源码确实是一件烧脑的事情,
但如果我们能跟踪代码的执行过程,难度就会降低很多。
给我们一个调试器,我们几乎可以研究任何复杂项目的实现原理。
因此,下文我们先准备调试环境,打算使用了 VSCode 对 TypeScript 源码进行调试。
为此,我们从克隆源码仓库开始,然后详细的介绍 TypeScript 的调试过程。
1. 克隆
$ git clone https://github.com/microsoft/TypeScript.git
$ cd TypeScript
$ git checkout v3.7.3
2. 构建
$ npm i
$ node node_modules/.bin/gulp LKG
其中,gulp LKG,会将 src/ 中的源码编译到 built/local/ 文件夹中,
详细解释可以参考这里,lib/README.md。
3. 调试
3.1 修改 bin/tsc
TypeScript 源码中 bin/tsc,require 的是 lib/tsc.js,
但 lib/ 中的代码是没有 source map 的,
我们要将这里改成 require 上一步 gulp 构建出来的 built/local/tsc.js。
#!/usr/bin/env node
require('../built/local/tsc.js');

3.2 调试配置
VSCode 菜单 -> Debug -> Add Configuration -> Node.js
VSCode 会新建 .vscode/launch.json 文件,我们写入如下内容,
{
  "version": "0.2.0",
  "configurations": [
    {
      "type": "node",
      "request": "launch",
      "name": "Debug TypeScript",
      "runtimeExecutable": "npm",
      "runtimeArgs": [
        "run-script",
        "debug"
      ],
      "port": 9001,
      "skipFiles": [
        "<node_internals>/**"
      ],
      "stopOnEntry": true,
    }
  ]
}
(1)name 字段名字可以任取,是展示在调试面板中的名字。

(2)runtimeArgs 数组的第二个元素,对应 VSCode 要调用 npm scripts 名字,一会我们要修改 package.json 文件,添加一个名为 debug 的 scripts。
(3)port 表示调试端口,要与 debug scripts 指定的端口号保持一致。

(4)stopOnEntry 断点自动停在,调试启动后执行的第一行代码那里。
3.3 debug scripts
打开 package.json,添加一个名为 debug 的 scripts,
{
  ...
  "scripts": {
    "debug": "node --inspect-brk=9001 bin/tsc debug/index.ts",
    ...
  },
  ...
}
(1)npm scripts 名字必须为 debug,保持与 .vscode/launch.json 中的 runtimeArgs 数组第二元素一致。
(2)--inspect-brk=9001 表示调试端口号,保持与 .vscode/launch.json 中的 port 字段一致。
(3)debug/index.ts 是 tsc 编译的 .ts 文件,我们需要新建一个 debug 目录,然后添加一个 index.ts 文件。

debug/index.ts 的内容如下,
const i: number = 1;
3.4 启动调试
使用 VSCode 打开 TypeScript 源码仓库的根目录,然后按 F5 启动调试。

我们看到断点自动停在了 bin/tsc 第一行了,这正是 stopOnEntry 的作用。
总结
以上每一节的介绍,稍微有些分散,现在这里总结一下,为了查阅方便。
(1)克隆仓库、安装依赖、执行构建
$ git clone https://github.com/microsoft/TypeScript.git
$ cd TypeScript
$ git checkout v3.7.3
$ npm i
$ node node_modules/.bin/gulp LKG
(2)修改 lib/tsc 为
#!/usr/bin/env node
require('../built/local/tsc.js');
(3)添加 .vscode/launch.json 调试配置
{
  "version": "0.2.0",
  "configurations": [
    {
      "type": "node",
      "request": "launch",
      "name": "Debug TypeScript",
      "runtimeExecutable": "npm",
      "runtimeArgs": [
        "run-script",
        "debug"
      ],
      "port": 9001,
      "skipFiles": [
        "<node_internals>/**"
      ],
      "stopOnEntry": true,
    }
  ]
}
(4)package.json 中添加 debug scripts
{
  ...
  "scripts": {
    "debug": "node --inspect-brk=9001 bin/tsc debug/index.ts",
    ...
  },
  ...
}
(5)添加待 tsc 编译的源码文件 debug/index.ts
const i: number = 1;
(6)VSCode 打开 TypeScript 仓库,按 F5 启动调试