本文是译文,原文请访问:http://www.rabbitmq.com/tutorials/tutorial-one-spring-amqp.html
RabbitMQ 是一个Brocker (消息队列服务器),它接受和转发消息 .
你可以将它当做邮局:
当你将要发布的邮件放在邮箱中时,您可以确定邮件先生或Mailperson女士最终会将邮件发送给您的收件人。在这个比喻中,RabbitMQ是邮箱,邮局和邮递员。
RabbitMQ和邮局之间的主要区别在于它不处理信纸,而是接受,存储和转发二进制大对象 blob(binary large object )数据 ——消息
0x01 RabbitMQ和一般的消息传递使用了一些术语
1. 生产者
生产者仅仅只是发送。一个发送消息的程序就是生产者:
2. 队列
队列是RabbitMQ中的邮箱的名称。虽然消息流经RabbitMQ和您的应用程序,但它们只能存储在队列中。甲队列仅由主机的存储器和磁盘限制约束,它本质上是一个大的消息缓冲器。
许多生产者可以发送到一个队列的消息,并且许多消费者可以尝试从一个队列接收数据。这就是我们代表队列的方式:

3. 消费者
消费这与生产者有类似的意义。一个消费者是一个程序,主要是等待接收信息:

请注意,生产者,消费者和代理不必驻留在同一主机上; 实际上在大多数应用中他们没有。应用程序既可以是生产者也可以是消费者。
0x02 官方 "Hello World"
2.1 (使用 spring-amqp client)
在本教程的这一部分中,我们将使用spring-amqp库编写两个程序; 发送单个消息的生产者,以及接收消息并将其打印出来的消费者。
我们将掩盖Spring-amqp API中的一些细节,专注于这个非常简单的事情才开始。它是消息传递的“Hello World”。
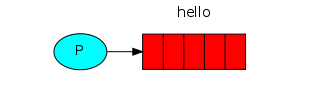
在下图中,“P”是我们的生产者,“C”是我们的消费者。中间的框是一个队列 - RabbitMQ代表消费者保留的消息缓冲区。

Spring AMQP框架
RabbitMQ说多种协议。本教程使用AMQP 0-9-1,它是一种开放的,通用的消息传递协议。RabbitMQ有许多不同语言的客户端 。
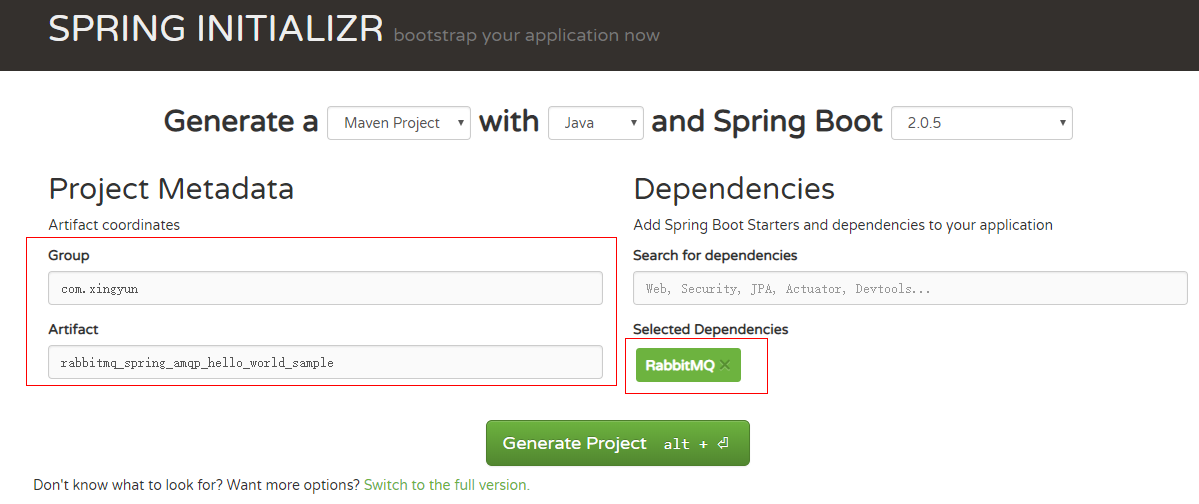
Spring AMQP利用Spring Boot进行配置和依赖管理。Spring支持maven或gradle,但在本教程中,我们将选择带有Spring Boot 1.5.2的maven
提供:
- group id (列如: org.springframework.amqp.tutorials)
- artifact id (e.g. rabbitmq-amqp-tutorials)
- 搜索 RabbitMQ依赖,然后选择 RabbitMQ 依赖
生成项目并将生成的项目解压缩到您选择的位置。
现在可以将其导入您喜欢的IDE中。或者,您可以从您喜欢的编辑器处理它。
2.2 配置项目
Spring Boot提供了许多功能,但我们只在这里强调一些。
首先,Spring Boot应用程序可以选择通过application.properties或application.yml文件提供其属性
编写application.properties
我们将在生成的项目中找到application.properties文件,其中没有任何内容。
添加application.properties 配置如下:
spring.profiles.active=usage_message
logging.level.org=ERROR
tutorial.client.duration=10000
刚才配置文件中我们配置了一个
tutorial.client.duration=10000
但是这个配置字段不存在于任何框架jar包里,因此我们需要编写一个类来处理这个属性
import org.springframework.beans.factory.annotation.Autowired;
import org.springframework.beans.factory.annotation.Value;
import org.springframework.boot.CommandLineRunner;
import org.springframework.context.ConfigurableApplicationContext;

public class RabbitAmqpTutorialsRunner implements CommandLineRunner {

    @Value("${tutorial.client.duration:0}")
    private int duration;

    @Autowired
    private ConfigurableApplicationContext ctx;

    @Override
    public void run(String... args) throws Exception {
        // TODO Auto-generated method stub
        System.out.println("Ready ... running for " + duration + "ms");
        Thread.sleep(duration);
        ctx.close();
    }

}
接下来我们创建一个Java Config 文件(比如我们起名叫做 Tut1Config.java) 用来描述我们的Bean.
Tut1Config.java
import org.springframework.amqp.core.Queue;
import org.springframework.context.annotation.Bean;
import org.springframework.context.annotation.Configuration;
import org.springframework.context.annotation.Profile;

import com.xingyun.springamqp.business.Tut1Receiver;
import com.xingyun.springamqp.business.Tut1Sender;

@Profile({"tut1","hello-world"})
@Configuration
public class Tut1Config {

    @Bean
    public Queue hello() {
        return new Queue("hello");
    }

    @Profile("receiver")
    @Bean
    public Tut1Receiver receiver() {
        return new Tut1Receiver();
    }

    @Profile("sender")
    @Bean
    public Tut1Sender sender() {
        return new Tut1Sender();
    }
}
通过上面这个配置类,我们做了四件事
- 首先通过 @Profile 注解,定义了 两个配置文件前缀别名,tut1 或者 hello-world
- 通过@Configuration 注解来让Spring 知道这是一个Java 配置文件
- 定义了 一个队列,名字叫做hello
- 另外定义了两个配置文件,一个叫做sender,一个叫做receiver
为什么要有这两个配置文件? 因为我们待会运行生产者和消费者的时候,可以通过动态加载不同的配置文件来启动不同的类。
比如我们启动生产者发布信息就可以调用这个配置:
--spring.profiles.active=hello-world,sender
当我们想启动消费者就动态调用这个配置
--spring.profiles.active=hello-world,receiver
接下来我们需要修改下整个应用程序的启动类:
import org.springframework.boot.CommandLineRunner;
import org.springframework.boot.SpringApplication;
import org.springframework.boot.autoconfigure.SpringBootApplication;
import org.springframework.context.annotation.Bean;
import org.springframework.context.annotation.Profile;
import org.springframework.scheduling.annotation.EnableScheduling;

import com.xingyun.config.RabbitAmqpTutorialsRunner;

@EnableScheduling
@SpringBootApplication
public class RabbitMq0x01SpringAmqpHelloWorldSampleApplication {

    @Profile("usage_message")
    @Bean
    public CommandLineRunner usage() {
        return new CommandLineRunner() {

            @Override
            public void run(String... arg0) throws Exception {
                System.out.println("This app uses Spring Profiles to control its behavior.
");
                System.out.println("Sample usage: java -jar rabbit-tutorials.jar --spring.profiles.active=hello-world,sender");
            }
        };
    }

    @Profile("!usage_message")
    @Bean
    public CommandLineRunner tutorial() {
        return new RabbitAmqpTutorialsRunner();
    }

    public static void main(String[] args) {
        SpringApplication.run(RabbitMq0x01SpringAmqpHelloWorldSampleApplication.class, args);
    }
}
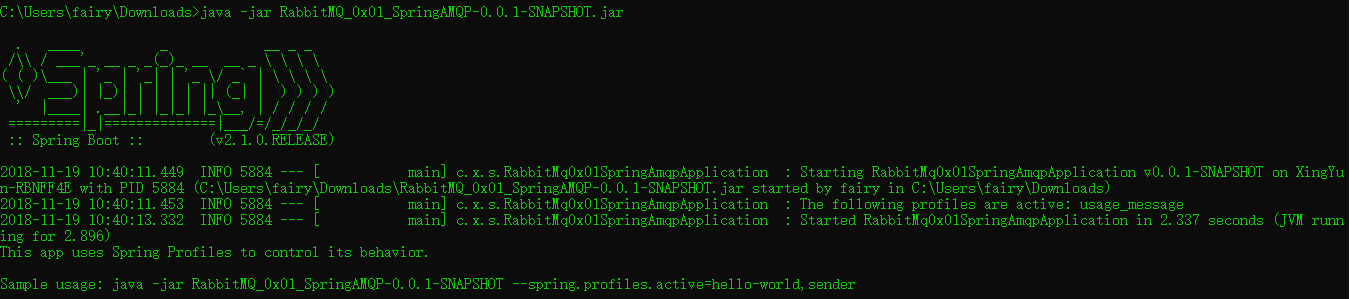
当执行这个项目的jar 文件时会自动加载这个usage_message 配置,打印用法信息。
我们在启动类上添加@EnableScheduling,以便于开启对定时任务的支持
生产者
现在很少有代码需要进入发送方和接收方类。 我们称他们为Tut1Receiver和Tut1Sender。
Sender利用我们的配置和RabbitTemplate发送消息。
Tut1Sender.java
import org.springframework.amqp.core.Queue;
import org.springframework.amqp.rabbit.core.RabbitTemplate;
import org.springframework.beans.factory.annotation.Autowired;
import org.springframework.scheduling.annotation.Scheduled;

public class Tut1Sender {
        @Autowired
        private RabbitTemplate template;

        @Autowired
        private Queue queue;

        @Scheduled(fixedDelay = 1000, initialDelay = 500)
        public void send() {
            String message = "Hello World!";
            this.template.convertAndSend(queue.getName(), message);
            System.out.println(" [x] Sent '" + message + "'");
        }
}
您会注意到spring-amqp删除了样板代码,只留下了需要关注的消息传递逻辑。
我们在Tut1Config类中的bean定义中配置的队列中进行自动装配,并且像许多Spring连接抽象一样,我们使用可以自动装入发送器的RabbitTemplate包装样板rabbitmq客户端类。
剩下的就是创建一个消息并调用模板的convertAndSend方法,该方法从我们定义的bean和刚创建的消息中传入队列名。
Sending 不工作
如果这是您第一次使用RabbitMQ并且没有看到“已发送”消息,那么您可能会感到头疼,想知道可能出现的问题。 也许代理是在没有足够的可用磁盘空间的情况下启动的(默认情况下它至少需要200 MB空闲),因此拒绝接受消息。 检查代理日志文件以确认并在必要时减少限制。 配置文件文档将向您展示如何设置disk_free_limit。
Receiving 消费者
接收器同样简单。 我们用@RabbitListener注入我们的Receiver类并传入队列的名称。
然后,我们使用@RabbitHandler传入我们的receive方法,并传入已推送到队列的有效负载。
import org.springframework.amqp.rabbit.annotation.RabbitHandler;
import org.springframework.amqp.rabbit.annotation.RabbitListener;

@RabbitListener(queues = "hello")
public class Tut1Receiver {
     @RabbitHandler
     public void receive(String in) {
            System.out.println(" [x] Received '" + in + "'");
     }
}
整体来看
该应用程序使用Spring Profiles来控制它正在运行的教程,以及它是Sender还是Receiver。 选择使用配置文件运行的教程。 例如:
- {tut1|hello-world},{sender|receiver}
- {tut2|work-queues},{sender|receiver}
- {tut3|pub-sub|publish-subscribe},{sender|receiver}
- {tut4|routing},{sender|receiver}
- {tut5|topics},{sender|receiver}
- {tut6|rpc},{client|server}
当我们逐步完成其他五个教程时,我们将回到此列表。
在使用maven构建之后,运行应用程序但是您希望运行启动应用程序(例如,从ide或命令行)。
我们将展示如何从命令行运行。
查看用法
java -jar RabbitMQ_0x01_SpringAMQP-0.0.1-SNAPSHOT.jar
启动生产者
java -jar RabbitMQ_0x01_SpringAMQP-0.0.1-SNAPSHOT --spring.profiles.active=hello-world,sender

启动消费者
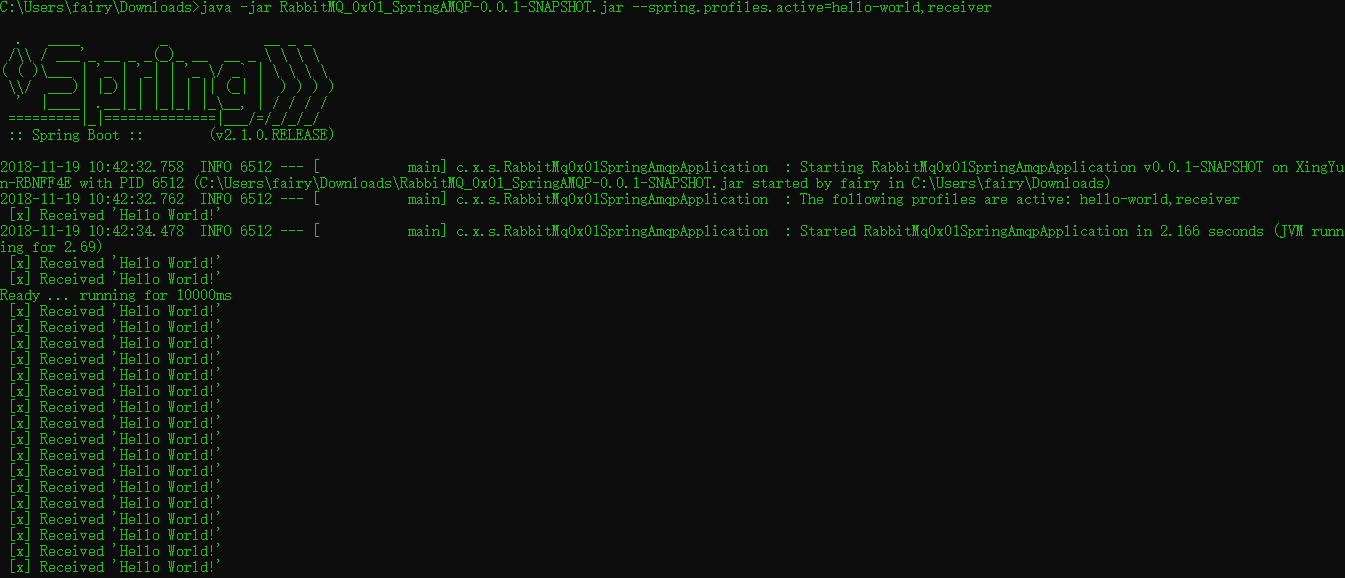
java -jar RabbitMQ_0x01_SpringAMQP-0.0.1-SNAPSHOT.jar --spring.profiles.active=hello-world,receiver
Listing queues 列出队列
您可能希望看到RabbitMQ有哪些队列以及它们中有多少消息。 您可以使用rabbitmqctl工具(作为特权用户)执行此操作:
sudo rabbitmqctl list_queues
在windows 电脑上去掉sudo
rabbitmqctl.bat list_queues
生产[非]适用性免责声明
请记住,这个和其他教程都是教程。 他们一次展示一个新概念,可能会故意过度简化某些事情而忽略其他事物。
例如,为了简洁起见,在很大程度上省略了诸如连接管理,错误处理,连接恢复,并发和度量收集之类的主题。 这种简化的代码不应被视为生产就绪。