房产地图google map的初步应用点滴.1)
房产地图google map的初步应用点滴.2)
房产地图google map的初步应用点滴.3)
本来是想将房产地图google map的应用记录一个系列,但继1)记录完之后总找不到时间继续记录下去,1)中主要解决了Google Maps JavaScript API V3 与 Google Local Search API两者由于版本问题带来的一系列麻烦,思路是使用一个iframe作为兼容的跳板,子页面应用Local Search API获得查询的result后返回给父页面,下面再记录一些地图坐标的定位和一些UI的组成。
效果可参考 http://xf.house.163.com/gz/map/00Xa.html
1.坐标定位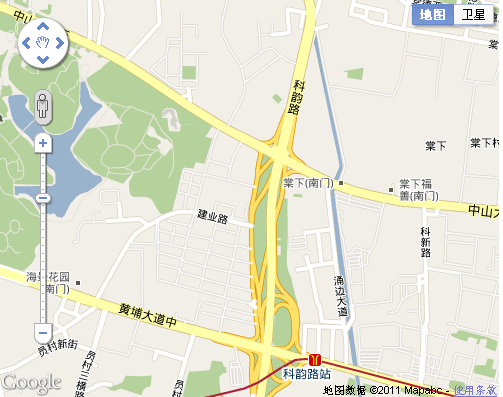
打开一个楼盘的地图,首先需要将此楼盘定位为此地图的中心点
<html xmlns="http://www.w3.org/1999/xhtml">
<head>
<meta http-equiv="content-type" content="text/html; charset=GBK"/>
<title></title>
<style type="text/css">
</style>
<script type="text/javascript" src="http://maps.google.com/maps/api/js?sensor=false"></script>
<script type="text/javascript">
var map;
var lat = 23.1257424;
var lng = 113.37404225;
function init() {
var mapDiv = document.getElementById('map-canvas');
map = new google.maps.Map(mapDiv, {
center: new google.maps.LatLng(lat,lng),
zoom: 15,
mapTypeId: google.maps.MapTypeId.ROADMAP
});
}
google.maps.event.addDomListener(window, 'load', init);
</script>
</head>
<body style="">
<div id="map-canvas" style=" 600px; height: 500px"></div>
</body>
</html>
这里要注意的是我们引进了http://maps.google.com/maps/api/js?sensor=false,这是google MAP API V3版本的连接点
创建了一个div <div id="map-canvas" style=" 600px; height: 500px"></div>作为地图的容器,然后对地图基本类Map进行创建
google.maps.Map 是google map的容器实现,在指定的 HTML 容器中创建新的地图,该容器通常是一个DIV元素
在初始化地图,还要创建一个地图的初始化变量,这些变量包括了上面的center,zoom,mapTypeId等等
google.maps.LatLng 是一个以纬度和经度表示的地理坐标点,在上面我们使用一个定义好的LatLng类确定了整个地图的中心点,其中lat 和 lng 分别为我们楼盘的经纬度值
zoom 为地图展开的级别
google.maps.MapTypeId.ROADMAP 是地图显示的类型,通常有ROADMAP,SATELLITE,TERRAIN等等,这里选择的ROADMAP类型是显示为普通的街道地图
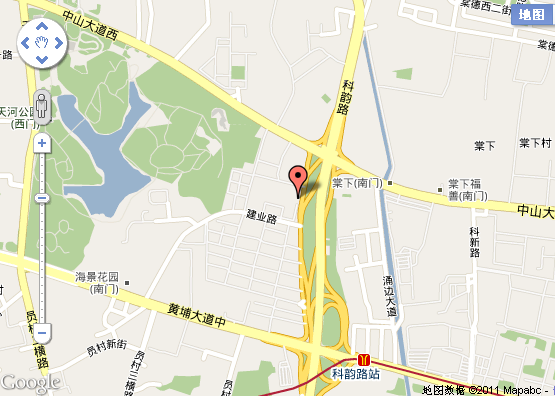
2.为定位的楼盘添加图标
在上面完成了将楼盘显示到整个地图的中心处,下面为该楼盘添加图标,给楼盘坐标的位置添加图标,实际上也就是在地图上添加一个叠加层,在google MAP API中拥有大量的实现类,如Marker,为我们上面的程序加多个Marker实现,楼盘的图标就可以显示出来
<!DOCTYPE html PUBLIC "-//W3C//DTD XHTML 1.0 Strict//EN" "http://www.w3.org/TR/xhtml1/DTD/xhtml1-strict.dtd">
<html xmlns="http://www.w3.org/1999/xhtml">
<head>
<meta http-equiv="content-type" content="text/html; charset=GBK"/>
<title></title>
<style type="text/css">
</style>
<script type="text/javascript" src="http://maps.google.com/maps/api/js?sensor=false"></script>
<script type="text/javascript">
var map;
var lat = 23.1257424;
var lng = 113.37404225;
function initialize() {
var mapDiv = document.getElementById('map-canvas');
map = new google.maps.Map(mapDiv, {
center: new google.maps.LatLng(lat,lng),
zoom: 15,
mapTypeId: google.maps.MapTypeId.ROADMAP
});
var marker = new google.maps.Marker({
position: new google.maps.LatLng(lat,lng),
map: map
});
}
google.maps.event.addDomListener(window, 'load', initialize);
</script>
</head>
<body style="">
<div id="map-canvas" style=" 600px; height: 500px"></div>
</body>
</html>
但是呢,这个图标并不是我们想要的,我们想要的是在此楼盘经纬度处放入自己的图片,设置是一段html的显示代码来组成自定义的叠加层,并且这个叠加层可以监听各种事件,可以对拖动地图的DOM元素中指定的地理位置像素坐标进行计算
<html xmlns="http://www.w3.org/1999/xhtml">
<head>
<meta http-equiv="content-type" content="text/html; charset=GBK"/>
<title></title>
<style type="text/css">
</style>
<script type="text/javascript" src="http://maps.google.com/maps/api/js?sensor=false"></script>
<script type="text/javascript">
var map;
var lat = 23.1257424;
var lng = 113.37404225;
function initialize() {
var mapDiv = document.getElementById('map-canvas');
map = new google.maps.Map(mapDiv, {
center: new google.maps.LatLng(lat,lng),
zoom: 15,
mapTypeId: google.maps.MapTypeId.ROADMAP
});
new CustomMarker(map.getCenter(), map);
}
function CustomMarker(latlng,map) {
this.latlng_ = latlng;
this.setMap(map);
}
//扩展自OverlayView;OverlayView扩展自MVCObject,实际上也扩展自MVCObject
CustomMarker.prototype = new google.maps.OverlayView();
CustomMarker.prototype.draw = function() {
var me = this;
var div = this.div_;
if (!div) {
div = this.div_ = document.createElement('DIV');
div.style.position = "absolute";
div.innerHTML = "<span><img src='http://gmaps-utility-library.googlecode.com/svn/trunk/markermanager/release/examples/images/house.png'/></span>";
//这个div的对象需要Listener事件,必须先用trigger(me)先进行侦听
google.maps.event.addDomListener(div, "click", function(event) {
google.maps.event.trigger(me, "click");
});
var panes = this.getPanes();
panes.overlayImage.appendChild(div);
}
CustomMarker.prototype.remove = function() {
if (this.div_) {
this.div_.parentNode.removeChild(this.div_);
this.div_ = null;
}
};
//获取Position
CustomMarker.prototype.getPosition = function() {
return this.latlng_;
};
}
google.maps.event.addDomListener(window, 'load', initialize);
</script>
</head>
<body style="">
<div id="map-canvas" style=" 500px; height: 400px"></div>
</body>
</html>
实现效果如下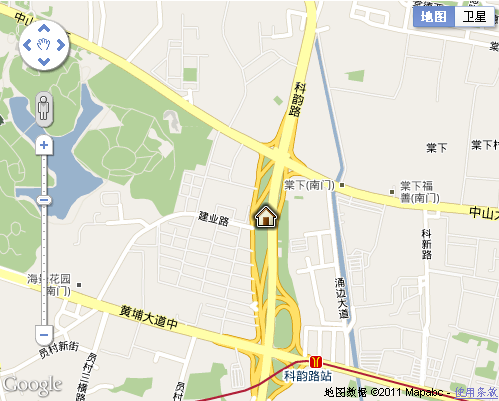
我们创建一个CustomMarker类,扩展自OverlayView;OverlayView扩展自MVCObject,实际上也扩展自MVCObject
这里需要详细说说OverlayView,我们继承了此类,方法是将叠加层的 prototype 设置为 new OverlayView.prototype。必须实现三个方法,即 onAdd()、draw() 和 onRemove()。在 add() 方法中,您应当创建 DOM 对象,并将其作为窗格的子对象附加。在 draw() 方法中,应放置这些元素。在 onRemove() 方法中,应将对象从 DOM 中删除。您必须调用包含有效地图对象的 setMap(),以触发对 onAdd() 方法和 setMap(null) 的调用,这样才能触发 onRemove() 方法。可以在构建叠加层时调用 setMap() 方法,也可以在需要重新显示已删除叠加层的任何时候调用该方法。每当地图属性更改时都会调用 draw() 方法,该方法可以更改元素的位置,如缩放、中心或地图类型。
把叠加层的绘图放在draw()方法中,我们再此方法中创建了一个DIV,并且使用innerHTML属性将要显示的html代码写回div中,并且如果需要对此属性加添加Listener事件时,则必须先使用trigger(me)先进行侦听,这样才能对外部的event事件进行反应,在构建完div后还需要获得panes窗口,panes包含渲染叠加层的 DOM 元素,作为显示此 OverlayView 的窗格,记住它是必须在draw 方法调用后才能实用。
onRemove() 实现此方法可将您的元素从 DOM 删除。调用 setMap(null) 之后立即调用此方法。
getProjection() 返回与相应 OverlayView 相关联的 MapCanvasProjection 对象。仅在调用 draw 函数后才可用
3.点击楼盘图标填出楼盘信息盒子
下面再需要实现的效果是点击刚才创建的楼盘图标,则弹出一个楼盘信息盒子
先上代码,再上效果图
<html xmlns="http://www.w3.org/1999/xhtml">
<head>
<meta http-equiv="content-type" content="text/html; charset=GBK"/>
<title></title>
<style type="text/css">
@import url("http://img1.cache.netease.com/cnews/css07/style.css");
@import url("http://img1.cache.netease.com/cnews/img09/channel_nav.css");
@import url("http://xf.house.163.com/product/css/ydmap.css");
</style>
<script type="text/javascript" src="http://maps.google.com/maps/api/js?sensor=false"></script>
<script type="text/javascript">
var map;
var lat = 23.1257424;
var lng = 113.37404225;
function initialize() {
var mapDiv = document.getElementById('map-canvas');
map = new google.maps.Map(mapDiv, {
center: new google.maps.LatLng(lat,lng),
zoom: 15,
mapTypeId: google.maps.MapTypeId.ROADMAP
});
var marker = new CustomMarker(map.getCenter(), map);
google.maps.event.addListener(marker, "click", function(e) {
var infoBox = new InfoBox({
latlng : marker.getPosition(),
map : map
});
});
}
function CustomMarker(latlng,map) {
this.latlng_ = latlng;
this.setMap(map);
}
//扩展自OverlayView;OverlayView扩展自MVCObject,实际上也扩展自MVCObject
CustomMarker.prototype = new google.maps.OverlayView();
CustomMarker.prototype.draw = function() {
var me = this;
var div = this.div_;
if (!div) {
div = this.div_ = document.createElement('DIV');
div.style.position = "absolute";
div.innerHTML = "<span><img src='http://gmaps-utility-library.googlecode.com/svn/trunk/markermanager/release/examples/images/house.png'/></span>";
//这个div的对象需要Listener事件,必须先用trigger(me)先进行侦听
google.maps.event.addDomListener(div, "click", function(event) {
google.maps.event.trigger(me, "click");
});
var panes = this.getPanes();
panes.overlayImage.appendChild(div);
}
//计算存放可拖动地图的 DOM 元素中指定地理位置的像素坐标
var point = this.getProjection().fromLatLngToDivPixel(this.latlng_);
//div的像素坐标
if (point) {
div.style.left = point.x + 'px';
div.style.top = point.y + 'px';
}
};
CustomMarker.prototype.remove = function() {
if (this.div_) {
this.div_.parentNode.removeChild(this.div_);
this.div_ = null;
}
};
//获取Position
CustomMarker.prototype.getPosition = function() {
return this.latlng_;
};
/*********************************************************************************************************************************************************
* InfoBox==楼盘icon点击后弹出的box窗口,继承OverlayView,
*/
function InfoBox(opts) {
google.maps.OverlayView.call(this);
this.latlng_ = opts.latlng;
this.map_ = opts.map;
this.offsetVertical_ = -260;
this.offsetHorizontal_ = -450;
//div偏移的像素
this.height_ = 260;
this.width_ = 460;
var me = this;
//监听bounds
this.boundsChangedListener_ = google.maps.event.addListener(this.map_,
"bounds_changed", function() {
return me.panMap.apply(me);
});
this.setMap(this.map_);
}
InfoBox.prototype = new google.maps.OverlayView();
//移除div
InfoBox.prototype.remove = function() {
if (this.div_) {
this.div_.parentNode.removeChild(this.div_);
this.div_ = null;
}
};
InfoBox.prototype.draw = function() {
// 创建element
this.createElement();
if (!this.div_)
return;
var pixPosition = this.getProjection().fromLatLngToDivPixel(this.latlng_);
if (!pixPosition)
return;
// top,left减去width,height达到右下角对齐的效果
this.div_.style.width = this.width_ + "px";
this.div_.style.left = (pixPosition.x + this.offsetHorizontal_ )+ "px";
this.div_.style.height = this.height_ + "px";
this.div_.style.top = (pixPosition.y + this.offsetVertical_ )+ "px";
this.div_.style.display = 'block';
};
InfoBox.prototype.createElement = function() {
//返回可在其中显示此 OverlayView 的窗格。仅在调用 draw 函数后才可用。
var panes = this.getPanes();
var div = this.div_;
if (!div) {
div = this.div_ = document.createElement("div");
var content = document.getElementById("houseInfoBox_template").value;
div.style.border = "0px none";
div.style.position = "absolute";
div.innerHTML = content;
panes.floatPane.appendChild(div);
this.panMap();
} else if (div.parentNode != panes.floatPane) {
// 如果panes发生变化,移除此div
div.parentNode.removeChild(div);
panes.floatPane.appendChild(div);
} else {
}
}
/*
* 对InfoBox的pan进行调整,调整到居中值减去偏移值,控制infobox的位置
*/
InfoBox.prototype.panMap = function() {
var map = this.map_;
//返回当前视口的纬度/经度范围。如果还未启动地图(即 mapType 仍为 Null),或者没有设置中心和缩放,则结果为 Null。
var bounds = map.getBounds();
if (!bounds)
return;
// InfoBox的位置
var position = this.latlng_;
// InfoBox的尺寸
var iwWidth = this.width_;
var iwHeight = this.height_;
// infobox位置和尺寸的抵消
var iwOffsetX = this.offsetHorizontal_;
var iwOffsetY = this.offsetVertical_;
var padX = 40;
var padY = 40;
// 像素的计算
var mapDiv = map.getDiv();
var mapWidth = mapDiv.offsetWidth;
var mapHeight = mapDiv.offsetHeight;
var boundsSpan = bounds.toSpan();////将指定的地图范围转换为纬度/经度跨度。
var longSpan = boundsSpan.lng();//
var latSpan = boundsSpan.lat();//纬度的地图跨度
var degPixelX = longSpan / mapWidth;
var degPixelY = latSpan / mapHeight;
// 地图界面跳动的定位
var mapWestLng = bounds.getSouthWest().lng();
var mapEastLng = bounds.getNorthEast().lng();
var mapNorthLat = bounds.getNorthEast().lat();
var mapSouthLat = bounds.getSouthWest().lat();
// infowindow的bounds
var iwWestLng = position.lng() + (iwOffsetX - padX) * degPixelX;
var iwEastLng = position.lng() + (iwOffsetX + iwWidth + padX) * degPixelX;
var iwNorthLat = position.lat() - (iwOffsetY - padY) * degPixelY;
var iwSouthLat = position.lat() - (iwOffsetY + iwHeight + padY) * degPixelY;
// 向居中的偏移计算
var shiftLng = (iwWestLng < mapWestLng ? mapWestLng - iwWestLng : 0) ;
var shiftLat = (iwNorthLat > mapNorthLat ? mapNorthLat - iwNorthLat : 0) ;
// 居中值
var center = map.getCenter();
// 居中值减去偏移值,得到infobox的位置
var centerX = center.lng() - shiftLng;
var centerY = center.lat() - shiftLat;
//***********************************************************
// 重新确定并显示楼盘为地图的中心点 ps:此处取消重新定位
map.setCenter(new google.maps.LatLng(centerY, centerX));
//***********************************************************
// 移除上面bounds监听值“this.boundsChangedListener_”
google.maps.event.removeListener(this.boundsChangedListener_);
this.boundsChangedListener_ = null;
};
google.maps.event.addDomListener(window, 'load', initialize);
</script>
</head>
<body style="">
<div id="map-canvas" style=" 600px; height: 400px"></div>
<textarea name="houseInfoBox_template" id="houseInfoBox_template">
<div class="houseInfoBox" style="460px;height:200px;">
<div class="boxc2"></div>
<div class="boxc1"></div>
<div class="boxc3"></div>
<div class="boxc5">
<div class="boxc4"></div>
<div class="houseDataMap">
<h2 class="title">房产地图</h2>
<div class="tabTilHouse">
<ul>
<li class="on">楼盘信息</li>
</ul>
</div>
<div class="datas">
<div class="infos">
<span class="equal">本月均价:<strong class="cDRed">¥1000</strong></span>
<span class="blank3"></span>
地址:广州广州广州广州广州广州广州<br />
电话:123123123123
<p class="about">简介简介简介简介简介简介简介简介简介简介简介简介简介简介简介简介简介简介简介简介简介简介 <span class="cDRed"><a href="">»查看详情</a></span></p>
</div>
<div class="prePic"><a href=""><img src="http://img2.cache.netease.com/photo/0087/2009-07-13/1247479037333.jpg" width="160" height="120" /></a></div>
</div>
</div>
<div class="boxc6"></div>
</div>
<div class="boxc7"></div>
<div class="boxc8"></div>
<div class="boxc9" ></div>
<span class="close" id="infohouse_close"></span>
</div>
</textarea>
</body>
</html>
下面是效果图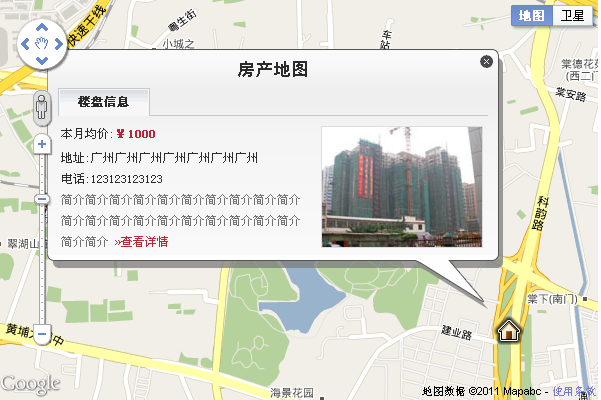
看似有点恐怖增加了很多代码,其实只是增加了一个InfoBox类,也是扩展自OverlayView,基本上实现的道理跟上面的CustomMarker一样,不过里面多了很多细节,最重要一点是div的偏移计算,因为这个box对应的方位是右下角,而div在定义时候与像素的对应点是在左上角,所以这里涉及到一个对InfoBox的pan进行调整,调整到居中值减去偏移值,控制infobox的位置,可见代码 InfoBox.prototype.panMap = function() {},当然啦,偏移值是跟你的div实际情况有关的,记住要将偏移像素值换算成地图的经纬度值,这部分计算的细节很多,要安装实际情况进行转换。
var marker = new CustomMarker(map.getCenter(), map);
google.maps.event.addListener(marker, "click", function(e) {
var infoBox = new InfoBox({
latlng : marker.getPosition(),
map : map
});
});
为楼盘图标添加一个addListener click事件,只要触动click就会相应new InfoBox,其实google的event非常多