新加一块硬盘,按照udev 服务命名规则,第二个被识别的SCSI 设备应该会被保存为/dev/sdb,
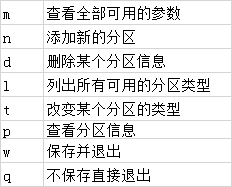
1.fdisk:管理磁盘分区,格式为“fdisk [磁盘名称]”
fdisk命令的参数是交互式的,可以根据需求动态调整。
举例:使用fdisk命令来管理dev/sdb1.看到提示信息后输入参数p 来查看硬盘设备内已有的分区信息,其中包括了硬盘的容量大小、扇区个数等信息:
[root@Centos ~]# fdisk /dev/sdb
Welcome to fdisk (util-linux 2.23.2).

Changes will remain in memory only, until you decide to write them.
Be careful before using the write command.


Command (m for help): p

Disk /dev/sdb: 21.5 GB, 21474836480 bytes, 41943040 sectors
Units = sectors of 1 * 512 = 512 bytes
Sector size (logical/physical): 512 bytes / 512 bytes
I/O size (minimum/optimal): 512 bytes / 512 bytes
Disk label type: dos
Disk identifier: 0xdb6e91a1

   Device Boot      Start         End      Blocks   Id  System
输入参数 n 尝试添加新的分区。系统会要求是选择继续输入参数p 来创建主分区,还是输入参数e 来创建扩展分区。这里输入参数p 来创建一个主分区:
在确认创建一个主分区后,系统要求先输入主分区的编号。主分区的编号范围是1~4,因此这里输入默认的1 就可以了。接下来系统会提示定义起始的扇区位置,这不需要改动,敲击回车键保留默认设置即可,系统会自动计算出最靠前的空闲扇区的位置。
最后,系统会要求定义分区的结束扇区位置,这其实就是要去定义整个分区的大小是多少。不用去计算扇区的个数,只需要输入+2G 即可创建出一个容量为2GB 的硬盘分区。
再次使用参数p 来查看硬盘设备中的分区信息。可以看到一个名称为/dev/sdb1、起始扇区位置为2048、结束扇区位置为4196351 的主分区了。敲击参数w 后回车,这样分区信息才是真正的写入成功。
Command (m for help): n
Partition type:
   p   primary (0 primary, 0 extended, 4 free)
   e   extended
Select (default p): p
Partition number (1-4, default 1):
First sector (2048-41943039, default 2048):
Using default value 2048
Last sector, +sectors or +size{K,M,G} (2048-41943039, default 41943039): +2G
Partition 1 of type Linux and of size 2 GiB is set

Command (m for help): p

Disk /dev/sdb: 21.5 GB, 21474836480 bytes, 41943040 sectors
Units = sectors of 1 * 512 = 512 bytes
Sector size (logical/physical): 512 bytes / 512 bytes
I/O size (minimum/optimal): 512 bytes / 512 bytes
Disk label type: dos
Disk identifier: 0xdb6e91a1

   Device Boot      Start         End      Blocks   Id  System
/dev/sdb1            2048     4196351     2097152   83  Linux

Command (m for help): w
The partition table has been altered!

Calling ioctl() to re-read partition table.
Syncing disks.
在上述步骤执行完毕之后,Linux 系统会自动把这个硬盘主分区抽象成/dev/sdb1 设备文件。可以使用file 命令查看该文件的属性,有些时候系统并没有自动把分区信息同步给Linux 内核,而且这种情况似乎还比较常见(但不能算作是严重的bug)。
我们可以输入partprobe 命令手动将分区信息同步到内核,而且一般推荐连续两次执行该命令,效果会更好。如果使用这个命令都无法解决问题,那么就重启计算机吧,这个杀手锏百试百灵。。。
删除分区:
[root@Centos ~]# fdisk /dev/sdb
Welcome to fdisk (util-linux 2.23.2).

Changes will remain in memory only, until you decide to write them.
Be careful before using the write command.


Command (m for help): p

Disk /dev/sdb: 21.5 GB, 21474836480 bytes, 41943040 sectors
Units = sectors of 1 * 512 = 512 bytes
Sector size (logical/physical): 512 bytes / 512 bytes
I/O size (minimum/optimal): 512 bytes / 512 bytes
Disk label type: dos
Disk identifier: 0xdb6e91a1

   Device Boot      Start         End      Blocks   Id  System
/dev/sdb1            2048     4196351     2097152   83  Linux

Command (m for help): d
Selected partition 1
Partition 1 is deleted

Command (m for help): w
The partition table has been altered!

Calling ioctl() to re-read partition table.
Syncing disks.
[root@Centos ~]# fdisk /dev/sdb
Welcome to fdisk (util-linux 2.23.2).

Changes will remain in memory only, until you decide to write them.
Be careful before using the write command.


Command (m for help): p

Disk /dev/sdb: 21.5 GB, 21474836480 bytes, 41943040 sectors
Units = sectors of 1 * 512 = 512 bytes
Sector size (logical/physical): 512 bytes / 512 bytes
I/O size (minimum/optimal): 512 bytes / 512 bytes
Disk label type: dos
Disk identifier: 0xdb6e91a1

   Device Boot      Start         End      Blocks   Id  System
如果硬件存储设备没有进行格式化,则Linux 系统无法得知怎么在其上写入数据。因此,在对存储设备进行分区后还需要进行格式化操作。
2.mkfs:格式化
在Shell 终端中输入mkfs 名后再敲击两下用于补齐命令的Tab,会有如下所示的效果
[root@Centos ~]# mkfs
mkfs         mkfs.cramfs  mkfs.ext3    mkfs.fat     mkfs.msdos   mkfs.xfs
mkfs.btrfs   mkfs.ext2    mkfs.ext4    mkfs.minix   mkfs.vfat
mkfs 命令地把常用的文件系统名称用后缀的方式保存成了多个命令文件,用起来也非常简单—mkfs.文件类型名称。
[root@Centos ~]# mkfs.xfs /dev/sdb1
mkfs.xfs: /dev/sdb1 appears to contain a partition table (dos).
mkfs.xfs: Use the -f option to force overwrite.
[root@Centos ~]#
[root@Centos ~]# mkfs.xfs -f /dev/sdb1
meta-data=/dev/sdb1              isize=512    agcount=4, agsize=131072 blks
         =                       sectsz=512   attr=2, projid32bit=1
         =                       crc=1        finobt=0, sparse=0
data     =                       bsize=4096   blocks=524288, imaxpct=25
         =                       sunit=0      swidth=0 blks
naming   =version 2              bsize=4096   ascii-ci=0 ftype=1
log      =internal log           bsize=4096   blocks=2560, version=2
         =                       sectsz=512   sunit=0 blks, lazy-count=1
realtime =none                   extsz=4096   blocks=0, rtextents=0
上述完成了存储设备的分区和格式化操作,挂载后即可使用:首先是创建一个用于挂载设备的挂载点目录;然后使用mount 命令将存储设备与挂载点进行关联;最后使用df -h 命令来查看挂载状态和硬盘使用量信息。
[root@Centos ~]# mkdir /netFS
[root@Centos ~]# mount /dev/sdb1 /netFS/
[root@Centos ~]# df -h
Filesystem                      Size  Used Avail Use% Mounted on
/dev/mapper/centos_centos-root   17G  4.3G   13G  25% /
devtmpfs                        897M     0  897M   0% /dev
tmpfs                           912M     0  912M   0% /dev/shm
tmpfs                           912M  8.9M  903M   1% /run
tmpfs                           912M     0  912M   0% /sys/fs/cgroup
/dev/sda1                      1014M  179M  836M  18% /boot
tmpfs                           183M   12K  183M   1% /run/user/42
tmpfs                           183M     0  183M   0% /run/user/0
/dev/sdb1                       2.0G   33M  2.0G   2% /netFS
把挂载信息写入配置文件:
[root@Centos ~]# vim /etc/fstab
...
/dev/sdb1  /newFS  xfs  default  0  0
3.存储设备顺利挂载后,接下来就可以尝试通过挂载点目录向存储设备中写入文件了。
du:查看文件数据占用量的,其格式为“du [选项][文件]”。简单来说,该命令就是用来查看一个或多个文件占用了多大的硬盘空间。
还可以使用du -sh /*命令来查看在Linux 系统根目录下所有一级目录分别占用的空间大小。
举例:先从某些目录中复制过来一批文件,然后查看这些文件总共占用了多大的容量:
[root@Centos ~]# cp -rf /etc/* /netFS/
[root@Centos ~]# ls /netFS/
abrt                        gconf                     mcelog             rpc
adjtime                     gcrypt                    mke2fs.conf        rpm
... ...
root@Centos ~]# du -sh /netFS/
40M    /netFS/