一 Spring框架的目的
不用Spring,用Struts2和Hibernate也可以做项目,Spring只是改善架构的框架。
思考:Spring怎么解决架构性的问题?怎么让架构变得更好?
Spring是一个基于core(Ioc容器)来架构多层JavaEE系统的框架,他的主要目的是简化企业开发
Spring是一种非侵入式的方式来管理你的代码。Spring提倡“最少侵入”。这也意味着你可以适当的时候安装或卸载Spring。
你不需要知道Spring的API,只是需要了解Spring启动的api,其他的根本不用涉及。
二 Spring IOC
Spring的控制反转:把对象的创建,初始化,销毁等工作交给spring容器来做,由spring容器控制对象的生命周期。
好处:让程序员把关注点不在放在对象创建与销毁上,把注意力转移到业务逻辑开发上。
三 Spring的第一个案例
使用Spring-framework-2.5.6的版本,之所以用2.5因为只需要导入一个jar包,随着版本越高,需要的版本的越高
(1)导入jar包
1. spring.jar
2. commons-logging-1.1.3.jar
(2)创建HelloWorld类


public class HelloWorld {
    public void hello(){
        System.out.println("hello world !");
    }
}
(3)根目录下创建配置文件
名字为:applicationContext.xml
格式为:
<?xml version="1.0" encoding="UTF-8"?>
<beans xmlns="http://www.springframework.org/schema/beans"
       xmlns:xsi="http://www.w3.org/2001/XMLSchema-instance"
       xsi:schemaLocation="http://www.springframework.org/schema/beans
           http://www.springframework.org/schema/beans/spring-beans-2.5.xsd">
    <!--
        把一个类放入到spring容器中,就是一个bean
        id:唯一标识
        class:完整类名
     -->
     <bean id="helloWorld" class="spring.createObject.HelloWorld">
     </bean>
</beans>
(4)使用
    @Test
    public void test_hello(){
        /**
         * ApplicationContext就是spring的总容器
         */
        ApplicationContext context=new ClassPathXmlApplicationContext("applicationContext.xml"); //启动spring容器
        HelloWorld helloWorld=(HelloWorld)context.getBean("helloWorld");
        helloWorld.hello();
    }
ApplicationContext就是Spring的总容器,ApplicationContext是一个接口
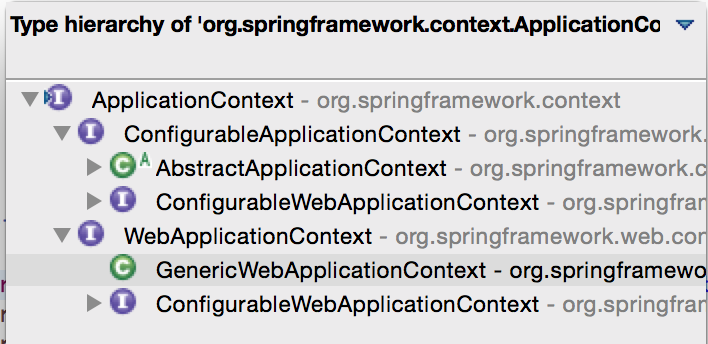
ConfigurableApplicationContext:
可配置容器,在单元测试的时候使用,我们上述的ClassPathXmlApplicationContext就是其的实现类的子类
WebApplicationContext:
web容器,在整合三大框架的使用
总结:通过这个例子,我看到Spring容器帮我们创建了对象,我们只需要通过id这个唯一标识就可以获得对象
四 Spring对象的创建方式
Spring对象创建方式有三种:
方式一:默认构造函数创建对象
验证:给Student类的默认构造函数添加了一句话
使用:
(1)在配置文件中这样使用
<bean id="student" class="spring.domain.Student"></bean>
(2) 使用
        ApplicationContext context=new ClassPathXmlApplicationContext("applicationContext.xml"); //启动spring容器
        Student student=(Student)context.getBean("student");
        student.say();
(3)控制台输出
    Student类的默认构造函数被调用了
    我是student
方式二:静态工厂
使用:
(1) 创建静态工厂类
public class StudentFactory {
    public static Student getStudent(){
        return new Student();
    }
}
(2) 修改配置文件
<bean id="studentFactory" class="spring.method.factory.StudentFactory" factory-method="getStudent"></bean>
方式三:实例工厂
实例工厂解释:
设计模式-工厂模式有两种:
(1)简单工厂
封装new方法,并且这方法是静态的
(2)抽象工厂
针对不同的实例,需要不同的实例工厂
(1) 创建实例工厂
public class StudentFactory {
    public Student getStudent(){
        return new Student();
    }
}
(2) 修改配置文件
   <bean id="factory" class="spring.method.factory.StudentFactory"></bean>
    <bean id="studentFactory" factory-bean="factory" factory-method="getStudent"></bean>
五。alias 别名
    <bean id="factory" class="spring.method.factory.StudentFactory"></bean>
        <!-- 给唯一标识符 再起一个名字,可以有多个名字-->
    <alias name="factory" alias="sf"/>
    <bean id="studentFactory" factory-bean="sf" factory-method="getStudent"></bean>
六。Spring创建对象的时机
两个时机创建对象:
(一)启动Spring容器的时候
条件:默认值
优点:
在spring容器启动的时候创建对象,所以只要配置文件书写错误,在启动的时候就能发现错误
(二) getBean的时候
条件:lazy-init 属性
修改配置文件:
<bean id="helloWorld2" class="spring.createObject.HelloWorld" lazy-init="true">
</bean>
七。Spring创建的对象是单例的还是多例的
证明:看对象的hashCode码。
结论:在Spring容器中的对象,默认是单例的
单例需要注意的问题:
线程安全问题: 如果在类上声明属性,该属性中含有数据,该属性将是全局的
-
让Spring容器中的对象,变成多例
<bean id="helloWorld2" class="spring.createObject.HelloWorld" scope="prototype">
多例需要注意的问题:
对象的创建时机问题:无论lazy-init是false还是true,在getBean()的时候创建对象(意味着自动让lazy-init="true")
注意:action是多例的。将来strus2和spring整合时,让spring创建action。则需要使用scope="prototype"。
八。对象的init和destroy时机
(1)给对象添加init和destroy方法
public class Student {
    private Integer id;
    private String name;

    public void init(){
        System.out.println("student对象Init");
    }
    public void destory(){
        System.out.println("student对象destroy");
    }
    public Student(){
        System.out.println("Student类的默认构造函数被调用了");
    }
    public void say(){
        System.out.println("我是student");
    }
        generator getter and setter
}
(2)修改配置文件
    <bean id="student" class="spring.domain.Student" lazy-init="true" scope="prototype"
    init-method="init" destroy-method="destroy"></bean>
(3)使用
        ApplicationContext context=new ClassPathXmlApplicationContext("applicationContext.xml"); //启动spring容器
        Student student=(Student)context.getBean("student");
        System.out.println(student);
        student.say();
(4)看控制台输出
Student类的默认构造函数被调用了
student对象Init
spring.domain.Student@7ebc7f3f
我是student
结论:
没有输出destroy方法,我们需要手动关闭spring容器
在构函数之后,立刻执行init方法(有很大用途)
spring容器执行了close方法之前,执行destroy方法
九。Spring流程
1.创建一个Spring容器对象
2.默认情况,调用构造函数。创建Spring容器中的对象
ps:该对象是单例的,且lazy-init不能为true
3.创建完对象后,执行对象的init方法
4.利用context.getBean(...)得到一个对象。
ps,在调用方法中,如该实例被设置了多例,或者lazy-init为true的情况下,则创建对象
5.对象调用业务逻辑方法
6。在Spring容器关闭之前,执行destroy方法
十。DI(依赖注入)
解释DI:给属性赋值
所谓的给属性赋值,就是给以下这些Hibernate类型数据赋值,在Hibernate中只有引用类型和基本类型两种
private Long pid;
private String name;
private Student student //引用类型
private List list;
private Set set;
private Map map;
private Property property; //枚举是一个引用
private Object[] object;
两种情况下给属性赋值:
情况一:xml
两种方法给属性赋值(专业术语:装配)
方法一:setter
前提:要有默认构造函数
基本类型用value,引用类型用ref。分别赋值。
    <bean id="student" class="spring.domain.Student" lazy-init="false">
        <property name="id" value="1"></property>
        <property name="name" value="小明"></property>
    </bean>
    <bean id="person" class="spring.domain.Person">
        <property name="student" ref="student"></property>
    </bean>
其中引用类型赋值还可以这样写(标准)
    <bean id="person" class="spring.domain.Person">
        <property name="student">
             <ref bean="student"/>
         </property>
    </bean>
方法二:构造函数
(1)增加构造函数
    public Student(String name){
        this.name=name;
    }
(2)修改配置文件
    <bean id="student" class="spring.domain.Student" lazy-init="false">
        <property name="id" value="1"></property>
        <!--
            <constructor-arg>指的是构造器中的参数
                index角标 从0开始
                value
                ref
         -->
        <constructor-arg index="0" value="构造器给我的名字"></constructor-arg>
    </bean>
情况二: 注解引用类型
注解一:使用@Resource注解(@Resource是java的,下面的例子都是该注解)
注解二:使用@Autowired(按照类型匹配)
使用@Qualifier(按照名称匹配)
我们使用注解一@Resource的方式:
1. 注解引用类型属性:
class Person(
  @Resource
    private Student student;
    ...
}
配置文件长这样:
    <bean id="student" class="spring.domain.Student">
    </bean>
    <bean id="person" class="spring.domain.Person">
    </bean>
我们这样使用,
        ApplicationContext context=new ClassPathXmlApplicationContext("applicationContext.xml"); //启动spring容器
        Person x=(Person)context.getBean("person");
        x.getStudent().say();
        ClassPathXmlApplicationContext classPathXmlApplicationContext=(ClassPathXmlApplicationContext)context;
        classPathXmlApplicationContext.close();
【结论】:这样子注解属性,我们获得了student实例。
【Spring注解属性的原理】
1 当Spring容器启动的时候,创建bean对象
2 当Spring容器解析到<context:annotation-config></context:annotation-config>
Spring容器会在Spring容器管理的bean范围内查找这些类的属性上面是否加了@Resource注解
3 Spring解析到@Resource注解的name属性
如果name属性为“”(默认为“”)
Spring容器会得到该注解所在的属性的名称和spring容器中的id做匹配。
如果匹配成功,则赋值。
如果匹配不成功,则按类型进行匹配
如果name属性的值不为“”
按照name属性和spring容器中的id属性进行匹配
如果匹配成功,则赋值
不成功,则报错
说明:
注解只能用于引用类型
注解写法比较简单,但是效率比较低
xml写法比较复杂,效率比较高
十一。IOC和DI结合的意义-Java代码段完全的面向接口编程
我们之前使用Dao的时候,通常这样用Dao dap=new StudentDaoImpl()。针对不同的表new不同的Dao。操作的是使用Dao接口中的方法,这是不完全的面向接口编程。因为我们是手动new的方法(硬编码)来给Dao赋值的,
现在我们用iod和di。可以写一个bean,来实现完全的面向接口编程
十二。Spring容器的继承
案例:XianStudent继承了Student。Student中有name属性和getter和setter方法
情形一:
    <bean id="xian" class="spring.domain.XianStudent">
        <property name="name" value="ahahaha"></property>
    </bean>
控制台输出
父类构造方法
ahahaha
情形二:
    <bean id="xian" class="spring.domain.XianStudent">
        <constructor-arg index="0" value="西西奥明"></constructor-arg>
    </bean>
控制台输出:
西西奥明
情形三:(标准)
     <bean id="student" class="spring.domain.Student">
         <property name="name" value="小明"></property>
    </bean>
    <bean id="xian" class="spring.domain.XianStudent" parent="student">
    </bean>
十三。注解类@Component
(1)用Component注解类
@Component
public class Person {
    @Resource
    private Student student;
        。。。。
}
(2)修改配置文件
只用写下面一句话,其他都不用写
<context:component-scan base-package="spring.domain"></context:component-scan>
【Spring类扫描原理】
1.启动Spring容器,Spring容器解析配置文件,
2.当解析到<context:component-scan base-package=".."></context:..>
就会在base-package指定的包及子包中扫描所有的类,看哪些类上面有@Component注解
3.如果有该注解,则有如下的规则
@Component
public class DaoImpl(){}
翻译为如下:
<bean id="daoImpl" class="..."></bean>
@Component("daoImpl2")
public class DaoImpl{}
<bean id="daoImpl2" class=".."/>
4.按照@Resource注解的规则进行赋值