前面吹水原理吹了一篇幅了,现在讲解下应用篇幅,前面说过,如果要用SpringSecurity的话要先导入一个包
        <dependency>
            <groupId>org.springframework.boot</groupId>
            <artifactId>spring-boot-starter-security</artifactId>
        </dependency>
        <dependency>
            <groupId>org.springframework.boot</groupId>
            <artifactId>spring-boot-starter-web</artifactId>
        </dependency>
如果要更改默认的帐号密码的话就配置如下
spring.security.user.name=admin
spring.security.user.password=admin
一、修改默认配置
通过前面的分析知道了修改默认一个是在配置文件中修改,另一个是自定义SpringSecurity配置类,重写配置类方法
import org.springframework.context.annotation.Configuration;
import org.springframework.security.config.annotation.authentication.builders.AuthenticationManagerBuilder;
import org.springframework.security.config.annotation.web.builders.HttpSecurity;
import org.springframework.security.config.annotation.web.configuration.WebSecurityConfigurerAdapter;

@Configuration
public class WebSecurityConfig extends WebSecurityConfigurerAdapter {


    @Override
    protected void configure(AuthenticationManagerBuilder auth) throws Exception {
         auth.inMemoryAuthentication()
                .withUser("admin")
                .password("{noop}admin")//不加密
                .authorities("ADMIN");

    }
    //自定义过滤器链
    @Override
    protected void configure(HttpSecurity httpSecurity) throws Exception {
        //使用默认的过滤器链
        super.configure(httpSecurity);
    }

}
上面的配置虽然达到了修改帐号密码及权限的目的,但是有一个问题,那就是现在一切都是写死的,而在真实环境中这些数据来源都是数据库,所以如果想要了解怎么从数据库中动态获取用户信息,那就要先从认证的源码进行分析起,有上篇的原码篇说明,可以很清楚的知道认证的过滤器是UsernamePasswordAuthenticationFilter类,从下面源码可以看到默认的表单传递过来帐号密码这里都有接收,这个认证的过滤器他继承了AbstractAuthenticationProcessingFilter这个过滤器
public class UsernamePasswordAuthenticationFilter extends
        AbstractAuthenticationProcessingFilter {
    // ~ Static fields/initializers
    // =====================================================================================

    public static final String SPRING_SECURITY_FORM_USERNAME_KEY = "username";
    public static final String SPRING_SECURITY_FORM_PASSWORD_KEY = "password";

    private String usernameParameter = SPRING_SECURITY_FORM_USERNAME_KEY;
    private String passwordParameter = SPRING_SECURITY_FORM_PASSWORD_KEY;
    private boolean postOnly = true;

    // ~ Constructors
    // ===================================================================================================

    public UsernamePasswordAuthenticationFilter() {
        super(new AntPathRequestMatcher("/login", "POST"));
    }

    // ~ Methods
    // ========================================================================================================

    public Authentication attemptAuthentication(HttpServletRequest request,
            HttpServletResponse response) throws AuthenticationException {
        if (postOnly && !request.getMethod().equals("POST")) {
            throw new AuthenticationServiceException(
                    "Authentication method not supported: " + request.getMethod());
        }

        String username = obtainUsername(request);
        String password = obtainPassword(request);

        if (username == null) {
            username = "";
        }

        if (password == null) {
            password = "";
        }

        username = username.trim();

        UsernamePasswordAuthenticationToken authRequest = new UsernamePasswordAuthenticationToken(
                username, password);

        // Allow subclasses to set the "details" property
        setDetails(request, authRequest);

        return this.getAuthenticationManager().authenticate(authRequest);
    }

    /**
     * Enables subclasses to override the composition of the password, such as by
     * including additional values and a separator.
     * <p>
     * This might be used for example if a postcode/zipcode was required in addition to
     * the password. A delimiter such as a pipe (|) should be used to separate the
     * password and extended value(s). The <code>AuthenticationDao</code> will need to
     * generate the expected password in a corresponding manner.
     * </p>
     *
     * @param request so that request attributes can be retrieved
     *
     * @return the password that will be presented in the <code>Authentication</code>
     * request token to the <code>AuthenticationManager</code>
     */
    @Nullable
    protected String obtainPassword(HttpServletRequest request) {
        return request.getParameter(passwordParameter);
    }

    /**
     * Enables subclasses to override the composition of the username, such as by
     * including additional values and a separator.
     *
     * @param request so that request attributes can be retrieved
     *
     * @return the username that will be presented in the <code>Authentication</code>
     * request token to the <code>AuthenticationManager</code>
     */
    @Nullable
    protected String obtainUsername(HttpServletRequest request) {
        return request.getParameter(usernameParameter);
    }

    /**
     * Provided so that subclasses may configure what is put into the authentication
     * request's details property.
     *
     * @param request that an authentication request is being created for
     * @param authRequest the authentication request object that should have its details
     * set
     */
    protected void setDetails(HttpServletRequest request,
            UsernamePasswordAuthenticationToken authRequest) {
        authRequest.setDetails(authenticationDetailsSource.buildDetails(request));
    }

    /**
     * Sets the parameter name which will be used to obtain the username from the login
     * request.
     *
     * @param usernameParameter the parameter name. Defaults to "username".
     */
    public void setUsernameParameter(String usernameParameter) {
        Assert.hasText(usernameParameter, "Username parameter must not be empty or null");
        this.usernameParameter = usernameParameter;
    }

    /**
     * Sets the parameter name which will be used to obtain the password from the login
     * request..
     *
     * @param passwordParameter the parameter name. Defaults to "password".
     */
    public void setPasswordParameter(String passwordParameter) {
        Assert.hasText(passwordParameter, "Password parameter must not be empty or null");
        this.passwordParameter = passwordParameter;
    }

    /**
     * Defines whether only HTTP POST requests will be allowed by this filter. If set to
     * true, and an authentication request is received which is not a POST request, an
     * exception will be raised immediately and authentication will not be attempted. The
     * <tt>unsuccessfulAuthentication()</tt> method will be called as if handling a failed
     * authentication.
     * <p>
     * Defaults to <tt>true</tt> but may be overridden by subclasses.
     */
    public void setPostOnly(boolean postOnly) {
        this.postOnly = postOnly;
    }

    public final String getUsernameParameter() {
        return usernameParameter;
    }

    public final String getPasswordParameter() {
        return passwordParameter;
    }
}
进入AbstractAuthenticationProcessingFilter过滤器;里面有个doFilter方法,具体的就看这个方法
public abstract class AbstractAuthenticationProcessingFilter extends GenericFilterBean
        implements ApplicationEventPublisherAware, MessageSourceAware {
    // ~ Static fields/initializers
    // =====================================================================================

    // ~ Instance fields
    // ================================================================================================

    protected ApplicationEventPublisher eventPublisher;
    protected AuthenticationDetailsSource<HttpServletRequest, ?> authenticationDetailsSource = new WebAuthenticationDetailsSource();
    private AuthenticationManager authenticationManager;
    protected MessageSourceAccessor messages = SpringSecurityMessageSource.getAccessor();
    private RememberMeServices rememberMeServices = new NullRememberMeServices();

    private RequestMatcher requiresAuthenticationRequestMatcher;

    private boolean continueChainBeforeSuccessfulAuthentication = false;

    private SessionAuthenticationStrategy sessionStrategy = new NullAuthenticatedSessionStrategy();

    private boolean allowSessionCreation = true;

    private AuthenticationSuccessHandler successHandler = new SavedRequestAwareAuthenticationSuccessHandler();
    private AuthenticationFailureHandler failureHandler = new SimpleUrlAuthenticationFailureHandler();

    // ~ Constructors
    // ===================================================================================================

    /**
     * @param defaultFilterProcessesUrl the default value for <tt>filterProcessesUrl</tt>.
     */
    protected AbstractAuthenticationProcessingFilter(String defaultFilterProcessesUrl) {
        setFilterProcessesUrl(defaultFilterProcessesUrl);
    }

    /**
     * Creates a new instance
     *
     * @param requiresAuthenticationRequestMatcher the {@link RequestMatcher} used to
     * determine if authentication is required. Cannot be null.
     */
    protected AbstractAuthenticationProcessingFilter(
            RequestMatcher requiresAuthenticationRequestMatcher) {
        Assert.notNull(requiresAuthenticationRequestMatcher,
                "requiresAuthenticationRequestMatcher cannot be null");
        this.requiresAuthenticationRequestMatcher = requiresAuthenticationRequestMatcher;
    }

    // ~ Methods
    // ========================================================================================================

    @Override
    public void afterPropertiesSet() {
        Assert.notNull(authenticationManager, "authenticationManager must be specified");
    }

    /**
     * Invokes the
     * {@link #requiresAuthentication(HttpServletRequest, HttpServletResponse)
     * requiresAuthentication} method to determine whether the request is for
     * authentication and should be handled by this filter. If it is an authentication
     * request, the
     * {@link #attemptAuthentication(HttpServletRequest, HttpServletResponse)
     * attemptAuthentication} will be invoked to perform the authentication. There are
     * then three possible outcomes:
     * <ol>
     * <li>An <tt>Authentication</tt> object is returned. The configured
     * {@link SessionAuthenticationStrategy} will be invoked (to handle any
     * session-related behaviour such as creating a new session to protect against
     * session-fixation attacks) followed by the invocation of
     * {@link #successfulAuthentication(HttpServletRequest, HttpServletResponse, FilterChain, Authentication)}
     * method</li>
     * <li>An <tt>AuthenticationException</tt> occurs during authentication. The
     * {@link #unsuccessfulAuthentication(HttpServletRequest, HttpServletResponse, AuthenticationException)
     * unsuccessfulAuthentication} method will be invoked</li>
     * <li>Null is returned, indicating that the authentication process is incomplete. The
     * method will then return immediately, assuming that the subclass has done any
     * necessary work (such as redirects) to continue the authentication process. The
     * assumption is that a later request will be received by this method where the
     * returned <tt>Authentication</tt> object is not null.
     * </ol>
     */
    public void doFilter(ServletRequest req, ServletResponse res, FilterChain chain)
            throws IOException, ServletException {

        HttpServletRequest request = (HttpServletRequest) req;
        HttpServletResponse response = (HttpServletResponse) res;

        if (!requiresAuthentication(request, response)) {
            chain.doFilter(request, response);

            return;
        }

        if (logger.isDebugEnabled()) {
            logger.debug("Request is to process authentication");
        }

        Authentication authResult;

        try {
           //attemptAuthentication是过滤认证信息的,这个方法是上层的抽象方法,是交给子类去实现的
            authResult = attemptAuthentication(request, response);
            if (authResult == null) {
                // return immediately as subclass has indicated that it hasn't completed
                // authentication
                return;
            }
            sessionStrategy.onAuthentication(authResult, request, response);
        }
        catch (InternalAuthenticationServiceException failed) {
            logger.error(
                    "An internal error occurred while trying to authenticate the user.",
                    failed);
            unsuccessfulAuthentication(request, response, failed);

            return;
        }
        catch (AuthenticationException failed) {
            // Authentication failed
            unsuccessfulAuthentication(request, response, failed);

            return;
        }

        // Authentication success
        if (continueChainBeforeSuccessfulAuthentication) {
            chain.doFilter(request, response);
        }

        successfulAuthentication(request, response, chain, authResult);
    }

    /**
     * Indicates whether this filter should attempt to process a login request for the
     * current invocation.
     * <p>
     * It strips any parameters from the "path" section of the request URL (such as the
     * jsessionid parameter in <em>https://host/myapp/index.html;jsessionid=blah</em>)
     * before matching against the <code>filterProcessesUrl</code> property.
     * <p>
     * Subclasses may override for special requirements, such as Tapestry integration.
     *
     * @return <code>true</code> if the filter should attempt authentication,
     * <code>false</code> otherwise.
     */
    protected boolean requiresAuthentication(HttpServletRequest request,
            HttpServletResponse response) {
        return requiresAuthenticationRequestMatcher.matches(request);
    }

    /**
     * Performs actual authentication.
     * <p>
     * The implementation should do one of the following:
     * <ol>
     * <li>Return a populated authentication token for the authenticated user, indicating
     * successful authentication</li>
     * <li>Return null, indicating that the authentication process is still in progress.
     * Before returning, the implementation should perform any additional work required to
     * complete the process.</li>
     * <li>Throw an <tt>AuthenticationException</tt> if the authentication process fails</li>
     * </ol>
     *
     * @param request from which to extract parameters and perform the authentication
     * @param response the response, which may be needed if the implementation has to do a
     * redirect as part of a multi-stage authentication process (such as OpenID).
     *
     * @return the authenticated user token, or null if authentication is incomplete.
     *
     * @throws AuthenticationException if authentication fails.
     */
    public abstract Authentication attemptAuthentication(HttpServletRequest request,
            HttpServletResponse response) throws AuthenticationException, IOException,
            ServletException;

    /**
     * Default behaviour for successful authentication.
     * <ol>
     * <li>Sets the successful <tt>Authentication</tt> object on the
     * {@link SecurityContextHolder}</li>
     * <li>Informs the configured <tt>RememberMeServices</tt> of the successful login</li>
     * <li>Fires an {@link InteractiveAuthenticationSuccessEvent} via the configured
     * <tt>ApplicationEventPublisher</tt></li>
     * <li>Delegates additional behaviour to the {@link AuthenticationSuccessHandler}.</li>
     * </ol>
     *
     * Subclasses can override this method to continue the {@link FilterChain} after
     * successful authentication.
     * @param request
     * @param response
     * @param chain
     * @param authResult the object returned from the <tt>attemptAuthentication</tt>
     * method.
     * @throws IOException
     * @throws ServletException
     */
    protected void successfulAuthentication(HttpServletRequest request,
            HttpServletResponse response, FilterChain chain, Authentication authResult)
            throws IOException, ServletException {

        if (logger.isDebugEnabled()) {
            logger.debug("Authentication success. Updating SecurityContextHolder to contain: "
                    + authResult);
        }

        SecurityContextHolder.getContext().setAuthentication(authResult);

        rememberMeServices.loginSuccess(request, response, authResult);

        // Fire event
        if (this.eventPublisher != null) {
            eventPublisher.publishEvent(new InteractiveAuthenticationSuccessEvent(
                    authResult, this.getClass()));
        }

        successHandler.onAuthenticationSuccess(request, response, authResult);
    }

    /**
     * Default behaviour for unsuccessful authentication.
     * <ol>
     * <li>Clears the {@link SecurityContextHolder}</li>
     * <li>Stores the exception in the session (if it exists or
     * <tt>allowSesssionCreation</tt> is set to <tt>true</tt>)</li>
     * <li>Informs the configured <tt>RememberMeServices</tt> of the failed login</li>
     * <li>Delegates additional behaviour to the {@link AuthenticationFailureHandler}.</li>
     * </ol>
     */
    protected void unsuccessfulAuthentication(HttpServletRequest request,
            HttpServletResponse response, AuthenticationException failed)
            throws IOException, ServletException {
        SecurityContextHolder.clearContext();

        if (logger.isDebugEnabled()) {
            logger.debug("Authentication request failed: " + failed.toString(), failed);
            logger.debug("Updated SecurityContextHolder to contain null Authentication");
            logger.debug("Delegating to authentication failure handler " + failureHandler);
        }

        rememberMeServices.loginFail(request, response);

        failureHandler.onAuthenticationFailure(request, response, failed);
    }

    protected AuthenticationManager getAuthenticationManager() {
        return authenticationManager;
    }

    public void setAuthenticationManager(AuthenticationManager authenticationManager) {
        this.authenticationManager = authenticationManager;
    }

    /**
     * Sets the URL that determines if authentication is required
     *
     * @param filterProcessesUrl
     */
    public void setFilterProcessesUrl(String filterProcessesUrl) {
        setRequiresAuthenticationRequestMatcher(new AntPathRequestMatcher(
                filterProcessesUrl));
    }

    public final void setRequiresAuthenticationRequestMatcher(
            RequestMatcher requestMatcher) {
        Assert.notNull(requestMatcher, "requestMatcher cannot be null");
        this.requiresAuthenticationRequestMatcher = requestMatcher;
    }

    public RememberMeServices getRememberMeServices() {
        return rememberMeServices;
    }

    public void setRememberMeServices(RememberMeServices rememberMeServices) {
        Assert.notNull(rememberMeServices, "rememberMeServices cannot be null");
        this.rememberMeServices = rememberMeServices;
    }

    /**
     * Indicates if the filter chain should be continued prior to delegation to
     * {@link #successfulAuthentication(HttpServletRequest, HttpServletResponse, FilterChain, Authentication)}
     * , which may be useful in certain environment (such as Tapestry applications).
     * Defaults to <code>false</code>.
     */
    public void setContinueChainBeforeSuccessfulAuthentication(
            boolean continueChainBeforeSuccessfulAuthentication) {
        this.continueChainBeforeSuccessfulAuthentication = continueChainBeforeSuccessfulAuthentication;
    }

    public void setApplicationEventPublisher(ApplicationEventPublisher eventPublisher) {
        this.eventPublisher = eventPublisher;
    }

    public void setAuthenticationDetailsSource(
            AuthenticationDetailsSource<HttpServletRequest, ?> authenticationDetailsSource) {
        Assert.notNull(authenticationDetailsSource,
                "AuthenticationDetailsSource required");
        this.authenticationDetailsSource = authenticationDetailsSource;
    }

    public void setMessageSource(MessageSource messageSource) {
        this.messages = new MessageSourceAccessor(messageSource);
    }

    protected boolean getAllowSessionCreation() {
        return allowSessionCreation;
    }

    public void setAllowSessionCreation(boolean allowSessionCreation) {
        this.allowSessionCreation = allowSessionCreation;
    }

    /**
     * The session handling strategy which will be invoked immediately after an
     * authentication request is successfully processed by the
     * <tt>AuthenticationManager</tt>. Used, for example, to handle changing of the
     * session identifier to prevent session fixation attacks.
     *
     * @param sessionStrategy the implementation to use. If not set a null implementation
     * is used.
     */
    public void setSessionAuthenticationStrategy(
            SessionAuthenticationStrategy sessionStrategy) {
        this.sessionStrategy = sessionStrategy;
    }

    /**
     * Sets the strategy used to handle a successful authentication. By default a
     * {@link SavedRequestAwareAuthenticationSuccessHandler} is used.
     */
    public void setAuthenticationSuccessHandler(
            AuthenticationSuccessHandler successHandler) {
        Assert.notNull(successHandler, "successHandler cannot be null");
        this.successHandler = successHandler;
    }

    public void setAuthenticationFailureHandler(
            AuthenticationFailureHandler failureHandler) {
        Assert.notNull(failureHandler, "failureHandler cannot be null");
        this.failureHandler = failureHandler;
    }

    protected AuthenticationSuccessHandler getSuccessHandler() {
        return successHandler;
    }

    protected AuthenticationFailureHandler getFailureHandler() {
        return failureHandler;
    }
}
点击attemptAuthentication,进入UsernamePasswordAuthenticationFilter方法的attemptAuthentication类中;这里面就是密码验证的逻辑了
    public Authentication attemptAuthentication(HttpServletRequest request,
            HttpServletResponse response) throws AuthenticationException {
        //验证提交方式
        if (postOnly && !request.getMethod().equals("POST")) {
            throw new AuthenticationServiceException(
                    "Authentication method not supported: " + request.getMethod());
        }
        //获取帐号密码
        String username = obtainUsername(request);
        String password = obtainPassword(request);

        if (username == null) {
            username = "";
        }

        if (password == null) {
            password = "";
        }

        username = username.trim();
          //封装到Token对象中
        UsernamePasswordAuthenticationToken authRequest = new UsernamePasswordAuthenticationToken(
                username, password);

        // Allow subclasses to set the "details" property
        setDetails(request, authRequest);
          //认证;认证是在AuthenticationManager中做的,实现是authenticate
        return this.getAuthenticationManager().authenticate(authRequest);
    }
点击authenticate,进入他的ProviderManager类中的authenticate方法中看认证的过程 ,这个类中定义了一个private List<AuthenticationProvider> providers = Collections.emptyList();属性,表示认证方式有多种
    public Authentication authenticate(Authentication authentication)
            throws AuthenticationException {
        Class<? extends Authentication> toTest = authentication.getClass();
        AuthenticationException lastException = null;
        AuthenticationException parentException = null;
        Authentication result = null;
        Authentication parentResult = null;
        boolean debug = logger.isDebugEnabled();
        //针对多种认证做循环,取出每一种provider
        for (AuthenticationProvider provider : getProviders()) {
            if (!provider.supports(toTest)) {
                continue;
            }

            if (debug) {
                logger.debug("Authentication attempt using "
                        + provider.getClass().getName());
            }

            try {
               //每一种取出来后做认证,所以要想继续看每种是怎么认证的就要跟进这个方法了
                result = provider.authenticate(authentication);

                if (result != null) {
                    copyDetails(authentication, result);
                    break;
                }
            }
            catch (AccountStatusException | InternalAuthenticationServiceException e) {
                prepareException(e, authentication);
                // SEC-546: Avoid polling additional providers if auth failure is due to
                // invalid account status
                throw e;
            } catch (AuthenticationException e) {
                lastException = e;
            }
        }

        if (result == null && parent != null) {
            // Allow the parent to try.
            try {
                result = parentResult = parent.authenticate(authentication);
            }
            catch (ProviderNotFoundException e) {
                // ignore as we will throw below if no other exception occurred prior to
                // calling parent and the parent
                // may throw ProviderNotFound even though a provider in the child already
                // handled the request
            }
            catch (AuthenticationException e) {
                lastException = parentException = e;
            }
        }

        if (result != null) {
            if (eraseCredentialsAfterAuthentication
                    && (result instanceof CredentialsContainer)) {
                // Authentication is complete. Remove credentials and other secret data
                // from authentication
                ((CredentialsContainer) result).eraseCredentials();
            }

            // If the parent AuthenticationManager was attempted and successful then it will publish an AuthenticationSuccessEvent
            // This check prevents a duplicate AuthenticationSuccessEvent if the parent AuthenticationManager already published it
            if (parentResult == null) {
                eventPublisher.publishAuthenticationSuccess(result);
            }
            return result;
        }

        // Parent was null, or didn't authenticate (or throw an exception).

        if (lastException == null) {
            lastException = new ProviderNotFoundException(messages.getMessage(
                    "ProviderManager.providerNotFound",
                    new Object[] { toTest.getName() },
                    "No AuthenticationProvider found for {0}"));
        }

        // If the parent AuthenticationManager was attempted and failed then it will publish an AbstractAuthenticationFailureEvent
        // This check prevents a duplicate AbstractAuthenticationFailureEvent if the parent AuthenticationManager already published it
        if (parentException == null) {
            prepareException(lastException, authentication);
        }

        throw lastException;
    }
点击authenticate进入 AuthenticationProvider类,这是一个抽象类,所以要找authenticate的实现,这里面它的实现是AbstractUserDetailsAuthenticationProvider;这里面如果不懂为什么就打断点看类图,进入AbstractUserDetailsAuthenticationProvider类中的authenticate方法
    public Authentication authenticate(Authentication authentication)
            throws AuthenticationException {
        Assert.isInstanceOf(UsernamePasswordAuthenticationToken.class, authentication,
                () -> messages.getMessage(
                        "AbstractUserDetailsAuthenticationProvider.onlySupports",
                        "Only UsernamePasswordAuthenticationToken is supported"));
         //获取凭证
        // Determine username
        String username = (authentication.getPrincipal() == null) ? "NONE_PROVIDED"
                : authentication.getName();

        boolean cacheWasUsed = true;
        //从缓存中取数据
        UserDetails user = this.userCache.getUserFromCache(username);

        if (user == null) {
            cacheWasUsed = false;

            try {
               //对帐号进行验证,进去看下帐号验证做了啥
                user = retrieveUser(username,
                        (UsernamePasswordAuthenticationToken) authentication);
            }
            catch (UsernameNotFoundException notFound) {
                logger.debug("User '" + username + "' not found");

                if (hideUserNotFoundExceptions) {
                    throw new BadCredentialsException(messages.getMessage(
                            "AbstractUserDetailsAuthenticationProvider.badCredentials",
                            "Bad credentials"));
                }
                else {
                    throw notFound;
                }
            }

            Assert.notNull(user,
                    "retrieveUser returned null - a violation of the interface contract");
        }

        try {
            preAuthenticationChecks.check(user);
            //对密码做一个匹配
            additionalAuthenticationChecks(user,
                    (UsernamePasswordAuthenticationToken) authentication);
        }
        catch (AuthenticationException exception) {
            if (cacheWasUsed) {
                // There was a problem, so try again after checking
                // we're using latest data (i.e. not from the cache)
                cacheWasUsed = false;
                user = retrieveUser(username,
                        (UsernamePasswordAuthenticationToken) authentication);
                preAuthenticationChecks.check(user);
                additionalAuthenticationChecks(user,
                        (UsernamePasswordAuthenticationToken) authentication);
            }
            else {
                throw exception;
            }
        }

        postAuthenticationChecks.check(user);

        if (!cacheWasUsed) {
            this.userCache.putUserInCache(user);
        }

        Object principalToReturn = user;

        if (forcePrincipalAsString) {
            principalToReturn = user.getUsername();
        }

        return createSuccessAuthentication(principalToReturn, authentication, user);
    }
点击进入DaoAuthenticationProvider类的retrieveUser方法中
protected final UserDetails retrieveUser(String username,
            UsernamePasswordAuthenticationToken authentication)
            throws AuthenticationException {
        prepareTimingAttackProtection();
        try {
            //根据名称去加载用户对象
            UserDetails loadedUser = this.getUserDetailsService().loadUserByUsername(username);
            if (loadedUser == null) {
                throw new InternalAuthenticationServiceException(
                        "UserDetailsService returned null, which is an interface contract violation");
            }
            return loadedUser;
        }
        catch (UsernameNotFoundException ex) {
            mitigateAgainstTimingAttack(authentication);
            throw ex;
        }
        catch (InternalAuthenticationServiceException ex) {
            throw ex;
        }
        catch (Exception ex) {
            throw new InternalAuthenticationServiceException(ex.getMessage(), ex);
        }
    }
点击看loadUserByUsername加载看了啥事,会发现下面只有一个接口然后一个loadUserByUsername实现
public interface UserDetailsService {
    // ~ Methods
    // ========================================================================================================

    /**
     * Locates the user based on the username. In the actual implementation, the search
     * may possibly be case sensitive, or case insensitive depending on how the
     * implementation instance is configured. In this case, the <code>UserDetails</code>
     * object that comes back may have a username that is of a different case than what
     * was actually requested..
     *
     * @param username the username identifying the user whose data is required.
     *
     * @return a fully populated user record (never <code>null</code>)
     *
     * @throws UsernameNotFoundException if the user could not be found or the user has no
     * GrantedAuthority
     */
    UserDetails loadUserByUsername(String username) throws UsernameNotFoundException;
}
点击看他的众多实现,会发现里在面有一个InMemoryUserDetailsManager实现,

点击进入 ,这个接口会实现验证的逻辑
    public UserDetails loadUserByUsername(String username)
            throws UsernameNotFoundException {
        UserDetails user = users.get(username.toLowerCase());

        if (user == null) {
            throw new UsernameNotFoundException(username);
        }

        return new User(user.getUsername(), user.getPassword(), user.isEnabled(),
                user.isAccountNonExpired(), user.isCredentialsNonExpired(),
                user.isAccountNonLocked(), user.getAuthorities());
    }
到了这一步,其实就很明显了,既然你实现 他的接口,如果我想实现从数据进行匹配的话,我实现你的接口不就完事了吗,那么我们如果要实现自定义的认证流程也只需要实现UserDetailsService接口重写loadUserByUsernameInMemoryUserDetailsManager就可以了
public interface UserService  extends UserDetailsService {
}
import com.example.demo.user.service.UserService;
import org.springframework.security.core.GrantedAuthority;
import org.springframework.security.core.authority.SimpleGrantedAuthority;
import org.springframework.security.core.userdetails.User;
import org.springframework.security.core.userdetails.UserDetails;

import org.springframework.stereotype.Service;

import java.util.ArrayList;
import java.util.List;

@Service
public class UserServiceImpl implements UserService {

    /**
     * 自已定义的认证逻辑方法,如果不懂看我写的原理篇
     *
     * @param username
     * @return
     */
    @Override
    public UserDetails loadUserByUsername(String username) {
        //保证权限的集合
        List<GrantedAuthority> authorities = new ArrayList<>();
        //生产中是从数据库拿的
        SimpleGrantedAuthority auth = new SimpleGrantedAuthority("ROLE_ROOT");
        authorities.add(auth);
        UserDetails user = new User(username
                , "{noop}admin"
                , true
                , true
                , true
                , true
                , authorities);
        return user;
    }
}
最后在SpringSecurity的配置文件中再修改一下写活就可以了
import com.example.demo.user.service.UserService;
import org.springframework.beans.factory.annotation.Autowired;
import org.springframework.context.annotation.Configuration;
import org.springframework.security.config.annotation.authentication.builders.AuthenticationManagerBuilder;
import org.springframework.security.config.annotation.web.builders.HttpSecurity;
import org.springframework.security.config.annotation.web.configuration.WebSecurityConfigurerAdapter;
import org.springframework.security.core.userdetails.User;

@Configuration
public class WebSecurityConfig extends WebSecurityConfigurerAdapter {


   @Autowired
   private UserService userService;
    @Override
    protected void configure(AuthenticationManagerBuilder auth) throws Exception {
//         auth.inMemoryAuthentication()
//                .withUser("admin")
//                .password("{noop}admin")//不加密
//                .authorities("ADMIN");
        auth.userDetailsService(userService);
    }
    //自定义过滤器链
    @Override
    protected void configure(HttpSecurity httpSecurity) throws Exception {
        //使用默认的过滤器链
        super.configure(httpSecurity);
    }

}
到这一步密码的自定义就实现了,有兴趣的可以自己启动试下;这个过程将帐号密码及权限的获取改成动态了,到这里可能有的人会想,我们自定义的类只实现了帐号的验证,但并没有看到密码的验证,其实前面我已经提到了密码的验证了,代码回退到AbstractUserDetailsAuthenticationProvider方法的authenticate类,其中的 preAuthenticationChecks.check(user);就是认证检查的前置处理
    public Authentication authenticate(Authentication authentication)
            throws AuthenticationException {
        Assert.isInstanceOf(UsernamePasswordAuthenticationToken.class, authentication,
                () -> messages.getMessage(
                        "AbstractUserDetailsAuthenticationProvider.onlySupports",
                        "Only UsernamePasswordAuthenticationToken is supported"));

        // Determine username
        String username = (authentication.getPrincipal() == null) ? "NONE_PROVIDED"
                : authentication.getName();

        boolean cacheWasUsed = true;
        UserDetails user = this.userCache.getUserFromCache(username);

        if (user == null) {
            cacheWasUsed = false;

            try {
                user = retrieveUser(username,
                        (UsernamePasswordAuthenticationToken) authentication);
            }
            catch (UsernameNotFoundException notFound) {
                logger.debug("User '" + username + "' not found");

                if (hideUserNotFoundExceptions) {
                    throw new BadCredentialsException(messages.getMessage(
                            "AbstractUserDetailsAuthenticationProvider.badCredentials",
                            "Bad credentials"));
                }
                else {
                    throw notFound;
                }
            }

            Assert.notNull(user,
                    "retrieveUser returned null - a violation of the interface contract");
        }

        try {
            preAuthenticationChecks.check(user);
            additionalAuthenticationChecks(user,
                    (UsernamePasswordAuthenticationToken) authentication);
        }
        catch (AuthenticationException exception) {
            if (cacheWasUsed) {
                // There was a problem, so try again after checking
                // we're using latest data (i.e. not from the cache)
                cacheWasUsed = false;
                user = retrieveUser(username,
                        (UsernamePasswordAuthenticationToken) authentication);
                preAuthenticationChecks.check(user);
                additionalAuthenticationChecks(user,
                        (UsernamePasswordAuthenticationToken) authentication);
            }
            else {
                throw exception;
            }
        }

        postAuthenticationChecks.check(user);

        if (!cacheWasUsed) {
            this.userCache.putUserInCache(user);
        }

        Object principalToReturn = user;

        if (forcePrincipalAsString) {
            principalToReturn = user.getUsername();
        }

        return createSuccessAuthentication(principalToReturn, authentication, user);
    }
点击check进入UserDetailsChecker类看它的处理
public interface UserDetailsChecker {
    /**
     * Examines the User
     * @param toCheck the UserDetails instance whose status should be checked.
     */
    void check(UserDetails toCheck);
}
选择它的AbstractUserDetailsAuthenticationProvider实现类,进入AbstractUserDetailsAuthenticationProvider类的check方法
private class DefaultPreAuthenticationChecks implements UserDetailsChecker {
        public void check(UserDetails user) {
              //帐号是否被锁定
            if (!user.isAccountNonLocked()) {
                logger.debug("User account is locked");

                throw new LockedException(messages.getMessage(
                        "AbstractUserDetailsAuthenticationProvider.locked",
                        "User account is locked"));
            }
             //是否可用
            if (!user.isEnabled()) {
                logger.debug("User account is disabled");

                throw new DisabledException(messages.getMessage(
                        "AbstractUserDetailsAuthenticationProvider.disabled",
                        "User is disabled"));
            }
             //是否过期
            if (!user.isAccountNonExpired()) {
                logger.debug("User account is expired");

                throw new AccountExpiredException(messages.getMessage(
                        "AbstractUserDetailsAuthenticationProvider.expired",
                        "User account has expired"));
            }
        }
    }
这一步看完后再回退到AbstractUserDetailsAuthenticationProvider方法的authenticate类,前置处理完后的additionalAuthenticationChecks(user,(UsernamePasswordAuthenticationToken) authentication);就是密码的效验了;
public Authentication authenticate(Authentication authentication)
            throws AuthenticationException {
        Assert.isInstanceOf(UsernamePasswordAuthenticationToken.class, authentication,
                () -> messages.getMessage(
                        "AbstractUserDetailsAuthenticationProvider.onlySupports",
                        "Only UsernamePasswordAuthenticationToken is supported"));

        // Determine username
        String username = (authentication.getPrincipal() == null) ? "NONE_PROVIDED"
                : authentication.getName();

        boolean cacheWasUsed = true;
        UserDetails user = this.userCache.getUserFromCache(username);

        if (user == null) {
            cacheWasUsed = false;

            try {
                user = retrieveUser(username,
                        (UsernamePasswordAuthenticationToken) authentication);
            }
            catch (UsernameNotFoundException notFound) {
                logger.debug("User '" + username + "' not found");

                if (hideUserNotFoundExceptions) {
                    throw new BadCredentialsException(messages.getMessage(
                            "AbstractUserDetailsAuthenticationProvider.badCredentials",
                            "Bad credentials"));
                }
                else {
                    throw notFound;
                }
            }

            Assert.notNull(user,
                    "retrieveUser returned null - a violation of the interface contract");
        }

        try {
            preAuthenticationChecks.check(user);
            additionalAuthenticationChecks(user,
                    (UsernamePasswordAuthenticationToken) authentication);
        }
        catch (AuthenticationException exception) {
            if (cacheWasUsed) {
                // There was a problem, so try again after checking
                // we're using latest data (i.e. not from the cache)
                cacheWasUsed = false;
                user = retrieveUser(username,
                        (UsernamePasswordAuthenticationToken) authentication);
                preAuthenticationChecks.check(user);
                additionalAuthenticationChecks(user,
                        (UsernamePasswordAuthenticationToken) authentication);
            }
            else {
                throw exception;
            }
        }

        postAuthenticationChecks.check(user);

        if (!cacheWasUsed) {
            this.userCache.putUserInCache(user);
        }

        Object principalToReturn = user;

        if (forcePrincipalAsString) {
            principalToReturn = user.getUsername();
        }

        return createSuccessAuthentication(principalToReturn, authentication, user);
    }
点击additionalAuthenticationChecks进入DaoAuthenticationProvider类的additionalAuthenticationChecks方法看它是怎么进行密码效验的
    protected void additionalAuthenticationChecks(UserDetails userDetails,
            UsernamePasswordAuthenticationToken authentication)
            throws AuthenticationException {
        //先判断有没有密码
        if (authentication.getCredentials() == null) {
            logger.debug("Authentication failed: no credentials provided");

            throw new BadCredentialsException(messages.getMessage(
                    "AbstractUserDetailsAuthenticationProvider.badCredentials",
                    "Bad credentials"));
        }
        //获取凭证
        String presentedPassword = authentication.getCredentials().toString();
         //做密码的匹配,这两个密码一个是表单提交的密码一个是从数据库查出来的密码
        if (!passwordEncoder.matches(presentedPassword, userDetails.getPassword())) {
            logger.debug("Authentication failed: password does not match stored value");

            throw new BadCredentialsException(messages.getMessage(
                    "AbstractUserDetailsAuthenticationProvider.badCredentials",
                    "Bad credentials"));
        }
    }
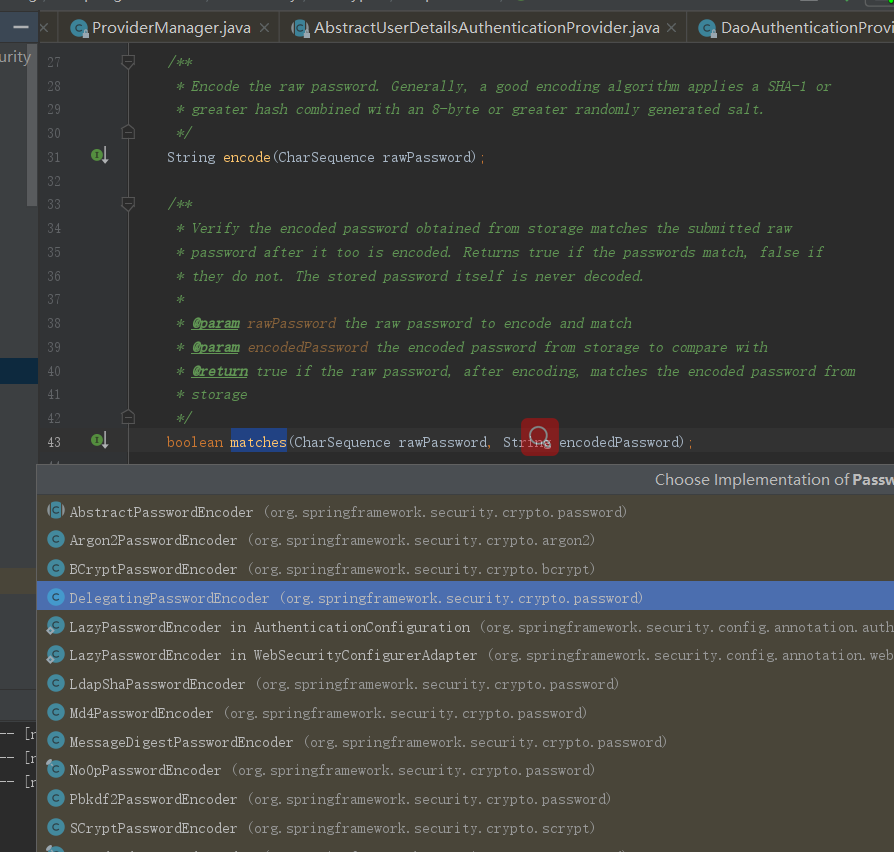
再看上面的matches方法,进入PasswordEncoder类
public interface PasswordEncoder {

    /**
     * Encode the raw password. Generally, a good encoding algorithm applies a SHA-1 or
     * greater hash combined with an 8-byte or greater randomly generated salt.
     */
    String encode(CharSequence rawPassword);

    /**
     * Verify the encoded password obtained from storage matches the submitted raw
     * password after it too is encoded. Returns true if the passwords match, false if
     * they do not. The stored password itself is never decoded.
     *
     * @param rawPassword the raw password to encode and match
     * @param encodedPassword the encoded password from storage to compare with
     * @return true if the raw password, after encoding, matches the encoded password from
     * storage
     */
    boolean matches(CharSequence rawPassword, String encodedPassword);

    /**
     * Returns true if the encoded password should be encoded again for better security,
     * else false. The default implementation always returns false.
     * @param encodedPassword the encoded password to check
     * @return true if the encoded password should be encoded again for better security,
     * else false.
     */
    default boolean upgradeEncoding(String encodedPassword) {
        return false;
    }
}
    @Override
    public boolean matches(CharSequence rawPassword, String prefixEncodedPassword) {
         //判断前缀
        if (rawPassword == null && prefixEncodedPassword == null) {
            return true;
        }
        String id = extractId(prefixEncodedPassword);
        PasswordEncoder delegate = this.idToPasswordEncoder.get(id);
        if (delegate == null) {
            return this.defaultPasswordEncoderForMatches
                .matches(rawPassword, prefixEncodedPassword);
        }
        String encodedPassword = extractEncodedPassword(prefixEncodedPassword);
        return delegate.matches(rawPassword, encodedPassword);
    }
二、加密
我们在实际生产中不可能用明文传递密码,所以接下来要聊的就是加密喽,在SpringSecurity的官网中他推荐的加密方式是BCryptPasswordEncoder方式进行加密,刚刚在上面截图中也看到了,所以接着改下项目
import com.example.demo.user.service.UserService;
import org.springframework.beans.factory.annotation.Autowired;
import org.springframework.context.annotation.Configuration;
import org.springframework.security.config.annotation.authentication.builders.AuthenticationManagerBuilder;
import org.springframework.security.config.annotation.web.builders.HttpSecurity;
import org.springframework.security.config.annotation.web.configuration.WebSecurityConfigurerAdapter;

import org.springframework.security.crypto.bcrypt.BCryptPasswordEncoder;

import javax.annotation.Resource;

@Configuration
public class WebSecurityConfig extends WebSecurityConfigurerAdapter {


   @Autowired
   private UserService userService;

   @Resource
   private BCryptPasswordEncoder bCryptPasswordEncoder;
    @Override
    protected void configure(AuthenticationManagerBuilder auth) throws Exception {
//         auth.inMemoryAuthentication()
//                .withUser("admin")
//                .password("{noop}admin")//不加密
//                .authorities("ADMIN");
        auth.userDetailsService(userService).passwordEncoder(bCryptPasswordEncoder);
    }
    //自定义过滤器链
    @Override
    protected void configure(HttpSecurity httpSecurity) throws Exception {
        //使用默认的过滤器链
        super.configure(httpSecurity);
    }

    public BCryptPasswordEncoder bCryptPasswordEncoder(){
        return new BCryptPasswordEncoder();
    }

}
然后UserServiceImpl里面就不能用明文了,要用密文了
@Service
public class UserServiceImpl implements UserService {

    /**
     * 自已定义的认证逻辑方法,如果不懂看我写的原理篇
     *
     * @param username
     * @return
     */
    @Override
    public UserDetails loadUserByUsername(String username) {
        //保证权限的集合
        List<GrantedAuthority> authorities = new ArrayList<>();
        //生产中是从数据库拿的
        SimpleGrantedAuthority auth = new SimpleGrantedAuthority("ROLE_ROOT");
        authorities.add(auth);
        UserDetails user = new User(username
                , "$2a$10$YOWyHqvtg.gqrbiSTlYQx.nu2j0psWsrs/JIiuzav7IDX7r93WGIe"
                , true
                , true
                , true
                , true
                , authorities);
        return user;
    }
}
2.1、认证状态判断
在实际项目中因为用户的不同操作,可能会给出不同的状态,比如正常、冻结等。SpringSecurity也支持
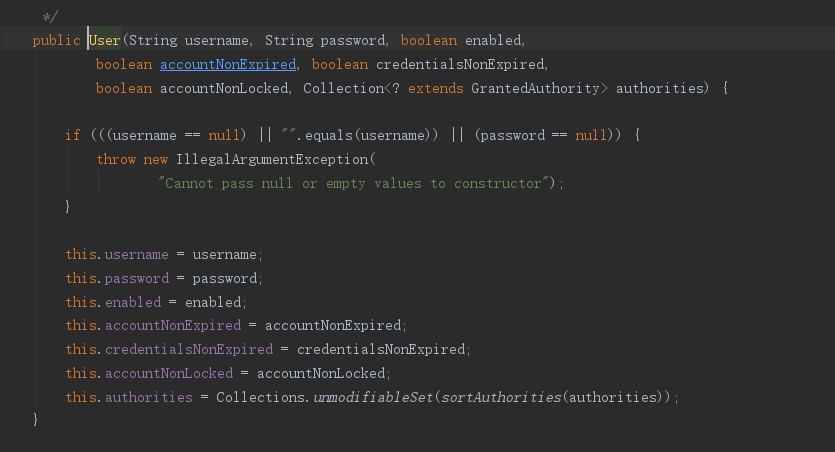
在User对象的属性中定义如下

三、自定义认证页面
好久没写前端代码了,为了偷懒,用thymeleaf来写吧,先导包
       <dependency>
            <groupId>org.springframework.boot</groupId>
            <artifactId>spring-boot-starter-thymeleaf</artifactId>
        </dependency>
搞个登录页面
<!DOCTYPE html>
<html xmlns="http://www.w3.org/1999/xhtml" xmlns:th="http://www.thymeleaf.org">
<head>
    <meta charset="UTF-8">
    <title>Title</title>
</head>
<body>
<h1>登录管理</h1>

    <form th:action="@{/login.do}" method="post">
        账号:<input type="text" name="username"><br>
        密码:<input type="password" name="password"><br>
        <input type="submit" value="登录"><br>
    </form>
</body>
</html>
再搞个异常页面
<!DOCTYPE html>
<html lang="en">
<head>
    <meta charset="UTF-8">
    <title>Title</title>
</head>
<body>
    <h1>错误页面</h1>
</body>
</html>
@Controller
public class UserController {
    @GetMapping("/login.html")
    public String loginPage(){

        return "/login.html";
    }

    @GetMapping("/index.html")
    public String index(){
        return "/index.html";
    }

    @GetMapping("/")
    public String basePage(){
        return "/index.html";
    }

    @GetMapping("/error.html")
    public String error(){
        return "/error.html";
    }
}
要使用自定义页面的话就要修改掉默认的页面,修改WebSecurityConfig类
package com.example.demo.config;


import com.example.demo.user.service.UserService;
import org.springframework.beans.factory.annotation.Autowired;
import org.springframework.context.annotation.Bean;
import org.springframework.context.annotation.Configuration;
import org.springframework.security.config.annotation.authentication.builders.AuthenticationManagerBuilder;
import org.springframework.security.config.annotation.web.builders.HttpSecurity;
import org.springframework.security.config.annotation.web.configuration.WebSecurityConfigurerAdapter;

import org.springframework.security.crypto.bcrypt.BCryptPasswordEncoder;

import javax.annotation.Resource;

@Configuration
public class WebSecurityConfig extends WebSecurityConfigurerAdapter {


   @Autowired
   private UserService userService;

   @Resource
   private BCryptPasswordEncoder bCryptPasswordEncoder;
    @Override
    protected void configure(AuthenticationManagerBuilder auth) throws Exception {
//         auth.inMemoryAuthentication()
//                .withUser("admin")
//                .password("{noop}admin")//不加密
//                .authorities("ADMIN");
        auth.userDetailsService(userService).passwordEncoder(bCryptPasswordEncoder);
    }
    //自定义过滤器链
    @Override
    protected void configure(HttpSecurity httpSecurity) throws Exception {
        System.out.println("拦截");
        //super.configure(http);
        httpSecurity.authorizeRequests() // 设置哪些页面可以直接访问,哪些需要验证
                .antMatchers("/login.html","/error.html").permitAll() // 放过
                .anyRequest().authenticated() // 剩下的所有的地址都是需要在认证状态下才可以访问
                .and()
                .formLogin()//其实就是添加一个过滤器
                .loginPage("/login.html") // 指定指定要的登录页面
                .loginProcessingUrl("/login.do") // 处理认证路径的请求
                .defaultSuccessUrl("/index.html")
                .failureForwardUrl("/error.html")//失败页面
                .and()
                .logout()
                .logoutUrl("/logout")//退出路径
                .logoutSuccessUrl("/login.html")//退出成功跳转页面
                .and().csrf().disable();//跨域攻击关闭
    }
    @Bean
    public BCryptPasswordEncoder bCryptPasswordEncoder(){
        return new BCryptPasswordEncoder();
    }

}
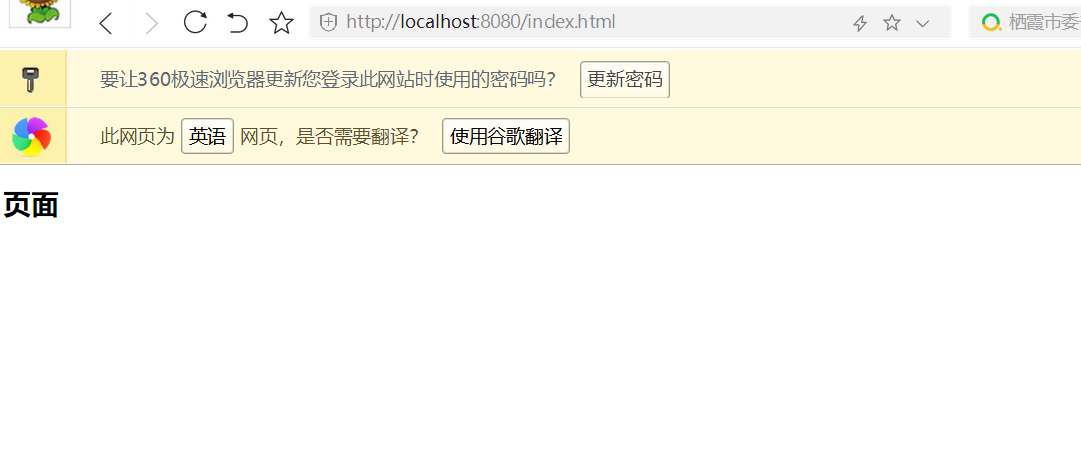
启动项目访问首页,登录页面就成了我们自己定义的页面了

输入错误代码也能跳转到异常页面

输入正确的密码后能进入指定页面
上面自定义页面聊完了,接着就要说下第四个了CSRF跨域攻击
四、CSRF跨域攻击
4.1、CSRF是什么?
CSRF(Cross-site request forgery),中文名称:跨站请求伪造,也被称为:one click attack/session riding,缩写为:CSRF/XSRF。
4.2、CSRF可以做什么?
你这可以这么理解CSRF攻击:攻击者盗用了你的身份,以你的名义发送恶意请求。CSRF能够做的事情包括:以你名义发送邮件,发消息,盗取你的账号,甚至于购买商品,虚拟货币转账......造成的问题包括:个人隐私泄露以及财产安全。
4.3、CSRF攻击的大致原理
- 用户通过浏览器,访问正常网站A(例如某银行),通过用户的身份认证(比如用户名/密码)成功A网站。
- 网站A产生Cookie信息并返回给用户的浏览器;
- 用户保持A网站页面登录状态,在同一浏览器中,打开一个新的TAB页访问恶意网站B;
- 网站B接收到用户请求后,返回一些攻击性代码,请求A网站的资源(例如转账请求);
- 浏览器执行恶意代码,例如发送一个图片链接让用户点击,在用户不知情的情况下携带Cookie信息,向网站A发出请求。
- 网站A根据用户的Cookie信息核实用户身份(此时用户在A网站是已登录状态),A网站会处理该请求,导致来自网站B的恶意请求被执行。
4.4、常用解决方案
4.4.1、验证Http Referer字段

根据HTTP协议,在HTTP头中有一个字段叫Referer,它记录了该HTTP请求的来源地址。在通常情况下,访问一个安全受限页面的请求必须来自于同一个网站。比如某银行的转账是通过用户访问http://bank.test/test?page=10&userID=101&money=10000页面完成,用户必须先登录bank.test,然后通过点击页面上的按钮来触发转账事件。当用户提交请求时,该转账请求的Referer值就会是转账按钮所在页面的URL(本例中,通常是以bank. test域名开头的地址)。而如果攻击者要对银行网站实施CSRF攻击,他只能在自己的网站构造请求,当用户通过攻击者的网站发送请求到银行时,该请求的Referer是指向攻击者的网站。因此,要防御CSRF攻击,银行网站只需要对于每一个转账请求验证其Referer值,如果是以bank. test开头的域名,则说明该请求是来自银行网站自己的请求,是合法的。如果Referer是其他网站的话,就有可能是CSRF攻击,则拒绝该请求。
4.4.2、在请求地址中添加token并验证
CSRF攻击之所以能够成功,是因为攻击者可以伪造用户的请求,该请求中所有的用户验证信息都存在于Cookie中,因此攻击者可以在不知道这些验证信息的情况下直接利用用户自己的Cookie来通过安全验证。由此可知,抵御CSRF攻击的关键在于:在请求中放入攻击者所不能伪造的信息,并且该信息不存在于Cookie之中。鉴于此,系统开发者可以在HTTP请求中以参数的形式加入一个随机产生的token,并在服务器端建立一个拦截器来验证这个token,如果请求中没有token或者token内容不正确,则认为可能是CSRF攻击而拒绝该请求。
4.4.3、在HTTP头中自定义属性并验证
自定义属性的方法也是使用token并进行验证,和前一种方法不同的是,这里并不是把token以参数的形式置于HTTP请求之中,而是把它放到HTTP头中自定义的属性里。通过XMLHttpRequest这个类,可以一次性给所有该类请求加上csrftoken这个HTTP头属性,并把token值放入其中。这样解决了前一种方法在请求中加入token的不便,同时,通过这个类请求的地址不会被记录到浏览器的地址栏,也不用担心token会通过Referer泄露到其他网站。
4.5、SpringSecurity对CSRF的处理
SpringSecurity中对处理CSRF攻击的采用方法就是在请求地址中添加token的方式
.and().csrf().disable();//跨域攻击关闭
点击csrf进去HttpSecurity类的csrf方法,这里面就是加了个CsrfConfigurer,与之对应的就是加了个CsrfConfigurer过滤器
 public CsrfConfigurer<HttpSecurity> csrf() throws Exception {
        ApplicationContext context = getContext();
        return getOrApply(new CsrfConfigurer<>(context));
    }
而disable()就是把配置CsrfFilter给移除过滤器链
    public B disable() {
        getBuilder().removeConfigurer(getClass());
        return getBuilder();
    }
所以说想看Csrf过滤器是怎么做的就要将.and().csrf().disable();这段代码注掉,注掉这段代码后进入CsrfFilter过滤器中
@Override
    protected void doFilterInternal(HttpServletRequest request,
            HttpServletResponse response, FilterChain filterChain)
                    throws ServletException, IOException {
        request.setAttribute(HttpServletResponse.class.getName(), response);
        //获取已经创建的csrfToken对象
        CsrfToken csrfToken = this.tokenRepository.loadToken(request);
        final boolean missingToken = csrfToken == null;
       //如果不存在
        if (missingToken) {
          //重新创建CsrfToken对象
            csrfToken = this.tokenRepository.generateToken(request);
           //将获取的Token信息保存在Session中进去看下就好
            this.tokenRepository.saveToken(csrfToken, request, response);
        }
        //将token信息保存在这次的请求中
        request.setAttribute(CsrfToken.class.getName(), csrfToken);
        request.setAttribute(csrfToken.getParameterName(), csrfToken);
         //如果不满足Csrf的拦截条件就放过
        if (!this.requireCsrfProtectionMatcher.matches(request)) {
            filterChain.doFilter(request, response);
            return;
        }
        //从Http协议的Head中获取token
        String actualToken = request.getHeader(csrfToken.getHeaderName());
        if (actualToken == null) {
           //如果没有则从请求的参数“_csrf”中获取token信息
            actualToken = request.getParameter(csrfToken.getParameterName());
        }
         //判断当前请求传递的token值是否和当前的session中记录的一致
        if (!csrfToken.getToken().equals(actualToken)) {
            if (this.logger.isDebugEnabled()) {
                this.logger.debug("Invalid CSRF token found for "
                        + UrlUtils.buildFullRequestUrl(request));
            }
            if (missingToken) {
                this.accessDeniedHandler.handle(request, response,
                        new MissingCsrfTokenException(actualToken));
            }
            else {
                this.accessDeniedHandler.handle(request, response,
                        new InvalidCsrfTokenException(csrfToken, actualToken));
            }
            return;
        }

        filterChain.doFilter(request, response);
    }
生成CsrfToken对象的逻辑在this.tokenRepository.generateToken(request);这行中,进入LazyCsrfTokenRepository类的generateToken方法中
    @Override
    public CsrfToken generateToken(HttpServletRequest request) {
        return wrap(request, this.delegate.generateToken(request));
    }
delegate的实际类型是HttpSessionCSrfTokenRepository
    public CsrfToken generateToken(HttpServletRequest request) {
        return new DefaultCsrfToken(this.headerName, this.parameterName,
                createNewToken());
    }
createNewToken()其实就是获取UUID的随机值
    private String createNewToken() {
        return UUID.randomUUID().toString();
    }
这上面过程是单体架构中实现csrf跨域攻击的防护,如果在前后分离的项目想实现这个也很简单,只用将token信息保存在Http协议的Head中
五、remember-me功能
更改登录页面,加个记住密码功能
<!DOCTYPE html>
<html xmlns="http://www.w3.org/1999/xhtml" xmlns:th="http://www.thymeleaf.org">
<head>
    <meta charset="UTF-8">
    <title>Title</title>
</head>
<body>
<h1>登录管理</h1>

    <form th:action="@{/login.do}" method="post">
        账号:<input type="text" name="username"><br>
        密码:<input type="password" name="password"><br>
        <input type="checkbox" name="remember-me" value="1">记住密码<br>
        <input type="submit" value="登录"><br>
    </form>
</body>
</html>
然后在WebSecurityConfig配置文件加个过滤器

这个rememberMe作用其实就是加了个RememberMeConfigurer配置类,这个配置类作用其实也就是加了个对应的过滤器
public RememberMeConfigurer<HttpSecurity> rememberMe() throws Exception {
return getOrApply(new RememberMeConfigurer<>());
    }
做到这一步记住密码功能就完成了;想测试的可以自己去试下;下面就来看下remember-me功能在源码中是怎么实现的;
5.1、remember-me源码分析
在找入口时首先要明白一点是remember-me功能是在认证成功后才有的,那么应该从UsernamePasswordAuthenticationFilter中分析,进入UsernamePasswordAuthenticationFilter类,进入后找了下发现没啥和认证有关的东西,那么进入他父类AbstractAuthenticationProcessingFilter看下;在doFilter方法中好像找到了我们要的东西
public void doFilter(ServletRequest req, ServletResponse res, FilterChain chain)
            throws IOException, ServletException {

        HttpServletRequest request = (HttpServletRequest) req;
        HttpServletResponse response = (HttpServletResponse) res;

        if (!requiresAuthentication(request, response)) {
            chain.doFilter(request, response);

            return;
        }

        if (logger.isDebugEnabled()) {
            logger.debug("Request is to process authentication");
        }

        Authentication authResult;

        try {
             //认证的方法
            authResult = attemptAuthentication(request, response);
            if (authResult == null) {
                // return immediately as subclass has indicated that it hasn't completed
                // authentication
                return;
            }
            sessionStrategy.onAuthentication(authResult, request, response);
        }
        catch (InternalAuthenticationServiceException failed) {
            logger.error(
                    "An internal error occurred while trying to authenticate the user.",
                    failed);
            unsuccessfulAuthentication(request, response, failed);

            return;
        }
        catch (AuthenticationException failed) {
            // Authentication failed
            unsuccessfulAuthentication(request, response, failed);

            return;
        }

        // Authentication success
        if (continueChainBeforeSuccessfulAuthentication) {
            chain.doFilter(request, response);
        }
        //认证成功后会进行remembber-me操作
        successfulAuthentication(request, response, chain, authResult);
    }
点击successfulAuthentication进入successfulAuthentication方法
    protected void successfulAuthentication(HttpServletRequest request,
            HttpServletResponse response, FilterChain chain, Authentication authResult)
            throws IOException, ServletException {

        if (logger.isDebugEnabled()) {
            logger.debug("Authentication success. Updating SecurityContextHolder to contain: "
                    + authResult);
        }

        SecurityContextHolder.getContext().setAuthentication(authResult);
       //remember-me处理的代码
        rememberMeServices.loginSuccess(request, response, authResult);

        // Fire event
        if (this.eventPublisher != null) {
            eventPublisher.publishEvent(new InteractiveAuthenticationSuccessEvent(
                    authResult, this.getClass()));
        }

        successHandler.onAuthenticationSuccess(request, response, authResult);
    }
点击loginSuccess进入AbstractRememberMeServices类的loginSuccess方法
    @Override
    public final void loginSuccess(HttpServletRequest request,
            HttpServletResponse response, Authentication successfulAuthentication) {
         //判断是否需要使用Remember-me
        if (!rememberMeRequested(request, parameter)) {
            logger.debug("Remember-me login not requested.");
            return;
        }
        //进行remember-me的相关设置
        onLoginSuccess(request, response, successfulAuthentication);
    }
点击rememberMeRequested看下他的判断
    protected boolean rememberMeRequested(HttpServletRequest request, String parameter) {
        //状态是否为true
        if (alwaysRemember) {
            return true;
        }
         //表单提交字段
        String paramValue = request.getParameter(parameter);
       //满足条件就返回true
        if (paramValue != null) {
            if (paramValue.equalsIgnoreCase("true") || paramValue.equalsIgnoreCase("on")
                    || paramValue.equalsIgnoreCase("yes") || paramValue.equals("1")) {
                return true;
            }
        }

        if (logger.isDebugEnabled()) {
            logger.debug("Did not send remember-me cookie (principal did not set parameter '"
                    + parameter + "')");
        }

        return false;
    }
点击onLoginSuccess,进入PersistentTokenBasedRememberMeServices类的onLoginSuccess方法
protected void onLoginSuccess(HttpServletRequest request,
            HttpServletResponse response, Authentication successfulAuthentication) {
        //认证成功的帐号
        String username = successfulAuthentication.getName();

        logger.debug("Creating new persistent login for user " + username);
        //封装Remember-me的数据
        PersistentRememberMeToken persistentToken = new PersistentRememberMeToken(
                username, generateSeriesData(), generateTokenData(), new Date());
        try {
            //保存在内存或者持久化到数据库中
            tokenRepository.createNewToken(persistentToken);
            //remember-me信息存储到cookie中
            addCookie(persistentToken, request, response);
        }
        catch (Exception e) {
            logger.error("Failed to save persistent token ", e);
        }
    }
通过上面代码可以发现,当认证成功后会判断是否勾选了记住密码的按钮,如果勾选了就会将认证信息封装到对应的token中,同时会将token信息保存到数据库和cookie中;既然这玩意能存到数据库中那么一定有他的实现那点击createNewToken进入JdbcTokenRepositoryImpl类(另一个类是放入内存的类)的createNewToken方法
    public void createNewToken(PersistentRememberMeToken token) {
        getJdbcTemplate().update(insertTokenSql, token.getUsername(), token.getSeries(),
                token.getTokenValue(), token.getDate());
    }
点击insertTokenSql看下他的SQL,所以说如果想要存数据库里面去就可以按下面要求建表搞了
    /** Default SQL for creating the database table to store the tokens */
    public static final String CREATE_TABLE_SQL = "create table persistent_logins (username varchar(64) not null, series varchar(64) primary key, "
            + "token varchar(64) not null, last_used timestamp not null)";
    /** The default SQL used by the <tt>getTokenBySeries</tt> query */
    public static final String DEF_TOKEN_BY_SERIES_SQL = "select username,series,token,last_used from persistent_logins where series = ?";
    /** The default SQL used by <tt>createNewToken</tt> */
    public static final String DEF_INSERT_TOKEN_SQL = "insert into persistent_logins (username, series, token, last_used) values(?,?,?,?)";
    /** The default SQL used by <tt>updateToken</tt> */
    public static final String DEF_UPDATE_TOKEN_SQL = "update persistent_logins set token = ?, last_used = ? where series = ?";
    /** The default SQL used by <tt>removeUserTokens</tt> */
    public static final String DEF_REMOVE_USER_TOKENS_SQL = "delete from persistent_logins where username = ?";

    // ~ Instance fields
    // ================================================================================================

    private String tokensBySeriesSql = DEF_TOKEN_BY_SERIES_SQL;
    private String insertTokenSql = DEF_INSERT_TOKEN_SQL;
    private String updateTokenSql = DEF_UPDATE_TOKEN_SQL;
    private String removeUserTokensSql = DEF_REMOVE_USER_TOKENS_SQL;
    private boolean createTableOnStartup;
下面来试下存数据库,添加两个依赖
        <dependency>
            <groupId>org.springframework.boot</groupId>
            <artifactId>spring-boot-starter-jdbc</artifactId>
        </dependency>

        <dependency>
            <groupId>mysql</groupId>
            <artifactId>mysql-connector-java</artifactId>
            <version>8.0.15</version>
        </dependency>
spring.datasource.username=root
spring.datasource.password=root
spring.datasource.url=jdbc:mysql://localhost:3306/ghy?serverTimezone=GMT%2B8&useSSL=false
spring.datasource.driver-class-name=com.mysql.cj.jdbc.Driver
然后再来修改下WebSecurityConfig类,新增加内容都标颜色了
package com.example.demo.config;


import com.example.demo.user.service.UserService;
import org.springframework.beans.factory.annotation.Autowired;
import org.springframework.context.annotation.Bean;
import org.springframework.context.annotation.Configuration;
import org.springframework.security.config.annotation.authentication.builders.AuthenticationManagerBuilder;
import org.springframework.security.config.annotation.web.builders.HttpSecurity;
import org.springframework.security.config.annotation.web.configuration.WebSecurityConfigurerAdapter;

import org.springframework.security.crypto.bcrypt.BCryptPasswordEncoder;
import org.springframework.security.web.authentication.rememberme.JdbcTokenRepositoryImpl;
import org.springframework.security.web.authentication.rememberme.PersistentRememberMeToken;
import org.springframework.security.web.authentication.rememberme.PersistentTokenRepository;

import javax.annotation.Resource;
import javax.sql.DataSource;
import java.util.Date;

@Configuration
public class WebSecurityConfig extends WebSecurityConfigurerAdapter {


   @Autowired
   private UserService userService;

   //密码加密
   @Resource
   private BCryptPasswordEncoder bCryptPasswordEncoder;

   //将认证后信息存数据库
   @Resource
   private DataSource dataSource;

   @Resource
   private PersistentTokenRepository persistentTokenRepository;

    @Override
    protected void configure(AuthenticationManagerBuilder auth) throws Exception {
//         auth.inMemoryAuthentication()
//                .withUser("admin")
//                .password("{noop}admin")//不加密
//                .authorities("ADMIN");
        auth.userDetailsService(userService).passwordEncoder(bCryptPasswordEncoder);
    }
    //自定义过滤器链
    @Override
    protected void configure(HttpSecurity httpSecurity) throws Exception {
        System.out.println("拦截");
        //super.configure(http);
        httpSecurity.authorizeRequests() // 设置哪些页面可以直接访问,哪些需要验证
                .antMatchers("/login.html","/error.html").permitAll() // 放过
                .anyRequest().authenticated() // 剩下的所有的地址都是需要在认证状态下才可以访问
                .and()
                .formLogin()//其实就是添加一个过滤器
                .loginPage("/login.html") // 指定指定要的登录页面
                .loginProcessingUrl("/login.do") // 处理认证路径的请求
                .defaultSuccessUrl("/index.html")
                .failureForwardUrl("/error.html")//失败页面
                .and()
                .logout()
                .logoutUrl("/logout")//退出路径
                .logoutSuccessUrl("/login.html")//退出成功跳转页面
                .and()
                .rememberMe()//记住密码功能配置
                .tokenRepository(persistentTokenRepository)//覆盖掉默认的基于内存存储的方式
//                .and().csrf().disable();//跨域攻击关闭
        ;
    }

    @Bean
    public PersistentTokenRepository persistentTokenRepository(){
        JdbcTokenRepositoryImpl repository = new JdbcTokenRepositoryImpl();
        repository.setDataSource(dataSource);
        // 第一次帮我们创建表结构,这样就不用我们自己建表了,第二次运行时这段注解掉
         repository.setCreateTableOnStartup(true);
        return repository;
    }
    @Bean
    public BCryptPasswordEncoder bCryptPasswordEncoder(){
        return new BCryptPasswordEncoder();
    }

}
然后启动项目就发现自动帮我们在数据库创建表了

然后在登录时勾选记住密码功能,这样数据就会缓存到数据库持久化了,这样在分布式系统数据同步问题就可以解决了

六、获取当前登录信息
上面内容搞完了就到业务代码了,在认证成功后如何在项目中获取认证的相关信息呢;这个其实在源码中也有,既然是登录成功后的事,那一样,一定是在UsernamePasswordAuthenticationFilter类中找,这个类看了三次了,相信也明白了找他的父类AbstractAuthenticationProcessingFilter的doFilter方法,里面在登录成功后会执行successfulAuthentication(request, response, chain, authResult);方法,进入 ;其中SecurityContextHolder.getContext().setAuthentication(authResult);就是存信息的代码
protected void successfulAuthentication(HttpServletRequest request,
            HttpServletResponse response, FilterChain chain, Authentication authResult)
            throws IOException, ServletException {

        if (logger.isDebugEnabled()) {
            logger.debug("Authentication success. Updating SecurityContextHolder to contain: "
                    + authResult);
        }

        SecurityContextHolder.getContext().setAuthentication(authResult);

        rememberMeServices.loginSuccess(request, response, authResult);

        // Fire event
        if (this.eventPublisher != null) {
            eventPublisher.publishEvent(new InteractiveAuthenticationSuccessEvent(
                    authResult, this.getClass()));
        }

        successHandler.onAuthenticationSuccess(request, response, authResult);
    }
有了这些了解后,那来写获取的代码,新增代码加了色
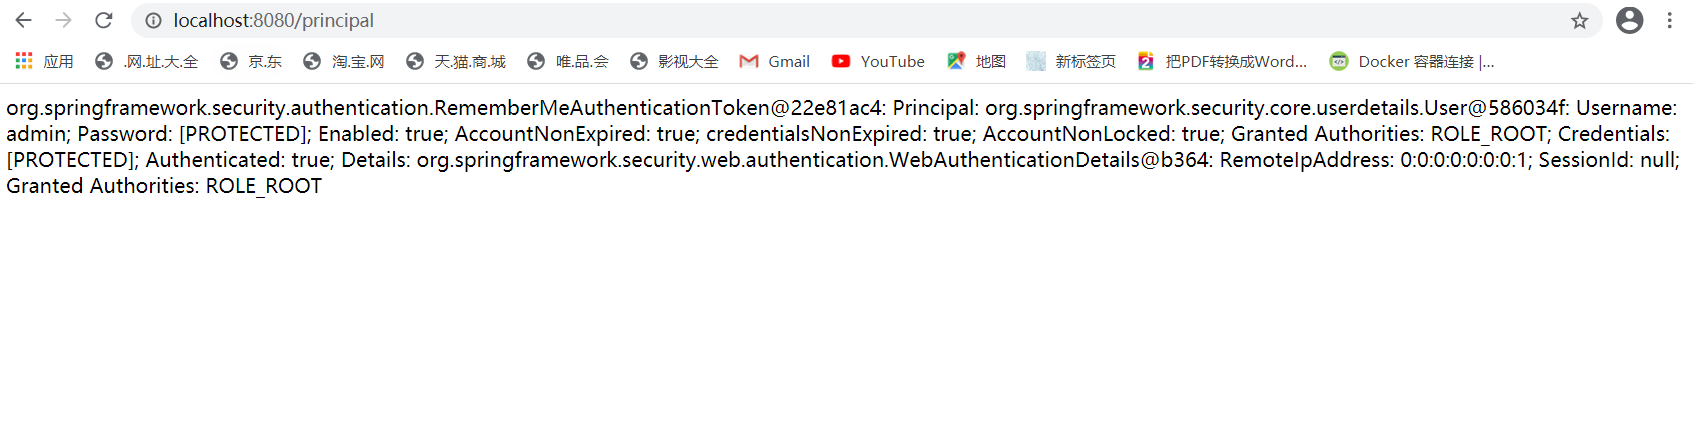
@Controller
public class UserController {
    @GetMapping("/login.html")
    public String loginPage(){

        return "/login.html";
    }

    @GetMapping("/index.html")
    public String index(){
        return "/index.html";
    }

    @GetMapping("/")
    public String basePage(){
        return "/index.html";
    }

    @GetMapping("/error.html")
    public String error(){
        return "/error.html";
    }

    @GetMapping("/principal")
    public String principal(){
        return ""+SecurityContextHolder.getContext().getAuthentication().toString();
    }
}
访问路径可以得到登录后的信息,这一步得到 后,接下来就要考虑如果前后分离的架构那就后台把这数据读取出来自己封装返给前台
七、授权
权限管理的两大核心是:认证和授权,前面说的所有内容都停在认证上面,下面就说下授权的操作;在操作前先导个包
       <dependency>
            <groupId>org.thymeleaf.extras</groupId>
            <artifactId>thymeleaf-extras-springsecurity5</artifactId>
            <version>3.0.4.RELEASE</version>
        </dependency>
权限管理分粗细两个粒度,开发的人都懂,这里不解释;先说粗粒度,其实在前面也说过WebSecurityConfig类的configure方法也可以配置权限,行在控制层新加两个方法
//@Controller
@RestController
public class UserController {
    @GetMapping("/login.html")
    public String loginPage(){

        return "/login.html";
    }

    @GetMapping("/index.html")
    public String index(){
        return "/index.html";
    }

    @GetMapping("/")
    public String basePage(){
        return "/index.html";
    }

    @GetMapping("/error.html")
    public String error(){
        return "/error.html";
    }

    @GetMapping("/principal")
    public String principal(){
        return SecurityContextHolder.getContext().getAuthentication().toString();
    }

    @GetMapping("/query")
    public String query(){
        return "测试查询";
    }


    @GetMapping("/save")
    public String save(){
        return "添加 ";
    }
}
然后在配置中配置粗粒度配置
@Configuration
public class WebSecurityConfig extends WebSecurityConfigurerAdapter {


   @Autowired
   private UserService userService;

   //密码加密
   @Resource
   private BCryptPasswordEncoder bCryptPasswordEncoder;

   //将认证后信息存数据库
   @Resource
   private DataSource dataSource;

   @Resource
   private PersistentTokenRepository persistentTokenRepository;

    @Override
    protected void configure(AuthenticationManagerBuilder auth) throws Exception {
//         auth.inMemoryAuthentication()
//                .withUser("admin")
//                .password("{noop}admin")//不加密
//                .authorities("ADMIN");
        auth.userDetailsService(userService).passwordEncoder(bCryptPasswordEncoder);
    }
    //自定义过滤器链
    @Override
    protected void configure(HttpSecurity httpSecurity) throws Exception {
        System.out.println("拦截");
        //super.configure(http);
        httpSecurity.authorizeRequests() // 设置哪些页面可以直接访问,哪些需要验证
                .antMatchers("/login.html","/error.html").permitAll() // 放过
                .antMatchers("/query").hasRole("admin")
                .antMatchers("/save").hasRole("ROOT")
                .anyRequest().authenticated() // 剩下的所有的地址都是需要在认证状态下才可以访问
                .and()
                .formLogin()//其实就是添加一个过滤器
                .loginPage("/login.html") // 指定指定要的登录页面
                .loginProcessingUrl("/login.do") // 处理认证路径的请求
                .defaultSuccessUrl("/index.html")
                .failureForwardUrl("/error.html")//失败页面
                .and()
                .logout()
                .logoutUrl("/logout")//退出路径
                .logoutSuccessUrl("/login.html")//退出成功跳转页面
                .and()
                .rememberMe()//记住密码功能配置
                .tokenRepository(persistentTokenRepository)//覆盖掉默认的基于内存存储的方式,我们要扩展哪个扩展点就点哪个功能进去查,这里面是点rememberMe功能查的
//                .and().csrf().disable();//跨域攻击关闭
        ;
    }

    @Bean
    public PersistentTokenRepository persistentTokenRepository(){
        JdbcTokenRepositoryImpl repository = new JdbcTokenRepositoryImpl();
        repository.setDataSource(dataSource);
        // 第一次帮我们创建表结构,这样就不用我们自己建表了,第二次运行时这段注解掉
//         repository.setCreateTableOnStartup(true);
        return repository;
    }
    @Bean
    public BCryptPasswordEncoder bCryptPasswordEncoder(){
        return new BCryptPasswordEncoder();
    }

}
然后重启项目访问两个接口,在前面代码中我设置的帐号权限是root,登录成功后再访问上面两个接口会发现一个能访问一个没权限跳转到了登录页面

上面的配置容易操作方便,但在实际开发中我们接口多着呢,不可能一个个这样写吧;所以下面说下注解操作的方法;在SpringSecurity中是支持三种注解的方式的;
@EnableGlobalMethodSecurity :Spring Security默认是禁用注解的,要想开启注解,需要在继承WebSecurityConfigurerAdapter的类上加@EnableGlobalMethodSecurity注解。
1、JSR-250注解
@DenyAll 拒绝所有访问
@RolesAllowed({"USER", "ADMIN"}) 该方法只要具有"USER", "ADMIN"任意一种权限就可以访问。这里可以省 略前缀ROLE_,实际的权限可能是ROLE_ADMIN
@PermitAll 允许所有访问
2、prePostEnabled注解
@PreAuthorize:在方法执行之前执行,而且这里可以调用方法的参数,也可以得到参数值,这是利用JAVA8的参数名反射特性,如果没用JAVA8,那么也可以利用Spring Security的@P标注参数,或者Spring Data的@Param标注参数。
@PreAuthorize("#userId == authentication.principal.userId or hasAuthority(‘ADMIN’)")
void changePassword(@P("userId") long userId ){
}
这里表示在changePassword方法执行之前,判断方法参数userId的值是否等于principal中保存的当前用户的userId,或者当前用户是否具有ROLE_ADMIN权限,两种符合其一,就可以访问该方法。
@PostAuthorize:在方法执行之后执行,而且这里可以调用方法的返回值,如果EL为false,那么该方法也已经执行完了,可能会回滚。EL变量returnObject表示返回的对象。
@PostAuthorize
User getUser("returnObject.userId == authentication.principal.userId or hasPermission(returnObject, 'ADMIN')");
@PreFilter:在方法执行之前执行,而且这里可以调用方法的参数,然后对参数值进行过滤或处理或修改,EL变量filterObject表示参数,如有多个参数,使用filterTarget注解参数。只有方法参数是集合或数组才行。(很少会用到,与分页技术不兼容)
3、securedEnabled 注解
@Secured认证是否有权限访问,例如
@Secured("IS_AUTHENTICATED_ANONYMOUSLY")public Account readAccount(Long id);
@Secured("ROLE_TELLER")
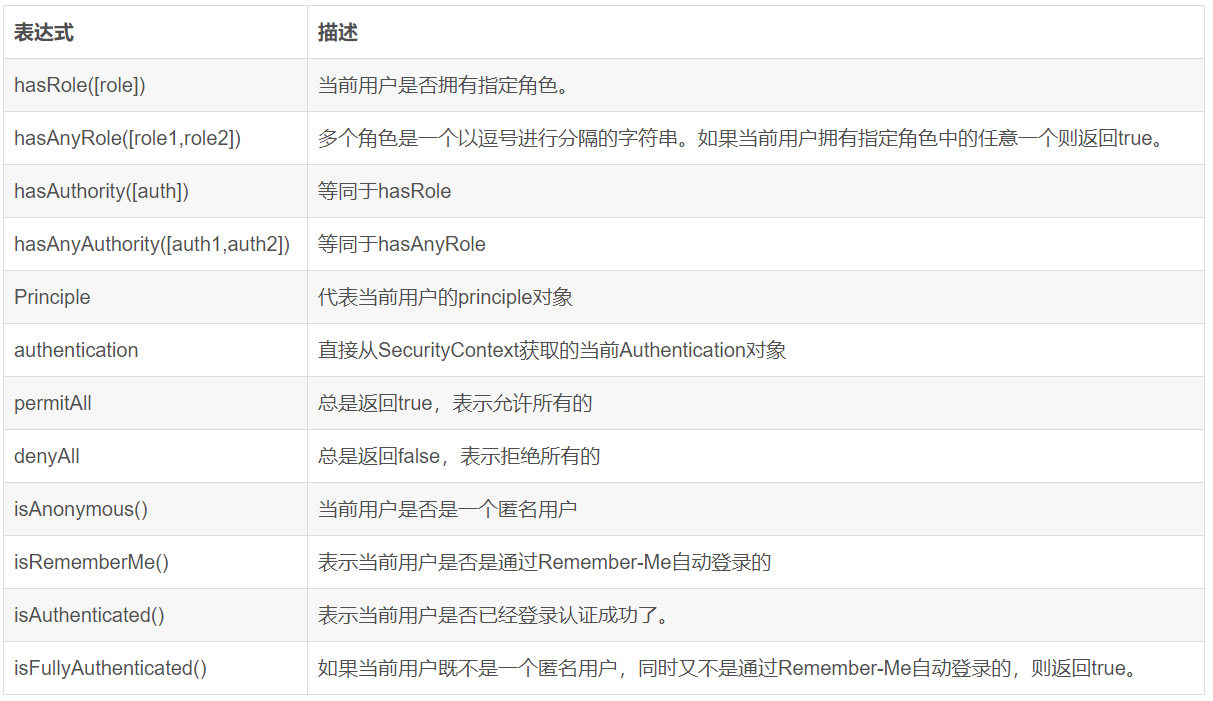
Spring Security允许我们在定义URL访问或方法访问所应有的权限时使用Spring EL表达式,在定义所需的访问权限时如果对应的表达式返回结果为true则表示拥有对应的权限,反之则无。Spring Security可用表达式对象的基类是SecurityExpressionRoot,其为我们提供了如下在使用Spring EL表达式对URL或方法进行权限控制时通用的内置表达式。
有了上面的了解下面来实操,首先在启动类上加上@EnableGlobalMethodSecurity(prePostEnabled= true)注解,这个放开是对springboot的表达式的支持;然后注销掉在WebSecurityConfig类中的配置
@Configuration
public class WebSecurityConfig extends WebSecurityConfigurerAdapter {


   @Autowired
   private UserService userService;

   //密码加密
   @Resource
   private BCryptPasswordEncoder bCryptPasswordEncoder;

   //将认证后信息存数据库
   @Resource
   private DataSource dataSource;

   @Resource
   private PersistentTokenRepository persistentTokenRepository;

    @Override
    protected void configure(AuthenticationManagerBuilder auth) throws Exception {
//         auth.inMemoryAuthentication()
//                .withUser("admin")
//                .password("{noop}admin")//不加密
//                .authorities("ADMIN");
        auth.userDetailsService(userService).passwordEncoder(bCryptPasswordEncoder);
    }
    //自定义过滤器链
    @Override
    protected void configure(HttpSecurity httpSecurity) throws Exception {
        System.out.println("拦截");
        //super.configure(http);
        httpSecurity.authorizeRequests() // 设置哪些页面可以直接访问,哪些需要验证
                .antMatchers("/login.html","/error.html").permitAll() // 放过
//                .antMatchers("/query").hasRole("admin")
////                .antMatchers("/save").hasRole("ROOT")
                .anyRequest().authenticated() // 剩下的所有的地址都是需要在认证状态下才可以访问
                .and()
                .formLogin()//其实就是添加一个过滤器
                .loginPage("/login.html") // 指定指定要的登录页面
                .loginProcessingUrl("/login.do") // 处理认证路径的请求
                .defaultSuccessUrl("/index.html")
                .failureForwardUrl("/error.html")//失败页面
                .and()
                .logout()
                .logoutUrl("/logout")//退出路径
                .logoutSuccessUrl("/login.html")//退出成功跳转页面
                .and()
                .rememberMe()//记住密码功能配置
                .tokenRepository(persistentTokenRepository)//覆盖掉默认的基于内存存储的方式,我们要扩展哪个扩展点就点哪个功能进去查,这里面是点rememberMe功能查的
//                .and().csrf().disable();//跨域攻击关闭
        ;
    }

    @Bean
    public PersistentTokenRepository persistentTokenRepository(){
        JdbcTokenRepositoryImpl repository = new JdbcTokenRepositoryImpl();
        repository.setDataSource(dataSource);
        // 第一次帮我们创建表结构,这样就不用我们自己建表了,第二次运行时这段注解掉
//         repository.setCreateTableOnStartup(true);
        return repository;
    }
    @Bean
    public BCryptPasswordEncoder bCryptPasswordEncoder(){
        return new BCryptPasswordEncoder();
    }

}
然后在控制层加上@PreAuthorize(value = "hasRole('ROOT')")注解
//@Controller
@RestController
public class UserController {

    @GetMapping("/principal")
    public String principal(){
        return SecurityContextHolder.getContext().getAuthentication().toString();
    }
    @PreAuthorize(value = "hasRole('ROOT')")
    @GetMapping("/query")
    public String query(){
        return "测试查询";
    }

    @PreAuthorize(value = "hasRole('admin')")
    @GetMapping("/save")
    public String save(){
        return "添加 ";
    }
}
然后再启动测试下,效果一样,接下来试下jsr250Enabled注解方式,一样在启动类上加上注解@EnableGlobalMethodSecurity(jsr250Enabled = true)并将原注解删了
然后在控制层加上注解@RolesAllowed(value = {"admin"})
//@Controller
@RestController
public class UserController {

    @GetMapping("/principal")
    public String principal(){
        return SecurityContextHolder.getContext().getAuthentication().toString();
    }
    //@PreAuthorize(value = "hasRole('ROOT')")
    @RolesAllowed(value = {"ROOT"})
    @GetMapping("/query")
    public String query(){
        return "测试查询";
    }

   // @PreAuthorize(value = "hasRole('admin')")
    @RolesAllowed(value = {"admin"})
    @GetMapping("/save")
    public String save(){
        return "添加 ";
    }
}
然后再操作下最后一种一样在启动类上加上注解@EnableGlobalMethodSecurity(securedEnabled = true)注解,然后再在控制层加上注解
//@Controller
@RestController
public class UserController {

    @GetMapping("/principal")
    public String principal(){
        return SecurityContextHolder.getContext().getAuthentication().toString();
    }
    //@PreAuthorize(value = "hasRole('ROOT')")
    //@RolesAllowed(value = {"ROOT"})
    @Secured(value = {"ROLE_ROOT"})
    @GetMapping("/query")
    public String query(){
        return "测试查询";
    }

   // @PreAuthorize(value = "hasRole('admin')")
    //@RolesAllowed(value = {"admin"})
   @Secured(value = {"admin"})
    @GetMapping("/save")
    public String save(){
        return "添加 ";
    }
}
粗粒度的搞完后,接下来就说下细粒度权限
在index.html页面改下就好,如果在前后端分离的话这把权限按钮交给前端让他们自己写
<!DOCTYPE html>
<html lang="en" xmlns="http://www.w3.org/1999/xhtml" xmlns:th="http://www.thymeleaf.org"
      xmlns:sec="http://www.thymeleaf.org/extras/spring-security">
<head>
    <meta charset="UTF-8">
    <title>Title</title>
</head>
<body>
<h1>欢迎页面</h1>
登录名:<span sec:authentication="name"></span><br>
角色:<span sec:authentication="principal.authorities"></span><br>
用户名:<span sec:authentication="principal.username"></span><br>
密码:<span sec:authentication="principal.password"></span><br>
<span sec:authorize="isAuthenticated()">
        已登陆<br>
        <span sec:authorize="hasRole('USER')">
            <a href="#">用户管理</a>
        </span><br>
        <span sec:authorize="hasRole('ROOT')">
            <a href="#">角色管理</a>
        </span><br>
        <span sec:authorize="hasRole('USER')">
            <a href="#">权限管理</a>
        </span><br>
        <span sec:authorize="hasRole('ROOT')">
            <a href="#">菜单管理</a>
        </span><br>
    </span>
</body>
</html>
git源码网址:https://github.com/ljx958720/spring-boot-security.git