1、设置分片数和副本数
es7默认主分片数和主分片副本数都为1,通过 default_template 指定分片数
PUT http://192.168.8.101:9200/_template/default_template
{
  "index_patterns" : ["*"],
  "settings": {
    "number_of_shards": 3,
    "number_of_replicas" : 1
  }
}
number_of_shards:每个索引的主分片数,默认值是 1 不再是5。这个配置在索引创建后不能修改。
number_of_replicas:每个主分片的副本数,默认值是 1 。对于活动的索引库,这个配置可以随时修改。

2、集群健康
http://192.168.8.101:9200/_cat/health?v

我们可以看到,我们命名为“elasticsearch”的集群现在是green状态。
无论何时我们请求集群健康时,我们会得到green, yellow, 或者 red 这三种状态。
Green : everything is good(一切都很好)(所有功能正常)
Yellow : 所有数据都是可用的,但有些副本还没有分配(所有功能正常)
Red : 有些数据不可用(部分功能正常)
从上面的响应中我们可以看到,集群"elasticsearch"总共有3个节点,0个分片因为还没有数据。
3、查看全部节点
http://192.168.8.101:9200/_cat/nodes?v

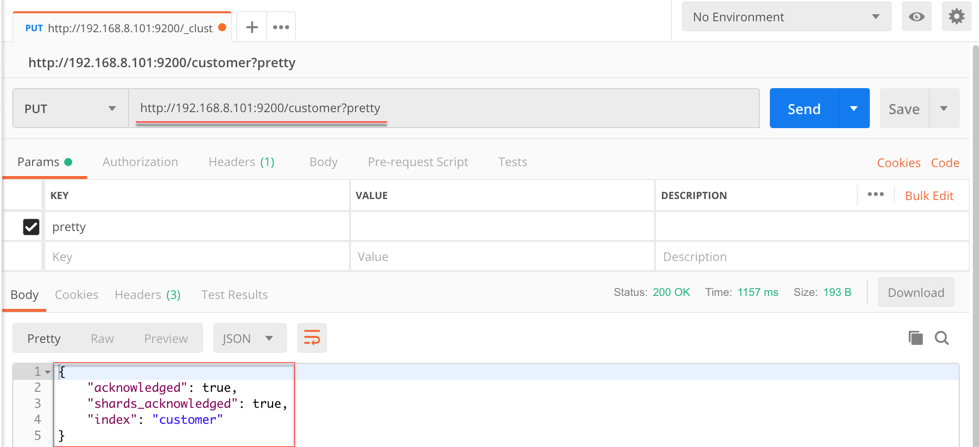
4、创建一个索引
http://192.168.8.101:9200/customer?pretty
5、查看索引
http://192.168.8.101:9200/_cat/indices?v

6、删除索引
curl -X DELETE "localhost:9200/customer?pretty"

删除后,查看索引
http://192.168.8.101:9200/_cat/indices?v

7、索引并查询一个文档
curl -X PUT "192.168.8.101:9200/customer/_doc/1?pretty" -H 'Content-Type: application/json' -d'{"name": "John Doe"}'
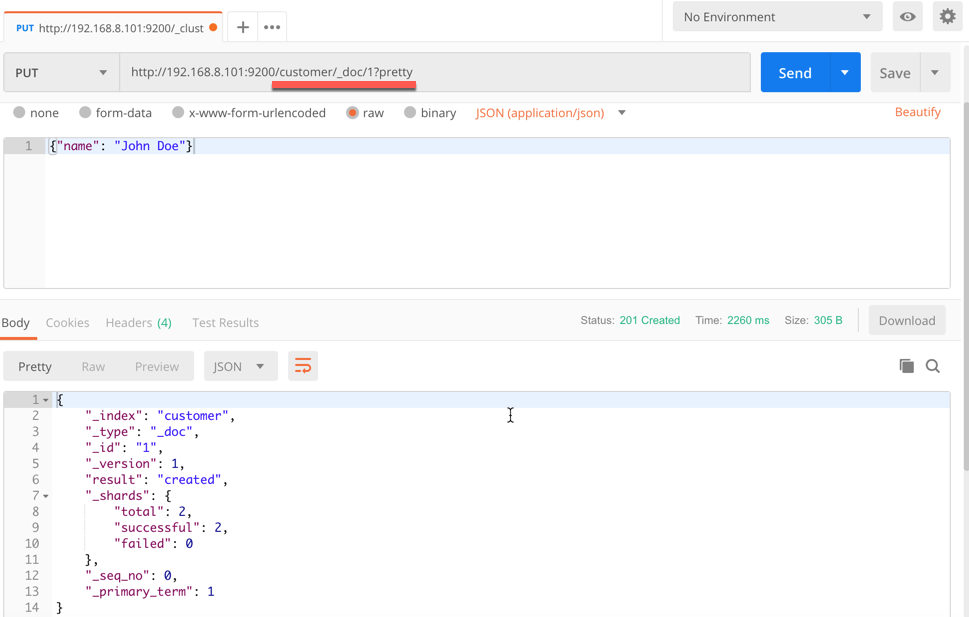
从上面的响应可以看到,我们在"customer"索引下成功创建了一个文档。
这个文档还有一个内部id为1,这是我们在创建的时候指定的。
需要注意的是,Elasticsearch并不要求你在索引文档之前就先创建索引,然后才能将文档编入索引。
在前面的示例中,如果事先不存在"customer"索引,Elasticsearch将自动创建"customer"索引。
也就是说,在新建文档的时候如果指定的索引不存在则会自动创建相应的索引
现在,让我重新检索这个文档:
curl -X GET "localhost:9200/customer/_doc/1?pretty"

可以看到除了"found"字段外没什么不同,"_source"字段返回了一个完整的JSON文档。
8、创建/删除索引、索引/查询文档总结
到现在为止,我们已经学习了创建/删除索引、索引/查询文档这四个命令
curl -X PUT "localhost:9200/customer"
curl -X PUT "localhost:9200/customer/_doc/1" -H 'Content-Type: application/json' -d'{"name": "John Doe"}'
curl -X GET "localhost:9200/customer/_doc/1"
curl -X DELETE "localhost:9200/customer"
如果我们仔细研究上面的命令,我们实际上可以看到如何在Elasticsearch中访问数据的模式。这种模式可以概括如下:
<REST Verb> /<Index>/<Type>/<ID>
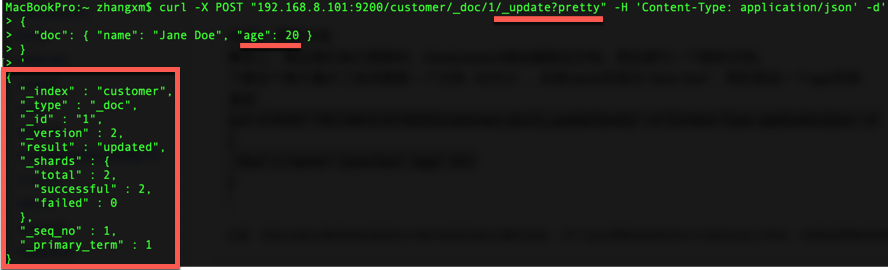
9、更新文档
事实上,每当我们执行更新时,Elasticsearch就会删除旧文档,然后索引一个新的文档。
下面这个例子展示了如何更新一个文档(ID为1),改变name字段为"Jane Doe",同时添加一个age字段:
请求:
curl -X POST "192.168.8.101:9200/customer/_doc/1/_update?pretty" -H 'Content-Type: application/json' -d'
{
  "doc": { "name": "Jane Doe", "age": 20 }
}
'
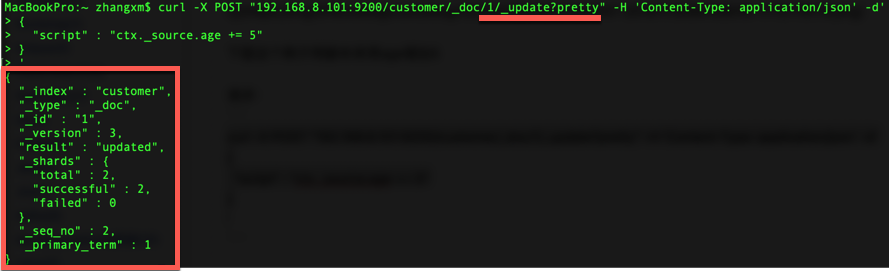
下面这个例子用脚本来将age增加5
请求:
curl -X POST "192.168.8.101:9200/customer/_doc/1/_update?pretty" -H 'Content-Type: application/json' -d'
{
  "script" : "ctx._source.age += 5"
}
'
在上面例子中,ctx._source引用的是当前源文档
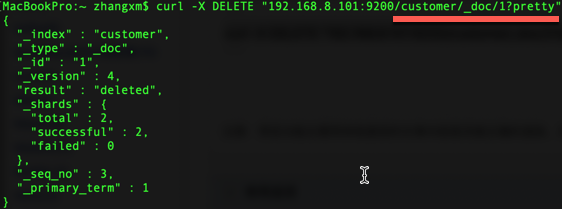
10、删除文档
删除文档相当简单。这个例子展示了如何从"customer"索引中删除ID为2的文档:
curl -X DELETE "192.168.8.101:9200/customer/_doc/2?pretty"
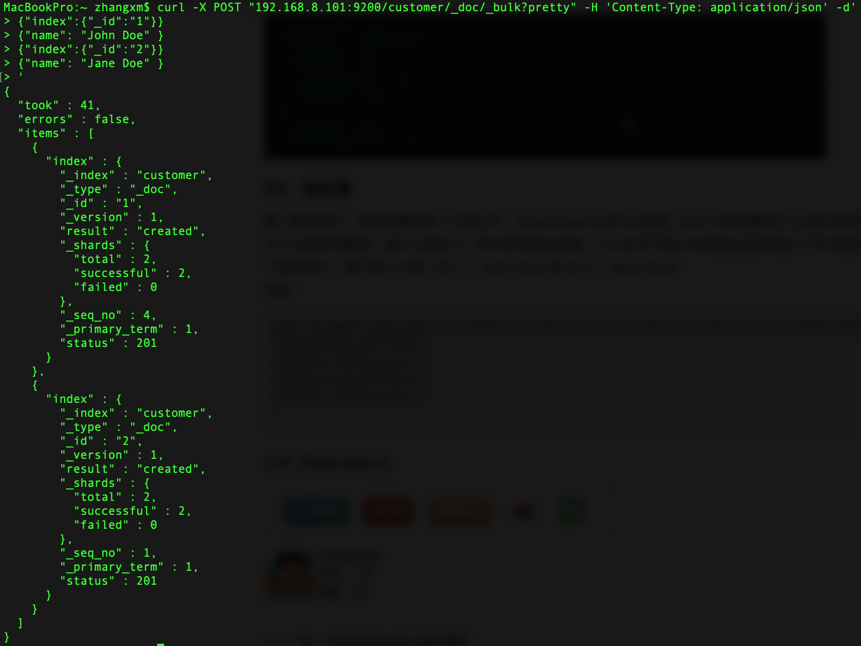
11、批处理
除了能够索引、更新和删除单个文档之外,Elasticsearch还可以使用_bulk API批量执行上述任何操作。
这个功能非常重要,因为它提供了一种非常有效的机制,可以在尽可能少的网络往返的情况下尽可能快地执行多个操作。
下面的例子,索引两个文档(ID 1 - John Doe 和 ID 2 - Jane Doe)
请求:
curl -X POST "192.168.8.101:9200/customer/_doc/_bulk?pretty" -H 'Content-Type: application/json' -d'
{"index":{"_id":"1"}}
{"name": "John Doe" }
{"index":{"_id":"2"}}
{"name": "Jane Doe" }
'
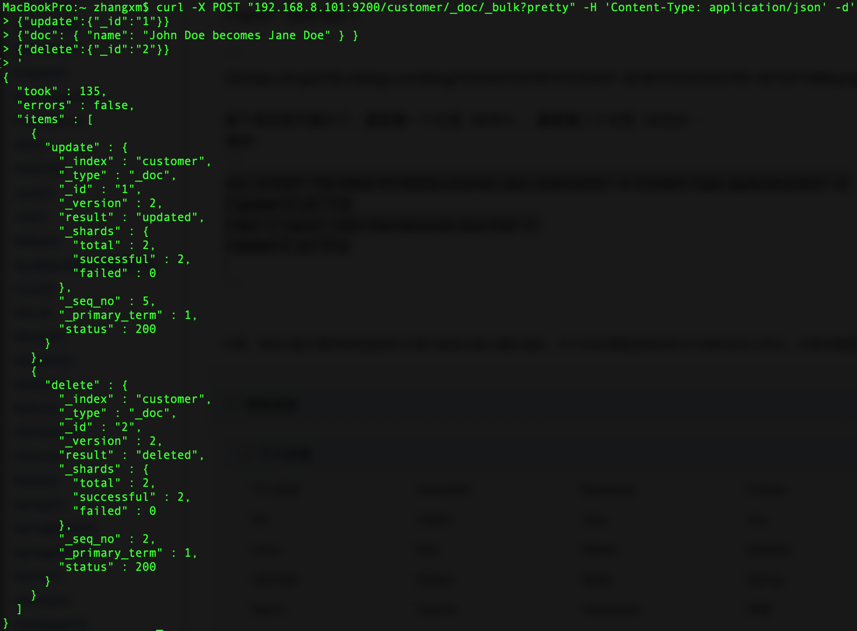
接下来的例子展示了,更新第一个文档(ID为1),删除第二个文档(ID为2):
请求:
curl -X POST "192.168.8.101:9200/customer/_doc/_bulk?pretty" -H 'Content-Type: application/json' -d'
{"update":{"_id":"1"}}
{"doc": { "name": "John Doe becomes Jane Doe" } }
{"delete":{"_id":"2"}}
'
现在,我们来重新查看一下索引文档
curl -X GET "192.168.8.101:9200/customer/_doc/1?pretty"

12、检索数据
现在让我们从一些简单的搜索开始。
运行搜索有两种基本方法:一种是通过REST请求URI发送检索参数,另一种是通过REST请求体发送检索参数。
(画外音:一种是把检索参数放在URL后面,另一种是放在请求体里面。相当于HTTP的GET和POST请求)
请求体方法允许你更有表现力,也可以用更可读的JSON格式定义搜索。
用于搜索的REST API可从_search端点访问。
1)通过REST请求URI发送检索参数
下面的例子返回"bank"索引中的所有文档:
curl -X GET "localhost:9200/bank/_search?q=*&sort=account_number:asc&pretty"
让我们来剖析一下上面的请求。
我们在
"bank"索引中检索,
q=*参数表示匹配所有文档;
sort=account_number:asc表示每个文档的account_number字段升序排序;
pretty参数表示返回漂亮打印的JSON结果。
响应结果看起来是这样的:
{
  "took" : 96,
  "timed_out" : false,
  "_shards" : {
    "total" : 5,
    "successful" : 5,
    "skipped" : 0,
    "failed" : 0
  },
  "hits" : {
    "total" : 1000,
    "max_score" : null,
    "hits" : [
      {
        "_index" : "bank",
        "_type" : "_doc",
        "_id" : "0",
        "_score" : null,
        "_source" : {
          "account_number" : 0,
          "balance" : 16623,
          "firstname" : "Bradshaw",
          "lastname" : "Mckenzie",
          "age" : 29,
          "gender" : "F",
          "address" : "244 Columbus Place",
          "employer" : "Euron",
          "email" : "bradshawmckenzie@euron.com",
          "city" : "Hobucken",
          "state" : "CO"
        },
        "sort" : [
          0
        ]
      },
      {
        "_index" : "bank",
        "_type" : "_doc",
        "_id" : "1",
        "_score" : null,
        "_source" : {
          "account_number" : 1,
          "balance" : 39225,
          "firstname" : "Amber",
          "lastname" : "Duke",
          "age" : 32,
          "gender" : "M",
          "address" : "880 Holmes Lane",
          "employer" : "Pyrami",
          "email" : "amberduke@pyrami.com",
          "city" : "Brogan",
          "state" : "IL"
        },
        "sort" : [
          1
        ]
      },
      {
        "_index" : "bank",
        "_type" : "_doc",
        "_id" : "2",
        "_score" : null,
        "_source" : {
          "account_number" : 2,
          "balance" : 28838,
          "firstname" : "Roberta",
          "lastname" : "Bender",
          "age" : 22,
          "gender" : "F",
          "address" : "560 Kingsway Place",
          "employer" : "Chillium",
          "email" : "robertabender@chillium.com",
          "city" : "Bennett",
          "state" : "LA"
        },
        "sort" : [
          2
        ]
      },
 	......
 	]
 }
可以看到,响应由下列几部分组成:
took : Elasticsearch执行搜索的时间(以毫秒为单位)
timed_out : 告诉我们检索是否超时
_shards : 告诉我们检索了多少分片,以及成功/失败的分片数各是多少
hits : 检索的结果
hits.total : 符合检索条件的文档总数
hits.hits : 实际的检索结果数组(默认为前10个文档)
hits.sort : 排序的key(如果按分值排序的话则不显示)
hits._score 和 max_score 现在我们先忽略这些字段
2) 通过REST请求体发送检索参数
curl -X GET "192.168.8.101:9200/bank/_search" -H 'Content-Type: application/json' -d'
{
  "query": { "match_all": {} },
  "sort": [
    { "account_number": "asc" }
  ]
}
'
1)和2)的区别在于,我们没有在URI中传递q=*,而是向_search API提供json风格的查询请求体
很重要的一点是,一旦返回搜索结果,Elasticsearch就完全完成了对请求的处理,不会在结果中维护任何类型的服务器端资源或打开游标。
这是许多其他平台如SQL形成鲜明对比。
13、查询语言
Elasticsearch提供了一种JSON风格的语言,您可以使用这种语言执行查询。这被成为查询DSL。
查询语言非常全面,乍一看可能有些吓人,但实际上最好的学习方法是从几个基本示例开始。
回到我们上一个例子,我们执行这样的查询:
curl -X GET "192.168.8.101:9200/bank/_search" -H 'Content-Type: application/json' -d'
{
  "query": { "match_all": {} }
}
'
查询部分告诉我们查询定义是什么,match_all部分只是我们想要运行的查询类型。
这里match_all查询只是在指定索引中搜索所有文档。
除了查询参数外,我们还可以传递其他参数来影响搜索结果。
在上面部分的例子中,我们传的是sort参数,这里我们传size:
curl -X GET "192.168.8.101:9200/bank/_search" -H 'Content-Type: application/json' -d'
{
  "query": { "match_all": {} },
  "size": 1
}
'
注意:如果size没有指定,则默认是10
下面的例子执行match_all,并返回第10到19条文档:
curl -X GET "192.168.8.101:9200/bank/_search" -H 'Content-Type: application/json' -d'
{
  "query": { "match_all": {} },
  "from": 10,
  "size": 10
}
'
from参数(从0开始)指定从哪个文档索引开始,并且size参数指定从from开始返回多少条。这个特性在分页查询时非常有用。
注意:如果没有指定from,则默认从0开始
这个示例执行match_all,并按照帐户余额降序对结果进行排序,并返回前10个(默认大小)文档。
curl -X GET "192.168.8.101:9200/bank/_search" -H 'Content-Type: application/json' -d'
{
  "query": { "match_all": {} },
  "sort": { "balance": { "order": "desc" } }
}
'
14、搜索
继续学习查询DSL。
首先,让我们看一下返回的文档字段。
默认情况下,会返回完整的JSON文档(PS:也就是返回所有字段)。
这被成为source(hits._source)
如果我们不希望返回整个源文档,我们可以从源文档中只请求几个字段来返回。
下面的例子展示了只返回文档中的两个字段:account_number 和 balance字段
curl -X GET "192.168.8.101:9200/bank/_search" -H 'Content-Type: application/json' -d'
{
  "query": { "match_all": {} },
  "_source": ["account_number", "balance"]
}
'

(画外音:相当于SELECT account_number, balance FROM bank)
现在让我们继续查询部分。
以前,我们已经看到了如何使用match_all查询匹配所有文档。
现在让我们引入一个名为match query的新查询,它可以被看作是基本的字段搜索查询(即针对特定字段或字段集进行的搜索)。
下面的例子返回account_number为20的文档
curl -X GET "192.168.8.101:9200/bank/_search" -H 'Content-Type: application/json' -d'
{
  "query": { "match": { "account_number": 20 } }
}
'
(画外音:相当于SELECT * FROM bank WHERE account_number = 20)
下面的例子返回address中包含"mill"的账户:
curl -X GET "`192.168.8.101:9200/bank/_search" -H 'Content-Type: application/json' -d'
{
  "query": { "match": { "address": "mill" } }
}
'
(画外音:相当于SELECT * FROM bank WHERE address LIKE '%mill%')
下面的例子返回address中包含"mill"或者"lane"的账户:
curl -X GET "192.168.8.101:9200/bank/_search" -H 'Content-Type: application/json' -d'
{
  "query": { "match": { "address": "mill lane" } }
}
'
(画外音:相当于SELECT * FROM bank WHERE address LIKE '%mill' OR address LIKE '%lane%')
让我们来引入bool查询,bool查询允许我们使用布尔逻辑将较小的查询组合成较大的查询。
下面的例子将两个match查询组合在一起,返回address中包含"mill"和"lane"的账户:
curl -X GET "192.168.8.101:9200/bank/_search" -H 'Content-Type: application/json' -d'
{
  "query": {
    "bool": {
      "must": [
        { "match": { "address": "mill" } },
        { "match": { "address": "lane" } }
      ]
    }
  }
}
'

(画外音:相当于SELECT * FROM bank WHERE address LIKE '%mill%lane%')
上面是bool must查询,下面这个是bool shoud查询:
curl -X GET "`192.168.8.101:9200/bank/_search" -H 'Content-Type: application/json' -d'
{
  "query": {
    "bool": {
      "should": [
        { "match": { "address": "mill" } },
        { "match": { "address": "lane" } }
      ]
    }
  }
}
'

(画外音:must相当于and,shoud相当于or,must_not相当于!)

(画外音:逻辑运算符:与/或/非,and/or/not,在这里就是must/should/must_not)
我们可以在bool查询中同时组合must、should和must_not子句。
此外,我们可以在任何bool子句中编写bool查询,以模拟任何复杂的多级布尔逻辑。
下面的例子是一个综合应用:
curl -X GET "192.168.8.101:9200/bank/_search" -H 'Content-Type: application/json' -d'
{
  "query": {
    "bool": {
      "must": [
        { "match": { "age": "40" } }
      ],
      "must_not": [
        { "match": { "state": "ID" } }
      ]
    }
  }
}
'

(画外音:相当于SELECT * FROM bank WHERE age LIKE '%40%' AND state NOT LIKE '%ID%')
15、过滤
分数是一个数值,它是文档与我们指定的搜索查询匹配程度的相对度量(PS:相似度)。
分数越高,文档越相关,分数越低,文档越不相关。
但是查询并不总是需要产生分数,特别是当它们仅用于“过滤”文档集时。
Elasticsearch检测到这些情况并自动优化查询执行,以便不计算无用的分数。
我们在前一节中介绍的bool查询还支持filter子句,该子句允许使用查询来限制将由其他子句匹配的文档,而不改变计算分数的方式。
作为一个例子,让我们引入range查询,它允许我们通过一系列值筛选文档。这通常用于数字或日期过滤。
下面这个例子用一个布尔查询返回所有余额在20000到30000之间(包括30000,BETWEEN...AND...是一个闭区间)的账户。
换句话说,我们想要找到余额大于等于20000并且小于等等30000的账户。
curl -X GET "localhost:9200/bank/_search" -H 'Content-Type: application/json' -d'
{
  "query": {
    "bool": {
      "must": { "match_all": {} },
      "filter": {
        "range": {
          "balance": {
            "gte": 20000,
            "lte": 30000
          }
        }
      }
    }
  }
}
'
16、聚集
(画外音:相当于SQL中的聚集函数,比如分组、求和、求平均数之类的)
首先,这个示例按state对所有帐户进行分组,然后按照count数降序(默认)返回前10条(默认):
(画外音:相当于按state分组,然后count(),每个组中按照COUNT()数取 top 10)
curl -X GET "192.168.8.101:9200/bank/_search" -H 'Content-Type: application/json' -d'
{
  "size": 0,
  "aggs": {
    "group_by_state": {
      "terms": {
        "field": "state.keyword"
      }
    }
  }
}
'
在SQL中,上面的聚集操作类似于:
SELECT state, COUNT(*) FROM bank GROUP BY state ORDER BY COUNT(*) DESC LIMIT 10;
响应:
{
    "took":50,
    "timed_out":false,
    "_shards":{
        "total":5,
        "successful":5,
        "skipped":0,
        "failed":0
    },
    "hits":{
        "total":1000,
        "max_score":0,
        "hits":[

        ]
    },
    "aggregations":{
        "group_by_state":{
            "doc_count_error_upper_bound":20,
            "sum_other_doc_count":770,
            "buckets":[
                {
                    "key":"ID",
                    "doc_count":27
                },
                {
                    "key":"TX",
                    "doc_count":27
                },
                {
                    "key":"AL",
                    "doc_count":25
                },
                {
                    "key":"MD",
                    "doc_count":25
                },
                {
                    "key":"TN",
                    "doc_count":23
                },
                {
                    "key":"MA",
                    "doc_count":21
                },
                {
                    "key":"NC",
                    "doc_count":21
                },
                {
                    "key":"ND",
                    "doc_count":21
                },
                {
                    "key":"ME",
                    "doc_count":20
                },
                {
                    "key":"MO",
                    "doc_count":20
                }
            ]
        }
    }
}
注意,我们将size=0设置为不显示搜索结果,因为我们只想看到响应中的聚合结果。
接下来的例子跟上一个类似,按照state分组,然后取balance的平均值
curl -X GET "192.168.8.101:9200/bank/_search" -H 'Content-Type: application/json' -d'
{
  "size": 0,
  "aggs": {
    "group_by_state": {
      "terms": {
        "field": "state.keyword"
      },
      "aggs": {
        "average_balance": {
          "avg": {
            "field": "balance"
          }
        }
      }
    }
  }
}
'
复制代码
在SQL中,相当于:
SELECT state, COUNT(), AVG(balance) FROM bank GROUP BY state ORDER BY COUNT() DESC LIMIT 10;
下面这个例子展示了我们如何根据年龄段(20-29岁,30-39岁,40-49岁)来分组,然后根据性别分组,最后得到平均账户余额,每个年龄等级,每个性别:
curl -X GET "localhost:9200/bank/_search" -H 'Content-Type: application/json' -d'
{
  "size": 0,
  "aggs": {
    "group_by_age": {
      "range": {
        "field": "age",
        "ranges": [
          {
            "from": 20,
            "to": 30
          },
          {
            "from": 30,
            "to": 40
          },
          {
            "from": 40,
            "to": 50
          }
        ]
      },
      "aggs": {
        "group_by_gender": {
          "terms": {
            "field": "gender.keyword"
          },
          "aggs": {
            "average_balance": {
              "avg": {
                "field": "balance"
              }
            }
          }
        }
      }
    }
  }
}
'