Erlide, the Erlang IDE
Copyright © 2000-2008 Vlad Dumitrescu; parts IBM Corporation and others. See Legal
Table of Contents
- Creating a project
- Importing an Erlang Project
- Configuring a project
- Editor view
- Running and debugging Erlang code
- Erlang navigator view
Getting started
Table of Contents
Installation guide
-
Install Erlang R11 or later, if it isn't already present on your system. On Windows systems, use a path with no spaces in it.
-
Install Eclipse. We target primarily version 3.3, but 3.4 works just as well.
-
If your network uses a proxy to connect to the internet, fill in the appropriate data in → → → , or for 3.4 → → → ,
-
In Eclipse 3.3, install Erlide by going to → → → . In the dialog, choose and enter
Erlideas name andhttp://erlide.org/updateas URL. Follow the dialogs with the obvious choices and in the end you will be asked to restart. -
In Eclipse 3.4 Install Erlide by going to → → . In the dialog, choose and enter
http://erlide.org/updateas URL. Follow the dialogs with the obvious choices and in the end you will be asked to restart. -
Restart. Go to → → → and add an entry (or several) for your Erlang installation(s) of choice. The required parameters are the name and the path to the top level directory (i.e.
$ERL_TOP). Now restart again.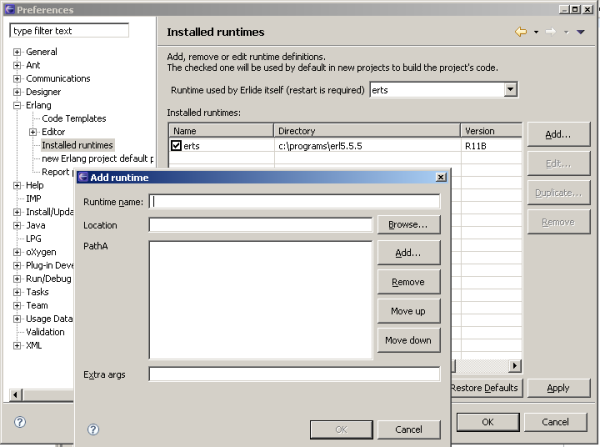
-
Done! You're ready to start exploring.
Tutorials
Quick start
Thanks to Eli Liang for writing this guide.
The steps outlined here use the Eclipse 3.4 menu names, for 3.3 the procedure is highly similar.
-
Start eclipse
-
If it prompts you to choose workspace, select the folder you want to work in. For this tutorial you might want to use a fresh one.
-
On the menu bar, Choose →
-
Select the Installed Software tab. If "Erlang IDE" appears under name, then go to 17.
-
Select the Available Software tab.
-
Click the button on the right.
-
In the Location field, enter
http://erlide.sourceforge.net/update -
Click
-
Check the box left of http://erlide.sourceforge.net/update
-
Check the box left of Unstable builds
-
Click the button on the right
-
When the Install dialog pops, click on the button
-
Accept the terms of the license agreement.
-
Click .
-
Click to restart.
-
Go to 20 below
-
Click on the button on the right
-
Follow the directions to update and restart Eclipse.
-
Click on the Workbench icon on the right side of the main eclipse window
-
On menu bar, choose → → →
-
See if there is a runtime listed in the drop down field called Runtime used by Erlide itself (restart is required). If there is something there, hit and go on to 28.
-
Click on the button.
-
In the Runtime name field, enter
erl5.6.4. -
In the Location field, browse to the very top level folder of the Erlang tree. This should be a folder called "erl5.6.4" or something like that.
-
Click . Then Click and in the Install runtimes pane.
-
On menu bar, choose →
-
On menu bar, chose Windows -> Open Perspective -> Other... -> Erlang. Click .
-
On menu bar, chose File -> New -> Project...
-
In wizard, chose Erlang -> Erlang Project and click Next
-
In Project name field, type
HelloWorldProject -
Click
-
On menu bar, choose Project and make sure that option is checked
-
The left pane is the Erlang Navigator. Right-click the HelloWorldProject branch. In the context menu that pops, select New -> Other... -> Erlang -> Module and click Next (can also just select "New Module" directly)
-
In the wizard, in the Module name field, type
hello -
Click Finish
-
On menu bar, choose Run -> Run Configurations...
-
Select the "Erlang application"
-
Click the New Launch configuration button (left side above the field with "type filter text")
-
Select the "New configuration"
-
Select the "Main tab" in the right pane
-
Check the box left of the HelloWorldProject
-
Select the "Runtimes" tab in the right pane
-
In the filed titled Node name, enter
erlide -
In some environments, Java and Erlang look for the default
.erlang.cookiefile in different places, and if you get connection problems you should enter some value for the Cookie field. If the node is already running, you have to use the same cookie value; otherwise, any string will do. -
Check the box to the left of "Start the Erlang node if not running presently"
-
Click "Apply" and "Run"
-
In the center code pane (titled "hello.erl"), enter the following code:
hello/0(within the brackets for the export, so it reads "-export([hello/0]).") -
On the next line after the export, enter the following code:
hello() -> io:format("Hello World!~n", []). -
In the menu bar, choose File -> Save As...
-
Double-click on the folder titled "HelloWorldProject" in the dialog box
-
Click on (select) the folder titled "
src" in the dialog box. The field entitled Enter or select the parent folder: should now readHelloWorldProject/src -
Click OK. The file "
hello.erl" is saved in the src directory and automatically built. -
The lower pane has a number of tabs. Select the "Console" tab.
-
In the console pane, enter the following command "
hello:hello()." and hit return. The output from the program will appear. -
To exit, in the menu bar, choose File -> Close, and then File -> Exit
Hello World
Thanks to Alain O'Dea for writing this guide.
Install Erlang/OTP (if you have not already)
-
Ubuntu Linux: run the following in Terminal:
sudo apt-get update
sudo apt-get install erlang
-
Windows: run the Windows Installer for Erlang
-
Mac OS X: install MacPorts and then run the following in Terminal:
sudo port selfupdate
sudo port install erlang
Install Eclipse and ErlIDE
-
Download Eclipse IDE for Java Developers
-
Extract it where you want to run it from (there is no installer, just an archive)
-
Launch Eclipse by double-clicking eclipse (Linux), eclipse.exe (Windows), or Eclipse (Mac) in the eclipse folder
-
Select (a dialog will appear)
-
Click Add Site...(another dialog will appear)
-
Enter http://erlide.sourceforge.net/update into the Location field, then click OK (dialog will close)
-
Select the checkbox by http://erlide.sourceforge.net/update and click Install... (another dialog will appear)
-
Select Next
-
Select I accept ... radio button and click Finish (a progress dialog will appear)
-
(wait for confirmation dialog) Select Yes (Eclipse will restart)
Add Primary Erlang Runtime
Without these steps things like syntax highlighting, code completion and other significant aspects of the ErlIDE UI will not work properly. The IDE will function basically, but it will not work as intended.
-
Select Window (menu) → Preferences... (Windows/Linux) or Eclipse (menu) → Preferences... (Mac) (a dialog will appear)
-
Expand Erlang and select Installed runtimes
-
Click Add... (a dialog will appear) and Enter Erlang in the Runtime name field
-
Click Browse... and select the root of your Erlang/OTP install (mine is /opt/local/lib/erlang), then click OK (dialog will close)
-
Click OK (preferences dialog will close)
Create Hello World Project
-
(wait for Eclipse to restart) Select Window (menu) → Close All Perspectives
-
Select Window (menu) → Open Perspective → Other... (a dialog will appear)
-
Select Erlang and click OK (dialog will close and Erlang Perspective will load)
-
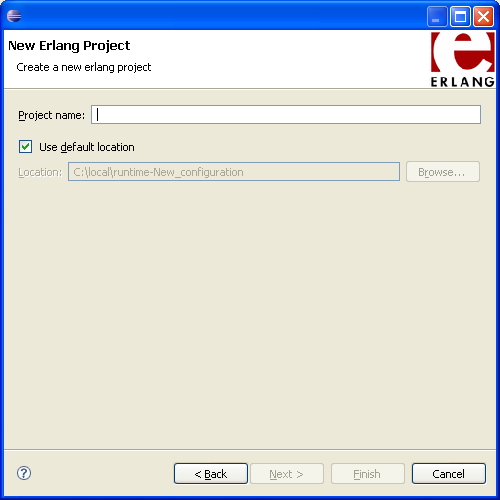
In the Erlang Navigator bring up the context menu (right-click/control-click) and select New Erlang Project (a dialog will appear)
-
Enter hello_world in the Project Name field and click Finish (dialog will close and hello_world project will appear in Erlang Navigator view)
Start Erlang Node To Run Code
-
Select hello_world project, bring up the context menu and select → (a dialog will appear)
-
Enter
hello_worldin the Name field -
Double-click Erlang application (a new confguration will appear in the right-hand panel)
-
In the Main tab under Projects click the checkbox beside hello_world
-
In the Runtimes tab click the checkbox beside Start the Erlang node if not running already and enter
hello_worldin the Node name field. -
In some environments, the cookie value needs to be specified (because Java and Erlang don't find the same default cookie).
-
Click Run (dialog will close and Console will appear with hello_world Erlang node)
-
Leave the Console running for the next part
Write Hello World Live!
-
On the hello_world project bring up the context menu (right-click/control-click) and select New Module (dialog will appear)
-
Enter
hello_worldin Module name field -
To the left of the Apply button, enter
say_helloin the first box and0in the second box and click -
Click (dialog will close and an editor for
hello_world.erlwill be opened) -
In the Console type
hello_world:say_hello(). -
Oops! It displays ok and shows no greeting! Let's fix that
-
In the hello_world.erl editor replace
okin say_hello withio:format("Hello World!")and save (Ctrl+S or Command+S) -
In the Console type
hello_world:say_hello(). -
Great! It displays "Hello World!" for us! Let's get it to say something else
-
In the hello_world.erl editor replace
"Hello World!"in say_hello with"Hello ErlIDE!") and save (Ctrl+S or Command+S) -
In the Console type
hello_world:say_hello(). -
Nifty! It displays
"Hello ErlIDE!"for us! We can change the code at runtime.
Features
- Wizards
-
New Project wizard
Create projects with the → → → project wizard. If the project isn't new, you can do an automatic search for source files, by using the "Discover paths" option. Review the result and add other needed directories.
New Module wizard
Create files by right-clicking on the desired directory in the resource view, and choosing either → → → and entering a name ending with erl, or → → → and following the instructions in the wizard. Leave empty any fields you don't understand the meaning of.
- Configuration
-
Preferences related to erlide can be found at → → . Please note that not all options are functional yet.
- Editor
-
The editor has all the generic Eclipse functionality and adds several Erlang-specific features:
-
Syntax highlighting
-
Indentation of Erlang code Ctrl+I. The reindentation affects the text selection or the current line only if nothing selected.
-
OTP documentation shown for external calls by hovering the cursor over a function call
-
Automatic completion of erlang modules, functions and records: Ctrl+Space. The list with proposals is also shown when entering : (colon).
-
Go to declaration of function, macro or record: F3 when the cursor is inside that element's name.
-
Show declaration of macros and records as a hover window
-
Bracket matching: the peer of the bracket at the cursor is highlighted.
-
Selective display of functions and declarations (folding)
-
context-sensitive menu when right clicking in the editor
-
- Builder
-
Building is automatic whenever a file is saved (if → is enabled) and the modified module is also reloaded in any Erlang backend that is linked to that project.
Provision for different runtimes, local or remote. Compile on one runtime, test and debug on another
Show errors and warnings in code and in problems view
Automatically mark and list comments with TODO and FIXME
Erlang log printouts with link to code line
- Outline view
-
Shows the structure of an Erlang module. The outline view allows navigation in a module and an overview of the functions in it. Clicking on an item will show its definition in the editor. The shown functions and declarations can be filtered and sorted.
In the editor a Quick outline dialog can be used for navigation (Ctrl+O). It has an automatic filtering feature, so you can just begin writing the function name and the list will only show the elements matching the prefix.
- Erlang console
-
The console lets you interact with the Erlang node that is behind the scenes. At the moment it is not as useful as it may be, as it only connects to the backend that hosts the Erlide functionality, not the ones where the code under development is run. This will be fixed in the future.
The console has history (Ctrl+Up and Ctrl+Down), syntax highlighting, code completion and other experimental features, like colored background for text depending on which process it was written from (useful when several processes output trace messages).
When lrunning/debugging, a "normal" console will show up and it can be used to interact with the runtime, but it has limited functionality.
- Live expressions view
-
In this view you can enter expressions that will be reevaluated every time a file is recompiled or when you press the refresh button in the view. You have to create a new entry, then go to the expression field and edit it. There is no need to end the expression with a dot.
![[Warning]](http://erlide.sourceforge.net/images/warning.png)
Warning Don't use expressions that might kill or crash the runtime (for example
init:stop()), because there are no restrictions yet and you'll get exactly what you ask for! - Process list view
-
A process list similar to etop. Double-clicking a process will show details about it. At the top, one can choose which backend to show the list from.
- EDoc view
-
Opening a "Edoc" view (in → → ) will display the documentation for the function where the cursor is. The documentation is also shown in a hover window, when the mouse cursor is above a function call.
The OTP documentation is shown, if installed on your system. Also, if the project contains HTML documentation that is located in an OTP-like location (i.e. in a
doc/htmldirectory in the project ), then this documentation is also shown. - Debugger
-
We offer all the features of the standard debugger, because we are using it.
Breakpoints, single-stepping. Breakpoints can be set by double-clicking on the left-side gutter in the editor.
Inspection and modification of local variables.
Distributed debugger, debug on multiple nodes.
- Problems view
-
The problems view will show all errors and warnings from the compiler. Clicking them opens the file in the editor at the right line.
There is also a Tasks view that will detect comments starting with
TODO,FIXMEandXXXand show them there.
A few Eclipse tips
For those not familiar with Eclipse, some short tips and tricks:
-
Ctrl+Shift+L will display a list of key bindings to the various commands
-
The Eclipse help system is pretty comperhensive, use it to find your way around.
Concepts
Runtimes and backends
In Erlide we often use the terms runtime and backend. Here we will try to make clear what each of them means.
- Runtime
-
Describes an Erlang installation by pointing to its home directory and optionally adding extra code path entries and/or arguments. For example, one might want to have two R12B runtimes defined, one with and one without SMP enabled, and be able to refer to them quickly. At the moment, this installation must be a full installation (from the source with documentation) but at a future time we will support other repository formats (CEAN, Faxien).
- Backend
-
Is an Erlang node that has Erlide-specific code loaded and running.
There are two kinds of backends: managed and standalone. The Erlang node behind a managed backend is started and stopped by Erlide. The one behind a standalone one has an independent life cycle. A managed backend's definition must include a runtime; for a standalone one, the reference is informative only since the Erlang node is already started.
There are several kinds of backends: ide, build and execution. A single Erlang node may very well be behind several backends, but only at most one of them must be managed.
- IDE backend
-
Used by Erlide itself for all IDE related functionality (lexing, parsing, etc)
- Build backend
-
Each project references a build backend where the compilation is done. This is also where the OTP documentation is taken from. The backend is specified in the project's properties and defaults to the IDE backend.
- Execution backend
-
The execution backend is where the code is loaded and run/debugged. It is specified in an Eclipse run or debug configuration.
![[Note]](http://erlide.sourceforge.net/images/note.png)
Reference
Table of Contents
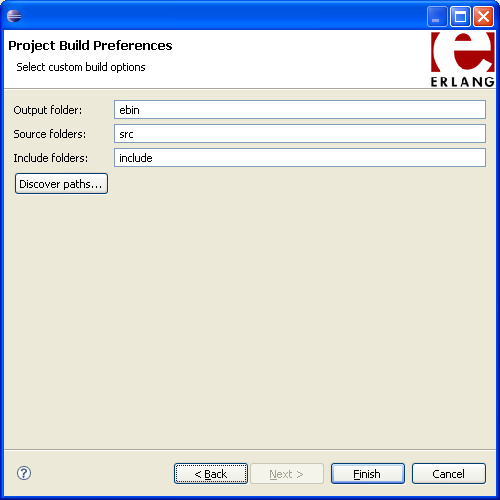
Creating a project
To create a project:
-
Click → → → or use the context menu in the navigator, right-clicking and choosing →

-
In the wizard, enter the project name and if needed choose the project's location
-
Click .
-
In the Project Build Preferences boxes, type Output, Source and Include folders or use the default values.
-
To create your project, click .
Importing an Erlang Project
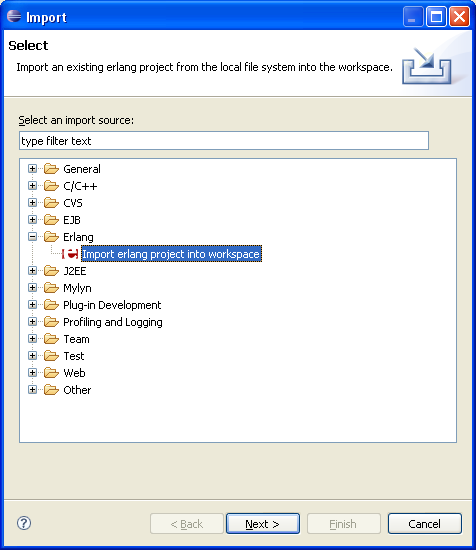
Import a project:
-
Click → → → or right click in →
-
In the Erlang Project Import Wizard, for Erlang project
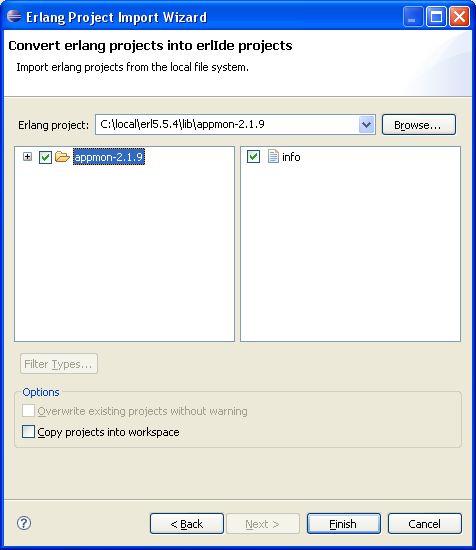
-
In the source field select project.
-
In Options you can choose to link to all folders and all files or to Copy selected files and selected folders to workspace.
-
To import your project, click .
Configuring a project
In the Navigator pane, right-click on the project and choose → . The dialog allows you to specify the project's settings.
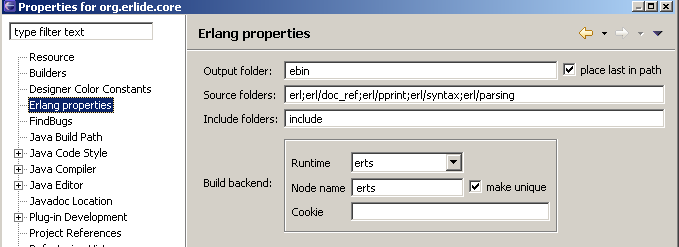
The build backend specifies the Erlang node on which the compilation will be done. By default, we use the same backend as the one the IDE is using and in most cases this is sufficient. See the Backends section for more details.
The "make unique" box lets you decide if the specified name will get a unique suffix in order to ensure that there will be no conflict with other running nodes (the use case is when there are several users running Erlide on the same machine, it's difficult to ensure that they won't use the same name for nodes). The suffix is derived from the workspace path, so it is deterministic.
An empty cookie field means thet the user's default cookie will be used.
Editor view
The Erlang editor provides specialized features for editing Erlang related files.
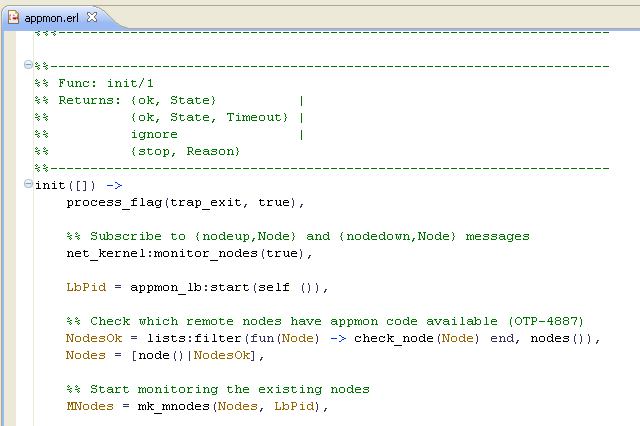
Associated with the editor is an Erlang-specific
outline view, which shows the structure of the active
.erl or .hrl file. It is updated as you edit these files.
The editor includes the following features:
-
Syntax highlighting
-
Content/code assist; auto completion of function calls, display of function documentation)
The most common way to invoke the Erlang editor is to open a file from the Erlang Navigator. If you want to open an Erlang file by name, the keyboard shortcut is Ctrl+Shift+R.
Running and debugging Erlang code
The Eclipse way to specify how to run the code that is being developed is called launch configurations. Erlide provides support for creating and executing Erlang-specific launch configurations. These configurations can be created and edited by opening the → dialog (or the → one, which offers some additional debug-specific options).
The main tab lets you select the projects whose code will be loaded and executed. There is also provision for defining one's own initialization by providing a function and arguments to be called.
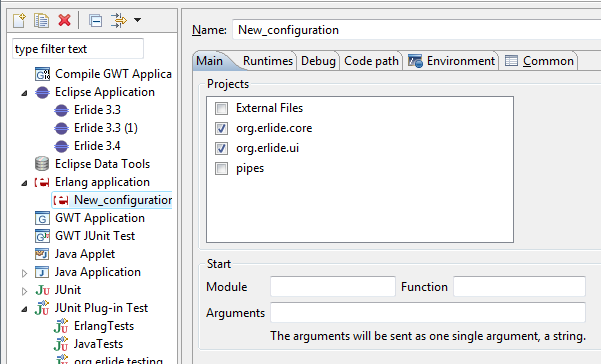
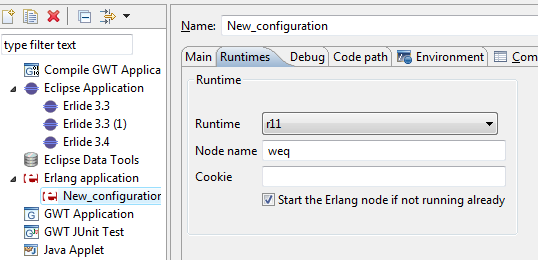
The runtimes tab lets you define the runtime that will be used and the node's name and cookie. The cookie is optional, defaulting to the user's default cookie.
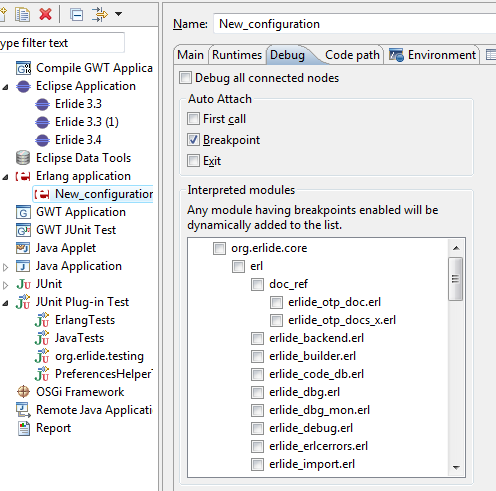
For a debug launch config, the debug tab contains the related options. The one that is erlide specific is the list of interpreted modules. The selected modules will be interpreted alongside with any module (from the referenced projects) that contains an enabled breakpoint. A similar list is available in the Interpreted modules view, allowing to change the status of the modules while debugging.
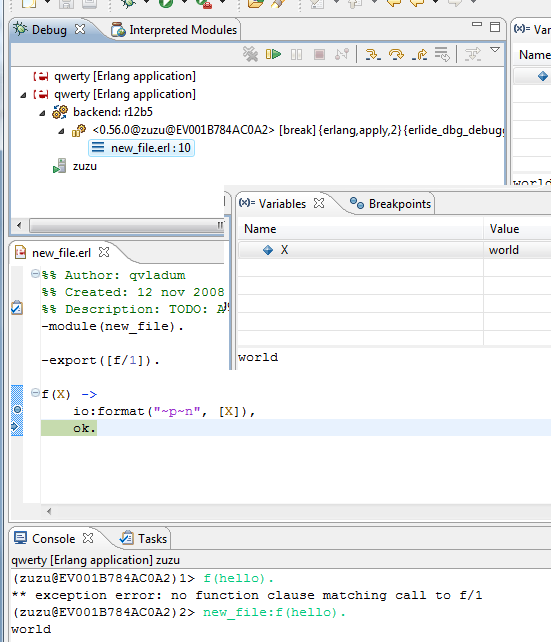
Debugging
While in the debugger, you can do most of the things that are expected while debugging: set breakpoints, execute code one line at the time, viewing local variables and even modifying them. Until a more detailed documentation of the debugger will be written, here come a couple of pictures showing a line of code executed with a changed variable. Before:
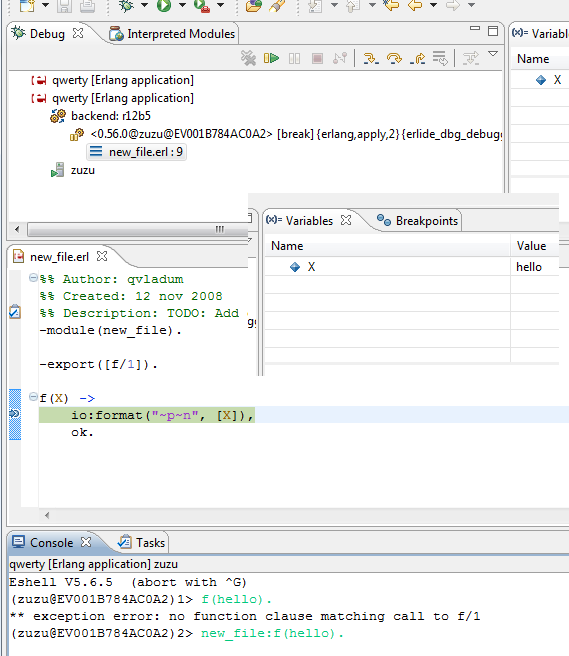
... and after:
Erlang navigator view
The Erlang naviagor view displays, in a tree structure, only elements relevant to Erlang project files. In this view you can do the following:
-
Browse the elements of
*.erlsource files -
Open files in the editor view
-
Open projects in a new window
-
Create new projects, modules, files, or folders
-
Manage existing files (cut, paste, delete, move or rename)
-
Restore deleted files from local history
-
Import or Export files and projects
Files that you select in the Navigator view affect the information that is displayed in other views.

Developer reference
Table of Contents
Installation
Install Eclipse SDK, Erlang R11 and Erlide as usual.
![[Important]](http://erlide.sourceforge.net/images/important.png) |
Important |
|---|---|
|
For developing Erlide, you can only use R11 for the IDE runtime. This is because we need have to support R11 at the user's site. |
Retrieve the code from repository
The repository is Subversion based. I recommend using the Subclipse plugin from http://subclipse.tigris.org.
The subversion repository has to be configured in the SVN Repository Browsing perspective. The URL for the repository is https://erlide.svn.sourceforge.net/svnroot/erlide.
I recommend to check out and commit the code by following the procedure below, not by checking out from within Eclipse.
$cd erlide.workspace # use your workspace's folder$svn co https://erlide.svn.sourceforge.net/svnroot/erlide/trunk .
On Windows, you can use TortoiseSVN to achieve the same effect.
This is because from within Eclipse we can get atomic commits only per each project. In order to get those across all projects, the operations need to be done at the workspace level and thus the workspace needs to be a versioned directory. This is important when branching and tagging.
Then go back to Eclipse and shut down the automatic builder ( → ) then choose → → . Import all projects and turn automatic build back on.
Build
Manual build
Go to the org.erlide.update project and create an entry for the current version, then press .
Automated build
Currently doesn't work. This is implemented in the org.erlide.build project. Description of the procedure will be added later. TBD.
Building the documentation
The source of the documentation is the erlide.xml file, in Docbook 5 format. It is used to generate Eclipse infocenter help, HTML pages to be put online and a printable PDF book.
Starting the newly built Erlide
-
After compiling the plugins, you can try starting the newly build Erlide. For this you have to create a run configuration. Choose → → → . Use a nice, friendly name like
Erlideand in the plug-ins tab select . -
In the main tab, select the "Program to run" to be "Run an application". The default value (org.eclipse.ui.ide.workbench) is fine.
-
Check all the Erlide plugins under "workspace plugins" and then "Add required plugins" for a minimal setting. Press validate and add any other plugins that may be needed.
-
Go to the tab and check the for both run and debug.
Plugin description
- com.ericsson.jinterface
-
This is a wrapper around the jinterface library from OTP.
- org.erlide
-
The feature that groups together all the deliverable plugins.
- org.erlide.core
-
Here we find the classes that model the Erlang code and that
- org.erlide.jinterface
-
This contains our extensions to jinterface. It is Eclipse-independent.
- org.erlide.ui
-
Here we find all UI related functionality.
- org.erlide.update
-
An update site is needed to distribute Erlide.
- org.erlide.help
-
The help files reside here. The documentation is written in Docbook 5 format and from it we generate Eclipse help, online HTML documentation, printable PDF.
- org.erlide.docs
-
Here we have no code, but administration-related files. Most notable is the source to the home page of the project in the
sitedirectory.
Development process
Source code management
Repository structure
The source code is stored in a Subversion repository. We use a standard structure, where the Eclipse project directories lie directly under the trunk:
/
  branches/
    RB_x/
      org.erlide.*
  tags/
    REL_y/
      org.erlide.*
  trunk/
    org.erlide.*
This way, we can do a checkout on the whole trunk directly in a workspace directory. This will allow to do atomic commits across all projects by using an external svn client, because from within Eclipse the atomicity is per project (a limitation of the Eclipse plugins).
Branches
-
The trunk will contain the bleeding edge of development, but it should be buildable at any time.
-
Release branches will be named RB-x.x
-
Larger features should be implemented in separate branches.
Commit policies
To be specified.
Testing
We strive to add both unit tests and "sanity" tests (the latter ones should check that a build is somewhat sane and didn't mess up anything basic).
Legal
Table of Contents
The basic structure and some material is Copyright © IBM Corporation and others 2000, 2005. The material in this guide is Copyright © Vlad Dumitrescu and others 2006-2008.©
Terms and conditions regarding the use of this guide
Unless otherwise indicated below, the Content is provided to you under the terms and conditions of the Eclipse Public License Version 1.0 ("EPL"). A copy of the EPL is available at http://www.eclipse.org/legal/epl-v10.html. For purposes of the EPL, "Program" will mean the Content.
If you did not receive this Content directly from the Eclipse Foundation, the Content is being redistributed by another party ("Redistributor") and different terms and conditions may apply to your use of any object code in the Content. Check the Redistributor's license that was provided with the Content. If no such license exists, contact the Redistributor. Unless otherwise indicated below, the terms and conditions of the EPL still apply to any source code in the Content.