目录:
1. 三个阶段生命周期函数
2. 不同生命周期详解
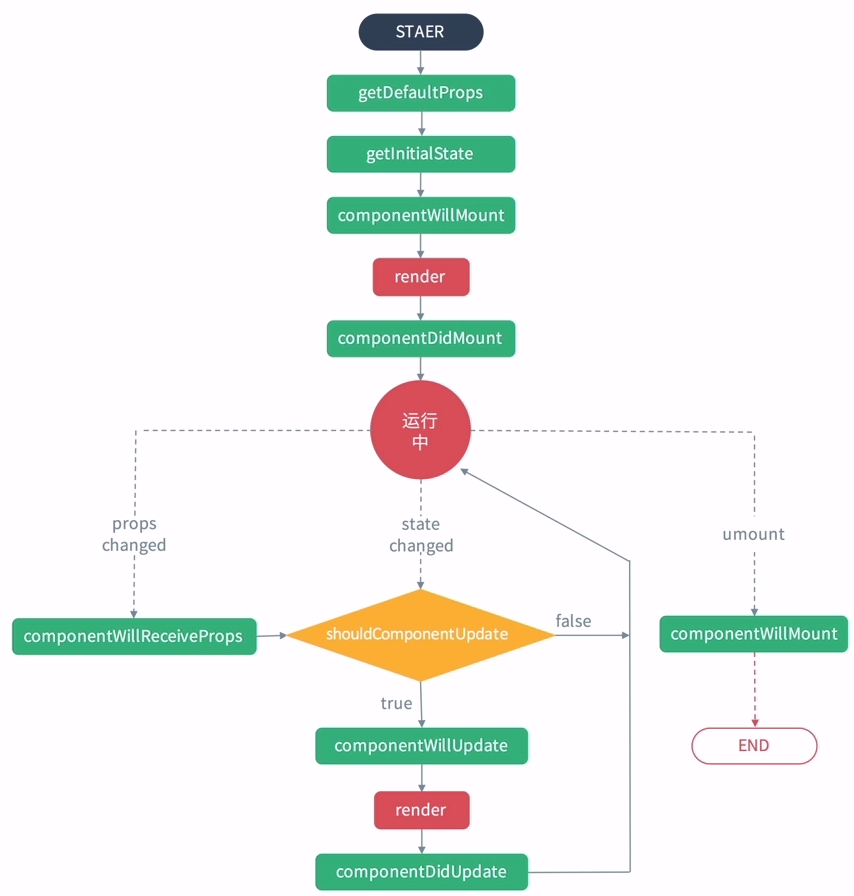
3. 图解生命周期
组件在页面上从创建到销毁分为了不同的状态,React 给出了让我们可以调用的生命周期函数。
React 生命周期主要包含 3 个阶段,分别是初始化阶段、运行中阶段、销毁阶段,也就是创建阶段、更新阶段、卸载阶段。在 React 不同的生命周期里会依次触发不同的钩子函数。
下面来看 React 生命周期中主要有哪些钩子函数。
在创建阶段会执行 Constructor 构造函数,此时会初始化 props 跟 state 值。在 Constructor 完成之后,会分别执行 componentWillMount、render、componentDidMount 这 3 个钩子函数。当 React 执行完 componentDidMount 之后,应用被加载到页面上。之后页面进行交互操作时,就进入更新阶段。
在更新阶段会依次触发 componentWillReceiveProps、shouldComponentUpdate、render、componentDidUpdate,这些函数的触发是一个循环的过程,每当有交互发生变动的时候,这些函数都会被依次调用。
当将一个组件从页面上移除的时候,就会触发 componentWillUnmount 。

下面分阶段看生命周期函数都有哪些特性和使用方法。
在创建阶段,组件会被创建出来并且被加载到 DOM 中去。
如果严格划分创建阶段的话,可以划分为初始化阶段、挂载阶段。
初始化阶段是调用 Constructor 的阶段,挂载阶段就是执行 componentWillMount、render、componentDidMount 的阶段。
创建阶段 constructor
一个类必须要有一个 constructor 方法,如果这个方法没有被显式定义,那么,一个默认的 constructor 函数会被添加。
一般,constructor 方法会返回一个实例对象,返回了实例对象之后我们可以在类函数中使用 this 关键字,在 constructor 中需要使用 super 方法调用基类的构造方法,也将父组件的 props 注入给子组件。
在 constructor 中可以做组件的初始化工作,比如说可以初始化 state,在 constructor 中可以直接修改 state,使用 this.state 进行赋值,不能使用 this.setState 方法。
创建阶段 componentWillMount
在组件挂载到 DOM 前(UI渲染完成前),componentWillMount 会被调用而且只会被调用一次。此时,如果使用 this.setState 是不会引起重新渲染的。
更多时候,会把组件元素里的内容提前到 constructor 中,所以在项目中很少使用到 componentWillMount 这个生命周期函数。
创建阶段 render
render 方法是一个类组件必须有的方法,render 方法会返回一个顶级的 react 元素。render 方法返回的并不是一个真正的 DOM 元素,它渲染的是 Dom Tree 的一个 React 对象,React 之所以效率高,是因为使用了虚拟的 Dom Tree。需要注意的是,不能在 render 方法里去执行 this.setState。
创建阶段 componentDidMount
在第一次渲染后调用,当 React 应用执行 componentDidMount 时就证明 UI 渲染完成了,这个生命周期函数只执行一次,它被调用时已经渲染出真实 DOM 了,这个生命周期函数比较适合使用的场景向服务端获取异步的数据,也就是获取一些外部数据资源。需要注意的是,当父组件执行 render 的时候,只有当所有的子组件都完成了创建,父组件才会完成渲染,然后执行 componentDidMount。


import React, { PureComponent } from 'react';
import Navbar from "./components/navbar"
import ListPage from './components/listPage'

class App extends PureComponent {
    constructor( props ){
        super(props)
        this.state = {
            listData : [
                {
                    id: 1,
                    name: '红苹果',
                    price: 2,
                    value: 4
                },
                {
                    id: 2,
                    name: '青苹果',
                    price: 3,
                    value: 2
                },
            ]
        }
        console.log('App - constructor');
    }
    componentDidMount () {
        console.log('App - mounted');
    }
    handleDelete = (id) => {
        const listData = this.state.listData.filter( item => item.id !== id )
        this.setState({
            listData
        })
    }
    handleReset = () => {
        const _list = this.state.listData.map( item => {
            const _item = {...item}
            _item.value = 0
            return _item
        })
        this.setState({
            listData : _list
        })
    }
    handleIncrease = (id) => {
        const _data = this.state.listData.map( item => {
            if( item.id === id ){
                const _item = {...item}
                _item.value++
                return _item
            }else{
                return item
            }
        })
        this.setState({
            listData : _data
        })
    }
    handleDecrease = (id) => {
        const _data = this.state.listData.map( item => {
            if( item.id === id ){
                const _item = {...item}
                _item.value--
                if( _item.value < 0 ) _item.value = 0
                return _item
            }else{
                return item
            }
        })
        this.setState({
            listData : _data
        })
    }
    render() {
        console.log('App - rendering');
        return(
            <>
                <Navbar
                    onReset = {this.handleReset}
                    total = {this.state.listData.length}
                />
                <ListPage
                    data = {this.state.listData}
                    handleDecrease = {this.handleDecrease}
                    handleIncrease = {this.handleIncrease}
                    handleDelete = {this.handleDelete}
                />
            </>
        )
    }
}

export default App;


在父组件 App.js 的 constructor 、componentDidMount、render 中加上标记。
在 App.js 的子组件 navbar.jsx 的 render 方法内加上标记 “Nav - rendering”
在 App.js 的子组件 listPage.jsx 的 render 方法内加上标记 “Page - rendering”
在 ListPage.jsx 的子组件 listItem.jsx 的 render 方法内加上标记 “Item - rendering”
控制台:
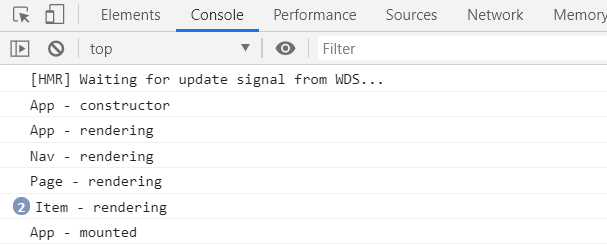
可以看到整个应用的加载过程,首先是父组件 App.js 执行 constructor,然后执行 render,然后执行 navbar.jsx 跟 listPage.jsx 的 render ,然后执行 listItem.jsx 的 render,当子组件都渲染完之后,父组件 App.js 才执行 componentDidMount,这时完成了整个应用程序的创建。
更新阶段 componentWillReceiveProps
组件接收到新 props 的时候调用 componentWillReceiveProps,可以在此对比新 props 和原来的 props,如果 props 发生变化,我们可以进行一些业务逻辑的操作。不过,现在不推荐使用这个方法了,因为有新的生命周期函数可以取代它。
更新阶段 shouldComponentUpdate
这个方法可以用于判断是否要继续执行 render 方法。它比较新传入的 nextProps 、 nextState 跟当前的 props、state ,如果返回 true,组件将继续执行更新,如果返回 false,会阻止组件更新,从而减少不必要的渲染,以达到性能优化的目的。但是,跟 shouldComponentUpdate 相比,更推荐使用 PureComponent 自动实现。 ( shouldComponentUpdate 相关笔记:https://www.cnblogs.com/xiaoxuStudy/p/13350935.html#shouldComponentUpdate )
shouldComponentUpdate 同时接受 props 跟 state,componentWillReceiveProps 只接受 props。
更新阶段 componentDidUpdate
componentDidUpdate 在每次 UI 更新时调用。这个方法接收 2 个参数:新传入的 props 跟 state,可以在这里和原来的数据进行对比,进行一些业务逻辑的处理。可以更新一些外部数据资源。
例 子
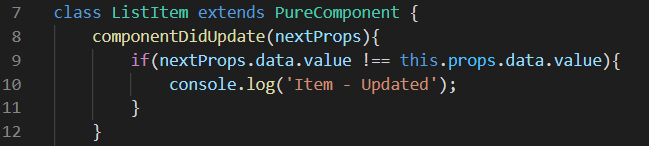
在上面例子的基础上,在 listItem.jsx 上添加一个 componentDidUpdate 函数,在函数内部添加一个判断,通过 value 对比新传入的 props 跟之前的 props,如果不一样的话,输出 ”Item - Updated“。
import React, { PureComponent } from 'react';
import style from './listItem.module.css';
import classnames from 'classnames/bind'

const cls = classnames.bind(style);

class ListItem extends PureComponent {
    componentDidUpdate(nextProps){
        if(nextProps.data.value !== this.props.data.value){
            console.log('Item - Updated');
        }
    }
    render() {
        console.log('Item - rendering');
        return (
            <div className="row mb-3">
                <div className="col-6 themed-grid-col">
                    <span className={ cls('title', 'list-title') }>
                        {this.props.data.name}
                    </span>
                </div>
                <div className="col-1 themed-grid-col">¥{this.props.data.price}</div>
                <div className={`col-2 themed-grid-col${this.props.data.value ? '' : '-s'}`}>
                    <button
                        onClick={()=>{this.props.onDecrease(this.props.data.id)}}
                        type="button" className="btn btn-primary"
                    >-</button>
                    <span className={ cls('digital') }>{this.props.data.value}</span>
                    <button
                        onClick={()=>{this.props.onIncrease(this.props.data.id)}}
                        type="button" className="btn btn-primary"
                    >+</button>
                </div>
                <div className="col-2 themed-grid-col">¥{this.props.data.price * this.props.data.value}</div>
                <div className="col-1 themed-grid-col">
                    <button
                        onClick={()=>{this.props.onDelete(this.props.data.id)}}
                        type="button" className="btn btn-danger btn-sm"
                    >删除
                    </button>
                </div>
            </div>
        );
    }
}

export default ListItem;
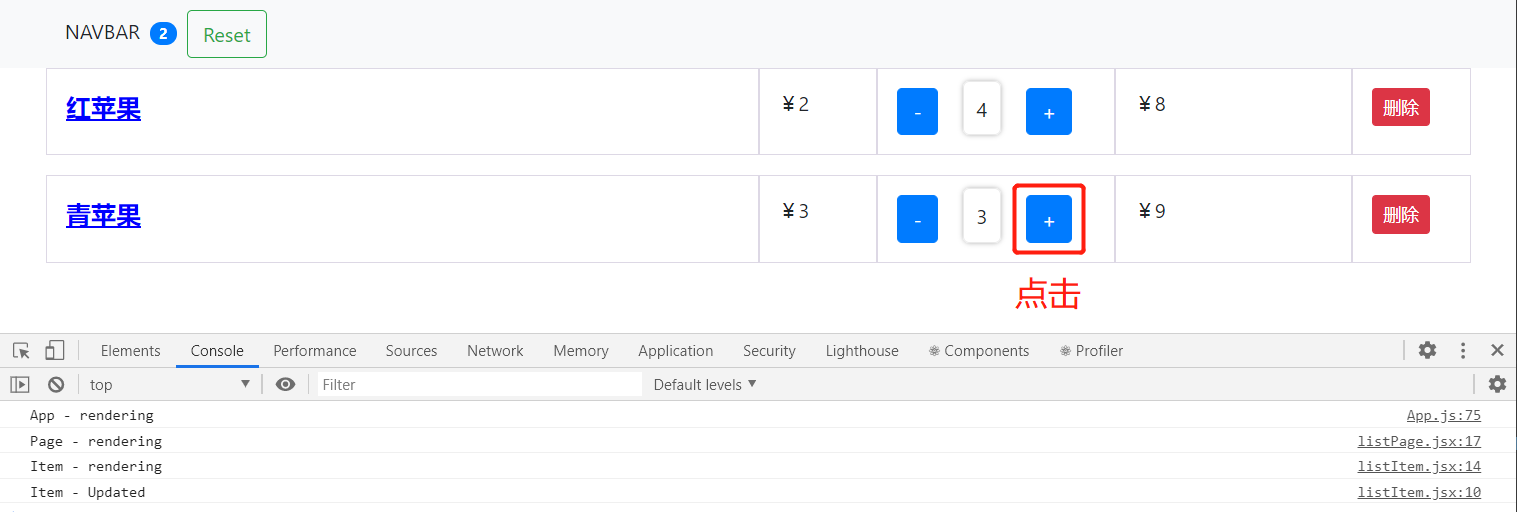
页面表现:

清空控制台,然后点击 “+” 按钮,可以看到当各个组件完成渲染,整个应用完成更新,最后执行的是 componentDidUpdate,只触发了一次。根据商品的变化,可以向后端要一些新的数据,这是这个生命周期函数的应用场景。
卸载阶段 componentWillUnmount
组件从 DOM 中移除之前立刻被调用 (比如说删除购物车中的某个商品时) componentWillUnmount,这个生命周期函数可以用来做资源的释放,比如说可以清理绑定的 timer。
例 子
在 listItem.jsx 中添加 componentWillUnmount 函数,当调用该函数输出“Item - Deleted”。
import React, { PureComponent } from 'react';
import style from './listItem.module.css';
import classnames from 'classnames/bind'

const cls = classnames.bind(style);

class ListItem extends PureComponent {
    componentDidUpdate(nextProps){
        if(nextProps.data.value !== this.props.data.value){
            console.log('Item - Updated');
        }
    }
    componentWillUnmount () {
        console.log( 'Item - Deleted' );
    }
    render() {
        console.log('Item - rendering');
        return (
            <div className="row mb-3">
                <div className="col-6 themed-grid-col">
                    <span className={ cls('title', 'list-title') }>
                        {this.props.data.name}
                    </span>
                </div>
                <div className="col-1 themed-grid-col">¥{this.props.data.price}</div>
                <div className={`col-2 themed-grid-col${this.props.data.value ? '' : '-s'}`}>
                    <button
                        onClick={()=>{this.props.onDecrease(this.props.data.id)}}
                        type="button" className="btn btn-primary"
                    >-</button>
                    <span className={ cls('digital') }>{this.props.data.value}</span>
                    <button
                        onClick={()=>{this.props.onIncrease(this.props.data.id)}}
                        type="button" className="btn btn-primary"
                    >+</button>
                </div>
                <div className="col-2 themed-grid-col">¥{this.props.data.price * this.props.data.value}</div>
                <div className="col-1 themed-grid-col">
                    <button
                        onClick={()=>{this.props.onDelete(this.props.data.id)}}
                        type="button" className="btn btn-danger btn-sm"
                    >删除
                    </button>
                </div>
            </div>
        );
    }
}

export default ListItem;

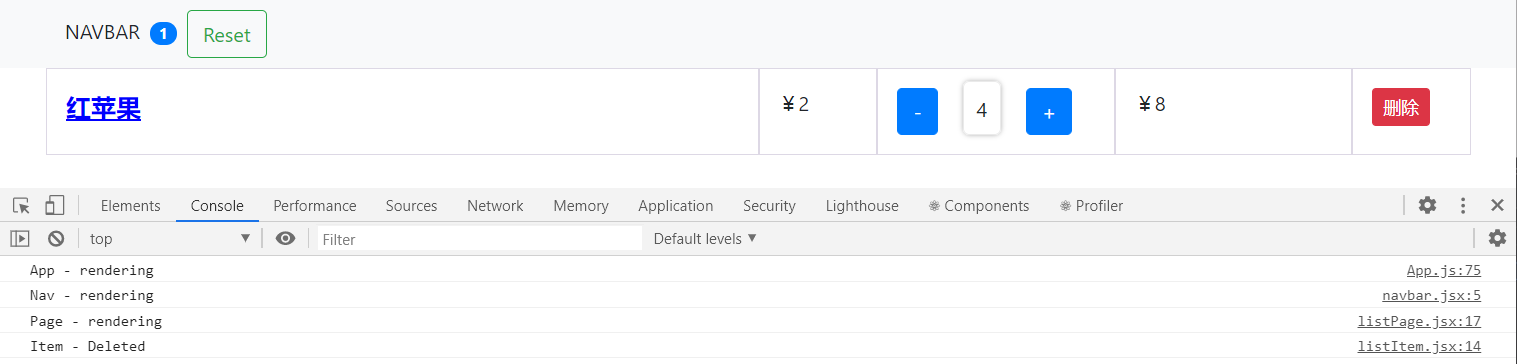
页面表现:

清空控制台,点击“删除”按钮后,可以看到当前子组件会在删除之前立刻调用 componentWillUnmount。
(图片来源:https://blog.hhking.cn/2018/09/18/react-lifecycle-change/ )
生命周期调用顺序(旧)
生命周期调用顺序(新)
