目录:
3. 事件处理如何传递参数
4. 向父组件传递参数
5. React 事件机制
React 事件其实跟 DOM 事件一样,遵循 JS 事件模型,可以通过回调函数去获取事件对象,只是在 JS 语法方面与 DOM 事件有些不同。
例 子
初始文件(只关注 listItem.jsx 即可 ):


<!DOCTYPE html>
<html lang="en">
  <head>
    <meta charset="utf-8" />
    <link rel="icon" href="%PUBLIC_URL%/favicon.ico" />
    <title>React App</title>
  </head>
  <body>
    <div id="root"></div>
  </body>
</html>
body {
  margin: 0;
  font-family: -apple-system, BlinkMacSystemFont, 'Segoe UI', 'Roboto', 'Oxygen',
    'Ubuntu', 'Cantarell', 'Fira Sans', 'Droid Sans', 'Helvetica Neue',
    sans-serif;
  -webkit-font-smoothing: antialiased;
  -moz-osx-font-smoothing: grayscale;
}

code {
  font-family: source-code-pro, Menlo, Monaco, Consolas, 'Courier New',
    monospace;
}

.themed-grid-col {
  padding-top: 15px;
  padding-bottom: 15px;
  background-color: rgba(255, 255, 255);
  border: 1px solid rgba(86, 61, 124, 0.2);
}

.themed-grid-col-s {
  padding-top: 15px;
  padding-bottom: 15px;
  background-color: rgba(86, 61, 124, 0.2);
  border: 1px solid rgba(86, 61, 124, 0.2);
}
.common{
    text-decoration: underline;
    text-indent: 2em;
}
.title{
    composes: common from 'common.module.css';
    color: red;
    font-size: 20px;
}
.list-title{
    color: blue;
    font-weight: bold;
}

.digital{
    border-radius: 5px;
    margin: 0 20px;
    padding: 10px;
    border: #eaeaea solid 1px;
    background-color: #fff;
    box-shadow: 0 0 4px rgba(100, 100, 100, .5);
}
import React from 'react';
import ReactDOM from 'react-dom';
import './index.css'
import App from './App';
import 'bootstrap/dist/css/bootstrap.css';

ReactDOM.render( <App />, document.getElementById('root'));
import React, { Component } from 'react';
import ListItem from './components/listItem'

const listData = [
    {
        id: 1,
        name: '红苹果',
        price: 2
    },
    {
        id: 2,
        name: '青苹果',
        price: 3
    },
]

class App extends Component {
    renderList(){
        return listData.map( item => {
            return <ListItem key={item.id} data={ item }/>
        })
    }
    render() {
        return(
            <div className="container">
                { listData.length === 0 && <div className="text-center">购物车是空的</div> }
                { this.renderList() }
            </div>
        )
    }
}

export default App;
import React, { Component } from 'react';
import style from './listItem.module.css';
import classnames from 'classnames/bind'

const cls = classnames.bind(style);

let count = 0;

class ListItem extends Component {
    render() {
        return (
            <div className="row mb-3">
                <div className="col-6 themed-grid-col">
                    <span className={ cls('title', 'list-title') }>
                        {this.props.data.name}
                    </span>
                </div>
                <div className="col-1 themed-grid-col">¥{this.props.data.price}</div>
                <div className={`col-2 themed-grid-col${count ? '' : '-s'}`}>
                    <button type="button" className="btn btn-primary">-</button>
                    <span className={ cls('digital') }>{count}</span>
                    <button type="button" className="btn btn-primary">+</button>
                </div>
            </div>
        );
    }
}

export default ListItem;
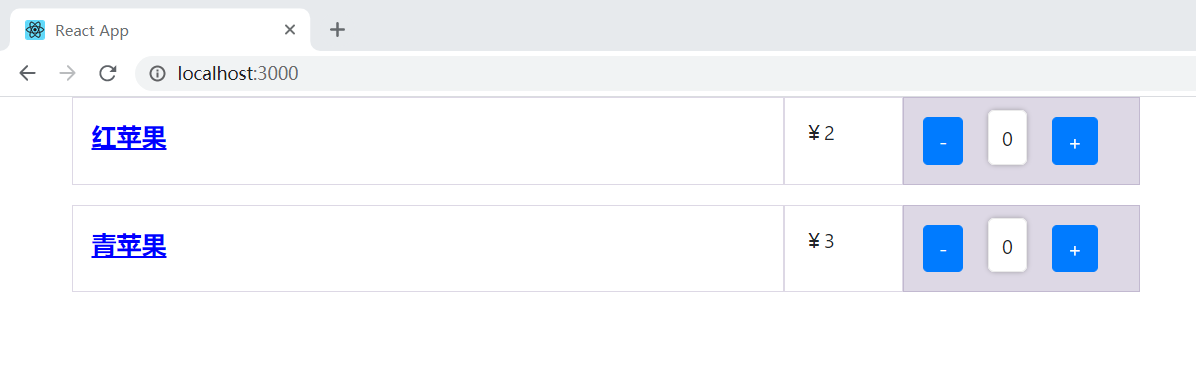
页面表现:
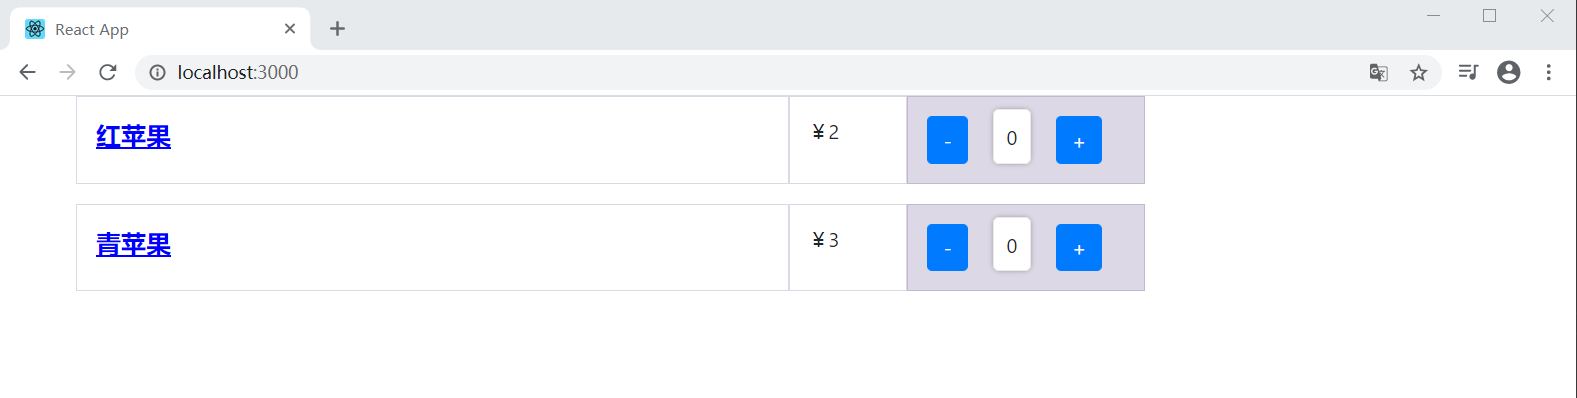
修改 listItem.jsx,在 listItem.jsx 中添加事件。所有的事件命名都遵循小驼峰命名法。
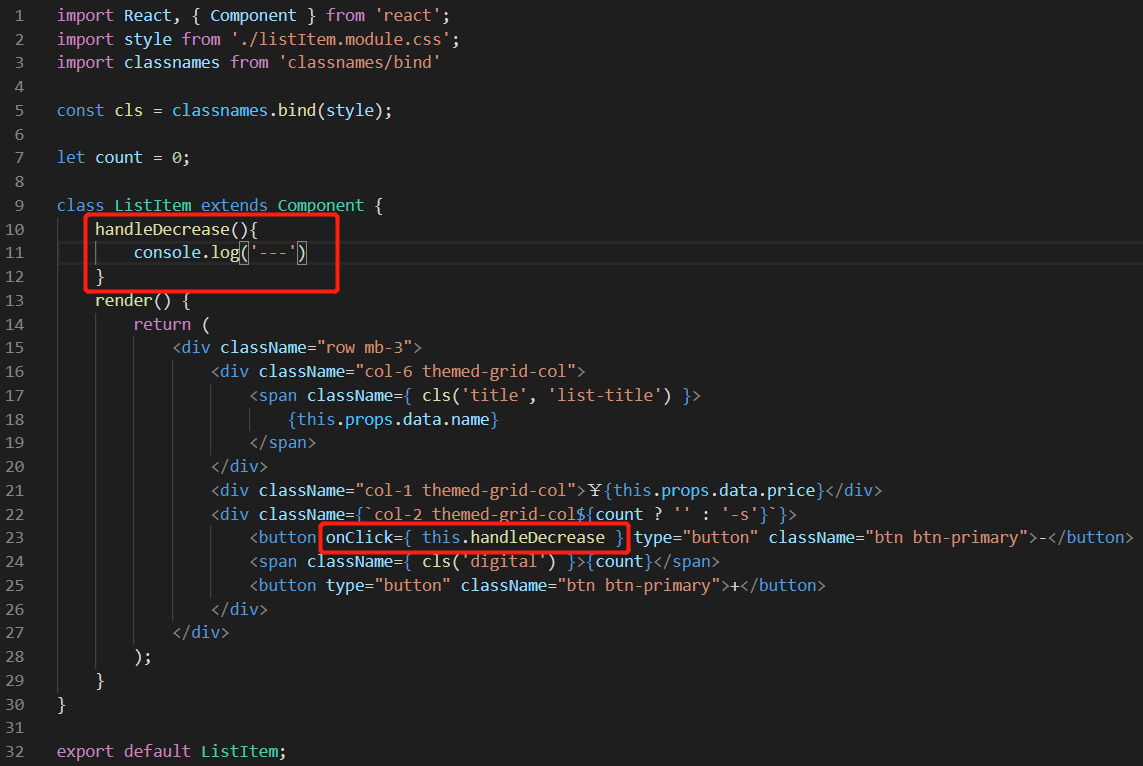
在 “-” 按钮上添加点击事件,表达式处调用事件回调函数 handleDecrease。
import React, { Component } from 'react';
import style from './listItem.module.css';
import classnames from 'classnames/bind'

const cls = classnames.bind(style);

let count = 0;

class ListItem extends Component {
    handleDecrease(){
        console.log('---')
    }
    render() {
        return (
            <div className="row mb-3">
                <div className="col-6 themed-grid-col">
                    <span className={ cls('title', 'list-title') }>
                        {this.props.data.name}
                    </span>
                </div>
                <div className="col-1 themed-grid-col">¥{this.props.data.price}</div>
                <div className={`col-2 themed-grid-col${count ? '' : '-s'}`}>
                    <button onClick={ this.handleDecrease } type="button" className="btn btn-primary">-</button>
                    <span className={ cls('digital') }>{count}</span>
                    <button type="button" className="btn btn-primary">+</button>
                </div>
            </div>
        );
    }
}

export default ListItem;
页面表现:
点击 “-” 按钮后,调用了 handleDecrease 方法,控制台输出了 “ --- ”。

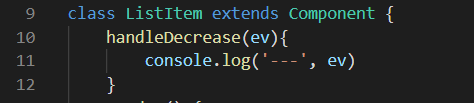
可以给事件回调函数 handleDecrese 传入参数,参数是事件对象。
页面表现:
点击 “-” 按钮后,调用了 handleDecrease 方法,控制台输出了 “ --- ”跟事件对象。

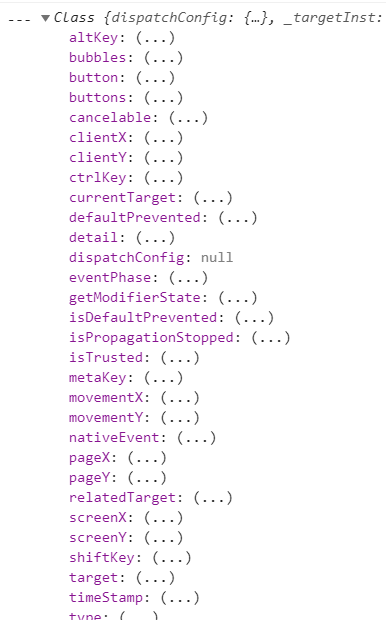
点开事件对象看看,可以看到很多参数。所以,我们可以通过在事件回调函数里使用事件对象获取当前事件需要的一些参数,比如屏幕点击的位置、当前绑定对象的位置等。
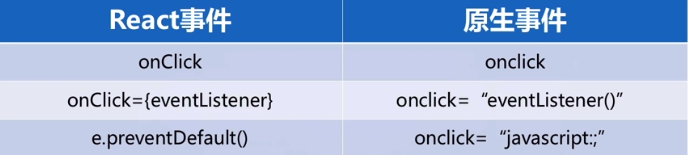
在写法上,React 事件采用驼峰命名法,原生事件采用小写写法。
在 React 事件中,不需要添加 “()” 执行事件,而原生事件需要添加 “()”。
React 事件使用 preventDefault 阻止默认行为,在原生事件中,可以直接使用 “javascript:;” 返回空值去阻止事件,而在 React 事件中不能这样做。
可以使用 3 种方法处理 this 关键字:1. 在 JSX 中使用 bind 方法;2. 在构造函数中使用 bind 方法;3. 使用箭头函数。
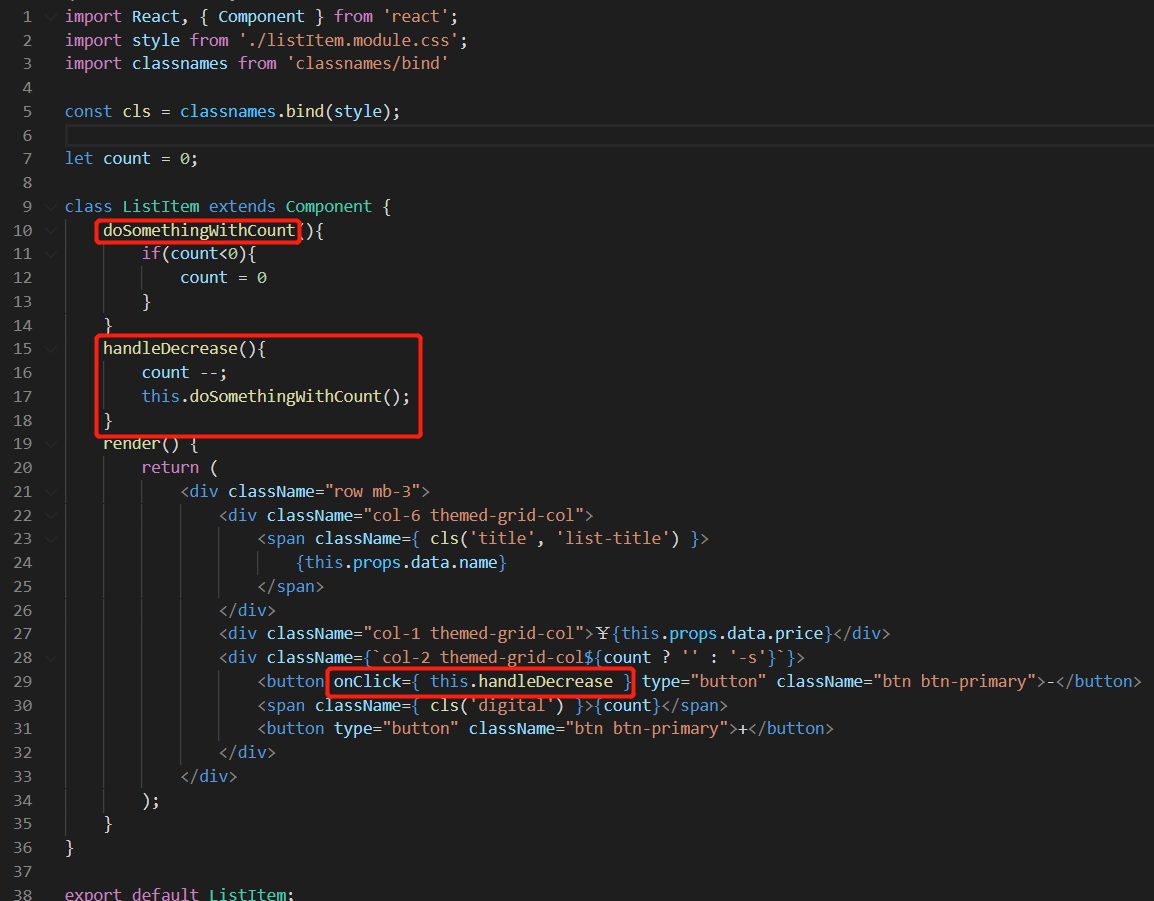
先举个例子演示使用 this 关键字可能出现问题:
在 “-” 按钮上添加点击事件,点击该按钮之后调用事件回调函数 handleDecrease,执行 handleDecrease 之后 count 减 1 ,调用执行 this.doSomethingWithCount()。
import React, { Component } from 'react';
import style from './listItem.module.css';
import classnames from 'classnames/bind'

const cls = classnames.bind(style);

let count = 0;

class ListItem extends Component {
    doSomethingWithCount(){
        if(count<0){
            count = 0
        }
    }
    handleDecrease(){
        count --;
        this.doSomethingWithCount();
    }
    render() {
        return (
            <div className="row mb-3">
                <div className="col-6 themed-grid-col">
                    <span className={ cls('title', 'list-title') }>
                        {this.props.data.name}
                    </span>
                </div>
                <div className="col-1 themed-grid-col">¥{this.props.data.price}</div>
                <div className={`col-2 themed-grid-col${count ? '' : '-s'}`}>
                    <button onClick={ this.handleDecrease } type="button" className="btn btn-primary">-</button>
                    <span className={ cls('digital') }>{count}</span>
                    <button type="button" className="btn btn-primary">+</button>
                </div>
            </div>
        );
    }
}

export default ListItem;
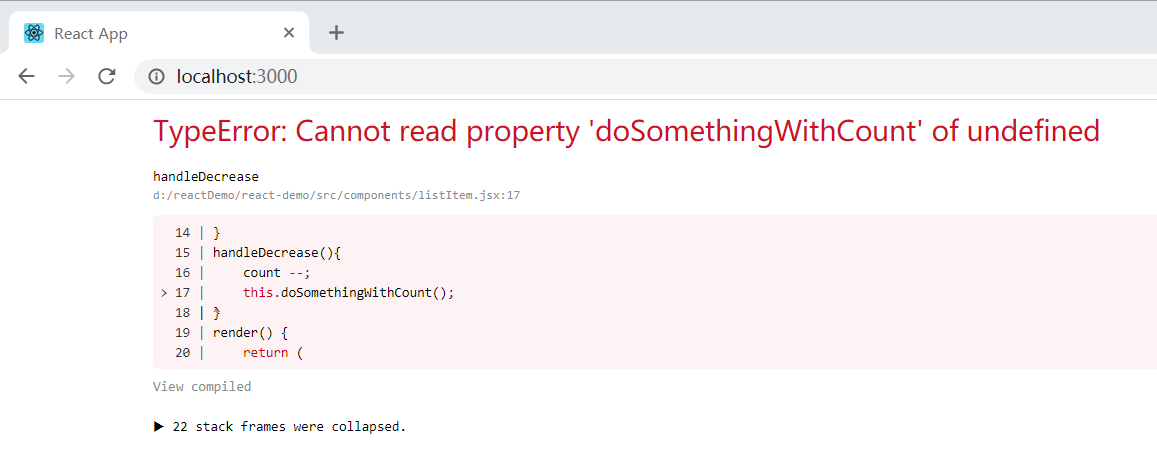
页面表现:
点击 “-” 按钮之后报错。提示 doSomethingWithCount 是 undefined 状态。
说明:
在 JS 中,this 的使用方法会随着引用对象的差别而不同。下面举几个例子:


下面举例说明怎么解决 this 关键字的问题。
在 button 元素上添加点击事件的时候使用 bind 方法,this 作为参数传入,也就是将 render 作用域的 this 传递进去,这样的话,在 handleDecrease 方法里面就可以使用 this 关键字了。
import React, { Component } from 'react';
import style from './listItem.module.css';
import classnames from 'classnames/bind'

const cls = classnames.bind(style);

let count = 0;

class ListItem extends Component {
    doSomethingWithCount(){
        if(count<0){
            count = 0
        }
    }
    handleDecrease(){
        console.log(this);
        this.doSomethingWithCount();
    }
    render() {
        return (
            <div className="row mb-3">
                <div className="col-6 themed-grid-col">
                    <span className={ cls('title', 'list-title') }>
                        {this.props.data.name}
                    </span>
                </div>
                <div className="col-1 themed-grid-col">¥{this.props.data.price}</div>
                <div className={`col-2 themed-grid-col${count ? '' : '-s'}`}>
                    <button onClick={ this.handleDecrease.bind(this) } type="button" className="btn btn-primary">-</button>
                    <span className={ cls('digital') }>{count}</span>
                    <button type="button" className="btn btn-primary">+</button>
                </div>
            </div>
        );
    }
}

export default ListItem;

点击“-”按钮后,可以看到 this 被正确地定义了,this 指向的是 ListItem 这个对象。
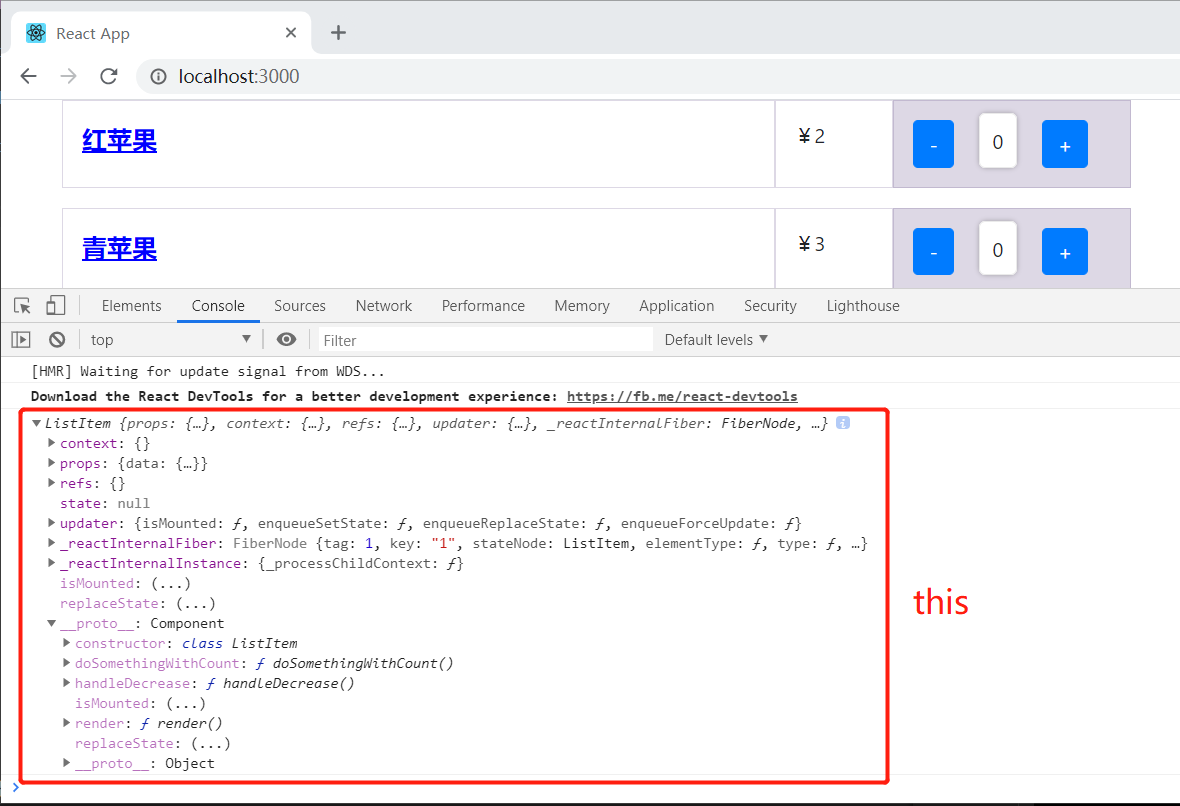
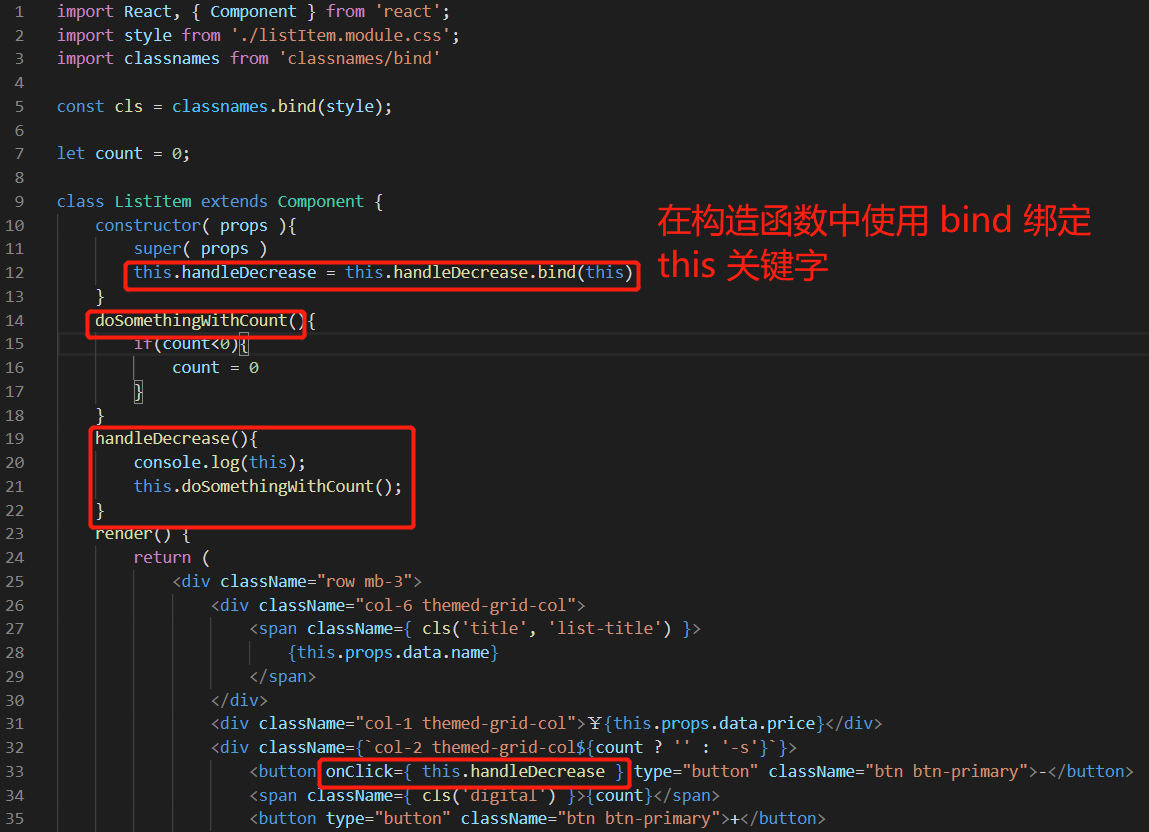
显示地定义构造函数,传入 props 作为参数,调用 super 方法传入 props。一定要在调用了 super 方法后才使用 this,使用 bind 方法绑定 this 关键字后会返回一个新的函数实例,将新的函数实例赋给 this.handleDecrease,这就完成了 this 关键字的绑定。
import React, { Component } from 'react';
import style from './listItem.module.css';
import classnames from 'classnames/bind'

const cls = classnames.bind(style);

let count = 0;

class ListItem extends Component {
    constructor( props ){
        super( props )
        this.handleDecrease = this.handleDecrease.bind(this)
    }
    doSomethingWithCount(){
        if(count<0){
            count = 0
        }
    }
    handleDecrease(){
        console.log(this);
        this.doSomethingWithCount();
    }
    render() {
        return (
            <div className="row mb-3">
                <div className="col-6 themed-grid-col">
                    <span className={ cls('title', 'list-title') }>
                        {this.props.data.name}
                    </span>
                </div>
                <div className="col-1 themed-grid-col">¥{this.props.data.price}</div>
                <div className={`col-2 themed-grid-col${count ? '' : '-s'}`}>
                    <button onClick={ this.handleDecrease } type="button" className="btn btn-primary">-</button>
                    <span className={ cls('digital') }>{count}</span>
                    <button type="button" className="btn btn-primary">+</button>
                </div>
            </div>
        );
    }
}

export default ListItem;
页面表现:同上
箭头函数的 this 总是定义时所在的对象
import React, { Component } from 'react';
import style from './listItem.module.css';
import classnames from 'classnames/bind'

const cls = classnames.bind(style);

let count = 0;

class ListItem extends Component {
    doSomethingWithCount(){
        if(count<0){
            count = 0
        }
    }
    handleDecrease = () => {
        console.log(this);
        this.doSomethingWithCount();
    }
    render() {
        return (
            <div className="row mb-3">
                <div className="col-6 themed-grid-col">
                    <span className={ cls('title', 'list-title') }>
                        {this.props.data.name}
                    </span>
                </div>
                <div className="col-1 themed-grid-col">¥{this.props.data.price}</div>
                <div className={`col-2 themed-grid-col${count ? '' : '-s'}`}>
                    <button onClick={ this.handleDecrease } type="button" className="btn btn-primary">-</button>
                    <span className={ cls('digital') }>{count}</span>
                    <button type="button" className="btn btn-primary">+</button>
                </div>
            </div>
        );
    }
}

export default ListItem;

页面表现:同上
对比方法1、2、3
建议使用方法 3 。之所以不推荐方法1、2,是因为使用方法1、2会在 JSX 元素中写很多 bind 或者在 contructor 中写很多 bind,如果这个组件或者 app 有很多事件要处理的话,使用方法1、2就不优雅。
例 子
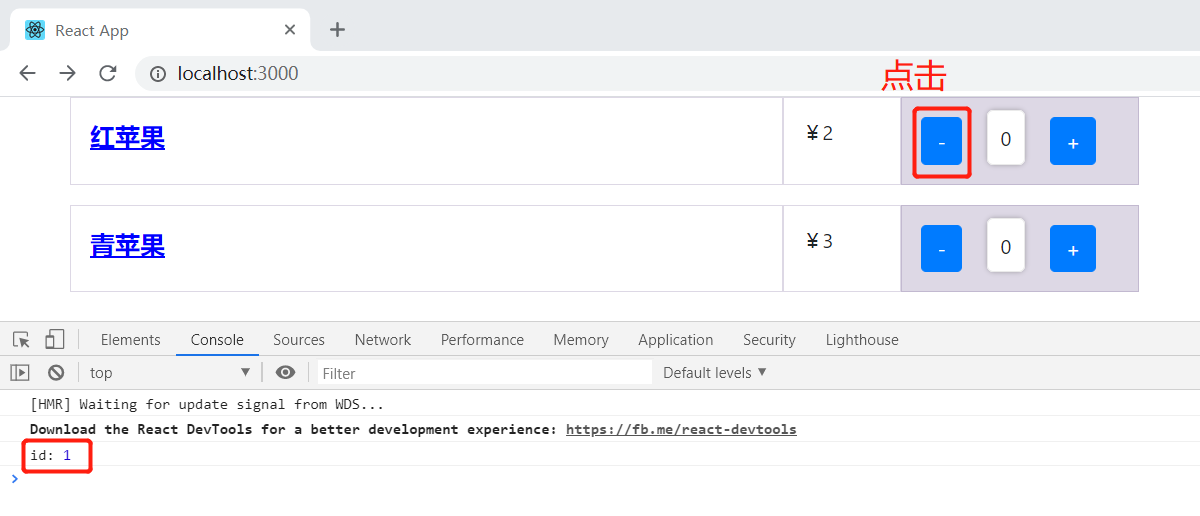
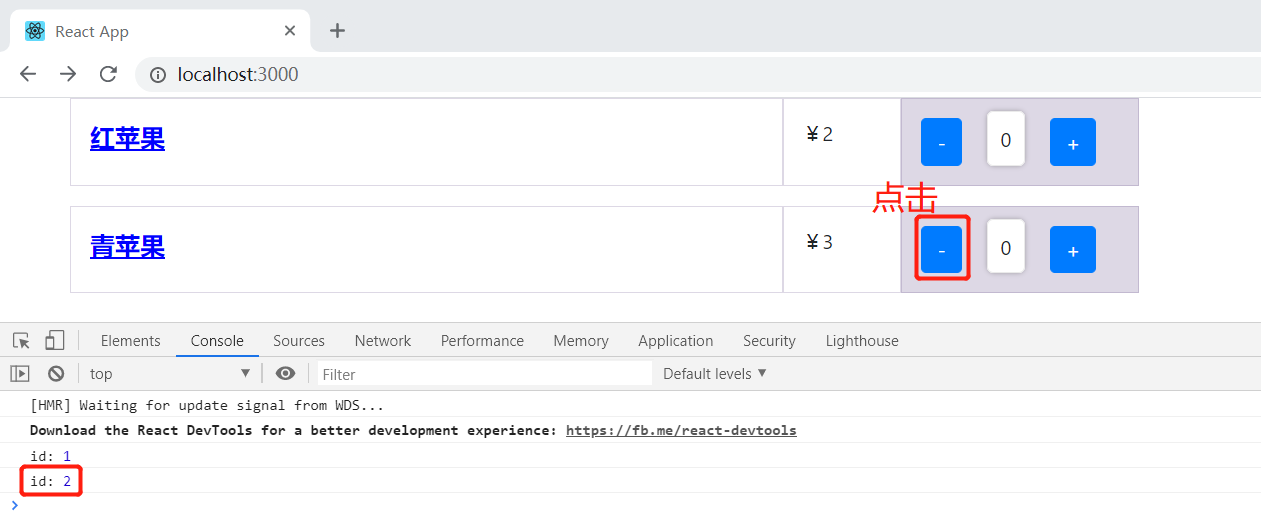
使用几种方法,实现当点击 “-” 按钮时,将当前商品的 id 传递给事件处理函数。
bind 的第一个参数是 this,第二个参数是需要传递的参数 this.props.data.id。在事件处理函数传入 id 参数,打印出 id。
import React, { Component } from 'react';
import style from './listItem.module.css';
import classnames from 'classnames/bind'

const cls = classnames.bind(style);

let count = 0;

class ListItem extends Component {
    doSomethingWithCount(){
        if(count<0){
            count = 0
        }
    }
    handleDecrease = (id) => {
        count --;
        this.doSomethingWithCount();
        console.log( "id:", id );
    }
    handleIncrease = () => {
        count ++;
    }
    render() {
        return (
            <div className="row mb-3">
                <div className="col-6 themed-grid-col">
                    <span className={ cls('title', 'list-title') }>
                        {this.props.data.name}
                    </span>
                </div>
                <div className="col-1 themed-grid-col">¥{this.props.data.price}</div>
                <div className={`col-2 themed-grid-col${count ? '' : '-s'}`}>
                    <button onClick={ this.handleDecrease.bind(this, this.props.data.id) } type="button" className="btn btn-primary">-</button>
                    <span className={ cls('digital') }>{count}</span>
                    <button onClick={ this.handleIncrease } type="button" className="btn btn-primary">+</button>
                </div>
            </div>
        );
    }
}

export default ListItem;

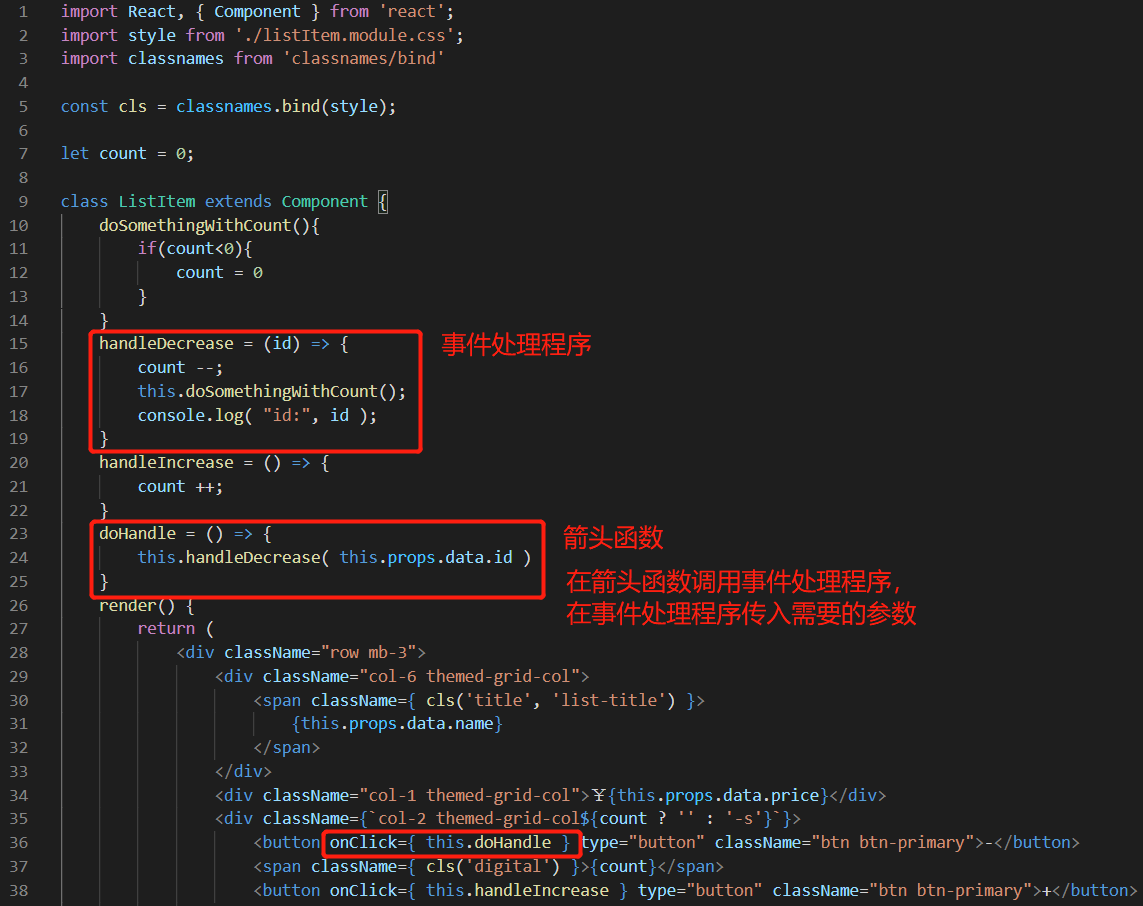
定义一个箭头函数 doHandle 去调用事件处理函数 handleDecrease,在 handleDecrease 传入需要的参数 id。在button 元素上的点击事件调用箭头函数 doHandle。
import React, { Component } from 'react';
import style from './listItem.module.css';
import classnames from 'classnames/bind'

const cls = classnames.bind(style);

let count = 0;

class ListItem extends Component {
    doSomethingWithCount(){
        if(count<0){
            count = 0
        }
    }
    handleDecrease = (id) => {
        count --;
        this.doSomethingWithCount();
        console.log( "id:", id );
    }
    handleIncrease = () => {
        count ++;
    }
    doHandle = () => {
        this.handleDecrease( this.props.data.id )
    }
    render() {
        return (
            <div className="row mb-3">
                <div className="col-6 themed-grid-col">
                    <span className={ cls('title', 'list-title') }>
                        {this.props.data.name}
                    </span>
                </div>
                <div className="col-1 themed-grid-col">¥{this.props.data.price}</div>
                <div className={`col-2 themed-grid-col${count ? '' : '-s'}`}>
                    <button onClick={ this.doHandle } type="button" className="btn btn-primary">-</button>
                    <span className={ cls('digital') }>{count}</span>
                    <button onClick={ this.handleIncrease } type="button" className="btn btn-primary">+</button>
                </div>
            </div>
        );
    }
}

export default ListItem;
页面表现:同上
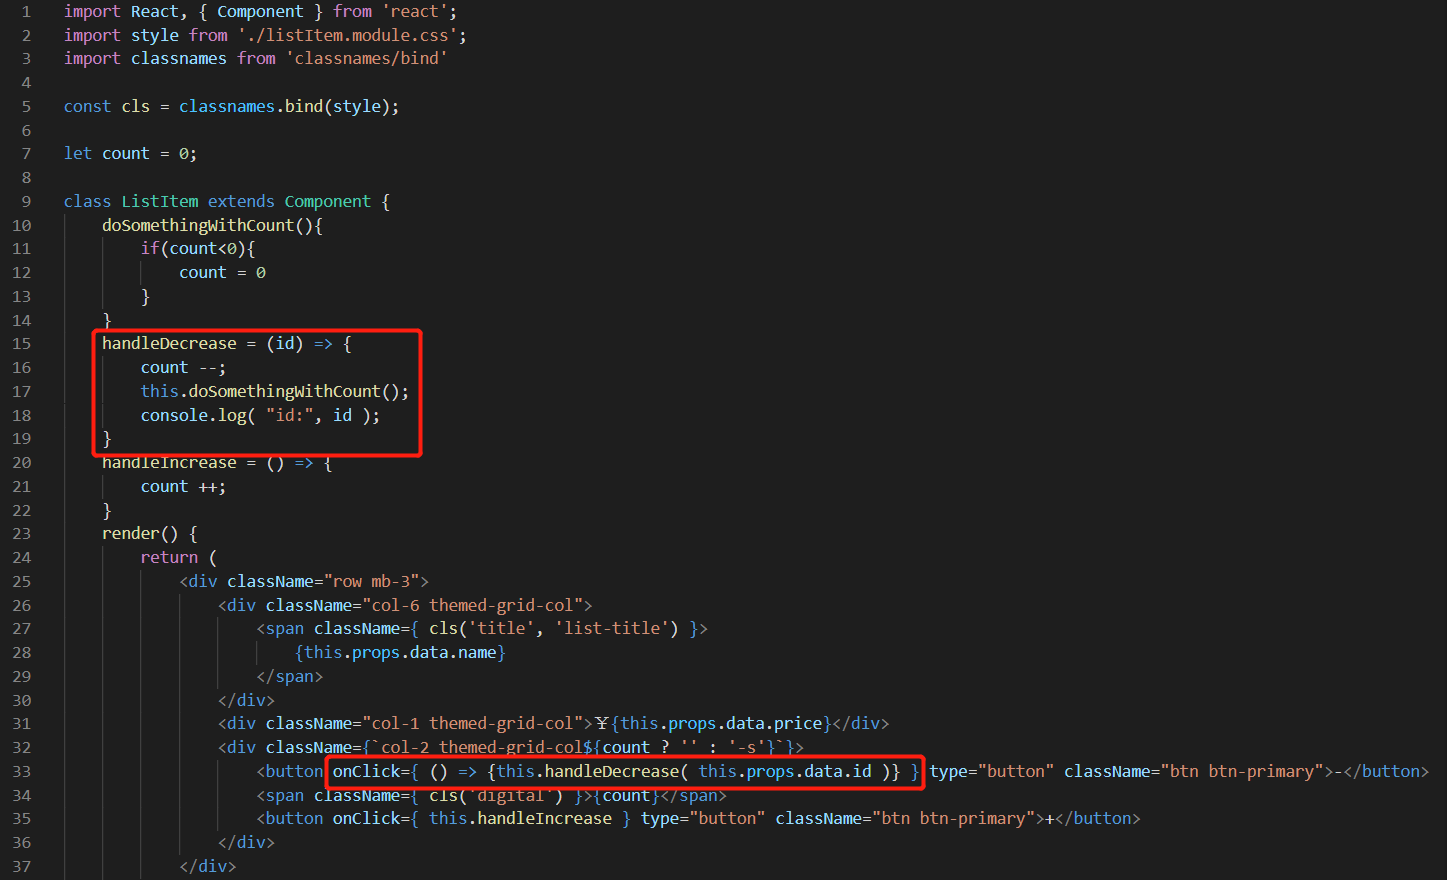
在事件表达式中直接定义匿名函数,传递需要的参数。更推荐使用这种方式。
import React, { Component } from 'react';
import style from './listItem.module.css';
import classnames from 'classnames/bind'

const cls = classnames.bind(style);

let count = 0;

class ListItem extends Component {
    doSomethingWithCount(){
        if(count<0){
            count = 0
        }
    }
    handleDecrease = (id) => {
        count --;
        this.doSomethingWithCount();
        console.log( "id:", id );
    }
    handleIncrease = () => {
        count ++;
    }
    render() {
        return (
            <div className="row mb-3">
                <div className="col-6 themed-grid-col">
                    <span className={ cls('title', 'list-title') }>
                        {this.props.data.name}
                    </span>
                </div>
                <div className="col-1 themed-grid-col">¥{this.props.data.price}</div>
                <div className={`col-2 themed-grid-col${count ? '' : '-s'}`}>
                    <button onClick={ () => {this.handleDecrease( this.props.data.id )} } type="button" className="btn btn-primary">-</button>
                    <span className={ cls('digital') }>{count}</span>
                    <button onClick={ this.handleIncrease } type="button" className="btn btn-primary">+</button>
                </div>
            </div>
        );
    }
}

export default ListItem;
页面表现:同上
在方法 1 中不需要显式定义事件对象,但是,使用方法 2 在匿名箭头函数里面如果需要使用事件对象的话,必须要显式定义事件对象。
例子:使用方法 2 时使用事件对象需要显式定义
如果需要在 handleDecrease 中使用事件处理函数,需要在事件处理函数 handleDecrease 跟 在 button 元素添加事件的时候都显示定义事件对象 ev。
没有显式调用事件程序时:
在事件处理程序输出事件对象 ev,如果没有显式定义事件对象,触发点击事件的时候输出的 ev 是 undefined。
import React, { Component } from 'react';
import style from './listItem.module.css';
import classnames from 'classnames/bind'

const cls = classnames.bind(style);

let count = 0;

class ListItem extends Component {
    doSomethingWithCount(){
        if(count<0){
            count = 0
        }
    }
    handleDecrease = (id, ev) => {
        count --;
        this.doSomethingWithCount();
        console.log( "id:", id );
        console.log( "ev:", ev );
    }
    handleIncrease = () => {
        count ++;
    }
    render() {
        return (
            <div className="row mb-3">
                <div className="col-6 themed-grid-col">
                    <span className={ cls('title', 'list-title') }>
                        {this.props.data.name}
                    </span>
                </div>
                <div className="col-1 themed-grid-col">¥{this.props.data.price}</div>
                <div className={`col-2 themed-grid-col${count ? '' : '-s'}`}>
                    <button onClick={ () => {this.handleDecrease( this.props.data.id )} } type="button" className="btn btn-primary">-</button>
                    <span className={ cls('digital') }>{count}</span>
                    <button onClick={ this.handleIncrease } type="button" className="btn btn-primary">+</button>
                </div>
            </div>
        );
    }
}

export default ListItem;

页面表现:

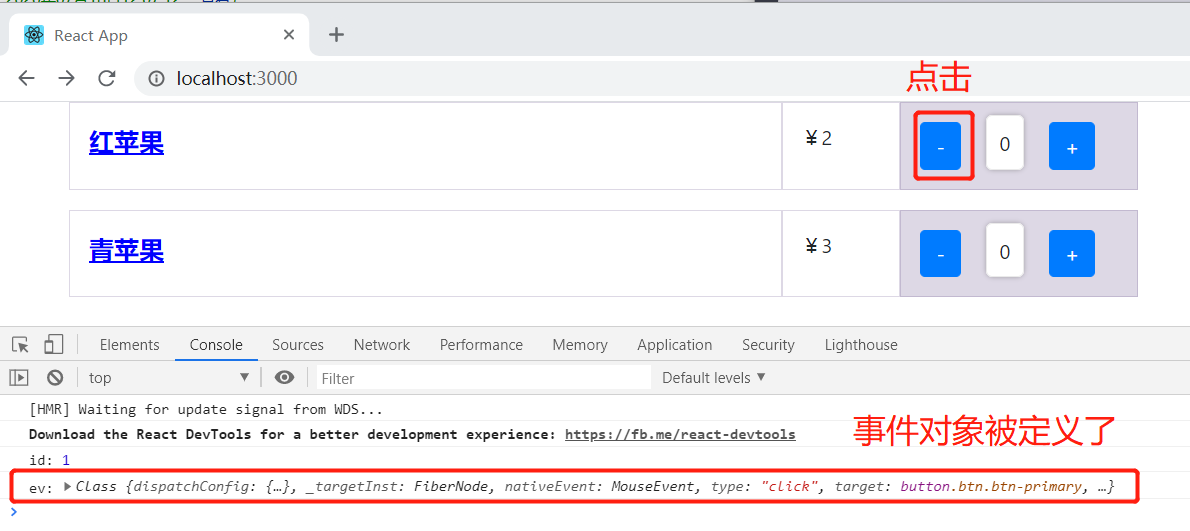
显式调用事件程序时:
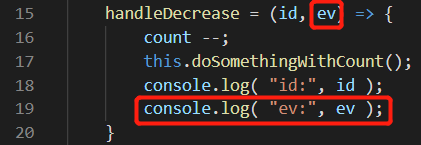
给匿名函数传入事件对象 ev ,并给事件处理程序传入事件对象 ev。

例子:使用方法 1 时使用事件对象不需要显式定义
无需显式定义事件对象
import React, { Component } from 'react';
import style from './listItem.module.css';
import classnames from 'classnames/bind'

const cls = classnames.bind(style);

let count = 0;

class ListItem extends Component {
    doSomethingWithCount(){
        if(count<0){
            count = 0
        }
    }
    handleDecrease = (id, ev) => {
        count --;
        this.doSomethingWithCount();
        console.log( "id:", id );
        console.log( ev );
    }
    handleIncrease = () => {
        count ++;
    }
    render() {
        return (
            <div className="row mb-3">
                <div className="col-6 themed-grid-col">
                    <span className={ cls('title', 'list-title') }>
                        {this.props.data.name}
                    </span>
                </div>
                <div className="col-1 themed-grid-col">¥{this.props.data.price}</div>
                <div className={`col-2 themed-grid-col${count ? '' : '-s'}`}>
                    <button onClick={ this.handleDecrease.bind(this, this.props.data.id) } type="button" className="btn btn-primary">-</button>
                    <span className={ cls('digital') }>{count}</span>
                    <button onClick={ this.handleIncrease } type="button" className="btn btn-primary">+</button>
                </div>
            </div>
        );
    }
}

export default ListItem;


页面表现:同上
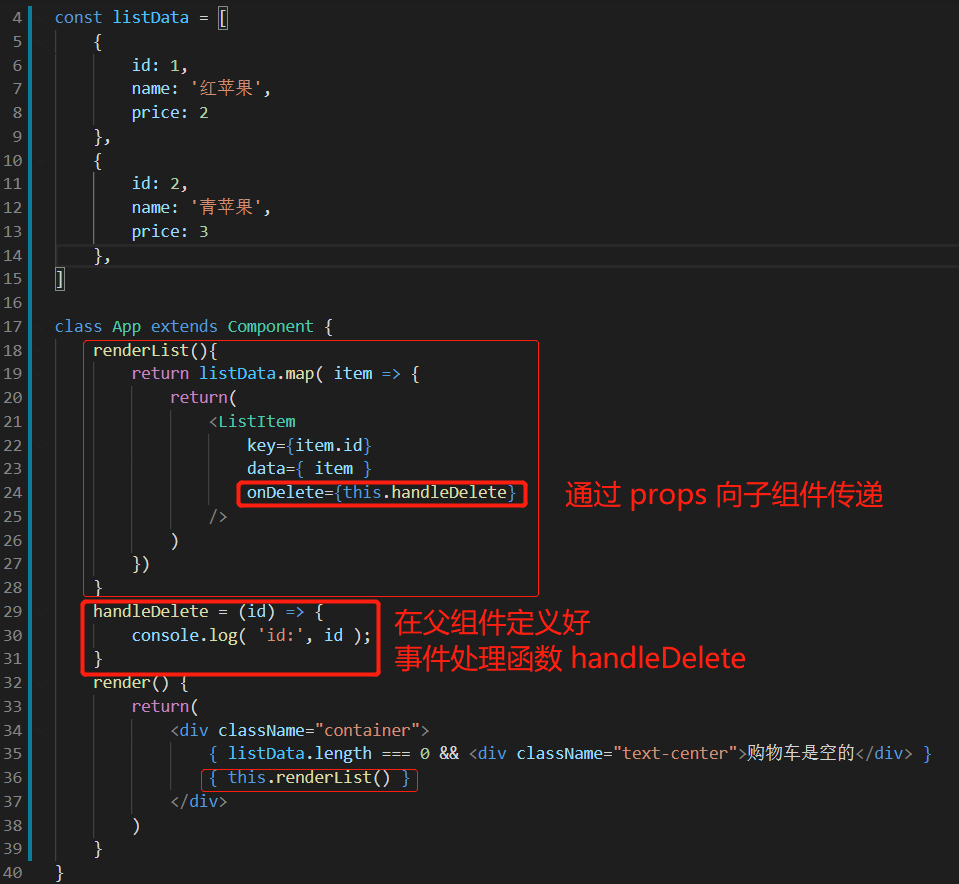
向父组件传递参数分为 2 步:
1. 在父组件定义好事件处理函数,并通过 props 向子组件传递
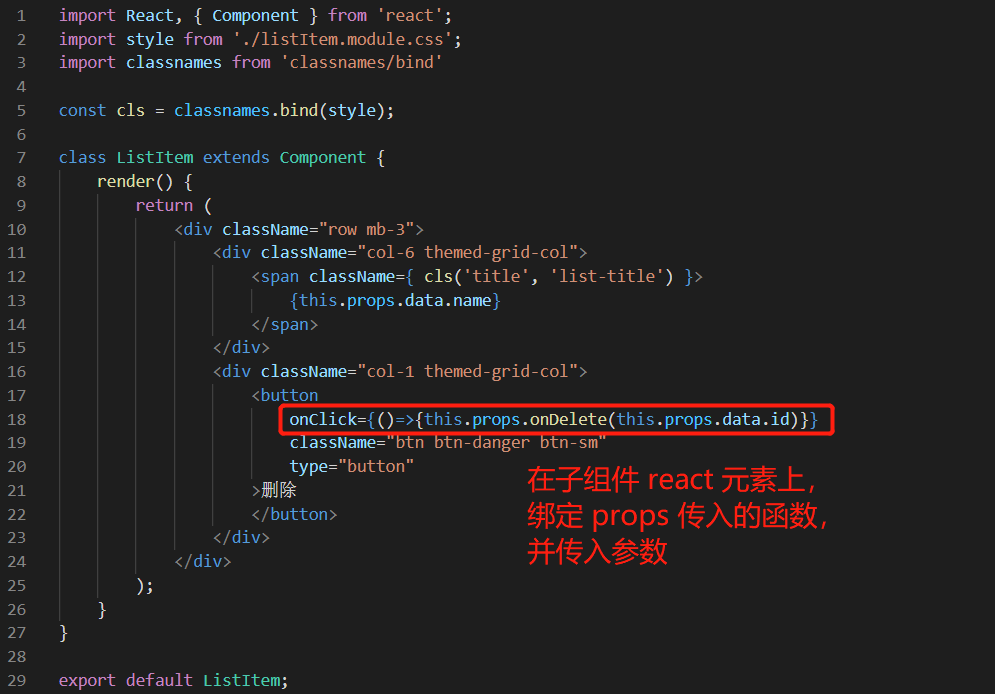
2. 在子组件 react 元素上,绑定 props 传入的函数并带入参数
例 子
实现点击 “删除” 按钮时,将商品 id 传给父组件。
从父组件传给子组件一个方法,让子组件来调用这个方法,并将参数传递到这个方法里,这样,就可以在父组件得到子组件传递过来的参数了。
在父组件 App.js 里面定义一个 handleDelete 箭头函数,将子组件 listItem.jsx 传递过来的 id 值打印出来。
import React, { Component } from 'react';
import ListItem from './components/listItem'

const listData = [
    {
        id: 1,
        name: '红苹果',
        price: 2
    },
    {
        id: 2,
        name: '青苹果',
        price: 3
    },
]

class App extends Component {
    renderList(){
        return listData.map( item => {
            return <ListItem key={item.id} data={ item } onDelete={this.handleDelete}/>
        })
    }
    handleDelete = (id) => {
        console.log( 'id:', id );
    }
    render() {
        return(
            <div className="container">
                { listData.length === 0 && <div className="text-center">购物车是空的</div> }
                { this.renderList() }
            </div>
        )
    }
}

export default App;
import React, { Component } from 'react';
import style from './listItem.module.css';
import classnames from 'classnames/bind'

const cls = classnames.bind(style);

class ListItem extends Component {
    render() {
        return (
            <div className="row mb-3">
                <div className="col-6 themed-grid-col">
                    <span className={ cls('title', 'list-title') }>
                        {this.props.data.name}
                    </span>
                </div>
                <div className="col-1 themed-grid-col">
                    <button
                        onClick={()=>{this.props.onDelete(this.props.data.id)}}
                        className="btn btn-danger btn-sm"
                        type="button"
                    >删除
                    </button>
                </div>
            </div>
        );
    }
}

export default ListItem;
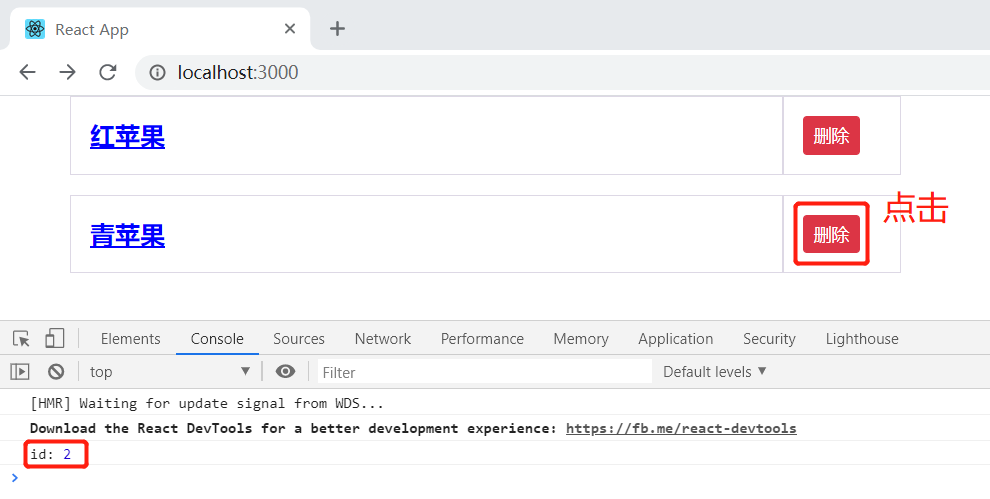
页面表现:
点击任一 “删除” 按钮,在控制台输出相应的商品 id 。
(事件流相关笔记:https://www.cnblogs.com/xiaoxuStudy/p/13126722.html#three )
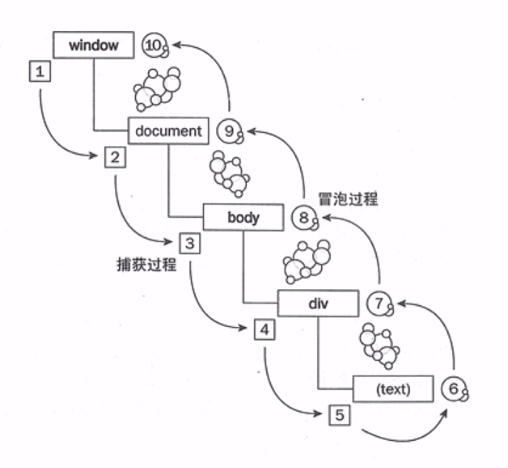
在 JS 中,"DOM2级事件" 规定的事件流包括3个阶段:1. 事件捕获阶段 ;2. 处于目标阶段 ;3. 事件冒泡阶段。
如下图,假设在 text 中触发了 click 事件,首先是事件捕获阶段,事件从父级元素传播到发生事件的元素,事件按 window->document->body 顺序传播,然后是处于目标阶段,执行事件,然后处于事件冒泡阶段,事件从子元素向父元素传播。
因为 DOM 从页面中接收事件的顺序,行为委托成为了可能。通俗地将,行为委托的实质就是将子元素的事件处理委托给父级元素进行处理。
React 会将所有事件都绑定在 document 上而不是某一元素上,统一地使用事件监听,并在冒泡阶段处理事件。所以,当挂载或者卸载组件的时候,只需要在统一的事件监听位置增加或删除对象。因此,会极大地提高效率。当事件触发的时候,组件会生成一个合成事件,然后传递到 document 中,document 会通过 Dispatch Event 回调函数依次执行 Dispatch Listener 中同类型事件的监听函数,事件注册在组件生成的时候将 Virtual DOM 中所有事件对应的原生事件都注册在 document 当中的一个监听器当中,也就是所有的事件处理函数都存放在 ListenerBank 中,并以 key 作为索引,这样的好处就是将可能要触发的事件分门别类。
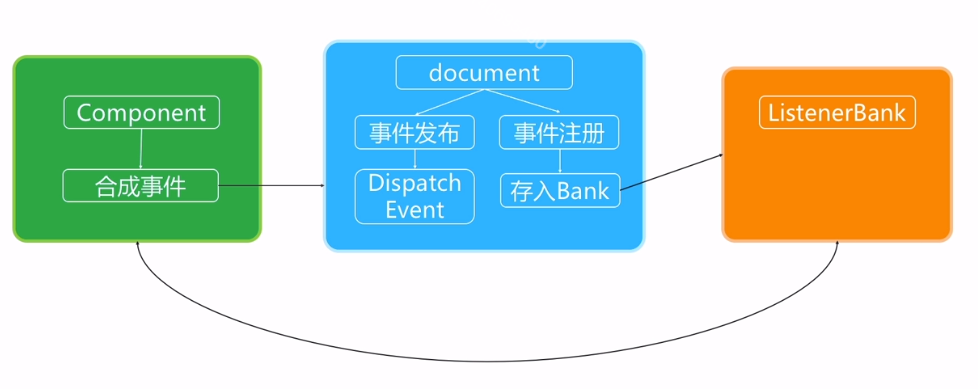
(React 机制抽象图)
1. React 事件是合成事件,不是 DOM 原生事件
2. React 在 document 监听所有支持事件
3. 使用统一的分发函数 dispatchEvent 去指定事件函数执行