转载于:https://www.yuque.com/ant-h5/sourcecode/klduug
作者: ant-h5, 蚂蚁金服前端团队
转载方式: 手打
转载者: lemon-Xu
3.初探React源码
课前思考题
- jsx在react中是如何处理的,为什么xml元素可以放在js文件内?
- renderComponent到底做了什么?
基本示例
在React源代码目录下,examples文件中包含了各种React实例代码。其中basic文件夹下,给出了一个React最简单的实例:
var ExampleApplication = React.createClass({
        render: function() {
          var elapsed = Math.round(this.props.elapsed  / 100);
          var seconds = elapsed / 10 + (elapsed % 10 ? '' : '.0' );
          var message =            'React has been successfully running for ' + seconds + ' seconds.';
          return React.DOM.p(null, message);
        }
      });
var start = new Date().getTime();
setInterval(function() {
    React.renderComponent(
      ExampleApplication({elapsed: new Date().getTime() - start}),
      document.getElementById('container')
    );
}, 50);
这段代码实现了一个自动更新React执行时间的计时器可以算是React框架的Hello Demo。在这个示例代码中,引出了两个非常非常重要的函数,分别是React.createClass和React.renderComponent。
renderComponent
React.renderComponent通常是中各react程序渲染的入口(对应到15.0.0以及往后的版本,就是ReactDOM.render)。
renderComponent接口引出了React框架的渲染机制及其详细过程。
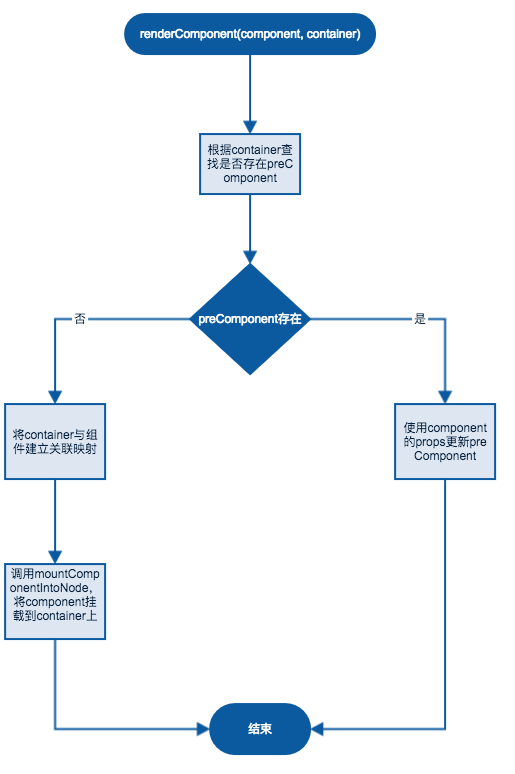
renderComponent(component,container)负责将一个component实例渲染到给定的container中。React框架在进行渲染时,会尽可能地复用现有的DOM节点,因此,React会先判断,当前的container是否存在一个与子对应的、已经渲染过的component,具体的查找过程暂且略过。
如果React并没有找到某个已有的组件实例与container有关联,它就会将component与container的关联信息保存下来,以待后续查询,同时调用mountComonentIntoNode,将component挂载到container上。
如果React找到了container关联的组件实例,则会执行一个更新流程,使用component的属性信息,来更新查找到的react组件实例。这一过程的简图如下所示。
/src/core/ReactMount.js
/** * Renders a React component into the DOM in the supplied `container`. * * If the React component was previously rendered into `container`, this will * perform an update on it and only mutate the DOM as necessary to reflect the * latest React component. * * @param {ReactComponent} nextComponent Component instance to render. * @param {DOMElement} container DOM element to render into. * @return {ReactComponent} Component instance rendered in `container`. */renderComponent: function(nextComponent, container) {
  // 获得历史缓存,如果之前有过renderComponent记录,把历史id记录在instanceByReactRootID变量中  var prevComponent = instanceByReactRootID[getReactRootID(container)];
  if (prevComponent) {
    if (prevComponent.constructor === nextComponent.constructor) {
      var nextProps = nextComponent.props;
      // 保持滚动条不变      ReactMount.scrollMonitor(container, function() {
        // 更新属性        prevComponent.replaceProps(nextProps);
      });
      return prevComponent;
    } else {
      // 卸载之前的组件      ReactMount.unmountAndReleaseReactRootNode(container);
    }
  }
  // 挂载事件  ReactMount.prepareTopLevelEvents(ReactEventTopLevelCallback);
  // 把历史id记录在instanceByReactRootID变量中  var reactRootID = ReactMount.registerContainer(container);
  instanceByReactRootID[reactRootID] = nextComponent;
  // 调用ReactComponent的createClass的返回结果  nextComponent.mountComponentIntoNode(reactRootID, container);
  return nextComponent;
}
jsx编译
这个函数第一个参数nextComponent是什么呢?带着这个问题,我们打断点看一下jsx编译后的结果是什么。
编译前:
var ExampleApplication = React.createClass({
  render: function() {
    var elapsed = Math.round(this.props.elapsed  / 100);
    var seconds = elapsed / 10 + (elapsed % 10 ? '' : '.0' );
    var message =      'React has been successfully running for ' + seconds + ' seconds.';
    return <div>{message}</div>;  }
});
var start = new Date().getTime();
setInterval(function() {
  debugger  React.renderComponent(
    <ExampleApplication elapsed={new Date().getTime() - start} />,
    document.getElementById('container')
  );
}, 50);
编译后:
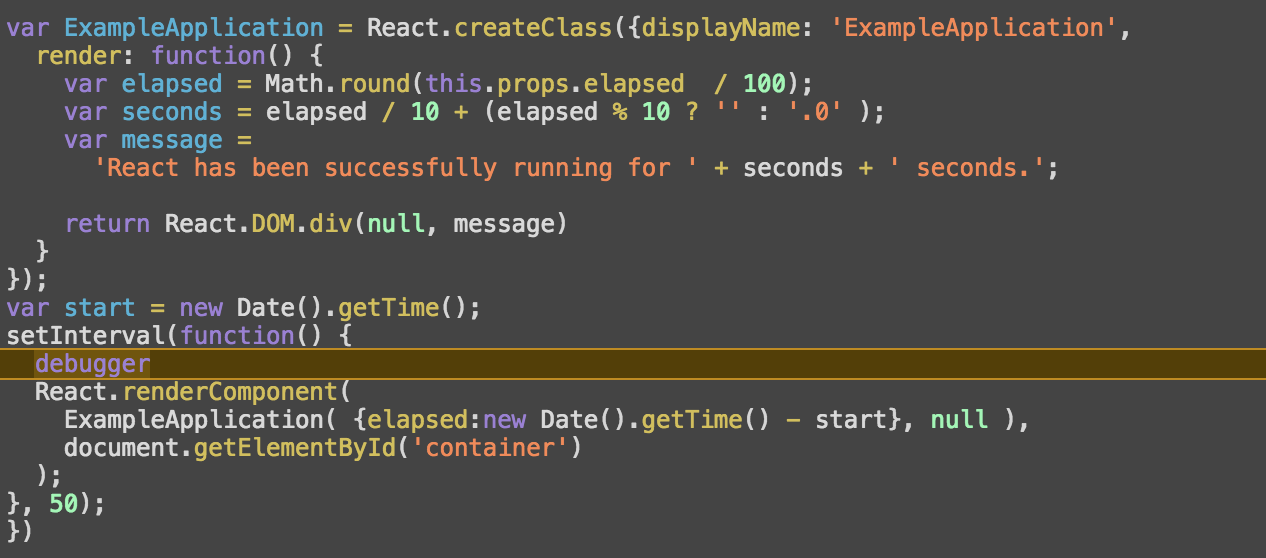
通过断点可以发现:
// 编译成 -> React.DOM.div(null, message)
<div>{message}</div>
// 编译成 -> ExampleApplication( {elapsed:new Date().getTime() - start}, null ),
<ExampleApplication elapsed={new Date().getTime() - start} />
我们通过Object.getPrototypeOf分别打印出来两个对象的原型对象

可以很明显看出,对于两种组件,分别是
- 复合组件(React组件),编译后继承ReactCompositeComponentBase的原型对象(prototype)
- 原生组件(如div),编译后继承ReactNativeComponent的原型对象(prototype)