sonar简介
sonar是一个用于代码质量管理的开放平台,通过插件机制,sonar可以集成不同的测试工具,代码分析工具,以及持续集成的工具(例如Jenkins、 Hudson )等。sonar并不是简单地把代码检查结果直接显示在web界面上,而是通过不同的插件对这些结果进行加工处理,通过量化的方式度量代码的质量的变化,从而可方便的对不同的插件对这些代码进行管理。。在对其他工具的支持方面,Sonar 不仅提供了对IDE 的支持,可以在 Eclipse和 IntelliJ IDEA 这些工具里联机查看结果;同时Sonar还对大量的持续集成工具提供了接口支持,可以很方便地在持续集成中使用Sonar,此外,Sonar的插件还可以对 Java 以外的其他编程语言提供支持例如(PHP/Python),对国际化以及报告文档化也有良好的支持。
sonar部署
sonar称之为代码质量管理,sonar的相关下载和文档可以在官网下载,官网地址:https://www.sonarqube.org/downloads/ 。需要特别注意最新版的Sonar需要jdk1.8至及以上版本及其数据库版本在5.6以上(这个必须重视,不然启动服务是报错为数据库连接失败)。上篇文章我们已经可以成功的使用git进行从gitlab拉取代码,Sonar的功能就是来检查代码是否有BUG,除此之外还有其他的功能,比如说:你的代码注释率是多少,代码有一些建议,编写语法的建议等。
1.编译安装数据库5.6以上版本
cd /opt
tar xf mysql-5.6.34-linux-glibc2.5-x86_64.tar.gz -C /usr/local/
cd /usr/local/
ln -sv mysql-5.6.34-linux-glibc2.5-x86_64 mysql
useradd mysql -s /sbin/nologin -M
mkdir /data ;chown -R mysql.mysql /data
/usr/local/mysql/scripts/mysql_install_db --user=mysql --datadir=/data --basedir=/usr/local/mysql
cd /usr/local/mysql/;cp support-files/mysql.server /etc/init.d/mysqld ;cp /usr/local/mysql/my.cnf /etc/my.cnf
chmod +x /etc/init.d/myqld ;chkconfig mysqld on
#编辑/etc/profile.d/添加mysql.sh
export PATH=/usr/local/mysql/bin:$PATH
#编辑/etc/my.cnf,指明datadir和port,及其启动MySQL创建sonar用户并授权sonar用户
grant all on sonar.* to ‘sonar‘@‘localhost‘ identified by ‘pass‘;
grant all on sonar.* to ‘sonar‘@‘10.1.10.%‘ identified by ‘pass‘;
flush privileges;
2.下载解压安装sonar,在安装之前需要配置jdk的环境,jdk的版本需要在1.8以上的版本
unzip sonarqube-5.6.6.zip
ln -sv /usr/local/sonarqube-5.6.6 /usr/local/sonar
编辑sonar配置文件,开启如下配置:/usr/local/sonar/conf/sonar.properties
sonar.jdbc.username=sonar #连接数据库用户名
sonar.jdbc.password=chen #连接数据库时密码 jdbc.url=jdbc:mysql://10.1.10.67则表示
sonar.jdbc.url=jdbc:mysql://10.1.10.67:3306/sonar?useUnicode=true&characterEncoding=utf8&rewriteBatchedStatements=true&useConfigs=maxPerformance
sonar.web.port=8800 #web界面的监听端口
既然使用到MySQL数据库则需连接MySQL数据库,创建库和授权用户
create database sonar character set utf8 collate utf8_general_ci;
grant all on sonar.* to ‘sonar‘@‘localhost‘ identified by ‘pass‘;
grant all on sonar.* to ‘soanr‘@‘10.1.10.%‘ identified by ‘pass‘;
flush privileges;
启动服务:/usr/local/sonar/bin/linux-x86_64/sonar.sh start #查看sonar监听的端口8800师傅开启,及其MySQL服务器中sonar库中是否创建出多张表。。。
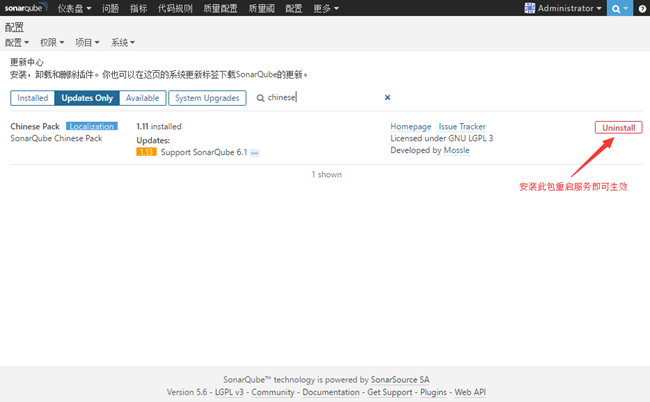
通过浏览器输入IP地址进行访问,默认情况下为英文,需要安装插件汉化,但是汉化的效果不是很好
默认登录sonar时,用户名:admin 密码:admin
安装中文插件如下配置:
使用IP地址访问如下:
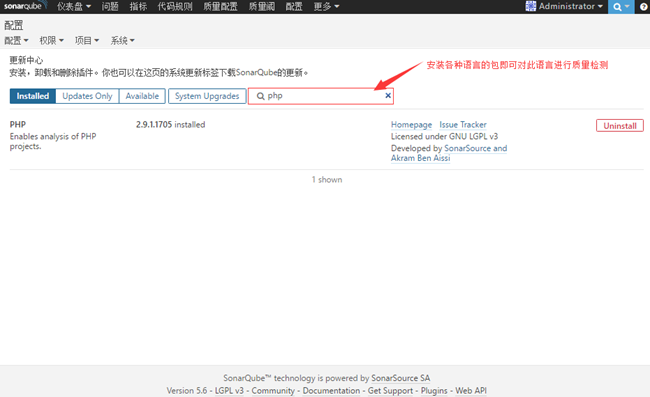
如果安装失败可将插件下载好后解压至sonar默认存放插件的目录,重启服务即可,安装可扫描php/java/python的插件。
sonar通过sonarqube scanner扫描器来对代码进行扫描分析
官方文档:
http://docs.sonarqube.org/display/SCAN/Analyzing+with+SonarQube+Scanner
sonar-scanner安装部署
unzip sonar-scanner-2.6.1.zip
ln -sv /usr/local/sonar-scanner-2.6.1 /usr/local/sonar-scanner
cd /usr/local/sonar-scanner/
grep "^[[:alpha:]]" sonar-scanner.properites
sonar.host.url= #sonar地址
sonar.sourceEncoding=UTF-8 #设定字符集
sonar.jdbc.password=chen #sonar数据库密码 #如下为连接数据库地址
sonar.jdbc.url=jdbc:mysql://10.1.10.67:3306/sonar?useUnicode=true&characterEncoding=utf8
扫描时需要在源码目录中有扫描配置文件及其源码
[root@node2 php-sonar-runner]# ls
README.md sonar-project.properties src validation.txt
[root@node2 php-sonar-runner]# cat sonar-project.properties
# Required metadata
sonar.projectKey=org.sonarqube:php-simple-sq-scanner #sonar项目key名称
sonar.projectName=PHP :: #sonar项目名称
Simple Project :: SonarQube Scanner
sonar.projectVersion=2.0 #版本号
# Comma-separated paths to directories with sources (required)
sonar.sources=src #源码路径
# Language
sonar.language=php #扫描语言
# Encoding of the source files
sonar.sourceEncoding=UTF-8 #字符编码
[root@node2 php-sonar-runner]# /usr/local/sonar-scanner/bin/sonar-scanner #再次执行sonar-scanner
INFO: Scanner configuration file: /usr/local/sonar-scanner/conf/sonar-scanner.properties
INFO: Project root configuration file: /home/mageedu/sonar-examples-master/projects/languages/php/php-sonar-runner/sonar-project.properties
INFO: SonarQube Scanner 2.6.1
INFO: Java 1.8.0_111 Oracle Corporation (64-bit)
INFO: Linux 3.10.0-327.el7.x86_64 amd64
INFO: User cache: /root/.sonar/cache
INFO: Load global repositories
INFO: Load global repositories (done) | time=1777ms
WARN: Property ‘sonar.jdbc.url‘ is not supported any more. It will be ignored. There is no longer any DB connection to the SQ database.
WARN: Property ‘sonar.jdbc.username‘ is not supported any more. It will be ignored. There is no longer any DB connection to the SQ database.
WARN: Property ‘sonar.jdbc.password‘ is not supported any more. It will be ignored. There is no longer any DB connection to the SQ database.
INFO: User cache: /root/.sonar/cache
INFO: Load plugins index
INFO: Load plugins index (done) | time=156ms
INFO: Plugin [l10nzh] defines ‘l10nen‘ as base plugin. This metadata can be removed from manifest of l10n plugins since version 5.2.
INFO: SonarQube server 5.6.6
INFO: Default locale: "en_US", source code encoding: "UTF-8"
INFO: Process project properties
INFO: Load project repositories
INFO: Load project repositories (done) | time=832ms
INFO: Load quality profiles
INFO: Load quality profiles (done) | time=1532ms
INFO: Load active rules
INFO: Load active rules (done) | time=6049ms
WARN: SCM provider autodetection failed. No SCM provider claims to support thisproject. Please use sonar.scm.provider to define SCM of your project.
INFO: Publish mode
INFO: ------------- Scan PHP :: Simple Project :: SonarQube Scanner
INFO: Language is forced to php
INFO: Load server rules
INFO: Load server rules (done) | time=4650ms
INFO: Base dir: /home/mageedu/sonar-examples-master/projects/languages/php/php-sonar-runner
INFO: Working dir: /home/mageedu/sonar-examples-master/projects/languages/php/php-sonar-runner/.sonar
INFO: Source paths: src
INFO: Source encoding: UTF-8, default locale: en_US
INFO: Index files
INFO: 0 files indexed
INFO: Quality profile for php: Sonar way
INFO: Sensor Lines Sensor
INFO: Sensor Lines Sensor (done) | time=1ms
INFO: Sensor SCM Sensor
INFO: No SCM system was detected. You can use the ‘sonar.scm.provider‘ propertyto explicitly specify it.
INFO: Sensor SCM Sensor (done) | time=0ms
INFO: Sensor Analyzer for "php.ini" files
INFO: Sensor Analyzer for "php.ini" files (done) | time=9ms
INFO: Sensor SonarJavaXmlFileSensor
INFO: Sensor SonarJavaXmlFileSensor (done) | time=0ms
INFO: Sensor Zero Coverage Sensor
INFO: Sensor Zero Coverage Sensor (done) | time=1ms
INFO: Sensor Code Colorizer Sensor
INFO: Sensor Code Colorizer Sensor (done) | time=0ms
INFO: Sensor CPD Block Indexer
INFO: DefaultCpdBlockIndexer is used for php
INFO: Sensor CPD Block Indexer (done) | time=14ms
INFO: Calculating CPD for 0 files
INFO: CPD calculation finished
INFO: Analysis report generated in 337ms, dir size=8 KB
INFO: Analysis reports compressed in 63ms, zip size=3 KB
INFO: Analysis report uploaded in 643ms
INFO: ANALYSIS SUCCESSFUL, you can browse http://10.1.10.12:8888/dashboard/index/org.sonarqube:php-simple-sq-scanner
INFO: Note that you will be able to access the updated dashboard once the server has processed the submitted analysis report
INFO: More about the report processing at http://10.1.10.12:8888/api/ce/task?id=AVrrR_tSXasaRrmKgvaL
INFO: ------------------------------------------------------------------------
INFO: EXECUTION SUCCESS
INFO: ------------------------------------------------------------------------
INFO: Total time: 32.914s
INFO: Final Memory: 40M/103M
INFO: ------------------------------------------------------------------------
[root@node2 php-sonar-runner]#
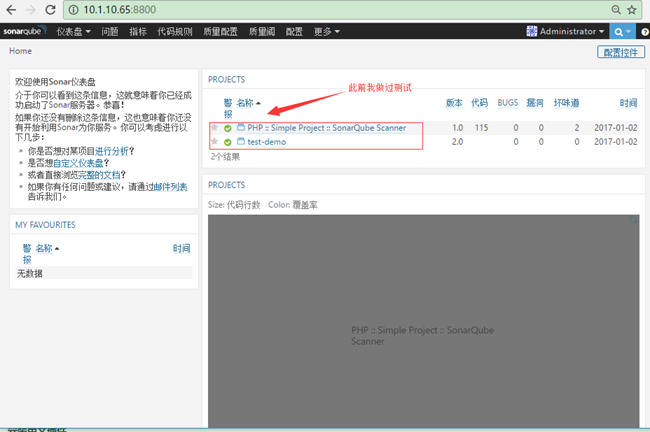
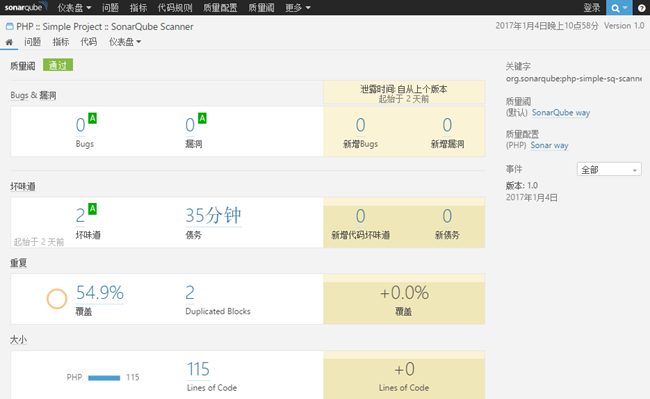
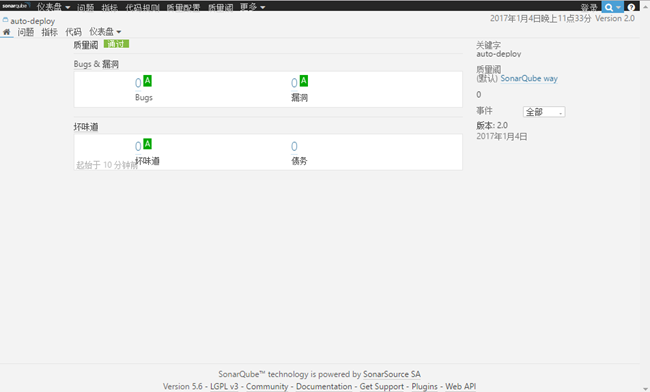
扫描后的结果会在web界面中给与显示扫描结果
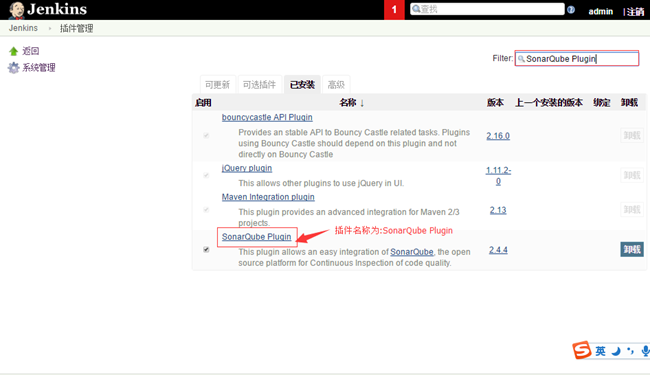
Jenkins结合sonar-scanner自动进行代码扫描
扫描之前需安装sonarqube plugin插件
系统管理-->管理插件-->搜索sonarqub plugin插件安装即可
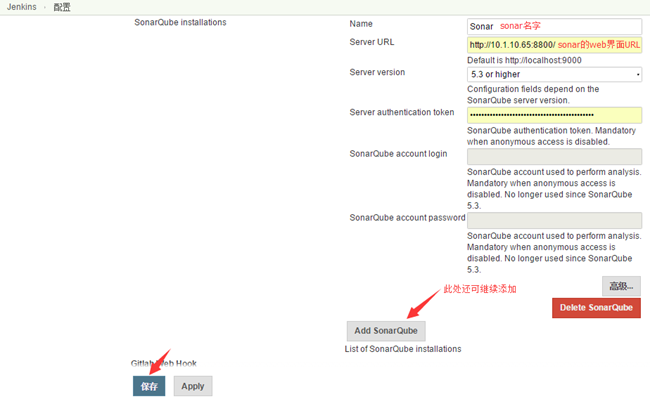
Jenkins结合sonar则需在系统管理-->系统设置-->sonar配置段进行配置,输入name、server URL、server version即可
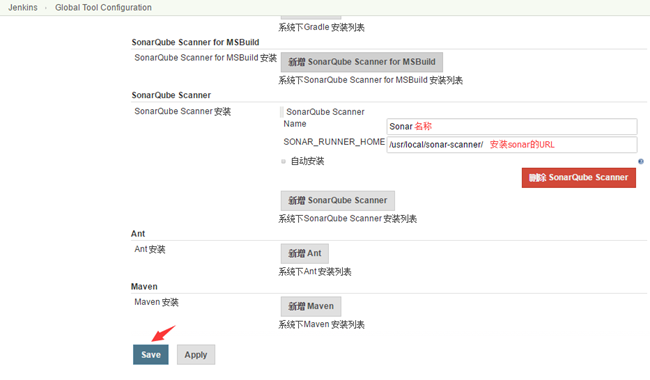
系统管理-->Global tools configuration找到sonarqube填写sonar的安装路径及其name
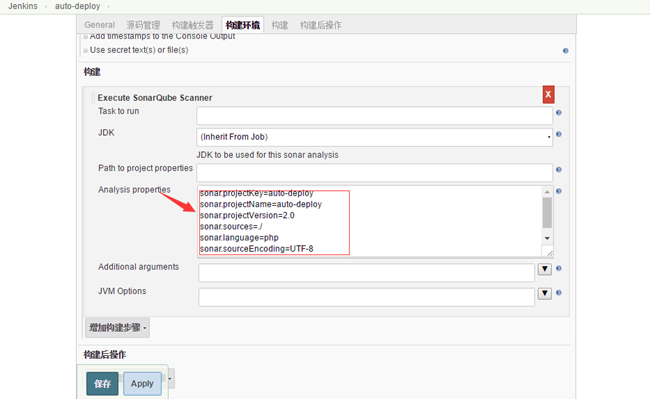
全局配置段配置完成之后则在接下来的项目中即可继承全集配置段中的配置,在需要扫描的项目中嵌入,点开项目-->设置-->构建-->execute sonarqube scanner 将扫描参数填写在文本框中
完成配置,点击构建,即可自动进行代码扫描测试
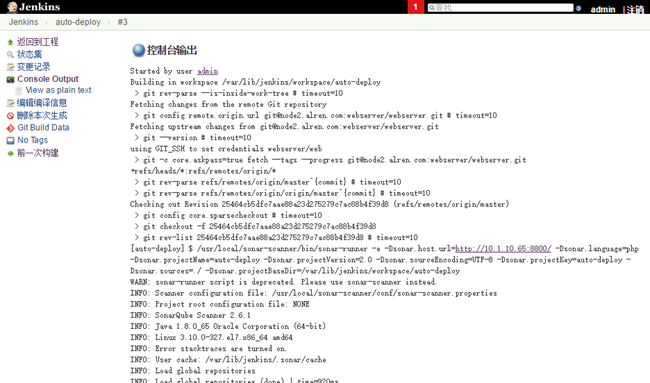
构建成功显示为蓝色的球,在旁边会显示sonar的图标,点击图标可查看代码的质量展示信息
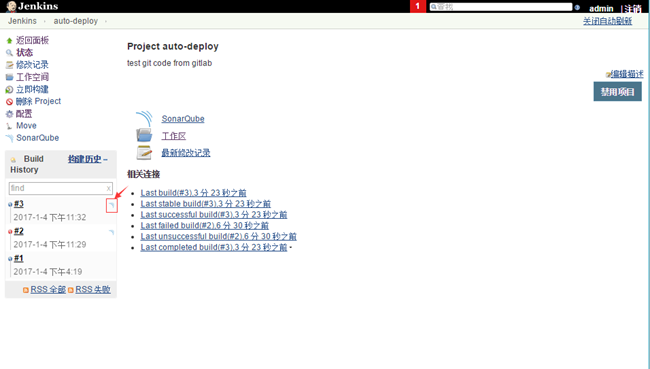
构建完成后,我们发现这里的SonarQube可以点击,我们点击SonarQube就会链接到10.1.10.65:8800就是代码查看器的地址
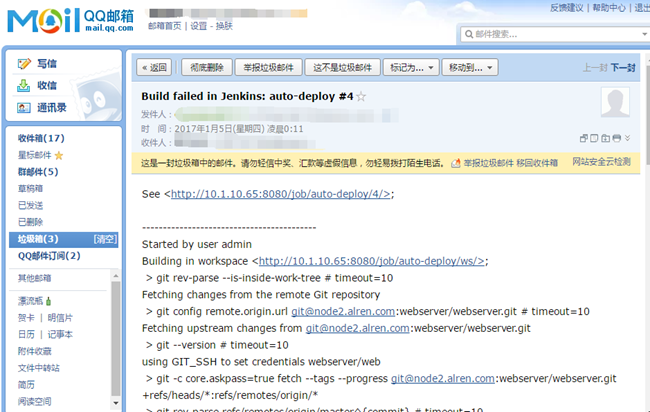
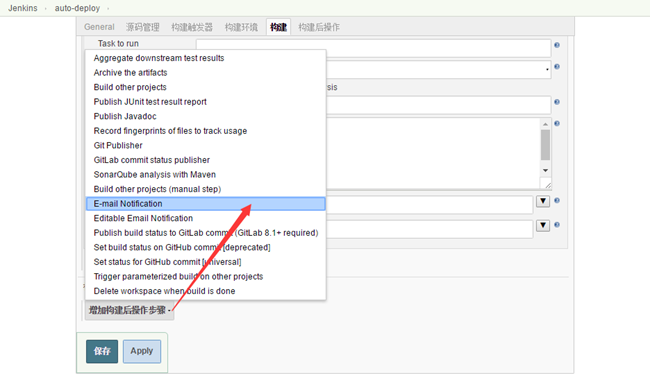
同时,可以在项目设置中配置构建后操作,例如构建失败可定义邮件通知等
构建失败后则会邮件提醒