前面博客已搭建出服务注册中心、服务提供者和服务消费者三个微服务,本文的案例我们依然在这三个案例的基础上来实现
一:搭建hystrx步骤
1.pom
<dependency>
    <groupId>org.springframework.cloud</groupId>
    <artifactId>spring-cloud-starter-hystrix</artifactId>
</dependency>
2.消费者入口
添加@EnableCircuitBreaker


@EnableCircuitBreaker
@SpringBootApplication
@EnableDiscoveryClient
public class RibbonConsumerApplication {

    public static void main(String[] args) {
        SpringApplication.run(RibbonConsumerApplication.class, args);
    }
    @LoadBalanced
    @Bean
    RestTemplate restTemplate() {
        return new RestTemplate();
    }
}
3.Controller类
创建一个helloService来单独处理Controller的接口函数
@Service
public class HelloService {
    @Autowired
    private RestTemplate restTemplate;

    @HystrixCommand(fallbackMethod = "error")
    public String hello() {
        ResponseEntity<String> responseEntity = restTemplate.getForEntity("http://HELLO-SERVICE/hello", String.class);
        return responseEntity.getBody();
    }

    public String error() {
        return "error";
    }
}
@RestController
public class ConsumerController {
    @Autowired
    private HelloService helloService;
    @RequestMapping(value = "/ribbon-consumer",method = RequestMethod.GET)
    public String helloController() {
        return helloService.hello();
    }
}
再运行后,访问这个消费者的方法,当其中一个生产者服务关掉时,连续刷新方法,也不会出现服务请求不到的情况,这就是我们想要的负载均衡效果!
是Hystrix断路器启动的效果
二:Hystrix缓存
在原来的helloService有注解@HystrixCommand在加一个注解@CacheResult,当参数都一样的时不调用请求直接返回缓存值,否则调用服务
@CacheResult,@CacheKey,@CacheRemove
@CacheResult(cacheKeyMethod = "getCacheKey2")
@HystrixCommand
public Book test6(Integer id) {
    return restTemplate.getForObject("http://HELLO-SERVICE/getbook5/{1}", Book.class, id);
}
public String getCacheKey2(Integer id) {
    return String.valueOf(id);
}
@CacheResult
@HystrixCommand
public Book test6(@CacheKey Integer id,String aa) {
    return restTemplate.getForObject("http://HELLO-SERVICE/getbook5/{1}", Book.class, id);
}
三:Hystrix请求合并(高并发请求这样的方案很棒)
高并发时通信次数增加会导致总的通信时间增加,线程池资源有限,高并发会有延迟,合拼请求能解决问题
原理:利用一个合并处理器,将对同一个服务发起的连续请求合并成一个请求进行处理(这些连续请求的时间窗默认为10ms)过程中涉及到的一个核心类就是HystrixCollapser
不怎么看懂,可以自行研究https://mp.weixin.qq.com/s/0QSKVLaDjBAscRaeccaXuA
四:Hystrix仪表盘,Turbine集群监控
1.Hystrix仪表盘:监控单体应用
1)作用:就像汽车的仪表盘实时显示汽车的各项数据一样,Hystrix仪表盘主要用来监控Hystrix的实时运行状态,通过它我们可以看到Hystrix的各项指标信息,从而快速发现系统中存在的问题进而解决它
2)由于微服务理念,单纯创建一个Springboot服务:hystrix-dashboard
i)pom
<parent>
    <groupId>org.springframework.cloud</groupId>
    <artifactId>spring-cloud-starter-parent</artifactId>
    <version>Dalston.SR3</version>
    <relativePath/>
</parent>
<dependencies>
    <!-- 其他默认依赖 -->
    <!-- 我们需要添加的依赖 -->
    <dependency>
        <groupId>org.springframework.cloud</groupId>
        <artifactId>spring-cloud-starter-hystrix</artifactId>
    </dependency>
    <dependency>
        <groupId>org.springframework.cloud</groupId>
        <artifactId>spring-cloud-starter-hystrix-dashboard</artifactId>
    </dependency>
    <dependency>
        <groupId>org.springframework.boot</groupId>
        <artifactId>spring-boot-starter-actuator</artifactId>
    </dependency>
</dependencies>
ii)入口类添加注解@EnableHystrixDashboard
@SpringBootApplication
@EnableHystrixDashboard
public class HystrixDashboardApplication {

    public static void main(String[] args) {
        SpringApplication.run(HystrixDashboardApplication.class, args);
    }
}
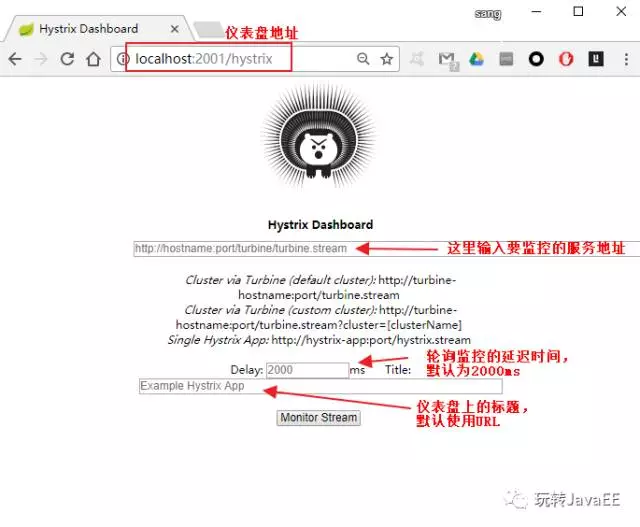
iii)测试访问:localhost:port/hystrix即可打开对应页面
3)修改消费者,让其具备/hystrix.stream接口,提供这个服务的各个参数,然后应用在仪表盘中
添加pom
<dependency>
    <groupId>org.springframework.cloud</groupId>
    <artifactId>spring-cloud-starter-hystrix</artifactId>
</dependency>
<dependency>
    <groupId>org.springframework.boot</groupId>
    <artifactId>spring-boot-starter-actuator</artifactId>
</dependency>
入口类添加@EnableCircuitBreaker
之后消费者服务重启,就可以访问/hystrix.stream接口,(访问这个接口前需要访问下其他接口,这个接口才能正常显示否则一直显示ping...)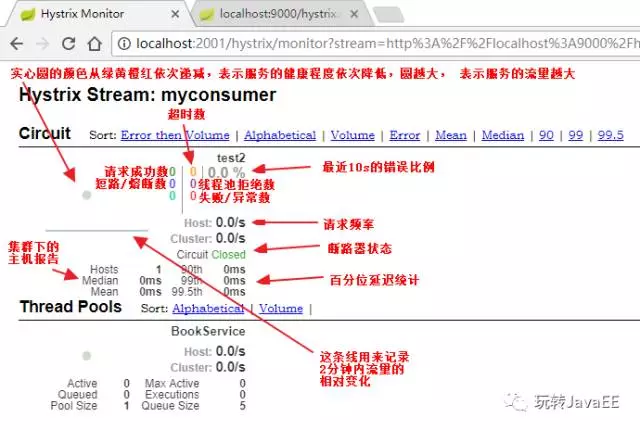
2.Turbine集群监控:监控一个集群
1)微服务理念创建一个单独的服务turbine
pom
<parent>
    <groupId>org.springframework.cloud</groupId>
    <artifactId>spring-cloud-starter-parent</artifactId>
    <version>Dalston.SR3</version>
    <relativePath/>
</parent>
<dependencies>
    <!-- 其他默认的依赖 -->
    <!-- 我们要添加的依赖 -->
    <dependency>
        <groupId>org.springframework.boot</groupId>
        <artifactId>spring-boot-starter-actuator</artifactId>
    </dependency>
    <dependency>
        <groupId>org.springframework.cloud</groupId>
        <artifactId>spring-cloud-starter-turbine</artifactId>
    </dependency>
</dependencies>
入口类添加注解:@EnableTurbine注解表示开启Turbine
@SpringBootApplication
@EnableDiscoveryClient
@EnableTurbine
public class TurbineApplication {

    public static void main(String[] args) {
        SpringApplication.run(TurbineApplication.class, args);
    }
}
修改配置application.properties
spring.application.name=turbine
server.port=2002
management.port=2003
eureka.client.service-url.defaultZone=http://localhost:1111/eureka/
turbine.app-config=ribbon-consumer #指定了要监控的应用名字为ribbon-consumer
turbine.cluster-name-expression="default" #表示集群的名字为default
turbine.combine-host-port=true#表示同一主机上的服务通过host和port的组合来进行区分,默认情况下是使用host来区分,这样会使本地调试有问题
测试方式:
启动:server,两个生产者,两个消费者,hystrix仪表盘启动,tuibe启动
先访问下消费者服务中一个接口,之后http://localhost:2002/turbine.stream,就能看到消息,将次url放入hystrix仪表盘http://localhost:http://localhost:2001/hystrix中查看集群消息