1.1 初始化项目
1、使用 webpack-simple 模板初始化vue项目
vue init webpack-simple vue-cli-demo # 生成项目模板:vue init 模板名 项目名
cd vue-cli-demo
cnpm install # 切换到项目目录安装需要的包
npm run dev # 启动测试服务
2、安装vue-router(模块化组件)
cnpm install vue-router -S
1.2 简单使用:步骤
1、webpack-simple 模板会生成的文件


C:.
│  .babelrc
│  .editorconfig
│  .gitignore
│  index.html
│  package.json
│  README.md
│  webpack.config.js
│
└─src
    │  App.vue
    │  main.js
    │
    └─assets
            logo.png
2、编辑main.js
import Vue from 'vue'
import VueRouter from 'vue-router'  // VueRouter是自己定义的名字,vue-router是固定的
import App from './App.vue'
import routerConfig from './router.config'  // 导入路由配置文件

// 使用VueRouter
Vue.use(VueRouter);

// 创建路由实例: 把路由配置文件传进来
const router=new VueRouter(routerConfig);

new Vue({
  el: '#app',
  render: h => h(App),
  router  // 注入这个路由
});
3、编辑App.vue
<template>
  <div id="app">
      {{msg}}
      <h3>
        <router-link to="/home">主页</router-link>
        <router-link to="/news">新闻</router-link>
      </h3>

      <!--router-view显示路由中内容,keep-alive缓存非活动组件-->
      <div>
        <keep-alive>
          <router-view></router-view>
        </keep-alive>
      </div>
  </div>

</template>

<script>
export default {
  name: 'app',
  data () {
    return {
      msg: 'Welcome to Tom Vue.js App'
    }
  }
}
</script>

<style>
#app {
  font-family: 'Avenir', Helvetica, Arial, sans-serif;
  -webkit-font-smoothing: antialiased;
  -moz-osx-font-smoothing: grayscale;
  text-align: center;
  color: #2c3e50;
  margin-top: 60px;
}

h1, h2 {
  font-weight: normal;
}

ul {
  list-style-type: none;
  padding: 0;
}

li {
  display: inline-block;
  margin: 0 10px;
}

a {
  color: #42b983;
}
</style>
4、编辑router.config.js
import Home from './components/Home'  // 从components目录导入Home组件
import News from './components/News'  // 从components目录导入News组件

// 导出
export default {
  routes:[
    {
      path:'/home',
      component:Home,
    },
    {
      path:'/news',
      component:News,
    }
  ]
}
5、创建 sre/components 文件夹 并创建两个组件
<template>
  <div id="home">
    <h3>这是主页</h3>
  </div>

</template>

<script>
    export default {
        name: "Home"
    }
</script>

<style scoped>

</style>
<template>
  <div id="news">
    <h3>这是新闻</h3>
  </div>
</template>

<script>
    export default {
        name: "News"
    }
</script>

<style scoped>

</style>
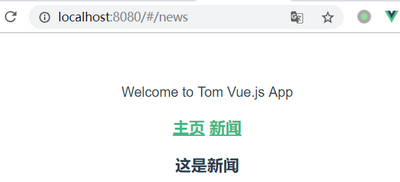
6、效果图
1.3 axios模块化
1、在项目中安装 axios
cnpm install axios -S
2、使用axios的两种方式
1) 方式1:在每个组件中引入axios发送请
<template>
  <div id="app">
      {{msg}}
     <button @click="send">发送ajax请求</button>
  </div>
</template>

<script>
import axios from 'axios'

export default {
  name: 'app',
  data () {
    return {
      msg: 'Welcome to Tom Vue.js App'
    }
  },
  methods:{
    send(){
      axios.get('https://api.github.com/users/Tom7481079')
        .then(resp => {
          console.log(resp.data);
        }).catch(err => {
          console.log(err);
      })
    }
  }
}
</script>

<style>
#app {
  font-family: 'Avenir', Helvetica, Arial, sans-serif;
  -webkit-font-smoothing: antialiased;
  -moz-osx-font-smoothing: grayscale;
  text-align: center;
  color: #2c3e50;
  margin-top: 60px;
}

h1, h2 {
  font-weight: normal;
}

ul {
  list-style-type: none;
  padding: 0;
}

li {
  display: inline-block;
  margin: 0 10px;
}

a {
  color: #42b983;
}
</style>
2)方式2:在main.js中全局引入axios并添加到Vue原型中
1. 在main.js入口文件中引入 axios 并赋值为全局变量:Vue.prototype.$http=axios;
2. 之后就可以在各组件使用: this.$http. 发送请求了
import Vue from 'vue'
import VueRouter from 'vue-router'  // VueRouter是自己定义的名字,vue-router是固定的
import App from './App.vue'
import routerConfig from './router.config'  // 导入路由配置文件
import axios from 'axios'  // 第一步:全局引入 axios

// 使用VueRouter
Vue.use(VueRouter);

// 第二步:定义全局变量
Vue.prototype.$http=axios;

// 创建路由实例: 把路由配置文件传进来
const router=new VueRouter(routerConfig);

new Vue({
  el: '#app',
  render: h => h(App),
  router  // 注入这个路由
});
<template>
  <div id="app">
      {{msg}}
     <button @click="send">发送ajax请求</button>
  </div>
</template>

<script>
export default {
  name: 'app',
  data () {
    return {
      msg: 'Welcome to Tom Vue.js App'
    }
  },
  methods:{
    send(){
      this.$http.get('https://api.github.com/users/Tom7481079')
        .then(resp => {
          console.log(resp.data);
        }).catch(err => {
          console.log(err);
      })
    }
  }
}
</script>

<style>
#app {
  font-family: 'Avenir', Helvetica, Arial, sans-serif;
  -webkit-font-smoothing: antialiased;
  -moz-osx-font-smoothing: grayscale;
  text-align: center;
  color: #2c3e50;
  margin-top: 60px;
}

h1, h2 {
  font-weight: normal;
}

ul {
  list-style-type: none;
  padding: 0;
}

li {
  display: inline-block;
  margin: 0 10px;
}

a {
  color: #42b983;
}
</style>
1.4 为自定义组件添加事件
1、自定义组件添加事件步骤
1. 新建组件 components/MyButton.vue
2. 导入组件:import MyButton from './components/MyButton'
3. 注册自定义组件: components:{ MyButton }
4. 引用组件并绑定事件:<MyButton @click.native="send"></MyButton>
2、相关文件
<template>
    <button>自定义按钮</button>
</template>

<style scoped>
    button{
        width: 100px;
        height: 30px;
        background-color:#ccc;
        color:red;
    }
</style>
<template>
  <div id="app">
      {{msg}}
     <button @click="send">发送ajax请求</button>
     <MyButton @click.native="send"></MyButton>
  </div>
</template>

<script>
import MyButton from './components/MyButton'

export default {
  name: 'app',
  data () {
    return {
      msg: 'Welcome to Tom Vue.js App'
    }
  },
  methods:{
    send(){
      this.$http.get('https://api.github.com/users/Tom7481079')
        .then(resp => {
          console.log(resp.data);
        }).catch(err => {
          console.log(err);
      })
    }
  },
  components:{
    MyButton   // 注册自定义组件
  }
}
</script>

<style>
#app {
  font-family: 'Avenir', Helvetica, Arial, sans-serif;
  -webkit-font-smoothing: antialiased;
  -moz-osx-font-smoothing: grayscale;
  text-align: center;
  color: #2c3e50;
  margin-top: 60px;
}

h1, h2 {
  font-weight: normal;
}

ul {
  list-style-type: none;
  padding: 0;
}

li {
  display: inline-block;
  margin: 0 10px;
}

a {
  color: #42b983;
}
</style>
