原需求是准备爬取中国天气网数据,后来做了这个,还有一个bug后面会提到。
环境:win10
python版本:python3
准备工作:爬取中国天气网的图标,参考https://blog.csdn.net/weixin_44775548/article/details/103873577这里就不多说了。
step 1:引入库
1 from tkinter import *
2 #GUI设计,tkinter模块包含不同的控件,如Button、Label、Text等
3 import requests
4 import urllib.request   #发送网络请求,获取数据
5 import gzip             #压缩和解压缩模块
6 import json             #解析获得的数据
7 from PIL import Image,ImageTk#用来显示图片的库
8 from tkinter import messagebox  #导入提示框库
step 2:设计界面
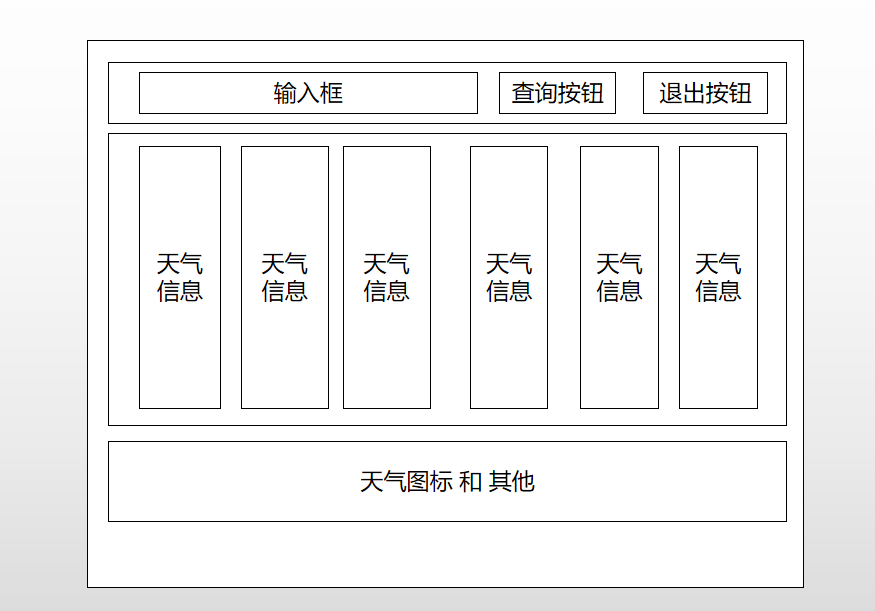
用ppt画的大家将就
参考是用的两个界面,然后给改成一个了,结果出现查询一次后重新查询会导致fream容器的内容不能刷新,希望有大佬指导一下我。
另外参考用的quit方法退出,在我电脑上运行会卡死,我改成了dedestroy就解决了问题。
 1     root = Tk()
 2     root.title('城市天气显示') #窗体名称显示
 3     root.geometry('700x300')  #设置窗体大小
 4     root.iconbitmap('bitbug_favicon.ico')#设置图标
 5
 6     ft=Frame(root)#按钮和文本
 7     ft.pack()
 8
 9     #Entry创建单行文本
10     var = StringVar()#输入框变量
11     e = Entry(ft, textvariable = var)
12     # city = var.get()
13     e.insert(0,'北京')#默认文本
14     e.pack(side = LEFT)#布局方式
15     #单行文本框显示出来
16
17
18     #定义个容器
19     f=Frame(root)#天气信息框架
20     f.pack()
21     f2=Frame(root)#天气图标容器
22     f2.pack()
23     f1=Frame(root)#温馨提示容器
24     f1.pack()
25
26     Button(ft,text='查询', width=20,command = get_weather_data).pack(side = LEFT)#查询按钮
27     Button(ft,text = '确认并退出',width=20,command = root.dedestroy).pack(side = LEFT)#退出按钮
28     root.mainloop()
ste3:通过接口获取天气信息
 1     def get_weather_data() :#获取网站数据
 2         city_name = var.get()#获取输入框的内容
 3         url1 = 'http://wthrcdn.etouch.cn/weather_mini?city='+urllib.parse.quote(city_name)
 4         #url2 = 'http://wthrcdn.etouch.cn/weather_mini?citykey=101010100'
 5         #网址1只需要输入城市名,网址2需要输入城市代码
 6         #print(url1)
 7         weather_data = urllib.request.urlopen(url1).read()
 8         #读取网页数据
 9         weather_data = gzip.decompress(weather_data).decode('utf-8')
10         #解压网页数据
11         #print(weather_data)
12         weather_dict = json.loads(weather_data)
13         #将json数据转换为dict数据
14         if weather_dict.get('desc') == 'invilad-citykey':
15             print(messagebox.askokcancel("提示","你输入的城市名有误,或者天气中心未收录你所在城市"))#没查询到报错
16         else:
17             #print(messagebox.askokcancel('xing','bingguo'))
18             show_data(weather_dict,city_name)#调用展示天气信息函数
step 4:处理信息和展示信息内含有布局等。
 1 def show_data(weather_dict,city_name):#显示数据
 2         '''times+=1
 3         if times!=1:
 4             f.pack_forget()
 5             f1.pack_forget()
 6             f2.pack_forget()
 7             times-=1
 8             print(times)'''
 9         forecast = weather_dict.get('data').get('forecast')#获取数据块
10         root.title(city_name+'城市天气显示')
11         for i in range(5):#将每一天的数据放入列表中
12             LANGS = [(forecast[i].get('date'),'日期'),
13                     (forecast[i].get('fengxiang'),'风向'),
14                     ((forecast[i].get('fengli')[9:-3]),'风力'),
15                     (forecast[i].get('high'),'最高温'),
16                     (forecast[i].get('low'),'最低温'),
17                     (forecast[i].get('type'),'天气')]
18
19             group = LabelFrame(f,text = '天气状况',padx = 0,pady = 0,)#框架
20             group.pack(padx=11,pady=0,side = LEFT)#放置框架
21             #print(LANGS)
22             for lang, value in LANGS:#将数据放入框架中
23                 c = Label(group,text = value + ': ' + lang,compound='center')
24                 c.pack(anchor = W)
25
26         for i in range(5):
27             weather=forecast[i].get('type')
28             group = Label(f2)#框架
29             img_open = Image.open('day/'+weather+'.gif')#打开图片,图片是从中国天气网爬取的
30             img=ImageTk.PhotoImage(img_open)#获取图片
31             group.config(image=img)#显示图片
32             group.image=img
33             group.pack(padx=40,pady=0,side = LEFT)#放置框架
34             #print(weather)
35         Label(f1,text = '今日' + weather_dict.get('data').get('ganmao'),fg = 'green').pack(side = BOTTOM)#温馨提示
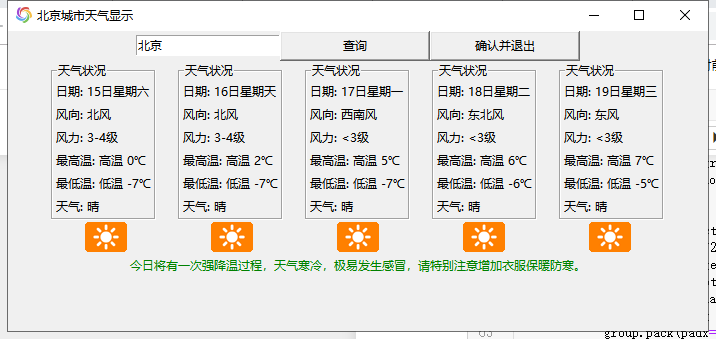
step 5:最终效果
完整代码:


 1 from tkinter import *
 2 #GUI设计,tkinter模块包含不同的控件,如Button、Label、Text等
 3 import requests
 4 import urllib.request   #发送网络请求,获取数据
 5 import gzip             #压缩和解压缩模块
 6 import json             #解析获得的数据
 7 from PIL import Image,ImageTk#用来显示图片的库
 8 from tkinter import messagebox  #导入提示框库
 9 global times
10 times=0
11 def main():
12     def get_weather_data() :#获取网站数据
13         city_name = var.get()#获取输入框的内容
14         url1 = 'http://wthrcdn.etouch.cn/weather_mini?city='+urllib.parse.quote(city_name)
15         #url2 = 'http://wthrcdn.etouch.cn/weather_mini?citykey=101010100'
16         #网址1只需要输入城市名,网址2需要输入城市代码
17         #print(url1)
18         weather_data = urllib.request.urlopen(url1).read()
19         #读取网页数据
20         weather_data = gzip.decompress(weather_data).decode('utf-8')
21         #解压网页数据
22         #print(weather_data)
23         weather_dict = json.loads(weather_data)
24         #将json数据转换为dict数据
25         if weather_dict.get('desc') == 'invilad-citykey':
26             print(messagebox.askokcancel("提示","你输入的城市名有误,或者天气中心未收录你所在城市"))#没查询到报错
27         else:
28             #print(messagebox.askokcancel('xing','bingguo'))
29             show_data(weather_dict,city_name)#调用展示天气信息函数
30
31     def show_data(weather_dict,city_name):#显示数据
32         '''times+=1
33         if times!=1:
34             f.pack_forget()
35             f1.pack_forget()
36             f2.pack_forget()
37             times-=1
38             print(times)'''
39         forecast = weather_dict.get('data').get('forecast')#获取数据块
40         root.title(city_name+'城市天气显示')
41         for i in range(5):#将每一天的数据放入列表中
42             LANGS = [(forecast[i].get('date'),'日期'),
43                     (forecast[i].get('fengxiang'),'风向'),
44                     ((forecast[i].get('fengli')[9:-3]),'风力'),
45                     (forecast[i].get('high'),'最高温'),
46                     (forecast[i].get('low'),'最低温'),
47                     (forecast[i].get('type'),'天气')]
48
49             group = LabelFrame(f,text = '天气状况',padx = 0,pady = 0,)#框架
50             group.pack(padx=11,pady=0,side = LEFT)#放置框架
51             #print(LANGS)
52             for lang, value in LANGS:#将数据放入框架中
53                 c = Label(group,text = value + ': ' + lang,compound='center')
54                 c.pack(anchor = W)
55
56         for i in range(5):
57             weather=forecast[i].get('type')
58             group = Label(f2)#框架
59             img_open = Image.open('day/'+weather+'.gif')#打开图片,图片是从中国天气网爬取的
60             img=ImageTk.PhotoImage(img_open)#获取图片
61             group.config(image=img)#显示图片
62             group.image=img
63             group.pack(padx=40,pady=0,side = LEFT)#放置框架
64             #print(weather)
65         Label(f1,text = '今日' + weather_dict.get('data').get('ganmao'),fg = 'green').pack(side = BOTTOM)#温馨提示
66
67     root = Tk()
68     root.title('城市天气显示') #窗体名称显示
69     root.geometry('700x300')  #设置窗体大小
70     root.iconbitmap('bitbug_favicon.ico')#设置图标
71
72     ft=Frame(root)#按钮和文本
73     ft.pack()
74
75     #Entry创建单行文本
76     var = StringVar()#输入框变量
77     e = Entry(ft, textvariable = var)
78     # city = var.get()
79     e.insert(0,'北京')#默认文本
80     e.pack(side = LEFT)#布局方式
81     #单行文本框显示出来
82
83
84     #定义个容器
85     f=Frame(root)#天气信息框架
86     f.pack()
87     f2=Frame(root)#天气图标容器
88     f2.pack()
89     f1=Frame(root)#温馨提示容器
90     f1.pack()
91
92     Button(ft,text='查询', width=20,command = get_weather_data).pack(side = LEFT)#查询按钮
93     Button(ft,text = '确认并退出',width=20,command = root.destroy).pack(side = LEFT)#退出按钮
94     root.mainloop()
95 if __name__=='__main__':
96     main()
参考:
https://blog.csdn.net/chuxin_2017/article/details/87802968
感谢大佬。
欢迎大家留言交流。