一、四层负载均衡
1.什么是四层负载均衡
四层负载均衡是基于传输层协议包来封装的(如:TCP/IP),那我们前面使用到的七层是指的应用层,
他的组装在四层的基础之上,无论四层还是七层都是指的OSI网络模型。
2.应用场景
1.四层+七层来做负载均衡,四层可以保证七层的负载均衡的高可用性;nginx就无法保证自己的服务高可用,需要依赖LVS或者keepalive。
2.tcp协议的负载均衡,有些请求是TCP协议的(mysql、ssh),
或者说这些请求只需要使用四层进行端口的转发就可以了,所以使用四层负载均衡。
3.数据库读写分离负载
4.跳板机端口映射
3.四层负载均衡特点
1、四层负载均衡仅能转发TCP/IP协议、UDP协议、通常用来转发端口,如:tcp/22、udp/53;
2、四层负载均衡可以用来解决七层负载均衡端口限制问题;(七层负载均衡最大使用65535个端口号)
3、四层负载均衡可以解决七层负载均衡高可用问题;(多台后端七层负载均衡能同事的使用)
4、四层的转发效率比七层的高得多,但仅支持tcp/ip协议,不支持http和https协议;
5、通常大并发场景通常会选择使用在七层负载前面增加四层负载均衡。
二、四层负载均衡实践
1.环境准备
| 主机 |
IP |
身份 |
| lb03 |
10.0.0.6 |
四层负载均衡 |
| lb01 |
10.0.0.4 |
七层负载均衡 |
| lb02 |
10.0.0.5 |
七层负载均衡 |
2.lb02安装nginx
1.配置yum源
2.安装nginx
3.配置nginx
4.创建用户
5.启动nginx
3.推送lb01配置到lb02
[root@lb01 ~]# scp /etc/nginx/conf.d/* 172.16.1.5:/etc/nginx/conf.d/
4.测试lb02七层负载均衡
[root@lb02 ~]# nginx -t
[root@lb02 ~]# systemctl start nginx

#配置hosts访问
5.配置四层负载均衡
1)四层负载均衡语法
Syntax:	stream { ... }
Default:	—
Context:	main

#示例:四层负载均衡stream模块跟http模块时同一级别,不能配置在http层里面
stream {
    upstream backend {
        server backend1.example.com:12345 weight=5;
        server 127.0.0.1:12345            max_fails=3 fail_timeout=30s;
    }

    server {
        listen 12345;
        proxy_connect_timeout 1s;
        proxy_timeout 3s;
        proxy_pass backend;
    }
}
2)配置nginx配置文件
[root@lb03 ~]# vim /etc/nginx/nginx.conf
events {
    worker_connections  1024;
}

include /etc/nginx/conf.c/*.conf;

http { ... }
3)配置四层负载均衡
[root@lb03 ~]# mkdir /etc/nginx/conf.c
[root@lb03 ~]# vim /etc/nginx/conf.c/4lb.conf
stream {
    upstream lbserver {
        server 10.0.0.4:80;
        server 10.0.0.5:80;
    }

    server {
        listen 80;
        proxy_connect_timeout 1s;
        proxy_timeout 3s;
        proxy_pass lbserver;
    }
}

#检查配置并启动
[root@lb03 ~]# nginx -t
[root@lb03 ~]# systemctl restart nginx
#如果启动失败,则删除httpc层内容或者删除conf.d的配置文件
4)配置hosts访问
10.0.0.6 linux.blog.com linux.zh.com linux.php.com

#访问
5)配置四层负载均衡日志
#四层负载均衡是没有access的日志的,因为在nginx.conf的配置中,access的日志格式是配置在http下的,而四层负载均衡配置时在http以外的;

#如果需要日志则需要配置在stream下面
[root@web03 conf.c]# cat lb_domain.conf
stream {
    log_format  proxy '$remote_addr $remote_port - [$time_local] $status $protocol '
                  '"$upstream_addr" "$upstream_bytes_sent" "$upstream_connect_time"' ;
    access_log /var/log/nginx/proxy.log proxy;
    upstream lbserver {
        server 10.0.0.4:80;
        server 10.0.0.5:80;
    }

    server {
        listen 80;
        proxy_connect_timeout 1s;
        proxy_timeout 3s;
        proxy_pass lbserver;
    }
}
三、四层负载均衡做端口转发
1.请求负载均衡的5555端口,转发至172.16.1.7的22端口
stream {
    upstream web_7 {
        server 172.16.1.7:22;
    }

    server {
        listen 5555;
        proxy_pass web_7;
    }
}
1.请求负载均衡的6666端口,转发至172.16.1.51的3306端口
stream {
   upstream mysql {
        server 172.16.1.52:3306;
        server 172.16.1.53:3306;
        server 172.16.1.54:3306;
        server 172.16.1.55:3306;
        server 172.16.1.56:3306;
    }

    server {
        listen 6666;
        proxy_pass mysql;
    }
}
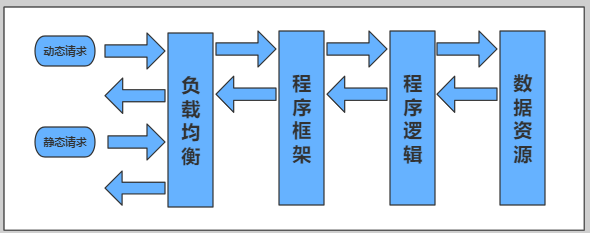
四、动静分离
动静分离,通过中间件将动静分离和静态请求进行分离;
通过中间件将动态请求和静态请求分离,可以减少不必要的请求消耗,同时能减少请求的延时。
通过中间件将动态请求和静态请求分离,逻辑图如下:
1.单台机器动静分离
#配置
[root@web01 /code]# cat /etc/nginx/conf.d/linux.blog.com.conf
server {
	listen 80;
	server_name linux.blog.com;
	root /code/wordpress;

	location / {
		index index.php;
	}

	location ~* .(jpg|png)$ {
		root /code/pic;
		root /code/wordpress;
	}

	location ~* .php$ {
		fastcgi_pass 127.0.0.1:9000;
		fastcgi_param SCRIPT_FILENAME $document_root$fastcgi_script_name;
		include fastcgi_params;
	}
}

#创建目录
[root@web01 /code]# mkdir /code/pic
#做软连接
[root@web01 /code]# ln -s /code/wordpress/wp-content /code/pic
2.多台机器做动静分离
1)环境准备
| 主机 |
IP |
身份 |
| lb01 |
10.0.0.4,172.16.1.4 |
负载均衡 |
| web01 |
172.16.1.7 |
静态资源 |
| web03 |
172.16.1.9 |
动态资源 |
2)web01配置静态资源
[root@web01 /code]# vim /etc/nginx/conf.d/jt.conf
server {
    listen 80;
    server_name linux.djfenli.com;

    location ~* .(jpg|png|gif)$ {
        root /code/pic;
    }
}

#重启
[root@web01 /code]# systemctl restart nginx
#上传一些图片
[root@web01 /code]# mkdir pic
[root@web01 /code/pic]# ll
total 1188
-rw-r--r-- 1 root root 407030 Sep  2 12:22 1.gif
-rw-r--r-- 1 root root 298866 Sep  2 12:21 3_web01.jpg
-rw-r--r-- 1 root root 410120 Sep  2 12:22 4_web02.jpg
-rw-r--r-- 1 root root  60494 Sep  2 12:21 timg_(2).jpg
-rw-r--r-- 1 root root  30607 Sep  2 12:21 timg_(3).jpg
3)web03配置动态资源
#部署tomcat
[root@web03 ~]# yum install -y tomcat
[root@web03 ~]# mkdir /usr/share/tomcat/webapps/ROOT
[root@web03 ~]# cat /usr/share/tomcat/webapps/ROOT/java_test.jsp
<%@ page language="java" import="java.util.*" pageEncoding="utf-8"%>
<HTML>
    <HEAD>
        <TITLE>曾老湿JSP Page</TITLE>
    </HEAD>
    <BODY>
        <%
            Random rand = new Random();
            out.println("<h1>曾老湿随机数:<h1>");
            out.println(rand.nextInt(99)+100);
        %>
    </BODY>
</HTML>

[root@web03 ~]# systemctl start tomcat
[root@web03 ~]# netstat -lntp
tcp6       0      0 :::8009                 :::*                    LISTEN      34369/java
tcp6       0      0 :::8080                 :::*                    LISTEN      34369/java
tcp6       0      0 127.0.0.1:8005          :::*                    LISTEN      34369/java
4)配置负载均衡
[root@lb01 ~]# cat /etc/nginx/conf.d/linux.djfenli.com.conf
upstream jt {
	server 172.16.1.7:80;
}

upstream dt {
    server 172.16.1.9:8080;
}

server {
	listen 80;
	server_name linux.djfenli.com;

	location ~* .gif$ {
		proxy_pass http://jt;
		include proxy_params;
	}

	location ~* .jsp$ {
		proxy_pass http://dt;
		include proxy_params;
	}
}
5)检查配置文件并重启
[root@lb01 ~]# nginx -t
nginx: the configuration file /etc/nginx/nginx.conf syntax is ok
nginx: configuration file /etc/nginx/nginx.conf test is successful
[root@lb01 ~]# systemctl restart nginx
6)配置hosts访问
10.0.0.4 linux.djfenli.com