一、nginx常用模块
1.目录索引模块 ngx_http_autoindex_module
1)配置
[root@web02 /etc/nginx/conf.d]# vim test.conf
server {
    listen 80;
    server_name www.test.com;

    location / {
        root /code;
        index index.html;
    }
    location /download {
        root /code;
        index index.html;
        autoindex on;
    }
}
2)优化参数
#显示文件大小,使用off
autoindex_exact_size off;

#显示确切文件修改时间
autoindex_localtime on;
2.访问限制模块 ngx_http_access_module
[root@web02 /etc/nginx/conf.d]# vim test.conf

server {
    listen 80;
    server_name www.test.com;

    location / {
        root /code;
        index index.html;
    }
    location /download {
        root /code;
        index index.html;
        autoindex on;
        autoindex_exact_size off;
        autoindex_localtime on;
        #allow 10.0.0.0/24;
        allow 10.0.0.1;
        deny all;
    }
}
3.访问控制模块
1)语法
#开启认证控制,没有任何作用就是为了开启
Syntax:	auth_basic string | off;
Default:	auth_basic off;
Context:	http, server, location, limit_except

#指定用户认证的文件
Syntax:	auth_basic_user_file file;
Default:	—
Context:	http, server, location, limit_except
2)配置密码文件
#生成密码文件
[root@web02 /etc/nginx/conf.d]# htpasswd -c /etc/nginx/auth_basic lhd
New password:
Re-type new password:
Adding password for user lhd

#生成密码,在命令行输入密码
[root@web02 /etc/nginx/conf.d]# htpasswd -b -c /etc/nginx/auth_basic lhd linux
Adding password for user lhd

#查看
[root@web02 /etc/nginx/conf.d]# vim /etc/nginx/auth_basic
lhd:$apr1$JmblF9to$jDnvQn1w7oETPYyvaL2OG.
3)配置nginx
[root@web02 /etc/nginx/conf.d]# cat test.conf
server {
	listen 80;
	server_name www.test.com;

	location / {
		root /code;
		index index.html;
	}
	location /download {
		root /code;
		index index.html;
		autoindex on;
		autoindex_exact_size off;
		autoindex_localtime on;
		allow 10.0.0.1;
		deny all;
		auth_basic "输入用户名和密码";
		auth_basic_user_file /etc/nginx/auth_basic;
    }
}
4)添加多用户
#不添加-c参数可以添加多个用户
[root@web02 /etc/nginx/conf.d]# htpasswd /etc/nginx/auth_basic lhd
New password:
Re-type new password:
Adding password for user lhd

[root@web02 /etc/nginx/conf.d]# vim /etc/nginx/auth_basic
qiudao:$apr1$UL89inf6$.59e04v5ILGHpkMs2xZzF.
lhd:$apr1$9fOQ/hLl$DEugqKzv.0SNBziFMLdVZ1
4.nginx状态模块
1)语法
Syntax:	stub_status;
Default:	—
Context:	server, location
2)配置
[root@web02 /etc/nginx/conf.d]# cat test.conf
server {
	listen 80;
	server_name www.test.com;

	location / {
		root /code;
		index index.html;
	}
	location /download {
		root /code;
		index index.html;
		autoindex on;
		autoindex_exact_size off;
		autoindex_localtime on;
		allow 10.0.0.1;
		deny all;
		auth_basic "输入用户名和密码";
		auth_basic_user_file /etc/nginx/auth_basic;
    }
	location /status {
		stub_status;
    }
}
3)状态页
#访问 http://www.test.com/status

#返回内容
Active connections: 2
server accepts handled requests
 		  2 	 2 	   	 1
Reading: 0 Writing: 1 Waiting: 1

#nginx七种状态
Active connections		#活跃的连接数
accepts				   #接受的TCP连接数
handled				   #已处理的TCP连接数
requests			   #请求数
Reading				   #读取的请求头的数量
Writing				   #响应的请求头的数量
Waiting				   #等待的请求数量

#可以用作监控日PV
[root@web02 /etc/nginx/conf.d]# curl -s http://www.test.com/status | awk 'NR==3 {print $3}'
5.连接限制模块 ngx_http_limit_conn_module
1)语法
#设置限制的空间
Syntax:	limit_conn_zone key zone=name:size;
Default:	—
Context:	http

limit_conn_zone 	#调用限制模块
key 			   #存储的内容
zone=			   #空间
name:			   #空间的名字
size;			   #空间的大小

#调用空间
Syntax:	limit_conn zone number;
Default:	—
Context:	http, server, location

limit_conn 			#调用空间
zone 				#空间名字
number;				#同一个信息可以保存的次数
2)配置
[root@web02 /etc/nginx/conf.d]# cat test.conf

limit_conn_zone $remote_addr zone=conn_zone:1m;
server {
	listen 80;
	server_name www.test.com;
	limit_conn conn_zone 1;

	location / {
		root /code;
		index index.html;
	}
	location /download {
		root /code;
		index index.html;
		autoindex on;
		autoindex_exact_size off;
		autoindex_localtime on;
		allow 10.0.0.1;
		deny all;
		auth_basic "输入用户名和密码";
		auth_basic_user_file /etc/nginx/auth_basic;
    }
	location /status {
		stub_status;
    }
}
6.请求限制模块
1)语法
#设置请求限制的空间
Syntax:	limit_req_zone key zone=name:size rate=rate [sync];
Default:	—
Context:	http

limit_req_zone 		#调用模块
key 				#空间存储的内容
zone=				#指定空间
name:				#空间的名字
size 				#空间的大小
rate=rate;			#读写速率

#调用空间
Syntax:	limit_req zone=name [burst=number] [nodelay | delay=number];
Default:	—
Context:	http, server, location

limit_req 					#调用空间
zone=name 					#指定空间名字
[burst=number] 				#扩展
[nodelay | delay=number];	  #延时
2)配置
[root@web02 /etc/nginx/conf.d]# cat test.conf
limit_conn_zone $remote_addr zone=conn_zone:1m;
limit_req_zone $remote_addr zone=req_zone:1m rate=1r/s;

server {
	listen 80;
	server_name www.test.com;
	limit_conn conn_zone 1;
	limit_req zone=req_zone;
	location / {
		root /code;
		index index.html;
	}
	location /download {
		root /code;
		index index.html;
		autoindex on;
		autoindex_exact_size off;
		autoindex_localtime on;
		allow 10.0.0.1;
		deny all;
		auth_basic "输入用户名和密码";
		auth_basic_user_file /etc/nginx/auth_basic;
    }
	location /status {
		stub_status;
    }
}
3)测试请求限制
[root@web02 /etc/nginx/conf.d]# ab -n 200 -c 2 http://www.test.com/
This is ApacheBench, Version 2.3 <$Revision: 1430300 $>
Copyright 1996 Adam Twiss, Zeus Technology Ltd, http://www.zeustech.net/
Licensed to The Apache Software Foundation, http://www.apache.org/

Benchmarking www.test.com (be patient)
Completed 100 requests
Completed 200 requests
Finished 200 requests


Server Software:        nginx/1.18.0
Server Hostname:        www.test.com
Server Port:            80

Document Path:          /
Document Length:        13 bytes

Concurrency Level:      2
Time taken for tests:   0.036 seconds
Complete requests:      200
Failed requests:        199
   (Connect: 0, Receive: 0, Length: 199, Exceptions: 0)
Write errors:           0
Non-2xx responses:      199
Total transferred:      73674 bytes
HTML transferred:       39216 bytes
Requests per second:    5492.24 [#/sec] (mean)
Time per request:       0.364 [ms] (mean)
Time per request:       0.182 [ms] (mean, across all concurrent requests)
Transfer rate:          1975.76 [Kbytes/sec] received

Connection Times (ms)
              min  mean[+/-sd] median   max
Connect:        0    0   0.8      0      12
Processing:     0    0   0.6      0       4
Waiting:        0    0   0.5      0       4
Total:          0    0   1.0      0      12

Percentage of the requests served within a certain time (ms)
  50%      0
  66%      0
  75%      0
  80%      0
  90%      0
  95%      0
  98%      4
  99%      4
 100%     12 (longest request)
[root@web02 /etc/nginx/conf.d]#
二、nginx的location配置
使用Nginx Location可以控制访问网站的路径,但一个server可以有多个location配置, 多个location的优先级该如何区分
1.location语法
Syntax:	location [ = | ~ | ~* | ^~ ] uri { ... }
location @name { ... }
Default:	—
Context:	server, location
2.location匹配符
| 匹配符 |
匹配规则 |
优先级 |
| = |
精确匹配 |
1 |
| ^~ |
以某个字符串开头 |
2 |
| ~ |
区分大小写的正则匹配 |
3 |
| ~* |
不区分大小写的正则匹配 |
3 |
| / |
通用匹配,任何请求都会匹配到 |
4 |
3.优先级验证
[root@web02 /etc/nginx/conf.d]# cat location.conf
server {
    listen 80;
    server_name www.location.com;
    #location / {
    #    default_type text/html;
    #    return 200 "location /";
    #}

    location =/ {
        default_type text/html;
        return 200 "location =/";
    }

    location ~* / {
        default_type text/html;
        return 200 "location ~* /";
    }

    location ^~ / {
      default_type text/html;
      return 200 "location ^~";
    }
}
4.location应用场景
#通用匹配,任何请求都会匹配到
location / {
    ...
}

#严格区分大小写,匹配以.php结尾的都走这个location
location ~ .php$ {
    ...
}

#严格区分大小写,匹配以.jsp结尾的都走这个location
location ~ .jsp$ {
    ...
}

#不区分大小写匹配,只要用户访问.jpg,gif,png,js,css结尾的都走这条location
location ~* .*.(jpg|gif|png|js|css)$ {
    ...
}

#不区分大小写匹配
location ~* ".(sql|bak|tgz|tar.gz|.git)$" {
    ...
}
三、LNMP架构
1.简介
LNMP是一套技术的组合,L=Linux、N=Nginx、M~=MySQL、P~=PHP
不仅仅包含这些,还有redis/ELK/zabbix/git/jenkins/kafka
2.LNMP工作方式
首先Nginx服务是不能处理动态请求,那么当用户发起动态请求时, Nginx又是如何进行处理的。
	1.静态请求:请求静态文件的请求
		静态文件:
		1)上传时什么样子,查看时就是什么样子
		2)html的页面都是静态的
	2.动态请求:请求动态内容,带参数的请求
		1)服务器上并不是真实存在的,需要都数据库等服务上去获取数据,组成的页面

当用户发起http请求,请求会被Nginx处理,如果是静态资源请求Nginx则直接返回,如果是动态请求Nginx则通过fastcgi协议转交给后端的PHP程序处理,具体如下图所示

1.访问流程
1.浏览器输入域名,浏览器拿着域名取DNS服务器解析
2.DNS服务器解析域名为IP
3.浏览器去请求该IP对应的服务器
4.浏览器请求nginx
5.nginx判断请求是动态请求还是静态请求
	#静态请求
	location / {
    	root /code;
    	index index.html;
	}
	#动态请求
	location ~* .php$ {
    	fastcgi_pass 127.0.0.1:9000;
    	... ...
	}
6.如果是静态请求,nginx直接返回内容
7.如果是动态内容,nginx会通过fastcgi协议找php-fpm管理进程
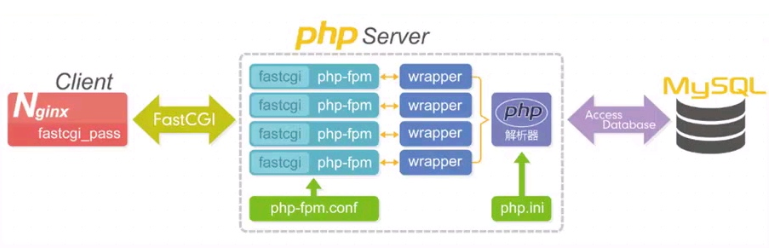
8.php-fpm管理进程会去下发工作给wrapper工作进程
9.wrapper工作进程判断是不是php文件
10.如果只是php文件,可以直接解析然后返回结果
11.如果还需要读取数据库,wrapper进程会去读取数据库数据,然后返回数据
12.数据流转:
	1)请求:浏览器-->负载均衡-->nginx-->php-fpm-->wrapper-->mysql
	2)响应:mysql-->wrappe-->php-fpm-->nginx-->负载均衡-->浏览器