参考链接 https://blog.csdn.net/culuo4781/article/details/107627070
Visual Studio is an application that is used by many developers and it has different kinds of features that can facilitate the developer’s work. Among these features, Visual Studio offers users the feature to compare two SQL databases via its Schema compare feature.
Visual Studio是许多开发人员使用的应用程序,它具有各种可以促进开发人员工作的功能。 在这些功能中,Visual Studio为用户提供了通过其架构比较功能比较两个SQL数据库的功能。
Besides comparing SQL Server database locally or on the network, Visual Studio can connect and compare Azure SQL Database as well. This is a neat feature, as it facilitates work for developers who are working on database development and need a quick way to synchronize the latest changes with the QA database, on which additional testing should be done before moving to production.
除了在本地或在网络上比较SQL Server数据库之外,Visual Studio还可以连接和比较Azure SQL数据库。 这是一个很好的功能,因为它便于从事数据库开发的开发人员的工作,他们需要一种快速的方法来将最新更改与QA数据库进行同步,在移至生产之前,应对此进行额外的测试。
Visual Studio中的架构比较功能 (Schema Compare feature in Visual Studio)
To compare two SQL databases with Visual Studio’s Schema Compare feature, follow these steps:
要将两个SQL数据库与Visual Studio的架构比较功能进行比较 ,请按照下列步骤操作:
-
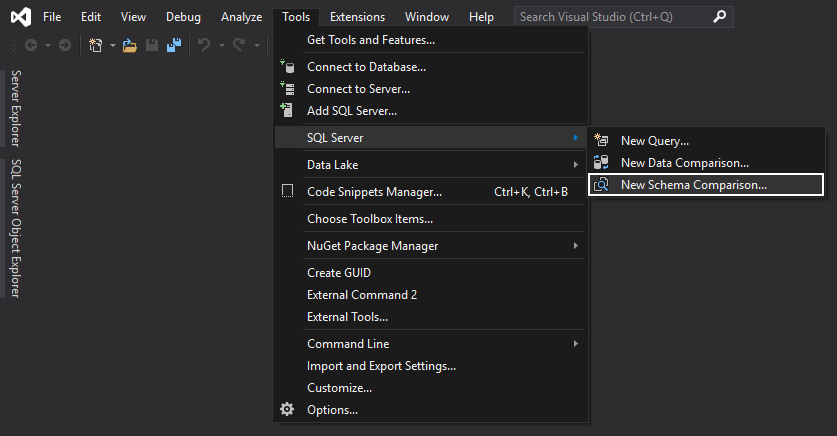
From the main menu, go to the Tools -> SQL Server sub-menu -> New Schema Comparison:
从主菜单转到“ 工具” ->“ SQL Server”子菜单->“ 新架构比较” :
-
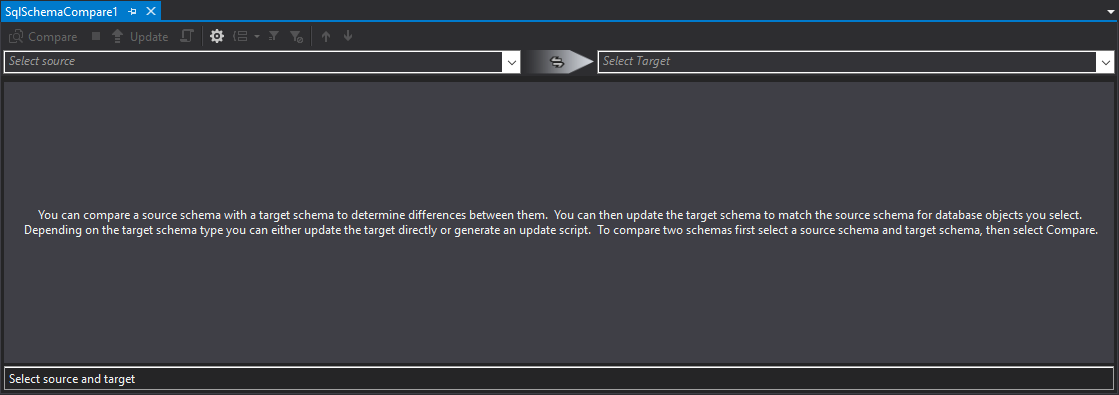
This will load the SqlSchemaCompare query window and the first thing that needs to be done is to select source and target from their corresponding drop-down lists:
这将加载SqlSchemaCompare查询窗口,首先需要做的是从相应的下拉列表中选择源和目标:
-
In the upper left corner of the SqlSchemaCompare query window, locate the Select source drop-down list and click on the Select Source item:
在SqlSchemaCompare查询窗口的左上角,找到“ 选择 源”下拉列表,然后单击“ 选择源”项:
Note: If there were some previous SQL Server database schema comparisons, data sources will be shown in this list
注意 :如果以前有一些SQL Server数据库架构比较,则数据源将显示在此列表中
-
The Select Source Schema dialog will be shown and in it, by default, the Database option is selected and under it, click the Select Connection button:
将显示“ 选择源模式”对话框,在其中,默认情况下,“ 数据库”选项处于选中状态,在其下方,单击“ 选择连接”按钮:
-
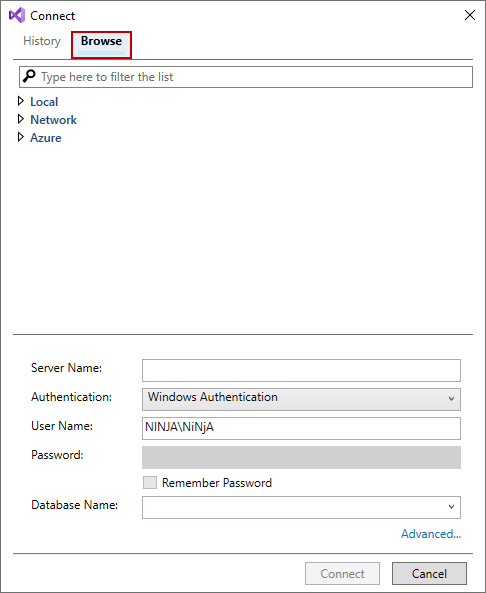
This will bring the new Connect dialog in which there are two tabs:
这将带来新的“ 连接”对话框,其中有两个选项卡:
-
History – in which all previous connections can be seen and selected:
历史记录 -在其中可以查看和选择所有以前的连接:
-
Browse – in which a new connection can be set via Local, Network or Azure list of sources that might already exist, or by directly providing Server Name, Authentication type, and Database name:
浏览 –可以通过本地 , 网络或Azure可能已经存在的源列表来设置新连接,或者直接提供服务器名称 , 身份验证类型和数据库名称 :
-
-
After all information for SQL Server and database are entered, click the Connect button:
输入有关SQL Server和数据库的所有信息后,单击“ 连接”按钮:
-
Once all information is loaded, the Select Source Schema dialog will be shown again and here the OK button should be clicked in order to load the source data source:
加载所有信息后,将再次显示“ 选择源模式”对话框,在此处应单击“ 确定”按钮以加载源数据源:
-
Now, the same process from the step 3) to step 7) needs to be repeated for the Target side in order to set everything to compare two SQL databases
现在,对于目标端,需要重复执行步骤3)到步骤7)的相同过程,以便设置所有内容以比较两个SQL数据库
-
Once both sides are loaded, data sources will be shown in the SqlSchemaCompare query window and before initiating the comparison process, there are options that can be set with a click on the Options button:
双方加载后,数据源将显示在SqlSchemaCompare查询窗口中,并且在启动比较过程之前,可以通过单击“ 选项”按钮来设置选项 :
-
Schema Compare Options window will be opened and under the General tab, various comparisons and synchronization options can be selected to personalize it. In this example, default settings will be used:
将打开“ 模式比较选项”窗口,在“ 常规”选项卡下,可以选择各种比较和同步选项来对其进行个性化设置。 在此示例中,将使用默认设置:
-
Under the Object Types tab, users can select specific object types and their children to compare two SQL databases. Default selection will be used in this example:
在“ 对象类型”选项卡下,用户可以选择特定的对象类型及其子对象来比较两个SQL数据库。 在此示例中将使用默认选择:
-
Once the above-mentioned options are set and the OK button is clicked, the SqlSchemaCompare query window is brought up again and now the Compare button can be clicked to compare two SQL databases:
设置完上述选项并单击“ 确定”按钮后,将再次弹出SqlSchemaCompare查询窗口,现在可以单击“ 比较”按钮来比较两个SQL数据库:
-
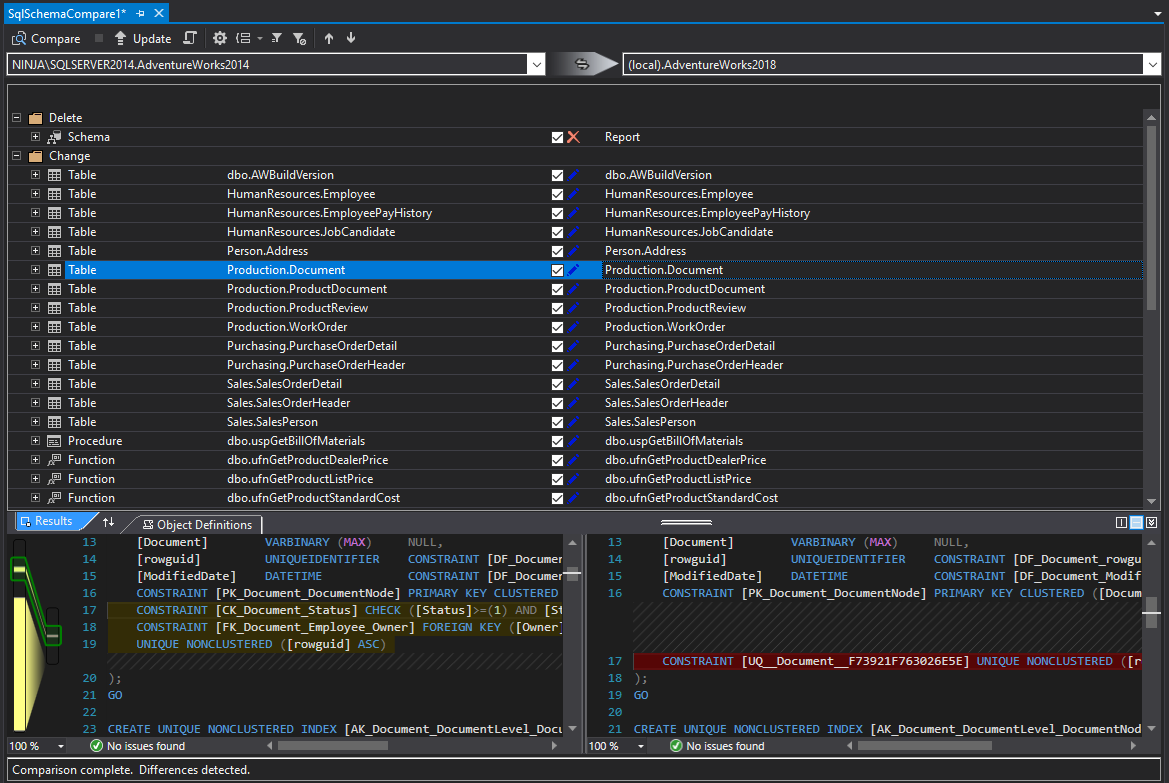
Once the process of comparison is finished, the comparison results will be presented and there are two panels shown:
完成比较过程后,将显示比较结果,并显示两个面板:
-
The Results panel that contains all compared objects sorted by action for the update process
“ 结果”面板包含所有比较对象,这些对象按操作针对更新过程进行排序
-
The Object Definitions panel that shows the SQL scripts of compared objects from source and target SQL databases
“ 对象定义”面板显示来自源和目标SQL数据库的比较对象SQL脚本
-
-
In the upper Results panel, objects are grouped by action, which can be changed under the Group results button to show results by action, schema or type:
在上方的“ 结果”面板中,对象按操作分组,可以在“ 分组结果”按钮下进行更改,以按操作 , 模式或类型显示结果:
After setting this up, based on the user’s preference, desired objects should be checked before initiating the update target process
设置完成后,应根据用户的喜好,在启动更新目标过程之前检查所需的对象
-
There are two ways to push changes to a target SQL database:
有两种方法可以将更改推送到目标SQL数据库:
-
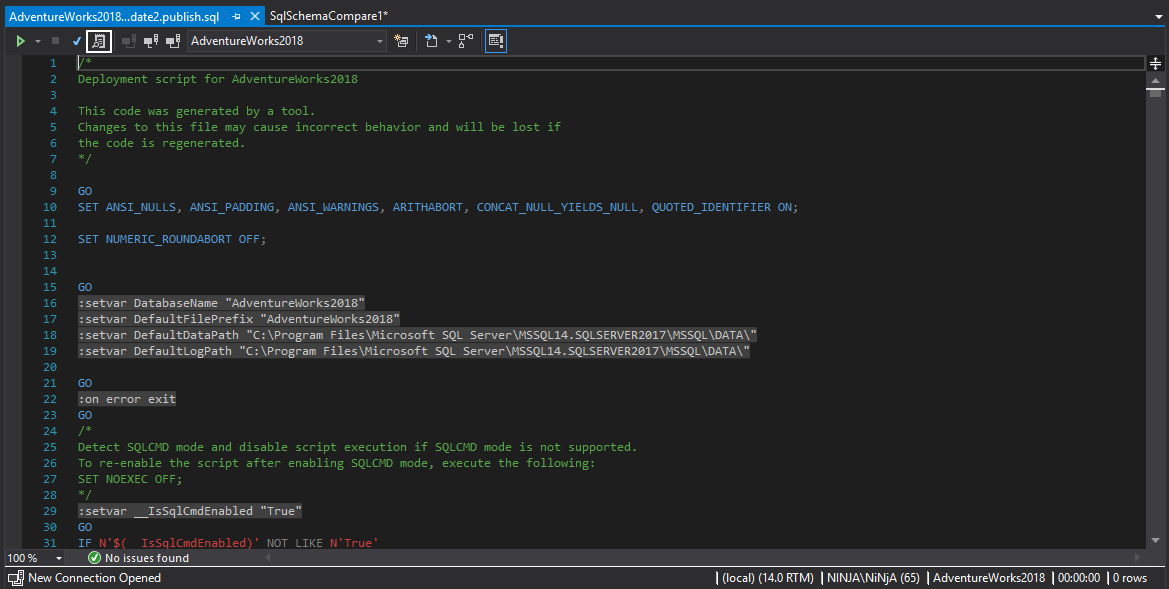
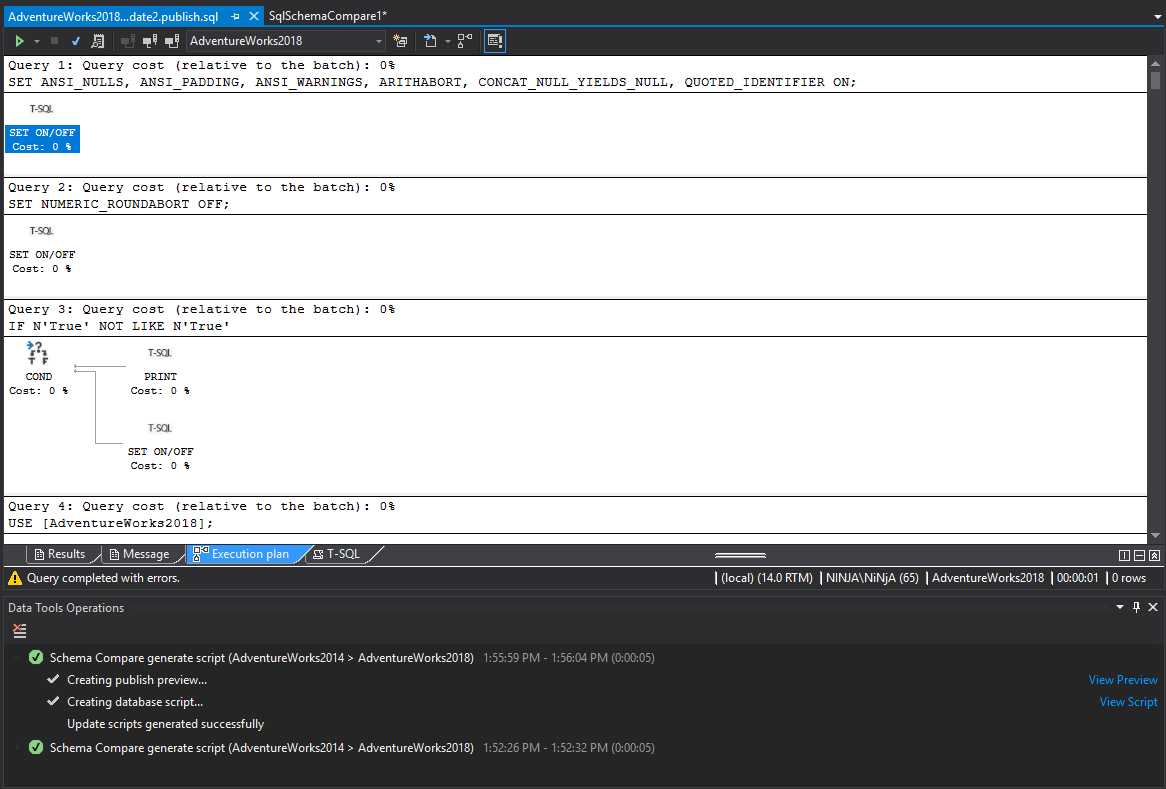
Generate Script – with a click on the Generate script button, a script is generated and shown under the newly opened panel which named is based on the target database name:
生成脚本 –单击生成脚本按钮,将生成一个脚本并将其显示在新打开的面板下,该面板的命名基于目标数据库名称:
In this case, the query window name is AdventureWorks2018_Update2.publish.sql:
在这种情况下,查询窗口名称为AdventureWorks2018_Update2.publish.sql :
If needed, the execution plan can be reviewed before updating a target SQL database, with a click on the Display Estimated Execution Plan button in the top-right corner of the newly opened panel, and it will show the Execution plan panel:
如果需要,可以在更新目标SQL数据库之前查看执行计划 ,方法是单击新打开的面板右上角的“ 显示估计的执行计划”按钮,它将显示“ 执行计划”面板:
Here, as it can be seen, the complete execution plan is shown, along with query cost values
可以看到,这里显示了完整的执行计划以及查询成本值
Once everything is set and reviewed, click the Execute button to run the generated SQL script on a target SQL database
设置并检查完所有内容后,单击“ 执行”按钮以在目标SQL数据库上运行生成SQL脚本。
The results of the execution can be reviewed under the Messages panel, to see whether it was successful or not:
可以在“ 消息”面板下查看执行结果,以查看执行是否成功:

Additionally, results can be exported with a click on the Results as button, in the top of the generated script query window, and user can choose between Results as Grid, Text, or File:
此外,可以在生成的脚本查询窗口顶部单击“ 结果为”按钮来导出结果 ,并且用户可以在“ 结果”为Grid , Text或File之间进行选择:
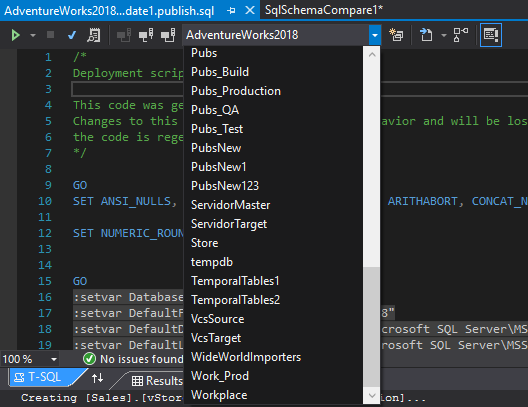
If the same SQL script needs to be executed on a different local SQL database, just select one from the drop-down list:
如果需要在不同的本地SQL数据库上执行相同SQL脚本,则只需从下拉列表中选择一个即可:
SQL Server, which has the same QA database, it can be done with a click on the Change Connection button and the same Connect window in which desired SQL Server can be selected, along with a SQL database that needs to be updated:
SQL Server具有相同的QA数据库,可以通过单击“ 更改连接”按钮和相同的“ 连接”窗口(可在其中选择所需SQL Server)以及需要更新SQL数据库来完成:
-
Update – with a click on the Update button, the previously generated SQL script will be executed directly on a target SQL database:
更新 –单击“ 更新”按钮,将直接在目标SQL数据库上执行以前生成SQL脚本:

Before the execution of generated SQL script for updating a target SQL database is run the confirmation dialog will be shown in which the Yes button needs to be clicked in order to proceed:
在运行生成的用于更新目标SQL数据库SQL脚本的执行之前,将显示确认对话框,其中需要单击“ 是”按钮才能继续:
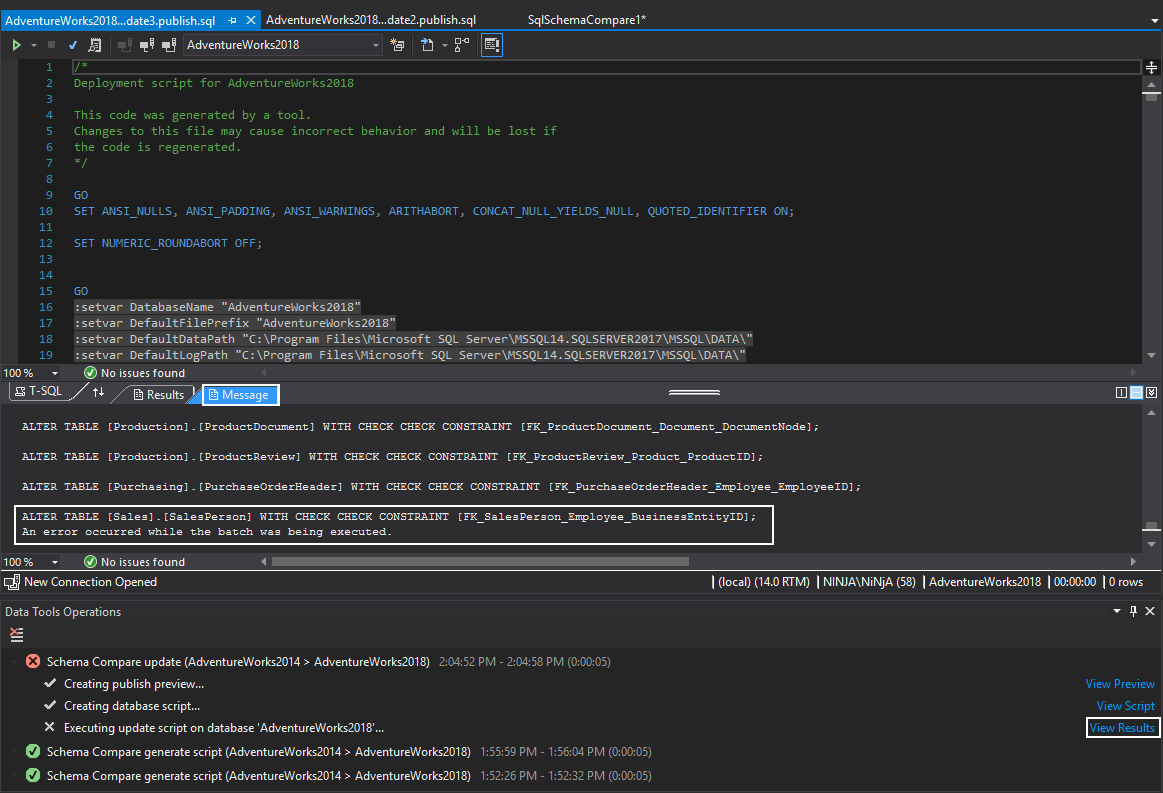
After the update process is finished, as it can be seen in the screen shot below, the execution results can be reviewed under the Data Tools Operations panel, and above it, under the Messages panel, there are details whether the execution was successful or not:
更新过程完成后,如下面的屏幕快照所示,可以在“ 数据工具操作”面板下查看执行结果,在上方的“ 消息”面板下可以查看执行成功与否的详细信息。 :
-


第三方软件解决方案 (Third-party software solution)
Another tool that can be used to compare two SQL databases is ApexSQL Diff. Even though it’s a standalone tool, it can integrate into Visual Studio and SQL Server Management Studio (SSMS). In addition, it can also compare other data sources, such as: source control projects, script folders, backups, and ApexSQL snapshots. It can also export comparison results into different output types: HTML simple report, HTML report, Excel report, and XML schema difference export.
可以用来比较两个SQL数据库的另一个工具是ApexSQL Diff 。 即使它是一个独立的工具,它也可以集成到Visual Studio和SQL Server Management Studio(SSMS)中。 此外,它还可以比较其他数据源,例如: 源代码管理项目 , 脚本文件夹 , 备份和ApexSQL快照 。 它还可以将比较结果导出为不同的输出类型: HTML简单报表 , HTML报表 , Excel报表和XML模式差异导出 。
The last, but not the least, it can automate and schedule the comparison and synchronization process, by creating the automation script as a batch file or a PowerShell script, in order to compare two SQL databases with a click. In this way, the developer saves time, by not going through the same steps repeatedly, rather than just executing the created automation script.
最后但并非最不重要的一点是,它可以通过将自动化脚本创建为批处理文件或PowerShell脚本来自动化和安排比较和同步过程 ,以便通过单击比较两个SQL数据库。 这样,开发人员无需重复执行相同的步骤,而不仅仅是执行创建的自动化脚本,从而节省了时间。
In order to compare two SQL databases from Visual Studio with ApexSQL Diff, follow these steps:
为了比较来自Visual Studio和ApexSQL Diff的两个SQL数据库,请按照下列步骤操作:
-
During the installation of ApexSQL Diff, under the Select hosts for integration step, only installed versions of SSMS and Visual Studio will be shown, so check the one that will be used:
在安装ApexSQL Diff的过程中 ,在“ 选择要集成的主机”步骤下,仅显示SSMS和Visual Studio的已安装版本,因此请检查将使用的版本:
-
Once the installation is finished, run Visual Studio version into which ApexSQL Diff was integrated
安装完成后,运行集成了ApexSQL Diff的 Visual Studio版本
-
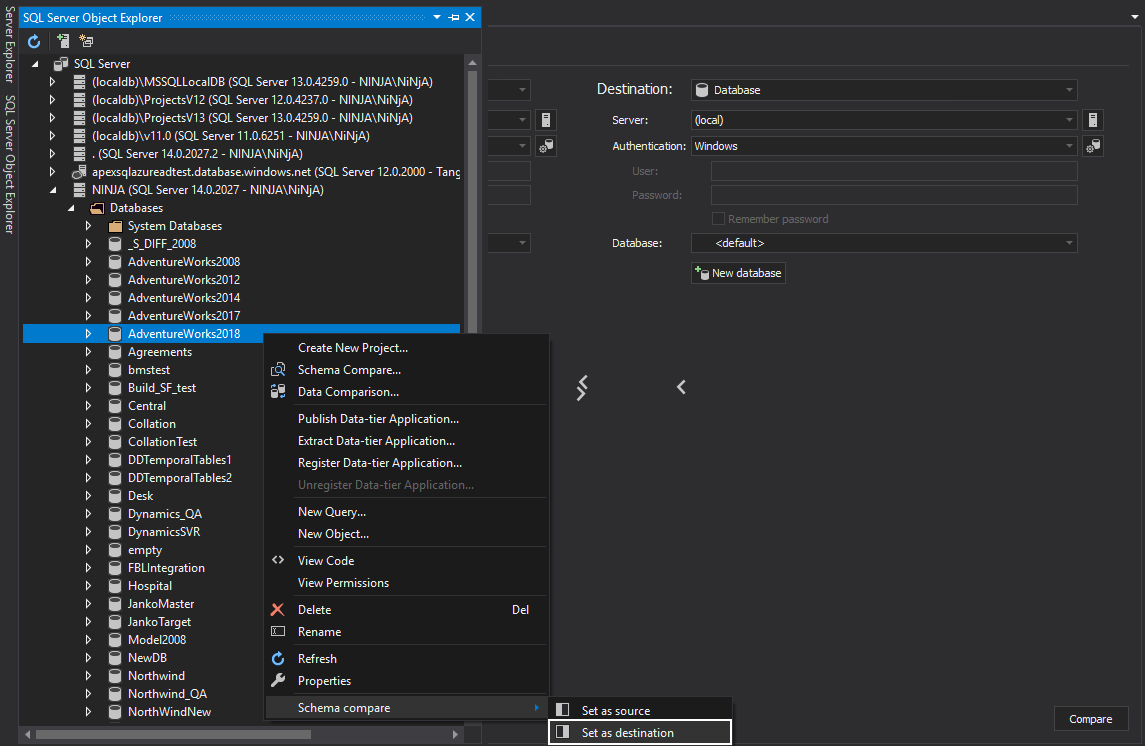
Schema compare sub-menu will be shown in the right-click context menu of SQL Server Object Explorer or Server Explorer panel, under the Set as source or Set as destination commands can be selected:
模式比较子菜单将显示在SQL Server Object Explorer或Server Explorer面板的右键单击上下文菜单中,在“ 设置为源”或“ 设置为目标”命令下可以选择:
-
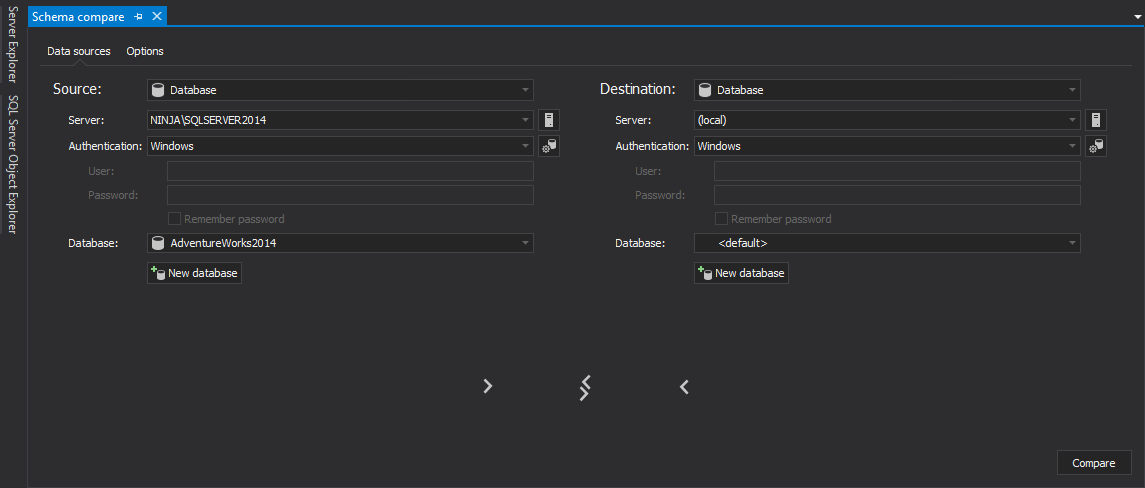
When any of these two commands is clicked, the Schema compare query window will be shown with loaded information for a selected SQL database:
单击这两个命令中的任何一个时,将显示“ 模式比较查询”窗口,其中包含所选SQL数据库的已加载信息:
-
The other side, the destination side in this case, can be either loaded as the first one (the source side) with the command from the right-click context menu (Set as destination command in this case), or simply by directly entering the information in the Schema compare query window:
另一端(在这种情况下为目标端)可以使用右键单击上下文菜单中的命令(在这种情况下, 设为目标命令)作为第一端(源端)加载。 模式比较查询窗口中的信息:
-
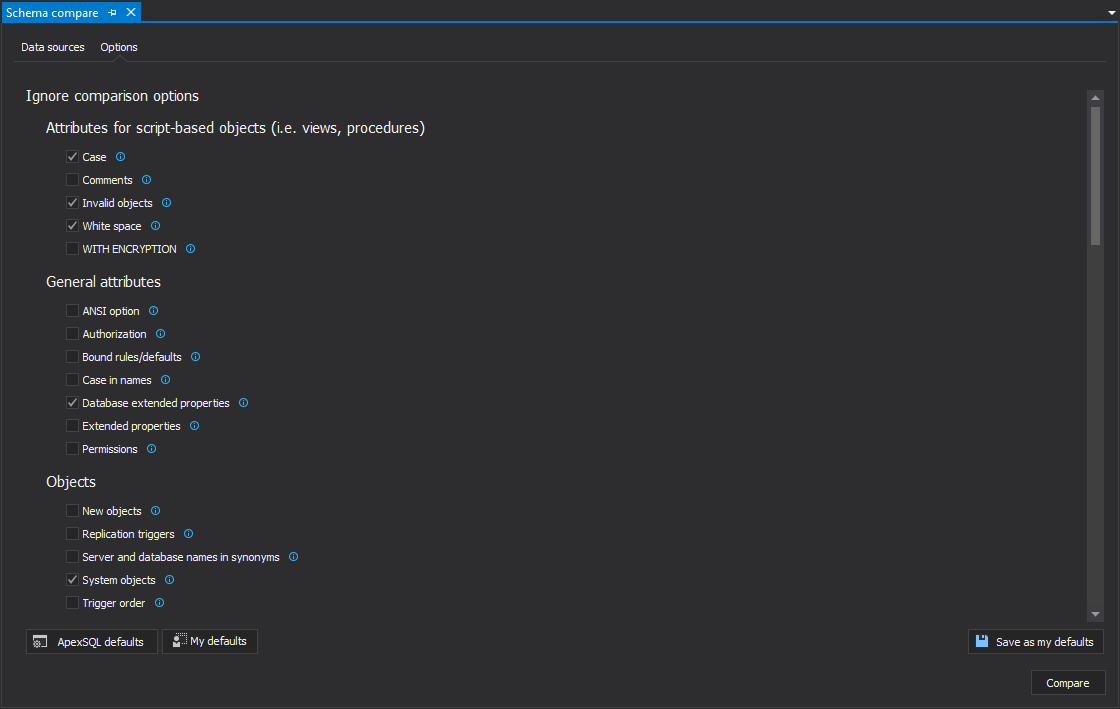
Additional, comparison and synchronization options can be set, if the Options tab is clicked in the Schema compare query window, before the compare of two SQL databases is started:
如果在开始比较两个SQL数据库之前,在“ 模式比较查询”窗口中单击“ 选项”选项卡,则可以设置其他比较和同步选项:
-
To start the compare of two SQL databases, click the Compare button in the bottom-right corner of the Schema compare query window, which will start the standalone tool and show the results in the main application window:
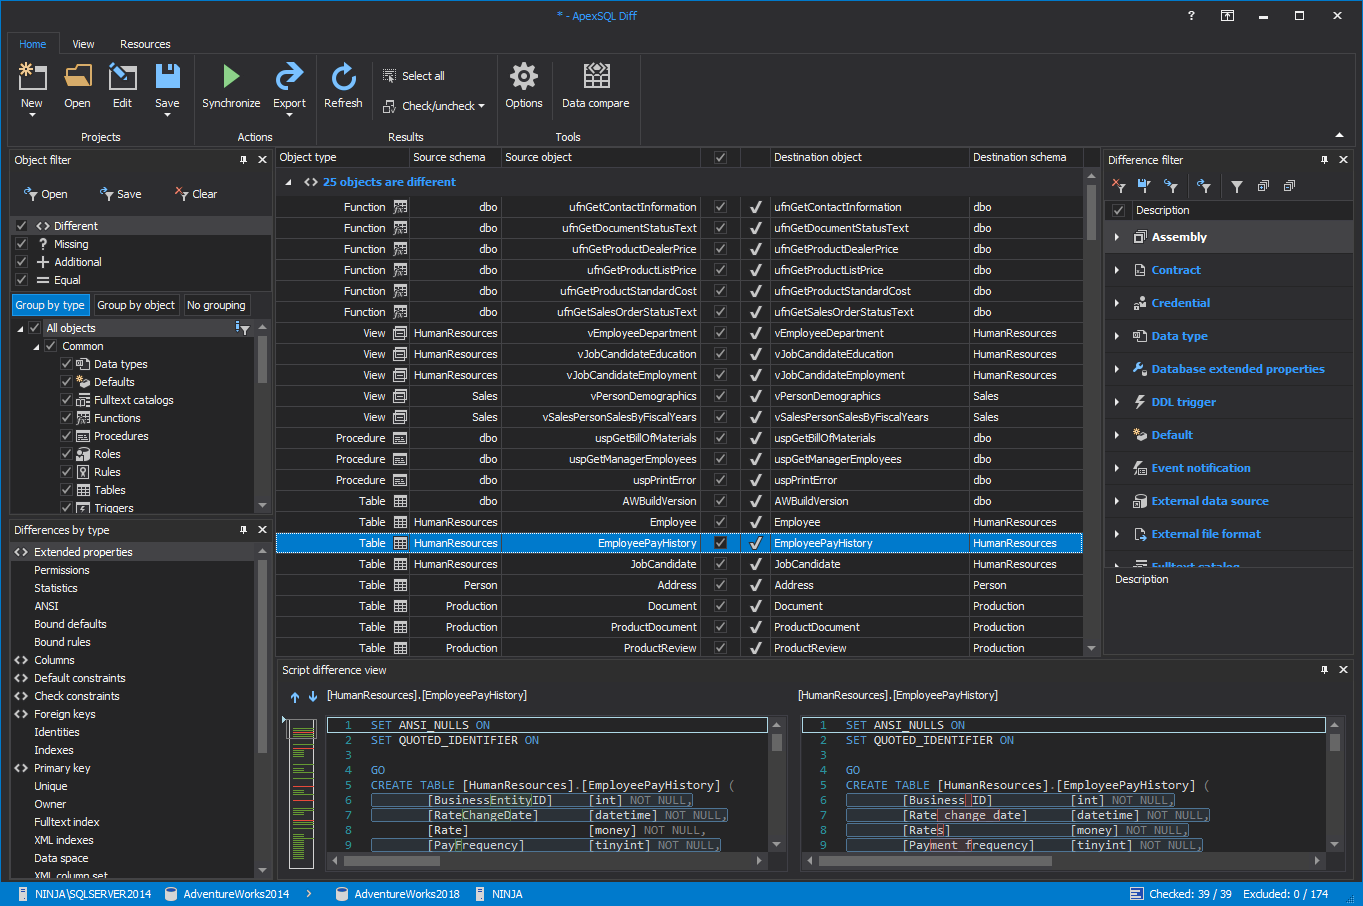
要开始两个SQL数据库的比较 ,请单击“ 模式比较查询”窗口右下角的“ 比较”按钮,这将启动独立工具并在主应用程序窗口中显示结果:
-
Under the Results grid, select each object if needed to review changes and check the ones that need to synchronize on the destination side. Learn more on how to narrow schema comparison and synchronization to affected objects only
在“ 结果”网格下,根据需要选择每个对象,以查看更改并检查需要在目标端进行同步的对象。 详细了解如何将模式比较和同步范围缩小到仅受影响的对象
-
To initiate the synchronization process, click the Synchronize button in the Home tab:
要启动同步过程,请单击“ 主页”选项卡中的“ 同步”按钮:
-
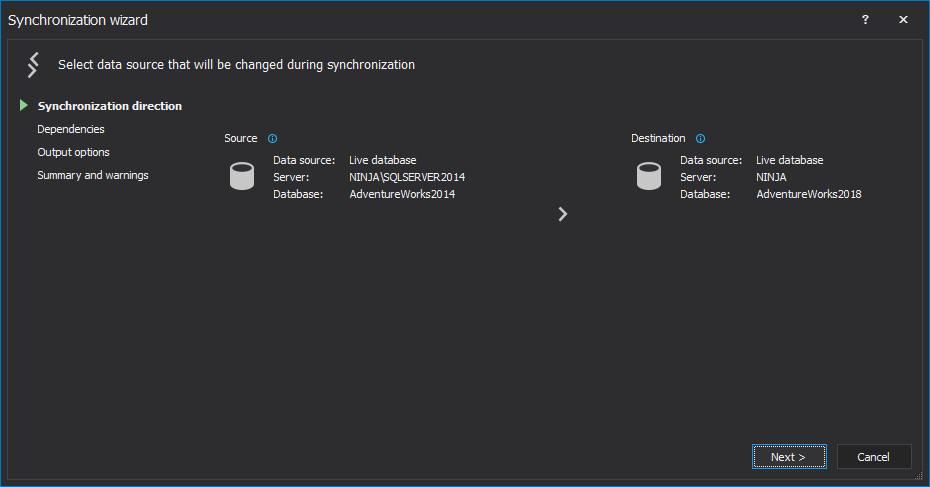
The Synchronization wizard is started and under the Synchronization direction step, the direction of the synchronization process is shown along with the data source information:
将启动“ 同步”向导 ,并在“ 同步方向”步骤下,显示同步过程的方向以及数据源信息:
-
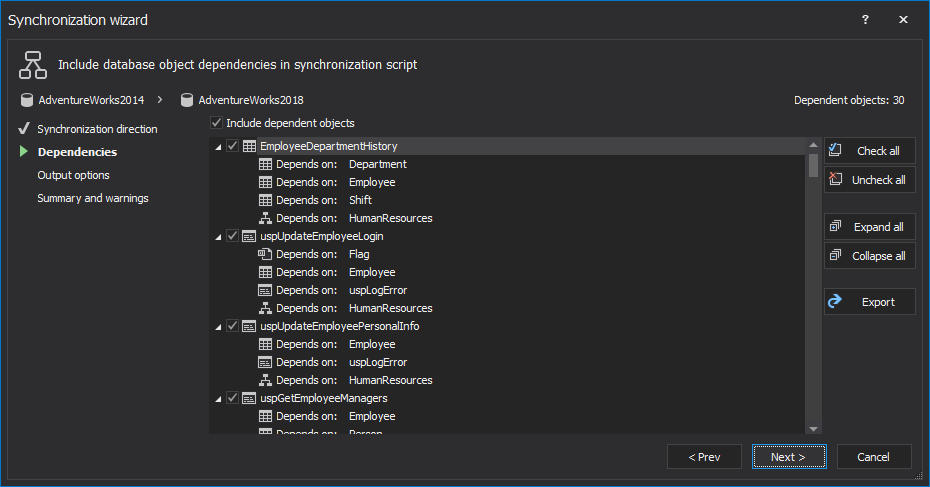
All dependent objects will be shown and included by default in the synchronization process under the Dependencies step:
默认情况下,所有依赖对象将显示在同步过程中的“ 依赖关系”步骤下并包括在内:
-
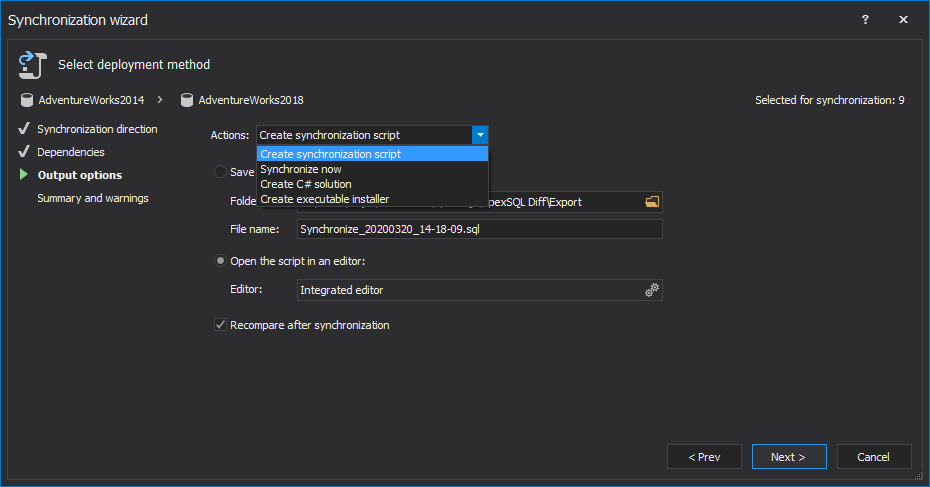
Four different actions can be chosen, under the Output actions step:
在“ 输出操作”步骤下,可以选择四个不同的操作:
-
Create synchronization script
创建同步脚本
-
Synchronize now
立即同步
-
Create C# solution
创建C#解决方案
-
Create executable installer
创建可执行安装程序
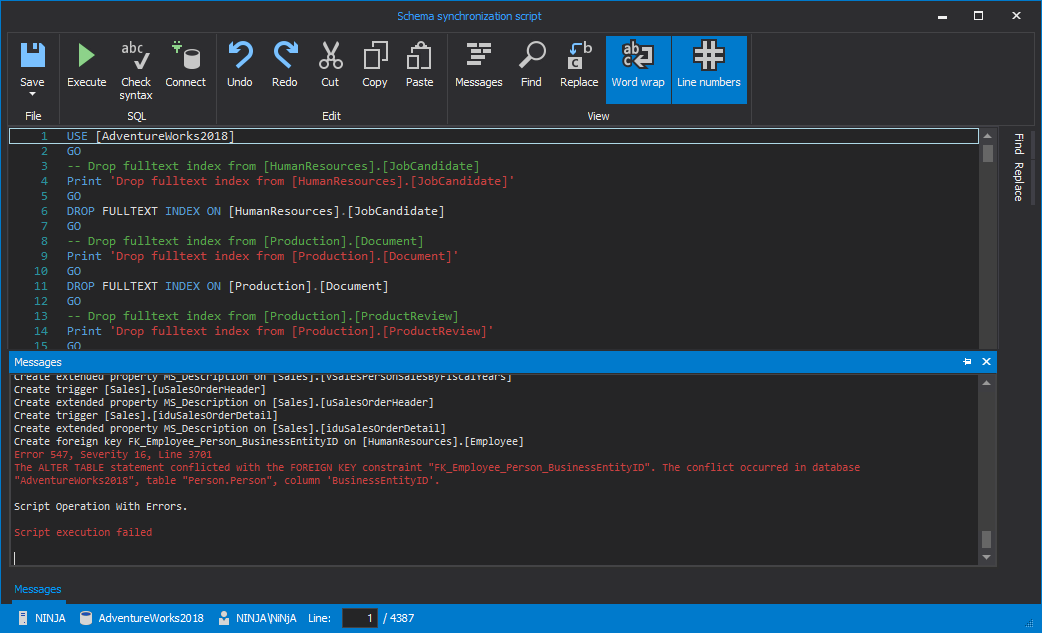
As it can be seen on the screenshot above, the Create synchronization script action can either Save script to a file on a default or any other desired location, or to open the created synchronization script in Integrated editor, or any other editor which can be set with a click on the Settings button in the Editor text box. If the second option is selected, at the end of the Synchronization wizard, the generated synchronization script will be shown and from there it can be reviewed, edited and executed:
从上面的屏幕截图可以看出,“ 创建同步脚本”操作可以将脚本保存到默认位置或任何其他所需位置的文件,也可以在集成编辑器或任何其他可设置的编辑器中打开创建的同步脚本。单击“ 编辑器”文本框中的“设置”按钮。 如果选择了第二个选项,则在“ 同步”向导的最后,将显示生成的同步脚本,并可以从此处对其进行查看,编辑和执行:
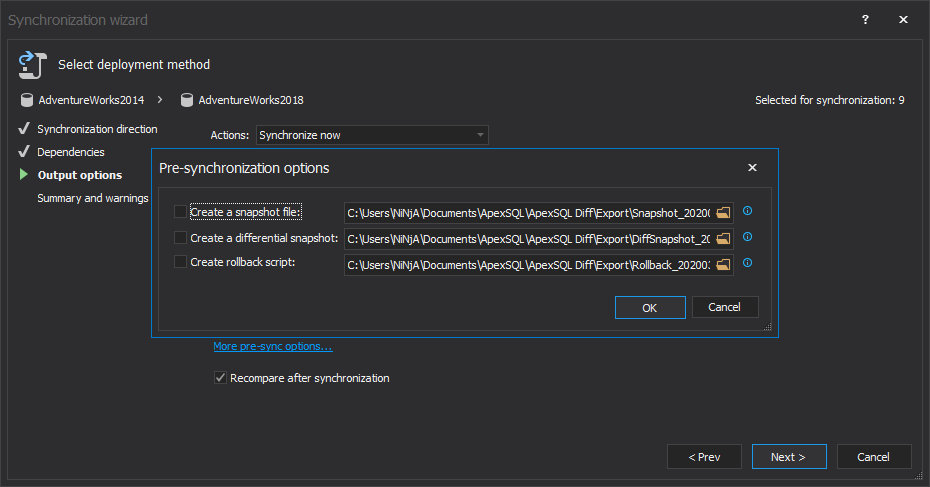
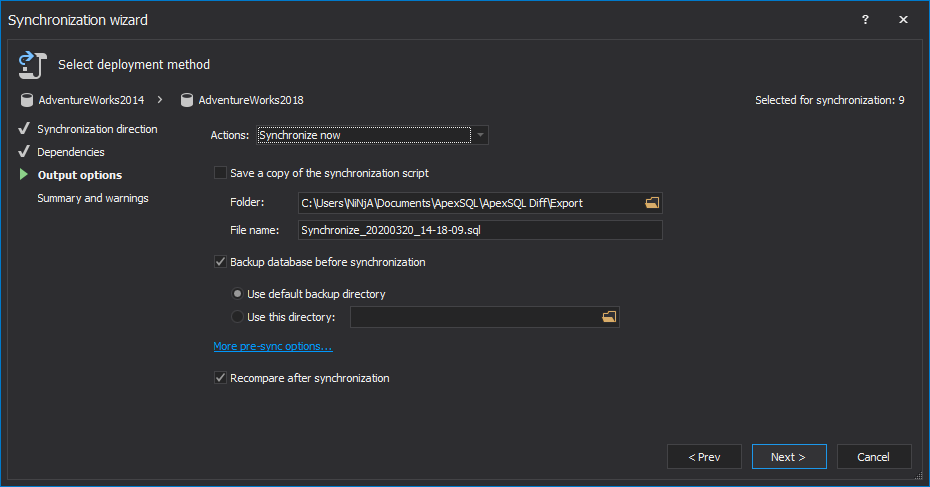
In this example, the Synchronize now action will be selected and the Backup database before synchronization option is checked to create a backup of a destination database on default SQL Server location:
在此示例中,将选择“立即同步”操作,并选中“ 同步之前备份数据库”选项以在默认SQL Server位置上创建目标数据库的备份:
With a click on the More pre-sync actions link, additional three options are shown that can come in handy if a synchronized destination SQL database needs to be reverted to a previous state:
通过单击“ 更多预同步操作”链接,显示了另外三个选项,如果需要将同步的目标SQL数据库恢复到先前的状态,这些选项将派上用场:
-
-
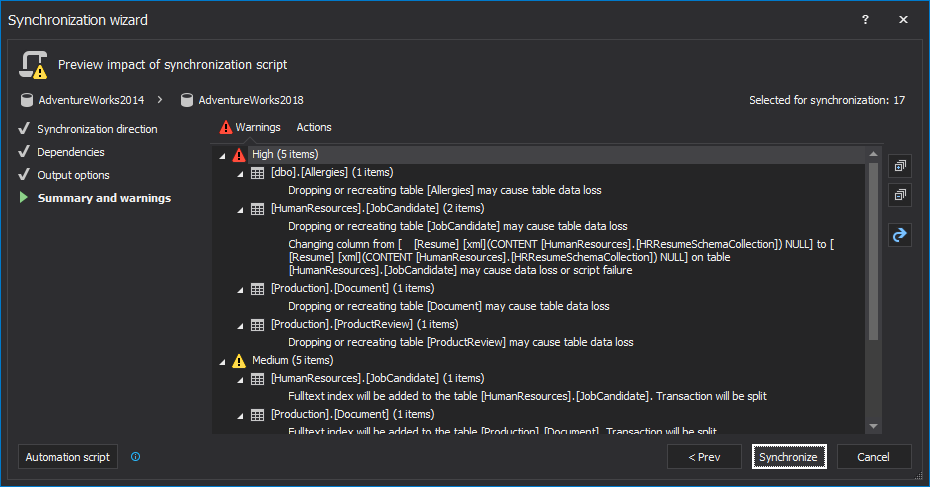
The last step is to review a list of Warnings and actions that will be done during the synchronization process:
最后一步是查看警告和在同步过程中将要执行的操作的列表:
Additionally, a developer can create the automation script with a click on the Automation script button in the bottom-left corner of the Synchronization wizard and save it as a PowerShell script, or as a batch file, depending on preference:
此外,开发人员可以通过单击“ 同步”向导左下角的“ 自动化脚本”按钮来创建自动化脚本 ,并将其另存为PowerShell脚本或批处理文件,具体取决于首选项:
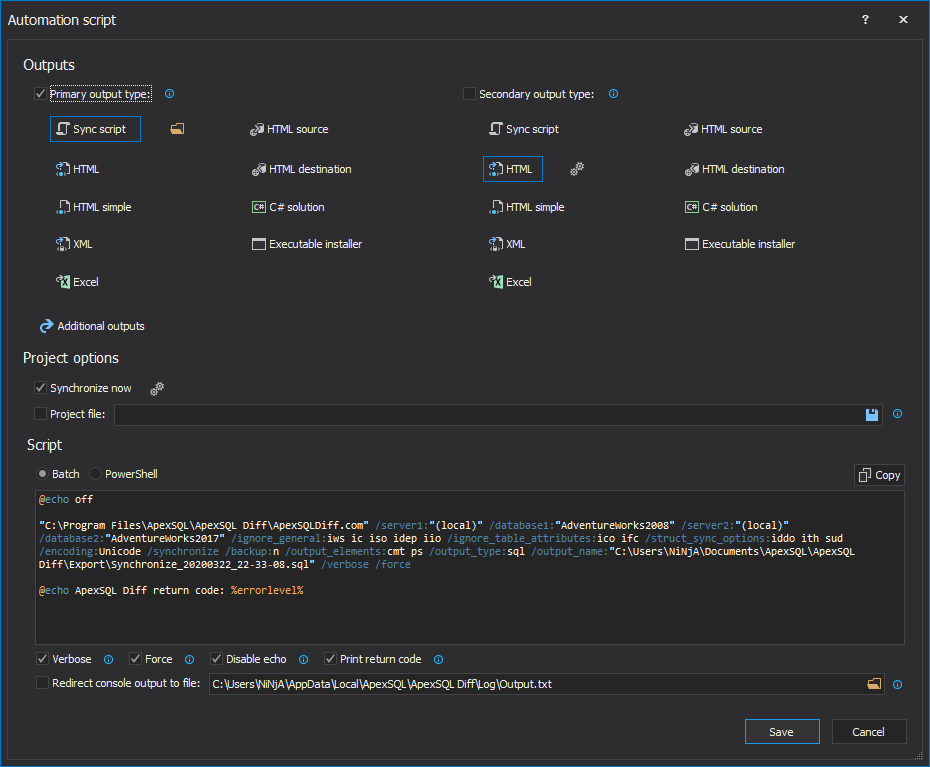
Once the automation script is saved, the last step of the Synchronization wizard will be shown again
保存自动化脚本后,将再次显示同步向导的最后一步
-
With a click on the Synchronize button, the synchronization process of a destination database begins:
单击“ 同步”按钮,目标数据库的同步过程开始:
-
Once the synchronization process is finished, the Results dialog will be shown:
同步过程完成后,将显示“ 结果”对话框:

结论 (Conclusion)
Both, Visual Studio Schema Compare and ApexSQL Diff have good solutions to compare two SQL databases from Visual Studio, with a few differences and some advantages, such as:
Visual Studio Schema Compare和ApexSQL Diff两者都有很好的解决方案,可以比较Visual Studio中的两个SQL数据库,但有一些区别和一些优点,例如:
- ApexSQL Diff doesn’t have that option through the ApexSQL Diff通过Visual Studio中打开的Schema compare query window that’s opened in Visual Studio, while it can edit the project afterwards and perform some further narrowing of objects and more detailed filtering Schema比较查询窗口不具有该选项,而之后可以编辑项目并进一步执行一些操作缩小对象范围并进行更详细的过滤
- Both tools have a lot of comparison and synchronization options with a bit more in Visual Studio Schema Compare
两种工具都有很多比较和同步选项,而Visual Studio Schema Compare中的功能更多 - Visual Studio Schema Compare lacks an option to backup a destination database before the synchronization process, while ApexSQL Diff has more than one
Visual Studio Schema Compare缺少在同步过程之前备份目标数据库的选项,而ApexSQL Diff具有多个选项 - export types of comparison results in ApexSQL Diff 导出类型的比较结果
- ApexSQL Diff informs and includes dependent database objects
ApexSQL Diff通知并包括相关的数据库对象 - data sources 数据源
- Last, but not the least, the automation of the whole process is quite useful feature in ApexSQL Diff
最后但并非最不重要的一点是,整个过程的自动化是ApexSQL Diff中非常有用的功能