大纲:
1.1-网络协议的应用和TCP连接
了解常见的网络相关协议
TCP三次握手和四次挥手
1.2-RHEL7.网络管理
网络相关的调试命令
实战tcpdump和tshark抓包
=================================================================
网络协议的应用和连接
常见网络协议:
ARP(Address Resolution Protocol)协议:IP地址解析为MAC地址
UDP(User Datagram Protocol)协议:用户数据包协议
DHCP(Dynamic Host Configuration Protocol)协议:动态主机配置协议
HTTP(Hypertext Transfer Protocol)协议:超文本传输协议
HTTPS(Secure Hypertext Transfer Protocol)协议:安全超文本传输协议
ICMP(Internet Control Message Protocol)协议:数据控制协议
DNS协议:域名解析协议 (Domain Name System Protocol)
FTP(File Transfer Protocol)协议:文件传输协议
SMTP(Simple Mail Transfer Protocol)协议:简单邮件传输协议
SNMP(Simple Network Managerment Protocol)协议:网络管理协议
TFTP(Trivial File Transfer Protocol)协议:小文件传输协议
Telnet协议:虚拟终端协议
===================================================================
TCP/IP协议簇
TCP/IP协议是一个协议的集合,包含很多协议,具体如下:
HTTP、FTP、TFTP、Telnet、SNMP、TCP、UDP、IP、ICMP、ARP、RARP等。
这里我们重点了解TCP和UDP
TCP(Transmission Control Protocol,传输控制协议)
是面向连接的协议
在收发数居前,必须建立可靠的数据连接。
一个TCP连接必须经过三次握手才能建立起来,(过程很复杂)

解释:
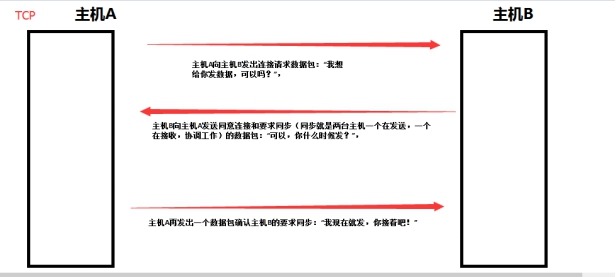
1、主机A向主机B发送连接请求
2、主机B向主机A发送收到请求确认并要求同步(同步就是两台主机,一个在发送,一个在接受)
3、主机A向主机B发送确认同步信息
总结:三次握手的目的是使数据包的发送和接收同步,经过三次握手后,主机A才向主机B正式发送数据
UDP(User Datagram Protocol,用户数据包协议)
一个非连接的协议,传输数据前,源端和终端不建立连接
UDP信息包的标题很短,只有8个字节,(相对于TCP的20个字节信息包)额外开销很小。
吞吐量不收拥挤控制算法的调解,只受应用软件生成数据的速率、传输带宽、源端和终端主机性能的限制。
UDP只管尽最大努力传输数据,但是不保证数据是否交付给终端,因此主机不需要维持复杂的连接状态。
总结:UDP传输速度很快,但不可靠!
总结:TCP和UDP的区别
1、相对于连接:TCP基于连接、UDP无连接
2、相对于系统资源:TCP占用较多,UDP较少
3、相对于结构:TCP复杂、UDP简单
4、相对于数据正确性和顺序:TCP保证数据正确性及顺序、UDP不保证
###############################
###############################
###############################
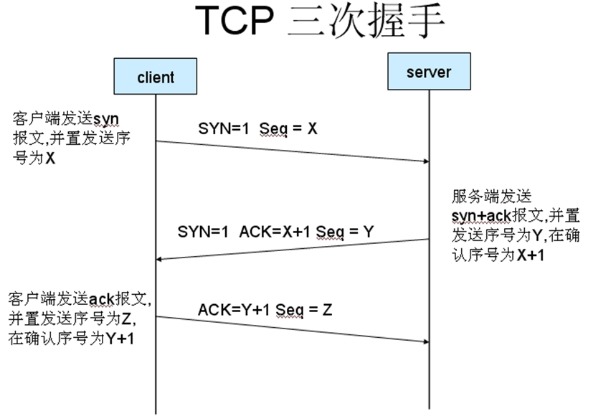
TCP三次握手建立的过程
Seq:序列号---根据序列号表示操作
Ack:确认标志---确认编号
SYN:同步标志
A-->seq=x
B-->ack+seq,SYN=1 (其中ack=A的seq+1)
A-->ack+seq,SYN=1 (其中ack=B的seq+1)
(主机A第一次向主机B发送数据是否有SYN同步标志?)

TCP四次挥手断开连接过程
FIN:结束标志
A-->FIN,ack,seq
B-->ack,seq (其中ack=A的seq+1)
B-->FIN,seq,ack (其中ack=A的seq)
A-->ack,seq(其中seq为第一次的seq,ack为上一条B发送结束标志的seq+1)

过程解析:
1、主机A向主机B发送结束请求
2、主机B向主机A发送回复,收到结束请求确认
3、主机B向主机A发送结束请求
4、主机A向主机B发送恢复,收到结束请求确认
为什么连接的时候是三次握手,关闭的时候却是四次握手?
因为当Server端收到Client端的SYN连接请求报文后,可以直接发送SYN+ACK报文。
其中ACK报文是用来应答的,SYN报文是用来同步的。
但是关闭连接时,当Server端收到FIN报文时,很可能并不会立即关闭SOCKET,所以只能先回复一个ACK报文,告诉Client端,"你发的FIN报文我收到了"。只有等到我Server端所有的报文都发送完了,我才能发送FIN报文,因此不能一起发送。故需要四步握手。
############################################
############################################
############################################
Linux下端口号的分配
TCP和UDP采用16位的端口号来识别应用程序
TCP/IP的临时分配1024-5000之间的端口号
大于5000的端口号为其他服务保留
TCP端口分配
20、21 ftp 文件传输协议
22 ssh 安全远程连接服务
23 telnet 远程连接服务
25 smtp 电子邮件服务
53 DNS 域名解析服务
80 http web服务
443 https安全web服务
UDP端口分配
69 tftp 简单文件传输协议
123 ntp 时间同步服务
161 snmp 简单网络管理
如何查询服务对应端口号?
当我们知道服务名称时,可使用netstat命令查看
netstat -anlpt | grep [服务名] #TCP
netstat -anlpu | grep [服务名] #UDP
当我们不知道服务名称时呢?
我们可以查看linux配置文件
vim /etc/services #包含所有的端口号
如图:


我们会发现有的端口,TCP和UDP都会监听
############################################
查看端口监听状态--->netstat命令
Usage:
netstat -anlpt #显示所有TCP连接
netstat -anlpu #显示所有UDP连接
netstat -anptu #显示所有TCP、UDP连接
-n, --numeric don't resolve names
-p, --programs display PID/Program name for sockets #显示进程ID
-l, --listening display listening server sockets #显示监听端口
-a, --all display all sockets (default: connected) #显示所有连接
-t 显示TCP连接
-u 显示UDP连接

############################################
网络相关调试命令:
查询网卡物理连接状态--->mii-tool 命令
(view, manipulate media-independent interface status)
[root@xiaogan122 ~]# mii-tool eno16777736 #查询网卡物理连接状态

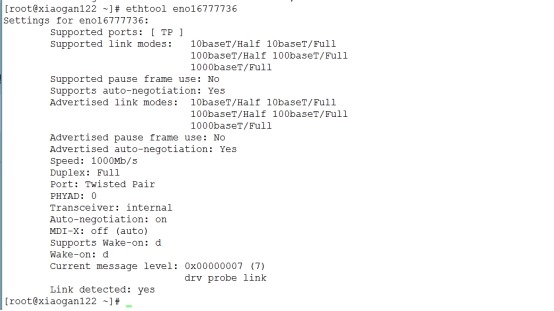
查看网卡硬件相关信息--->ethtool命令
(query or control network driver and hardware settings)
ethtool可以查询并设置网络驱动和硬件设置,详情见:man ethtool
[root@xiaogan122 ~]# ethtool eno16777736 #查询网卡硬件相关信息

############################################
############################################
############################################
实战:为虚拟机添加一块儿网卡
第一步:虚拟机软件中添加硬件---网卡

第二步:查看添加的网卡名称

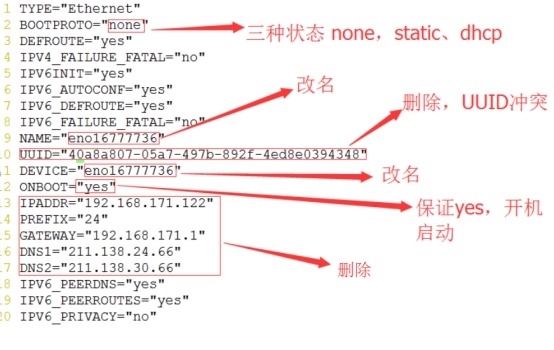
第三步:复制一个网卡配置文件为新网卡的配置文件
cd /etc/sysconfig/network-scripts
cp ifcfg-eno16777736 ifcfg-eno50332216
vim ifcfg-eno50332216
具体配置如下:

成果如下:

第四步:重启网络服务,并查看ip状态
[root@xiaogan122 ~]# systemctl restart NetworkManager
[root@xiaogan122 ~]# systemctl restart network
[root@xiaogan122 ~]# ifconfig

第五步:到此两块网卡,添加成功!!!
当发生配置不成功,触犯规则问题时,可删除规则文件并重启即可:
[root@xiaogan122 network-scripts]# rm -fr /etc/udev/rules.d/70-persistent-ipoib.rules
重启计算机
我们还可以使用nmtui-edit图形界面来配置新添加的网卡,图形界面这里不再阐述。
启动命令 nmtui-edit eno50332216
注意:若使用nmtui-edit命令,需保证NetworkManager服务启动;
在RHEL7中强化了NetworkManager服务功能,弱化了network的功能。
[root@xuegod60 ~]# systemctl status NetworkManager
● NetworkManager.service - Network Manager
Loaded: loaded (/usr/lib/systemd/system/NetworkManager.service; enabled; vendor preset: enabled)
Active: active (running) since Mon 2016-03-07 20:19:42 CST; 1h 36min ago
开启NetworkManager
[root@xuegod60 ~]# systemctl restart NetworkManager #开启服务
[root@xuegod60 ~]# systemctl enable NetworkManager #设置服务开机自动启动
#此服务不开启,则无法通过nmtui工具配置网络
############################################
############################################
############################################
修改主机名配置文件
永久需改主机名,直接修改配置文件即可:
vim /etc/hostname #删除原始记录,填写要修改的名称
修改后保存退出,执行
bash命令,即可!!
临时修改:
hostname ddd

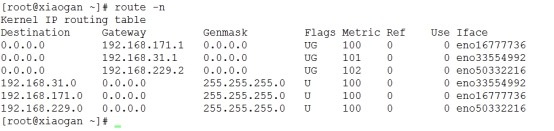
查看路由信息: 查看默认网关route命令
Usage: route [-nNvee] [-FC] [<AF>] List kernel routing tables
Usage: route [-nNvee] [-FC] [<AF>] List kernel routing tables
[root@xiaogan ~]# route -n

添加/删除路由条目:
增加 (add) 与删除 (del) 路由的相关参数:
-net :网络ID;
-host :为连接到主机的路由;
netmask :与网域有关,可以设定 netmask 决定网域的大小;
dev :如果只是要指定由那一块网路卡连线出去,则使用这个设定,后面接 eth0 等
route add -net 192.168.2.0 netmask 255.255.255.0 dev eno50332216
eno50332216添加192.168.2.0段,可以让其路由到这个网段

route del -net 192.168.2.0 netmask 255.255.255.0 #直接删除即可
############################################
############################################
############################################
抓包:(在网络发生堵塞时,使用抓包,查找问题)
tcpdump命令:(dump traffic on a network)

[root@xiaogan ~]# tcpdump -h
tcpdump version 4.5.1
libpcap version 1.5.3
Usage: tcpdump [-aAbdDefhHIJKlLnNOpqRStuUvxX] [ -B size ] [ -c count ]
[ -C file_size ] [ -E algo:secret ] [ -F file ] [ -G seconds ]
[ -i interface ] [ -j tstamptype ] [ -M secret ]
[ -P in|out|inout ]
[ -r file ] [ -s snaplen ] [ -T type ] [ -V file ] [ -w file ]
[ -W filecount ] [ -y datalinktype ] [ -z command ]
[ -Z user ] [ expression ]
port #监听端口号
-S Print absolute, rather than relative, TCP sequence numbers.
-i Listen on interface.#指定监听网卡
-w Write the raw packets to file rather than parsing and printing them out.
-c Exit after receiving count packets.
tcpdump port 22 -i eno50332216 -c 3 -n -S
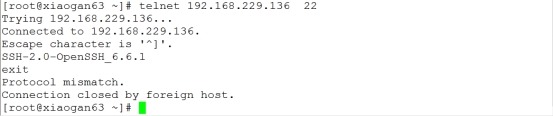
client端安装telnet
yum -y Install telnet
第一步:在服务端输入抓包命令,等待抓包
server端:
[root@xiaogan ~]# tcpdump port 22 -c 3 -n -S -i eno50332216

第二步:在client端,输入连接命令
client端:telnet 192.168.171.136 22

第三步:返回server端查看抓包结果!!!
tcpdump: verbose output suppressed, use -v or -vv for full protocol decode
listening on eno50332216, link-type EN10MB (Ethernet), capture size 65535 bytes
01:49:55.193118 IP 192.168.229.138.37860 > 192.168.229.136.ssh: Flags [S], seq 979150317, win 29200, options [mss 1460,sackOK,TS val 348880 ecr 0,nop,wscale 7], length 0
01:49:55.193213 IP 192.168.229.136.ssh > 192.168.229.138.37860: Flags [S.], seq 1066911696, ack 979150318, win 28960, options [mss 1460,sackOK,TS val 8874543 ecr 348880,nop,wscale 7], length 0
01:49:55.194170 IP 192.168.229.138.37860 > 192.168.229.136.ssh: Flags [.], ack 1066911697, win 229, options [nop,nop,TS val 348881 ecr 8874543], length 0
3 packets captured
3 packets received by filter
0 packets dropped by kernel

抓包命令-wireshark:
tshark命令,
使用方法:tshark -w a.txt -i eno50332216
查看信息:tshark -r a.txt
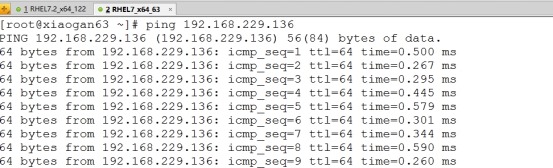
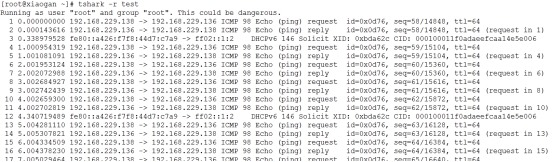
第一步:客户端ping server

第二步:server端,使用tshark命令抓包

第三步:ctrl + c终止后,查看抓到的包,注意不能使用cat命令直接查看,而应使用tshark命令直接查看,如下图:

[root@xiaogan ~]# tshark --help
tshark: invalid option -- '-'
TShark 1.10.14 (Git Rev Unknown from unknown)
Dump and analyze network traffic.
See http://www.wireshark.org for more information.
Copyright 1998-2015 Gerald Combs <gerald@wireshark.org> and contributors.
This is free software; see the source for copying conditions. There is NO
warranty; not even for MERCHANTABILITY or FITNESS FOR A PARTICULAR PURPOSE.
Usage: tshark [options] ...
Capture interface:
-i <interface> name or idx of interface (def: first non-loopback)
-f <capture filter> packet filter in libpcap filter syntax
-s <snaplen> packet snapshot length (def: 65535)
-p don't capture in promiscuous mode
-I capture in monitor mode, if available
-B <buffer size> size of kernel buffer (def: 2MB)
-y <link type> link layer type (def: first appropriate)
-D print list of interfaces and exit
-L print list of link-layer types of iface and exit
Capture stop conditions:
-c <packet count> stop after n packets (def: infinite)
-a <autostop cond.> ... duration:NUM - stop after NUM seconds
filesize:NUM - stop this file after NUM KB
files:NUM - stop after NUM files
Capture output:
-b <ringbuffer opt.> ... duration:NUM - switch to next file after NUM secs
filesize:NUM - switch to next file after NUM KB
files:NUM - ringbuffer: replace after NUM files
Input file:
-r <infile> set the filename to read from (no pipes or stdin!)
Processing:
-2 perform a two-pass analysis
-R <read filter> packet Read filter in Wireshark display filter syntax
-Y <display filter> packet displaY filter in Wireshark display filter syntax
-n disable all name resolutions (def: all enabled)
-N <name resolve flags> enable specific name resolution(s): "mnNtC"
-d <layer_type>==<selector>,<decode_as_protocol> ...
"Decode As", see the man page for details
Example: tcp.port==8888,http
-H <hosts file> read a list of entries from a hosts file, which will
then be written to a capture file. (Implies -W n)
Output:
-w <outfile|-> write packets to a pcap-format file named "outfile"
(or to the standard output for "-")
-C <config profile> start with specified configuration profile
-F <output file type> set the output file type, default is pcapng
an empty "-F" option will list the file types
-V add output of packet tree (Packet Details)
-O <protocols> Only show packet details of these protocols, comma
separated
-P print packet summary even when writing to a file
-S <separator> the line separator to print between packets
-x add output of hex and ASCII dump (Packet Bytes)
-T pdml|ps|psml|text|fields
format of text output (def: text)
-e <field> field to print if -Tfields selected (e.g. tcp.port, col.Info);
this option can be repeated to print multiple fields
-E<fieldsoption>=<value> set options for output when -Tfields selected:
header=y|n switch headers on and off
separator=/t|/s|<char> select tab, space, printable character as separator
occurrence=f|l|a print first, last or all occurrences of each field
aggregator=,|/s|<char> select comma, space, printable character as
aggregator
quote=d|s|n select double, single, no quotes for values
-t a|ad|d|dd|e|r|u|ud output format of time stamps (def: r: rel. to first)
-u s|hms output format of seconds (def: s: seconds)
-l flush standard output after each packet
-q be more quiet on stdout (e.g. when using statistics)
-Q only log true errors to stderr (quieter than -q)
-g enable group read access on the output file(s)
-W n Save extra information in the file, if supported.
n = write network address resolution information
-X <key>:<value> eXtension options, see the man page for details
-z <statistics> various statistics, see the man page for details
Miscellaneous:
-h display this help and exit
-v display version info and exit
-o <name>:<value> ... override preference setting
-K <keytab> keytab file to use for kerberos decryption
-G [report] dump one of several available reports and exit
default report="fields"
use "-G ?" for more help