我是阿福,公众号「阿福聊编程」作者,一个在后端技术路上摸盘滚打的程序员,在进阶的路上,共勉!文章已收录在 JavaSharing 中,包含Java技术文章,面试指南,资源分享。
思路分析
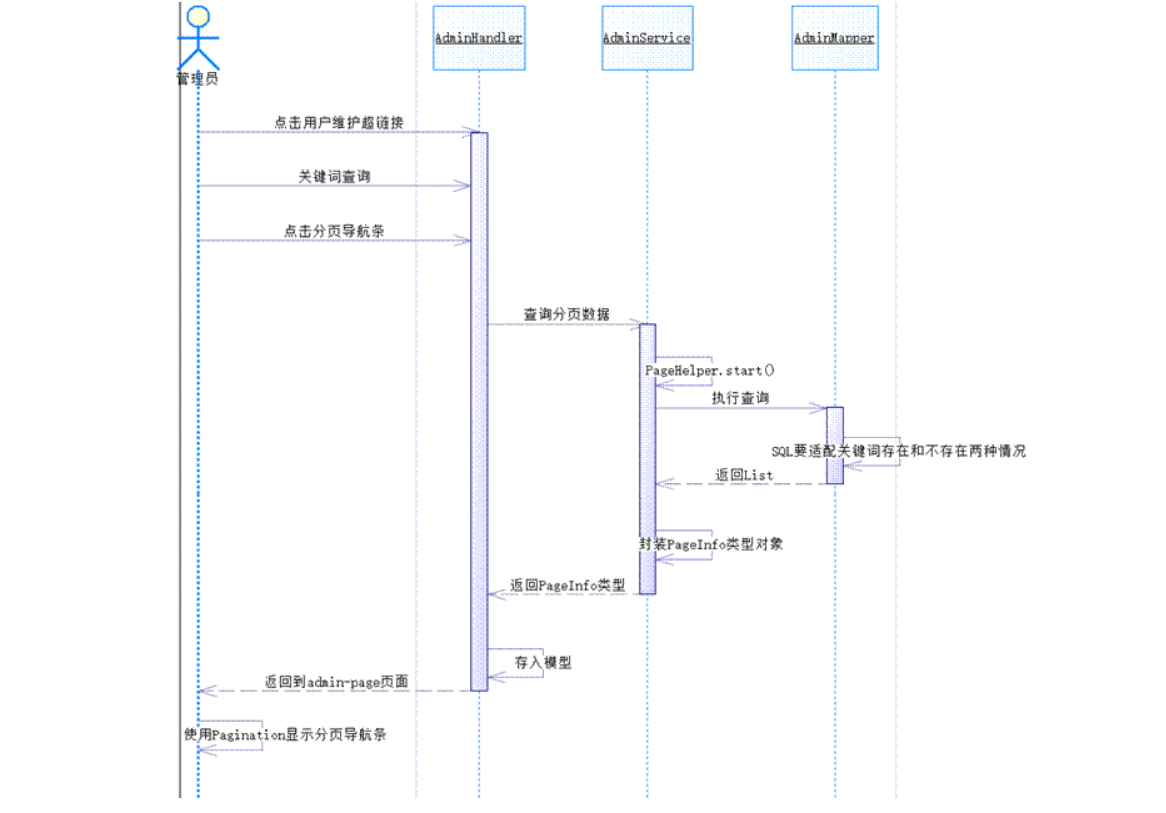
MyBatis的PageHelper插件(后台)
作用
以完全非侵入的方式在原有查询基础上附加分页效果。从SQL层面来说,在SQL语句后面附加LIMIT子句。从Java代码来说,把原来返回的List类型封装为Page类型。
依赖信息
<!-- MyBatis分页插件 -->
    <dependency>
        <groupId>com.github.pagehelper</groupId>
        <artifactId>pagehelper</artifactId>
        <version>4.0.0</version>
    </dependency>
配置方式
那么如何让插件起作用呢?就需要在SqlSessionFactoryBean中配置MyBatis插件
<!--配置SqlSessionFactoryBean-->
    <bean id="sqlSessionFactoryBean" class="org.mybatis.spring.SqlSessionFactoryBean">
        <!--装配数据源-->
        <property name="dataSource" ref="dataSource"></property>
        <!--mybatis配置文件所在的位置-->
        <property name="configLocation" value="classpath:/mybstis/mybatis-config.xml"></property>
        <!--配置mapper所在的文件位置-->
        <property name="mapperLocations" value="classpath:/mybstis/mapper/*Mapper.xml"></property>
        <property name="plugins">
            <array>
                <bean class="com.github.pagehelper.PageHelper">
                    <!-- 配置插件属性 -->
                    <property name="properties">
                        <props>
                            <!-- 配置数据库方言 -->
                            <!-- MySQL分页:LIMIT -->
                            <!-- Oracle分页:TopN分析 -->
                            <prop key="dialect">mysql</prop>
                            <!-- 配置自动修正页码 -->
                            <!-- pageNo的有效范围:1~总页数 -->
                            <prop key="reasonable">true</prop>
                        </props>
                    </property>
                </bean>
            </array>
        </property>
    </bean>
数据库的Sql 脚本
SELECT
	*
FROM
	t_admin
WHERE
	loginacct LIKE CONCAT('%','ad','%')
	OR username LIKE CONCAT('%','ad','%')
	OR email LIKE CONCAT('%','ad','%')
AdminMapper配置文件
<resultMap id="BaseResultMap" type="com.zfcoding.model.AdminBean" >
    <id column="id" property="id" jdbcType="INTEGER" />
    <result column="loginacct" property="loginAcct" jdbcType="VARCHAR" />
    <result column="userpswd" property="userPswd" jdbcType="CHAR" />
    <result column="username" property="userName" jdbcType="VARCHAR" />
    <result column="email" property="email" jdbcType="VARCHAR" />
    <result column="createtime" property="createTime" jdbcType="CHAR" />
  </resultMap>

<sql id="Base_Column_List" >
    id, loginacct, userpswd, username, email, createtime
</sql>

<select id="queryAdminByKeyWord" parameterType="java.lang.String" resultMap="BaseResultMap">
      SELECT
    <include refid="Base_Column_List"/>
FROM
	t_admin
WHERE
	loginacct LIKE CONCAT('%',#{keyword},'%')
	OR username LIKE CONCAT('%',#{keyword},'%')
	OR email LIKE CONCAT('%',#{keyword},'%')
</select>
Mapper接口
List<AdminBean> queryAdminByKeyWord(@Param("keyword") String keyword);
AdminServiceImpl
public PageInfo<AdminBean> queryForKeywordSearch(int pageNum, int pageSize, String keyword) {
     //调用PageHelper的工具方法,开启分页功能
     PageHelper.startPage(pageNum, pageSize);
     List<AdminBean> adminBeans = adminMapper.queryAdminByKeyWord(keyword);
     //执行分页查询
     return new PageInfo<AdminBean>(adminBeans);
 }
AdminController
@RequestMapping("/queryAdmin")
    public String queryAdminByKeyword(@RequestParam(value = "pageNum", defaultValue = "1") int pageNum,
                                      @RequestParam(value = "pageSize", defaultValue = "5") int pageSize,
                                      @RequestParam(value = "keyword", defaultValue = "") String keyword,
                                      Model model) {
        PageInfo<AdminBean> adminBeanPageInfo = adminService.queryForKeywordSearch(pageNum, pageSize, keyword);
        model.addAttribute(CrowdFundingConstant.ATTR_NAME_PAGE_INFO, adminBeanPageInfo);
        return "admin/admin-page";
    }
常量类
public class CrowdFundingConstant {
	public static final String ATTR_NAME_PAGE_INFO="PAGEINFO-ADMIN";
}
到这里后台的功能都实现完了,下面来实现前台的功能。
页面显示 主体部分(前台)
前台页面
<table class="table  table-bordered">
                            <thead>
                            <tr>
                                <th width="30">#</th>
                                <th width="30"><input id="summaryBox" type="checkbox"></th>
                                <th>账号</th>
                                <th>名称</th>
                                <th>邮箱地址</th>
                                <th width="100">操作</th>
                            </tr>
                            </thead>
                            <tbody>
                            <c:if test="${empty requestScope['PAGEINFO-ADMIN'].list}">
                                <tr>
                                    <td style="text-align: center" colspan="6">抱歉,没有用户查询的数据!!!!</td>
                                </tr>
                            </c:if>
                            <c:if test="${! empty requestScope['PAGEINFO-ADMIN'].list}">
                                <c:forEach items="${requestScope['PAGEINFO-ADMIN'].list}" var="item"
                                           varStatus="myStatus">
                                    <tr>
                                        <td>${myStatus.count}</td>
                                        <th width="30"><input  class="itemBox" type="checkbox"></th>
                                        <td>${item.loginAcct}</td>
                                        <td>${item.userName}</td>
                                        <td>${item.email}</td>
                                        <td>
                                            <button type="button" class="btn btn-success btn-xs"><i
                                                    class=" glyphicon glyphicon-check"></i></button>

                                            <button type="button"  class="btn btn-danger btn-xs uniqueRemoveBtn"><i
                                                    class=" glyphicon glyphicon-remove"></i></button>
                                        </td>
                                    </tr>
                                </c:forEach>
                            </c:if>
                            </tbody>
                            <tfoot>
                            <tr>
                                <td colspan="6" align="center">
                                    <div id="Pagination" class="pagination"><!-- 这里显示分页 --></div>
                                </td>
                            </tr>

                            </tfoot>
                        </table>
页面导航条部分的实现
使用一个基于jQuery的分页插件:Pagination
环境搭建
加入样式文件,pagination.css引入工程,在需要的页面引用pagination.css
<link rel="stylesheet" href="css/pagination.css"/>
加入Pagination的js文件,在需要的页面引用jquery.pagination.js,这里要注意一下,需要把源码文件中 这段代码注释掉:opts.callback(current_page, this); 因为在这个地方重新加载页面,会造成死循环。
<script type="text/javascript" src="script/jquery.pagination.js"></script>
分页导航条需要在HTML标签中加入的部分
 <tr>
     <td colspan="6" align="center">
         <div id="Pagination" class="pagination"><!-- 这里显示分页 --></div>
     </td>
</tr>
jQuery代
// 声明函数封装导航条初始化操作
        function initPagination() {
            // 声明变量存储总记录数
            var totalRecord = ${requestScope['PAGEINFO-ADMIN'].total};
            // 声明变量存储分页导航条显示时的属性设置
            var paginationProperties = {
                num_edge_entries: 3,			//边缘页数
                num_display_entries: 5,		//主体页数
                callback: pageselectCallback,	//回调函数
                items_per_page: ${requestScope['PAGEINFO-ADMIN'].pageSize},	//每页显示数据数量,就是pageSize
                current_page: ${requestScope['PAGEINFO-ADMIN'].pageNum - 1},//当前页页码
                prev_text: "上一页",			//上一页文本
                next_text: "下一页"			//下一页文本
            };
            // 显示分页导航条
            $("#Pagination").pagination(totalRecord, paginationProperties);
        };

        // 在每一次点击“上一页”、“下一页”、“页码”时执行这个函数跳转页面
        function pageselectCallback(pageIndex, jq) {

            // pageIndex从0开始,pageNum从1开始
            var pageNum = pageIndex + 1;

            // 跳转页面
            window.location.href = "admin/queryAdmin.action?pageNum=" + pageNum + "&keyword=${param.keyword}";

            return false;
        };
关键词查询
<form class="form-inline" action="/admin/queryAdmin.action" method="post" role="form"
                       style="float:left;">
<div class="form-group has-feedback">
               <div class="input-group">
                             <div class="input-group-addon">查询条件</div>
                             <input class="form-control has-success" name="keyword" type="text"
                                    placeholder="请输入查询条件">
             </div>
</div>
 <button type="submit" class="btn btn-warning"><i class="glyphicon glyphicon-search"></i> 查询
  </button>
</form>
点击查询的按钮就可以实现分页查询的功能了。