第一步:搭建http服务
安装apache并启动
[root@x112 html]# yum install -y httpd
[root@x112 html]# systemctl start httpd
[root@x112 html]# systemctl enable httpd

查看运行状态
[root@x112 html]# ps -ef| grep http
root       2899      1  0 10:11 ?        00:00:00 /usr/sbin/httpd -DFOREGROUND
apache     2900   2899  0 10:11 ?        00:00:00 /usr/sbin/httpd -DFOREGROUND
apache     2901   2899  0 10:11 ?        00:00:00 /usr/sbin/httpd -DFOREGROUND
apache     2902   2899  0 10:11 ?        00:00:00 /usr/sbin/httpd -DFOREGROUND
apache     2903   2899  0 10:11 ?        00:00:00 /usr/sbin/httpd -DFOREGROUND
apache     2904   2899  0 10:11 ?        00:00:00 /usr/sbin/httpd -DFOREGROUND
apache     2905   2899  0 10:11 ?        00:00:00 /usr/sbin/httpd -DFOREGROUND
apache     2906   2899  0 10:11 ?        00:00:00 /usr/sbin/httpd -DFOREGROUND
apache     2907   2899  0 10:11 ?        00:00:00 /usr/sbin/httpd -DFOREGROUND
root       2984   1311  0 10:15 pts/0    00:00:00 grep --color=auto http
[root@x112 html]# netstat -antup | grep 80
tcp6       0      0 :::80                   :::*                    LISTEN      2899/httpd
tcp6       0      0 :::8080                 :::*                    LISTEN      1032/java
tcp6       0      0 127.0.0.1:8005          :::*                    LISTEN      1032/java
关闭防火墙
[root@x112 html]# systemctl stop firewalld
[root@x112 html]# systemctl disable firewalld


关闭selinux
[root@x112 html]# setenforce 0
[root@x112 html]# sed -i '/^SELINUX=/cSELINUX=disabled' /etc/selinux/config
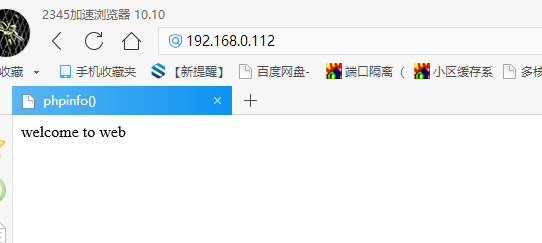
创建web首页
[root@x112 html]# echo "welcome to web" > /var/www/html/index.html
客户端浏览器访问测试,结果如下:
第二步,安装php服务前状态查看
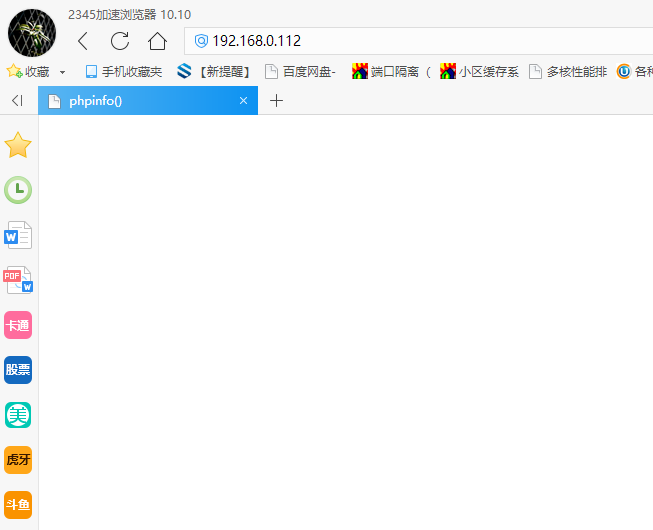
[root@x112 html]# rm -rf index.html
[root@x112 html]# cat <<-eof >index.php
> <?php
> phpinfo();
> ?>
> eof
[root@x112 html]# cat index.php
<?php
phpinfo();
?>
[root@x112 html]#
[root@x112 html]# ls /etc/httpd/conf/
httpd.conf  magic
[root@x112 html]# ls /etc/httpd/conf.modules.d/
00-base.conf  00-lua.conf  00-proxy.conf    01-cgi.conf
00-dav.conf   00-mpm.conf  00-systemd.conf
[root@x112 html]# ls /etc/httpd/conf.d/
autoindex.conf  README  userdir.conf  welcome.conf
[root@x112 html]#
安装php之前,使用客户端浏览器测试,无法打开index.php页面。因为浏览器只能打开静态页面,php动态页面需要服务器解析好后发送给浏览器才能正常打开。结果如下图:
开始安装php服务
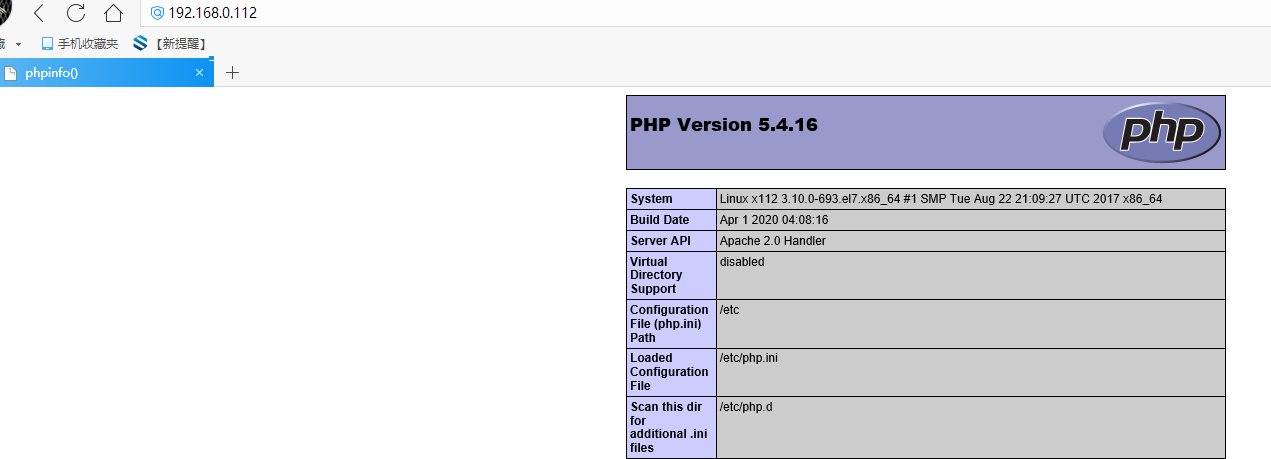
[root@x112 html]# yum install -y php

php安装后,状态查看
[root@x112 html]# ls /etc/httpd/conf.modules.d/
00-base.conf  00-dav.conf  00-lua.conf  00-mpm.conf  00-proxy.conf  00-systemd.conf  01-cgi.conf  10-php.conf
[root@x112 html]#
[root@x112 html]# ls /etc/httpd/conf.d/
autoindex.conf  php.conf        README          userdir.conf    welcome.conf
[root@x112 html]# systemctl restart httpd
通过php安装前后发现,php是作为apache服务的一个应用模块被加载的。安装后,在/etc/httpd/conf.modules.d/目录下多了10-php.conf驱动模块;在/etc/httpd/conf.d/目录下多了php.conf的子配置文件。
重启apache服务,重新加载配置文件生效。使用客户端浏览器访问php测试页面,结果如下:
第三步:安装mysql服务
手动安装mysql服务
[root@x112 html]# yum install -y mysql-community-common-5.7.20-1.el7.x86_64
[root@x112 html]# yum install -y mysql-community-libs-5.7.20-1.el7.x86_64
[root@x112 html]# yum install -y mysql-community-client-5.7.20-1.el7.x86_64
[root@x112 html]# yum install -y mysql-community-server-5.7.20-1.el7.x86_64

启动mysql服务,查看进程状态
[root@x112 html]# systemctl start mysqld
[root@x112 html]# systemctl enable mysqld
[root@x112 html]# ps -ef| grep mysql
mysql      3102      1  8 10:46 ?        00:00:01 /usr/sbin/mysqld --daemonize --pid-file=/var/run/mysqld/mysqld.pid
root       3159   1311  0 10:46 pts/0    00:00:00 grep --color=auto mysql
[root@x112 html]#
进入mysql官网,手动下载mysql安装包,这里选择mysql-community-5.7.20版本。注意安装顺序依次为common、libs、client、server, 否则会报错。
初始化mysql数据库
[root@x112 html]# mysql_secure_installation
登陆mysql数据库
[root@x112 html]# mysql -uroot -p
忘记密码可以编辑my.cnf,添加如下内容,重启mysql服务再次登陆
[root@x112 html]# vim /etc/my.cnf
skip-grant-tables
validate-password=off #关闭密码强度策略
[root@x112 html]# systemctl restart mysqld
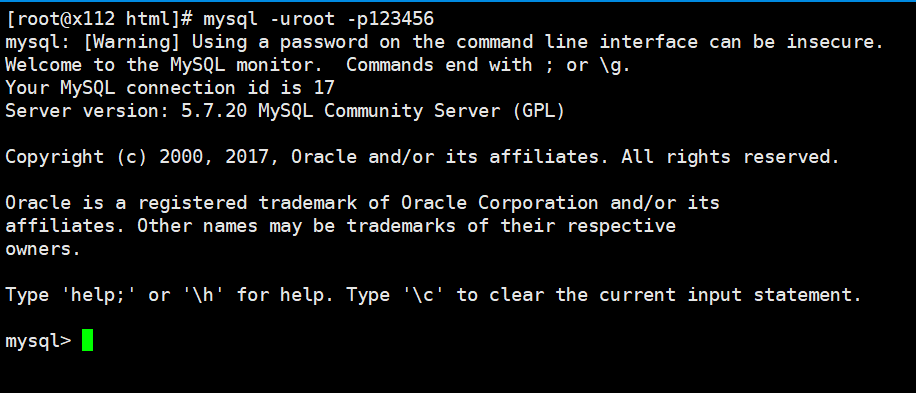
[root@x112 html]# mysql -uroot -p
Enter password:
mysql> update mysql.user set authentication_string=password('123456') where user='root';
Query OK, 1 row affected, 1 warning (0.00 sec)
Rows matched: 1 Changed: 1 Warnings: 1
mysql> flush privileges;
Query OK, 0 rows affected (0.00 sec)
#update修改root密码为123456,退出重新登陆即可生效。
使用xshell远程登陆测试,结果如下图:
至此,centos7二进制方式安装lamp环境搭建完成。