Google今年七月份的时候更新了他们的Google+应用,采用了新的导航方式并抛弃了navigationdrawer。一时之间,又引发了一系列关于NavigationDrawer利弊的讨论,不过对于开发者而言我们只需要管好自己需要实现或者学习的功能的即可,2012年Youtube、Facebook、Path等应用纷纷使用了Navigationdrawer这样的导航方式,去年Google为了整治越来越混的Android,设计出了抽屉导航,开始正题还是关心下如何使用吧:
页面布局
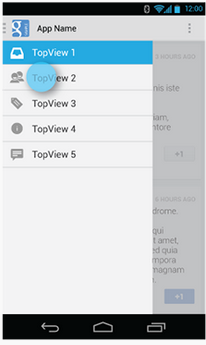
看布局之前看下布局吧,网上常见的一张图片如下,Android官方文档上的一个图片,文章最后会给出链接:
布局文件代码:
<RelativeLayout xmlns:android="http://schemas.android.com/apk/res/android"
    xmlns:tools="http://schemas.android.com/tools"
    android:layout_width="match_parent"
    android:layout_height="match_parent"
    tools:context="com.example.naviganationdrawer.MainActivity" >

    <android.support.v4.widget.DrawerLayout
        android:id="@+id/mDrawerLayout"
        android:layout_width="match_parent"
        android:layout_height="match_parent" >

        <FrameLayout
            android:id="@+id/content_frame"
            android:layout_width="match_parent"
            android:layout_height="match_parent" >
        </FrameLayout>
        <!-- 导航抽屉 -->

        <ListView
            android:id="@+id/left_drawer"
            android:layout_width="120dp"
            android:layout_height="match_parent"
            android:layout_gravity="start"
            android:background="@android:color/holo_red_light"
            android:choiceMode="singleChoice"
            android:divider="@android:color/transparent"
            android:dividerHeight="0dp" />
    </android.support.v4.widget.DrawerLayout>

</RelativeLayout>
DrawerLayout 作为界面根控件,在DrawerLayout里面第一个View为当前界面主内容;第二个和第三个View为抽屉菜单内容。如果当前界面只需要一个抽屉菜单,则第三个View可以省略。
显示的主要内容的View必须要是第一个必须为DrawerLayout的第一个子View, 原因在于 XML 布局文件中的View顺序为Android系统中的 z-ordering顺序,而抽屉必须出现在内容之上。
右侧图片的显示是个ImageView,贴下代码:
<?xml version="1.0" encoding="utf-8"?>
<FrameLayout xmlns:android="http://schemas.android.com/apk/res/android"
    android:layout_width="match_parent"
    android:layout_height="match_parent" >

    <ImageView
        android:id="@+id/content_image"
        android:layout_width="wrap_content"
        android:layout_height="wrap_content"
        android:src="@drawable/ic_launcher"
        />

</FrameLayout>
代码实现
onCreate中的代码实现:
	    mPlanetTitles=new String[]{"财经","科技"};
	        mDrawerList = (ListView) findViewById(R.id.left_drawer);

	        mDrawerList.setAdapter(new ArrayAdapter<String>(this,
	                android.R.layout.simple_list_item_1, mPlanetTitles));
	    	mDrawerLayout=(DrawerLayout) findViewById(R.id.mDrawerLayout);
	        mDrawerList.setOnItemClickListener(new DrawerItemClickListener());
页面左侧是ListView,里面的是当用户选择菜单List中的条目时,系统会调用 OnItemClickListener的 onItemClick()函数,点击事件:
	private class DrawerItemClickListener implements ListView.OnItemClickListener {
	    @Override
	    public void onItemClick(AdapterView parent, View view, int position, long id) {
	        selectItem(position);
	    }
	}
选中的事件:
	private void selectItem(int position) {
	    Fragment fragment = new FragmentContent(mImageList[position]);
	    getSupportFragmentManager().beginTransaction().replace(R.id.content_frame, fragment)
		.commit();
	    mDrawerList.setItemChecked(position, true);
	    setTitle(mPlanetTitles[position]);
	    mDrawerLayout.closeDrawer(mDrawerList);
	}
设置标题:
	@Override
	public void setTitle(CharSequence title) {
	    mTitle = title;
	    getActionBar().setTitle(mTitle);
	}
右侧显示图片的FragementContent中的代码:
public class FragmentContent extends Fragment {

	private int resourceId;


	public FragmentContent(int i) {
		// TODO Auto-generated constructor stub
		resourceId=i;
	}

	@Override
	public void onActivityCreated(Bundle savedInstanceState) {
		// TODO Auto-generated method stub
		super.onActivityCreated(savedInstanceState);
	}

	private View view;
	private ImageView mImageView;


	@Override
	public View onCreateView(LayoutInflater inflater,
			 ViewGroup container,  Bundle savedInstanceState) {
		// TODO Auto-generated method stub
		 view= inflater.inflate(R.layout.fragmentcontent, null);
		 mImageView = (ImageView)view.findViewById(R.id.content_image);
		 mImageView.setImageResource(resourceId);
		return view;
	}

	@Override
	public void onCreate(Bundle savedInstanceState) {
		// TODO Auto-generated method stub
		super.onCreate(savedInstanceState);
	}

}
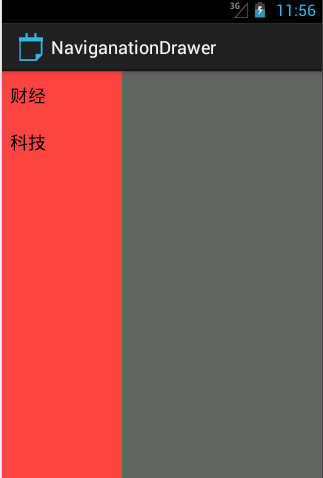
最后看下效果吧:
参考资料:
http://developer.android.com/design/patterns/navigation-drawer.html
http://developer.android.com/training/implementing-navigation/nav-drawer.html