- 前言
Bootstrap 是流行的 HTML、CSS 和 JS 框架,用于开发响应式布局、移动设备优先的 WEB 项目。源自于twiteer内部的开发框架。
当前(2019-05)最新版本是v3.3.7。
学习初衷: 不能每来一个项目都重头开始吧,希望积累框架,节省时间,快速上手,尽快出效果。不用太花哨,但也不能太难看。
选一个简单易上手的框架,那就选这个bootstrap吧。
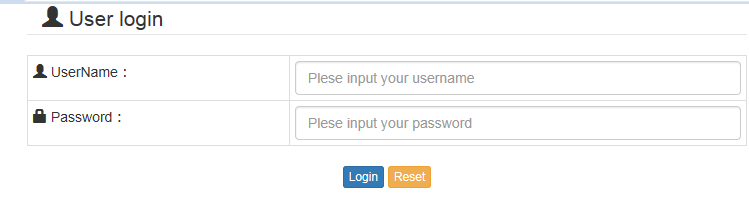
- 效果图
没使用样式:
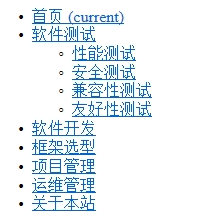
使用bootstrap样式:

自己写的样式:
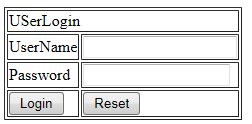
使用bootstrap样式:
作为后端开发人员,我们不需要懂太多的前端美工知识,但是又不想做出来太难看,在保证快的基础上,出一个还可以的界面。
- 实战(step by step):
工具:Eclipse Java Photon 4.8.0
说明: 网上已经很多这类介绍了,这里更多的是做一个整合。并把自己学习过程的一些步骤关键点记录下来,看官可以挑着看。
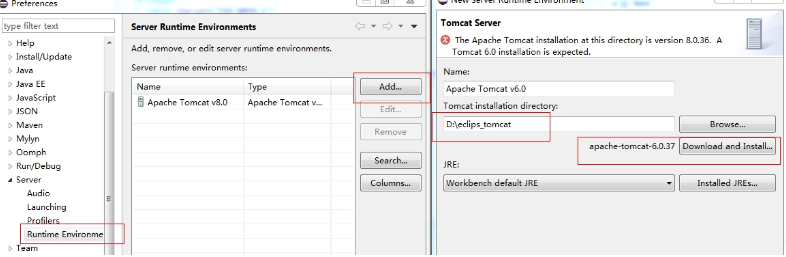
一:配置开发环境
1.新增动态网页库以及配置tomcat
默认eclipse已安装,但默认是没有动态网页的,需要安装配置下。
参考:https://blog.csdn.net/weixin_40626699/article/details/83341560
2. 新建一个动态Web项目
参考:https://www.cnblogs.com/sanmubird/p/6940522.html
如果报错:The superclass "javax.servlet.http.HttpServlet" was not found on the Java Build Path
那么需要配置tomcat,参考:http://www.cnblogs.com/herd/p/9548592.html
然后关联到项目中,参考:https://blog.csdn.net/testcs_dn/article/details/36455669
如果这个过程还没有找到可选的tomcat配置,则可以参考下图下载配置一个:
3. 项目中引入bootstrap
参考:引入BootStrap开发一个JSP项目
https://cloud.tencent.com/developer/article/1343258
4. 实例: 写一个简单的带登录功能的首页
参考:
https://cloud.tencent.com/developer/article/1343207
https://www.cnblogs.com/ATtuing/p/5424227.html
视频教程:https://study.163.com/course/courseLearn.htm?courseId=1002923012#/learn/video?lessonId=1003312146&courseId=1002923012
1) Login.jsp


<%@ page language="java" contentType="text/html; charset=UTF-8" pageEncoding="UTF-8"%> <% String path = request.getContextPath(); String basePath = request.getScheme() + "://"+ request.getServerName() + ":" + request.getServerPort() + path + "/"; %> <!DOCTYPE html> <html> <head> <!-- 这里没啥用,前面已经定义过了,只是好习惯留着 --> <meta charset="UTF-8"> <!-- 设置为设备的宽度,高端为1:1。以便适应手机端浏览。--> <meta name="viewport" content="width=device-width,initial-scale=1.0"> <title>Login</title> <link rel="stylesheet" type="text/css" href="<%=basePath %>/bootstrapcss/css/bootstrap.min.css" > <link rel="stylesheet" href="/bootstrap_study/myCss/login.css"> <!-- jQuery文件。务必在bootstrap.min.js 之前引入 --> <script src="//cdn.bootcss.com/jquery/1.11.3/jquery.min.js"></script> <!-- 最新的 Bootstrap 核心 JavaScript 文件 --> <script src="//cdn.bootcss.com/bootstrap/3.3.5/js/bootstrap.min.js"></script> </head> <body> <div class="container"> <form action="Login_Check.jsp" method="post" class="form-horizontal"> <filedset> <legend><lable> <span class="glyphicon glyphicon-user"></span> User login </lable></legend> <div class="row"> <!--栅格系统,每row行共12列,分个3div,每1,3个div占3列,第2个div则占5列,即3列+5列+4列=12列--> <div class="col-sm-3"><span class="glyphicon glyphicon-user"></span> UserName: </div> <div class="col-sm-5"><input type="text" name="ID" placeholder="Plese input your username" class="form-control"> </div> <div class="col-sm-4"></div> </div> <div class="row"> <div class="col-sm-3"><span class="glyphicon glyphicon-lock"></span> Password: </div> <div class="col-sm-5"><input type="password" name="PWD" placeholder="Plese input your password" class="form-control"></div> <div class="col-sm-4" ></div> </div> <div class="row"> <div class="col-sm-5 col-sm-offset-3"> <input type="submit" value="Login" class="btn btn-xs btn-primary"> <input type="reset" value="Reset" class="btn btn-xs btn-warning"> </div> </div> </filedset> </form> </div> </body> </html>
2) Login_check.jsp
<%@ page language="java" contentType="text/html; charset=UTF-8"
    pageEncoding="UTF-8"%>
      <%@ page import="java.io.*" %>
     <%@ page import="java.util.*" %>
     <%@ page import="java.sql.*" %>
<!DOCTYPE html>
<html>
<head>
<meta charset="UTF-8">
<title>Insert title here</title>
</script>

</head>
<body>

<%
Class.forName("com.mysql.jdbc.Driver");
System.out.println("创建数据库驱动成功!");
 //DataSource ds = null;

  String dbUrl="jdbc:mysql://IP:端口/数据库名";
     String Username="账号";
     String Password="密码";
     Class.forName("com.mysql.jdbc.Driver").newInstance();
 //    Connection conn = DriverManager.getConnection(dbUrl,Username,Password);//连接
 //    Statement stmt=conn.createStatement();//会话
  //   ResultSet rst=stmt.executeQuery("select * from yourTable");

  String ID=null;
  String PWD=null;
 //while(rst.next())
 {
  //ID=rst.getString("yourColumnName");
  //PWD=request.getParameter("PWD");

 }
 ID="1";
 if(ID.equals(ID))
 {
     %>
     <jsp:forward page="Login_Success.jsp">
     <jsp:param name="uname" value="<%=ID%>"/>
     </jsp:forward>
     <%
     }else{
     %>
     <jsp:forward page="Login_Failure.html"/>
     <%
     }
     %>

</body>
</html>
3) Login_sucess.jsp
<%@ page language="java" contentType="text/html; charset=UTF-8" pageEncoding="UTF-8"%> <% String path = request.getContextPath(); String basePath = request.getScheme() + "://"+ request.getServerName() + ":" + request.getServerPort() + path + "/"; %> <!DOCTYPE html> <html> <head> <meta charset="UTF-8"> <title>Insert title here</title> <link rel="stylesheet" type="text/css" href="<%=basePath %>/bootstrapcss/css/bootstrap.min.css" > </head> <body> <filedset> <legend><lable> <span class="glyphicon glyphicon-hourglass"></span> Welcome </lable></legend> </filedset> Welcome. <%="ID"%> </body> </html>
4) login_failure.html
略
- 学习笔记:
1. JSP页面编码
默认项目没配置情况下,新建的页面默认是GBK,部署后可能显示乱码,那么需要在页面设置一下为UTF-8。
1) <%@ page contentType="text/html; charset=UTF-8" %>
那不能每个页面都设置一下吧,那么对整个eclipse一起设置:
2) Windows---->Preferences---->JSP--->把这个目录下的Encoding选为你要设置的编码UTF-8。
2. JSP获取当前项目路径
引用css时,需要考虑开发环境与部署环境的路径差异,因此不想把项目路径写死到代码中。可以通过以下代码获取路径并配置。
在页面开头部分添加:
<%
    String path = request.getContextPath();
    String basePath = request.getScheme() + "://"+ request.getServerName() + ":" + request.getServerPort() + path + "/";
%>
说明:得到工程名:request.getContextPath()
3. 引入bootstrap配置
<head>
<link rel="stylesheet" type="text/css" href="<%=basePath %>/bootstrapcss/css/bootstrap.min.css" >
</head>
注意:这里的<%=basePath %>就是上述获取到的项目路径,当然测试的时候你可以写死项目的名字
4. bootstrap.min.css与bootstrap.css区别
bootstrap.css 是未压缩的,bootstrap.min.css是压缩过的。一般情况下,未压缩的用于开发环境,如果程序出错方便调试。而压缩过的用生生产环境,大大减少网络数据传输量,便之更快更节约流量……其它 .min.css 和 .min.js 文件同理。
5. <div class="container">
container容器,大概是占屏幕宽度的80%,然后居中对齐。
所以建议,在最外层,可以放在容器中。
6. <meta name="viewport" content="width=device-width,initial-scale=1.0">
https://blog.csdn.net/u012402190/article/details/70172371
7. form表单中,分组归类fieldset
fieldset:对表单进行分组,一个表单可以有多个fieldset。
legend:说明每组的内容描述。
7. 栅格布局col-xs-*、col-sm-*、col-md-*、col-lg-*
bootstrap的栅格布局,默认会将每行的row分为12列
col是column简写:列;
xs是maxsmall简写:超小, sm是small简写:小, md是medium简写:中等, lg是large简写:大;
-* 表示占列数,即占每行row分12列栅格系统比,如.col-md-3 在中等屏幕中占3列也就是1/4(12/3列=4个div);
.col-xs-* 超小屏幕如手机 (<768px)时使用;
.col-sm-* 小屏幕如平板 (768px ≤ 宽度 <992px)时使用;
.col-md-* 中等屏幕如普通显示器 (992px ≤ 宽度 < 1200px)时使用;
.col-lg-* 大屏幕如大显示器 (≥1200px)时使用。
--可以混合使用,t以适应不同的屏幕,如:
<div class="col-xs-12 col-sm-9 col-md-6 col-lg-3">测试</div>
<!--
当屏幕尺寸:
小于 768px 的时候,用 col-xs-12 类对应的样式;
在 768px 到 992px 之间的时候,用 col-sm-9 类对应的样式;
在 992px 到 1200px 之间的时候,用 col-md-6 类对应的样式;
大于 1200px 的时候,用 col-lg-3 类对应的样式;
-->