昨日内容回顾
flask和django对比
flask和django本质是一样的,都是web框架。
但是django自带了一些组件,flask虽然自带的组件比较少,但是它有很多的第三方插件。
那么在什么情况下,使用flask呢?
比如让flask写一个大型项目,它需要很多第三方插件。
那么堆着堆着,就和django一样了!
总结:
如果一个项目需要的插件比较少,可以使用flask。
如果需要的插件比较多,使用django更加方便。
flask知识点
装饰器
在flask中,装饰器用的是比较多的。看下面一段代码
from flask import Flask

app = Flask(__name__)

@app.route('/index')
def index():
    return 'index'

if __name__ == '__main__':
    app.run()
现在有一个装饰器函数xxx,如果需要在每次请求index页面时,做一些操作。
那么装饰器,应该加在哪里呢?
这样?
@xxx
@app.route('/index')
还是这样呢?
@app.route('/index')
@xxx
答案是,必须在@app.route('/index')下面才行。为什么呢?
因为如果加在@app.route上面,那么执行@xxx之后,那么就直接走视图函数了。已经没有意义了!
而如果在@app.route下面,那么执行到路由后,就会先执行@xxx,再执行视图函数!
装饰器的顺序
看下面一段代码,index视图函数,加了一个装饰器xxxx


from flask import Flask

app = Flask(__name__)

def xxxx(func):
    def inner(*args,**kwargs):
        print('before')
        return func(*args,**kwargs)

    return inner

@app.route('/index')
@xxxx
def index():
    return 'index'

if __name__ == '__main__':
    app.run()
启动程序,访问首页
http://127.0.0.1:5000/index
查看Pycharm控制台输出: before
如果再加视图函数home,并应用xxxx装饰器
from flask import Flask

app = Flask(__name__)

def xxxx(func):
    def inner(*args,**kwargs):
        print('before')
        return func(*args,**kwargs)

    return inner

@app.route('/index')
@xxxx
def index():
    return 'index'

@app.route('/home')
@xxxx
def home():
    return 'home'

if __name__ == '__main__':
    app.run()
启动之后,会直接报错
AssertionError: View function mapping is overwriting an existing endpoint function: inner
为什么呢?由于代码是从上至下执行的。视图函数执行xxxx装饰器之后,使用__name__方法获取函数名时,名字是inner
那么因此执行到home时,函数名也是inner。那么flask就会抛出异常,inner函数重复了!
如何解决呢?使用functools就可以了!它会保留原函数信息,包括函数名!
from flask import Flask
import functools

app = Flask(__name__)

def xxxx(func):
    @functools.wraps(func)
    def inner(*args,**kwargs):
        print('before')
        return func(*args,**kwargs)

    return inner

@app.route('/index')
@xxxx
def index():
    return 'index'

@app.route('/home')
@xxxx
def home():
    return 'home'

if __name__ == '__main__':
    app.run()
再次执行,就不会报错了。
因此,以后为了装饰器不出问题,一定要加functools
before_request/after_request
看下面的代码,b1和b2谁会先执行?
# import pymysql
# from DBUtils.PooledDB import PooledDB, SharedDBConnection
# POOL = PooledDB(
#     creator=pymysql,  # 使用链接数据库的模块
#     maxconnections=6,  # 连接池允许的最大连接数,0和None表示不限制连接数
#     mincached=2,  # 初始化时,链接池中至少创建的空闲的链接,0表示不创建
#     maxcached=5,  # 链接池中最多闲置的链接,0和None不限制
#     maxshared=3,  # 链接池中最多共享的链接数量,0和None表示全部共享。PS: 无用,因为pymysql和MySQLdb等模块的 threadsafety都为1,所有值无论设置为多少,_maxcached永远为0,所以永远是所有链接都共享。
#     blocking=True,  # 连接池中如果没有可用连接后,是否阻塞等待。True,等待;False,不等待然后报错
#     maxusage=None,  # 一个链接最多被重复使用的次数,None表示无限制
#     setsession=[],  # 开始会话前执行的命令列表。如:["set datestyle to ...", "set time zone ..."]
#     ping=0,
#     # ping MySQL服务端,检查是否服务可用。# 如:0 = None = never, 1 = default = whenever it is requested, 2 = when a cursor is created, 4 = when a query is executed, 7 = always
#     host='127.0.0.1',
#     port=3306,
#     user='root',
#     password='123',
#     database='pooldb',
#     charset='utf8'
# )
'''
1.Flask路由
    1.endpoint="user" # 反向url地址
    2.url_address = url_for("user")
    3.methods = ["GET","POST"] # 允许请求进入视图函数的方式
    4.redirect_to # 在进入视图函数之前重定向
    5./index/<nid> # 动态参数路由 <int:nid> def index(nid)
    6.strict_slashes # 是否严格要求路由地址 /
    7.defaults={"nid":1} # def index(nid)

2.Flask初始化配置(实例化):
    1.template_folder # 指定模板路径
    2.static_url_path # 指定静态文件目录的URL地址
    3.static_folder # 指定静态文件目录路径

3.Flask对象配置
    1.DEBUG #开发模式的调试功能 True False
    2.app.config.from_object(class) # 通过对象的方式导入配置
    3.secret_key # 开启session功能的时候需要添加的配置

4.Blueprint
    1.将功能和主程序分离,注册
    2.bl = Blueprint("dongdong",__name__)
    3.注册 register_blueprint(bl)

5.send_file jsonify
    1.send_file # 打开并返回文件 content-type:文件类型
    2.jsonify # 将一个字符串 转为JSON格式 加入 content-type:application/json 头

6.特殊的装饰器:
    1.before_request # 在请求进入视图函数之前执行的函数(登录认证)
    2.after_request # 在请求响应回浏览器之前执行的函数
    3.before_first_request # 在第一次请求进入视图函数之前执行的函数
    4.errorheader(404) # 当遇到此类错误响应的时候(自定义错误页面)

7.flash
    1.flash("msg","tag") # 闪现存储
    2.get_flashed_messages(category_filter=["tag"]) # 闪现取值
    只要用到了get_flashed_messages就一定清空flash


1.DButils 数据库连接池
    创建连接池同时创建连接
    用到连接时从连接池中抽取一个连接
    释放连接时将连接放回连接池中
    节省与mysql的通讯次数和时长

2.Websocket 通讯协议

 Web + socket
 QQ 即时通讯软件 97

 初期轮询:
    QQ 联众 软件不断的循环访问服务器问它有没有给我发送的消息
    优点:响应及时
    缺点:浪费CPU资源,浪费带宽

 长轮询:
    当客户端发起询问,服务器说你等着1分钟之后,你再来问我
    断开再次发起连接,服务器帮你轮询
    优点:响应及时
    缺点:用户一旦形成规模,服务器消耗是致命的

 新的协议 websocket
    规定了一个数据格式
    收发数据
    该收就收
    该发就发

3.群聊

4.私聊

'''
# from flask import Flask,request,redirect,session
#
# app = Flask(__name__)
# app.secret_key = "DragonFire"
#
#
# @app.before_request
# def is_login():  # 判断是否登录
#     # 白名单设置,判断为登录页面时
#     if request.path == "/login":
#         # 跳过处理
#         return None
#     # 判断session是不存在时
#     if not session.get("user"):
#         # 重定向到登录页面
#         return redirect("/login")
#
# @app.after_request
# def foot_log(environ):  # 记录访问日志
#     print(environ)  # 响应信息
#     # 判断请求路径不是登录页面
#     if request.path != "/login":
#         # 打印访问路径
#         print("有客人访问了",request.path)
#
#     return environ
#
# @app.route("/login",methods=["POST","GET"])
# def login():
#     if request.method == "GET":
#         return "Login"
#
#     user = request.form["username"]  # form表单获取
#     pwd = request.form["password"]  # form表单获取
#     # 判断form表示数据和 后台数据库匹配
#     # models.UserInfo.objects.filter(username=user,password=pwd).first()
#     if user == 'xiao' and pwd == '123':
#         # 设置session
#         session["user"] = user
#         # 跳转首页
#         return redirect("/index")
#
#
# @app.route("/index")
# def index():
#     return "Index"
#
# @app.route("/home")
# def home():
#     return "Home"
#
# if __name__ == '__main__':
#     app.run("0.0.0.0", 5000)

'''

1.玩具开机提示语
刚刚开机的时候:
    1.授权问题(MD5授权码)提示语 : 请联系玩具厂商
    2.绑定问题 提示语 : 快给我找一个小主人
    3.成功 提示语:欢迎使用


2.为多个玩具发送点播:
    mpop 弹出菜单


3.聊天界面:
    <div class="leftd">
        <img src="avatar/girl.jpg" class="leftd_h" />
        <div class="speech left">点击播放</div>
    </div>
    <div class="rightd">
        <img src="avatar/girl.jpg" class="rightd_h" />
        <div class="speech right">点击播放</div>
    </div>

    按住录音:
        hold: 按住事件 开始录音(回调函数)
        release: 松开事件 结束录音 执行录音中的回调函数

4.app录音:
    var rec = plus.audio.getRcorder()
    rec.record(
        {filename:"_doc/audio/",format:"amr"},
        function(success){ success //录音文件保存路径 },
        function(error){}
    )

    rec.stop()

5.app与服务器端文件传输(ws传输):
    1.app使用dataURL方式打开录音文件 : base64 文件
    2.通过某个函数 将 Base64 格式的文件 转为 Blob 用于 websocket传输
    3.将Blob对象使用Ws发送至服务端
    4.服务端保存文件(amr)
    5.将amr 转换为 mp3  使用 ffmpeg -i xxx.amr xxx.mp3


6.简单的对话(app向玩具(web)发起):
    app:    1.发起两次 ws.send({to_user:}) 告诉服务端我要发给谁消息
            2. ws.send(blob) app与服务器端文件传输

    websocket服务:
        0.创建两个变量,用于接收to_user 和 blob对象
        1.收到用户的JSON字符串,to_user
            获取对方的Websocket,用户send
        2.收到用户的Blob对象,语音文件
            保存成amr文件,转换成mp3
            注意保存文件的路径

        3.将转换完成的文件发送给 to_user

        4.两个变量置空

'''

from flask import Flask
import functools

app = Flask(__name__)

@app.before_request
def b1():
    print('b1')

@app.before_request
def b2():
    print('b2')

def xxxx(func):
    @functools.wraps(func)
    def inner(*args,**kwargs):
        print('before')
        return func(*args,**kwargs)

    return inner

@app.route('/index')
@xxxx
def index():
    return 'index'

@app.route('/home')
@xxxx
def home():
    return 'home'

if __name__ == '__main__':
    app.run(debug=True)
启动程序,访问index页面
http://127.0.0.1:5000/index
查看Pycharm控制台输出:
b1
b2
before
可以发现,b1先执行。为什么呢?因为代码是从上至下执行的,所以谁先加载,谁就先执行!
关于before_request源码分析,请参考链接:
https://blog.csdn.net/slamx/article/details/50491192
举例:
from flask import Flask

app = Flask(__name__)


@app.before_request
def b1():
    print('b1')

@app.after_request
def a1(environ):
    print('a1')
    return environ


@app.route('/index')
def hello_world():
    return 'Hello World!'


if __name__ == '__main__':
    app.run()
访问首页:http://127.0.0.1:5000/index,效果如下:

Pycharm输出:
b1
a1
总结:before_request实际上是将视图函数,append到一个列表中。after_request也是将视图函数append到一个列表中,但是它对列表做了reverse操作!具体,可以看源码。
endpoint
endpoint主要是做反向解析的,使用url_for模块,就可以反向生成url
from flask import Flask,url_for

app = Flask(__name__)

@app.route('/index',endpoint='n1')
def index():
    print(url_for('n1'))
    return 'index'


if __name__ == '__main__':
    app.run(debug=True)
访问url:
http://127.0.0.1:5000/index
执行输出:
/index
flask内置session
flask的session默认存储在哪里呢?在django中,session默认是保存在表里面的。
那么flask的session其实是保存在 用户浏览器的cookie中
它是如何存储的呢?看下面一段代码
from flask import Flask,request,session

app = Flask(__name__)
app.secret_key = 'fdsa'  # 必须要指定这个参数

@app.route('/login')
def login():
    #认证过程省略...
    # 设置session
    session['user_info'] = 'xiao'
    return '123'

if __name__ == '__main__':
    app.run(debug=True)
访问登录页面,效果如下:

查看请求, 发现一个Set-Cookie。这个cookie的key就是session,值为一堆字符串。它是已经加密过的!

那么它是如何实现的呢?看这一行代码
session['user_info'] = 'xiao'
它在内存中,维护了一个空间,这个空间是一个字典。由于服务端是单进程,单线程。
所有请求过来时,会排队。这个字典,会放一个key,这个key就是程序的线程id,value存放用户信息。
而value是一个字典,比如:{'user_info':'xiao'}
假设有100个用户,那么有100个值。大概是这样的样子:
{
    "线程id": {
        "user_info": "xiao"
    },
    "线程id": {
        "user_info": "zhang"
    },
    ...
}
返回给浏览器时,将内存中的字典做序列化,并做了加密
加完密之后,在cookie中写了一点数据
key是随机的,但是vlaue才是真正的数据
这个时候,flask字典,就清空了。
用户浏览器cookie中就有数据了,但是flask中的数据已经没有了!
这个时候,如果再来一用户,也是执行上面的流程。
总之,作为服务器,我不存储数据。
那么问题来了,flask如何做session验证?
如果之前的用户来了,它会携带cookie。
flask会读取cookie值,如果发现有,进行解密。如果解密成功,那么就是已经登录过了,否则没有登录过。
解密之后,它会将数据放到字典中!
那么读取时,它会直接从内存中读取。
关于flask的源码分析,请参考链接:
https://blog.csdn.net/m0_37519490/article/details/80774069
一、websocket原理
由于时间关系,步骤略...
关于websocket原理,请参考链接:
https://www.cnblogs.com/wupeiqi/p/6558766.html
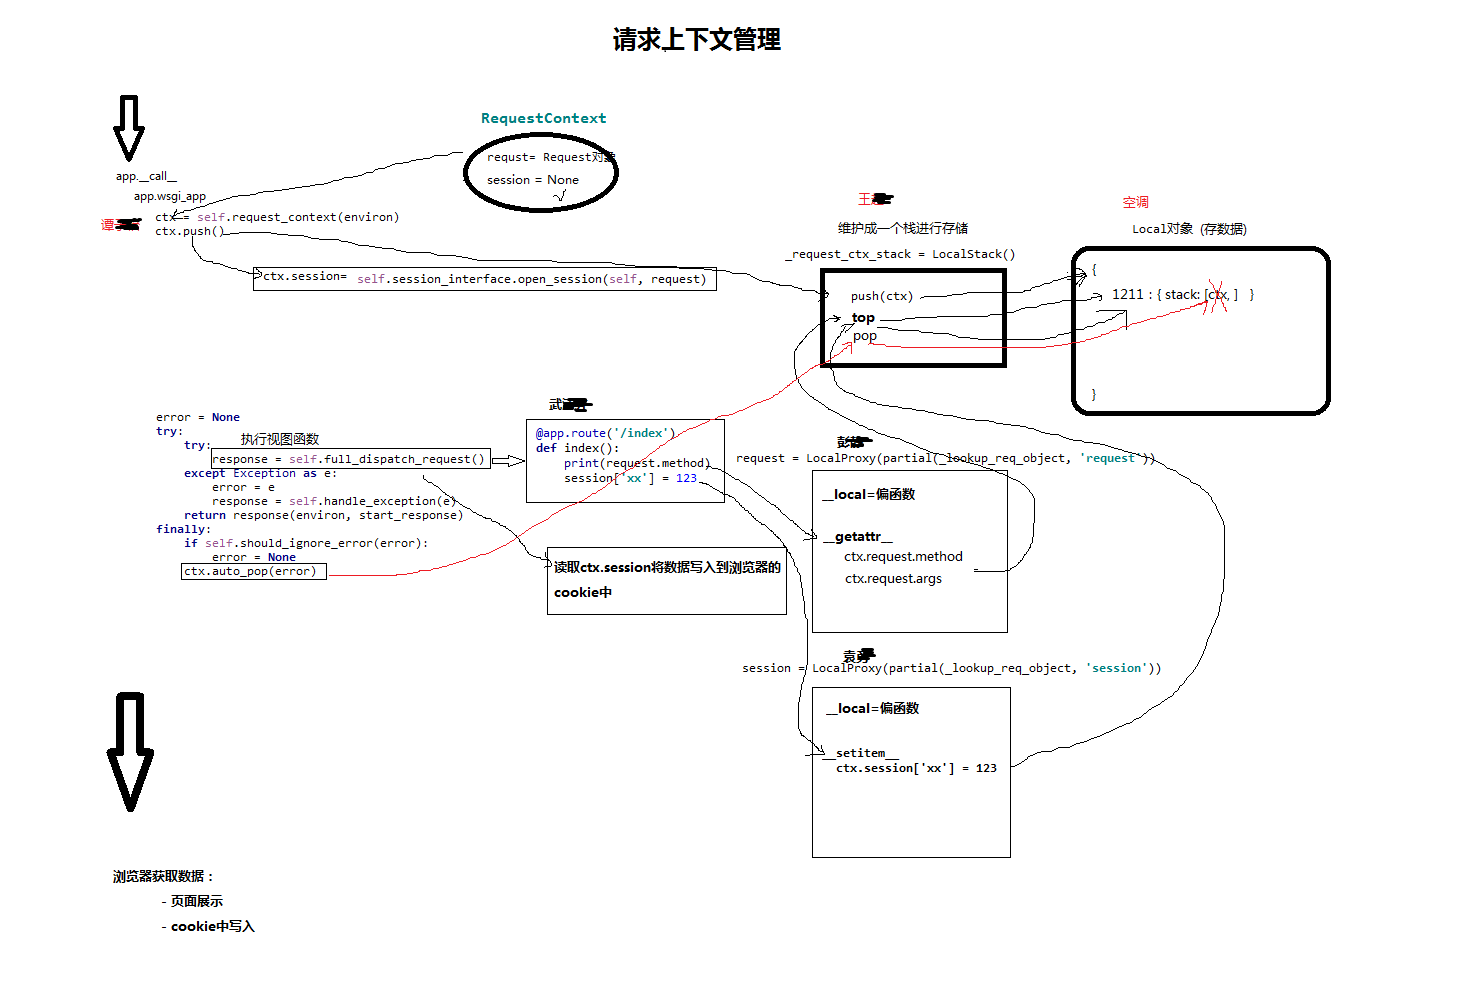
二、flask之请求上下文
flask上下文管理,主要分为2类:
请求上下文管理
应用上下文管理
由于时间关系,步骤略...
草稿图
关于flask上下文管理,请参考链接:
https://www.cnblogs.com/zhaopanpan/p/9457343.html
https://blog.csdn.net/bestallen/article/details/54429629
关于flask面试题,请参考链接:
https://www.cnblogs.com/caochao-/articles/8963610.html
今日内容总结:
内容详细:
    1. websocket原理
        a. websocket是一个协议。
            websocket解决了一个问题:服务端可以向客户端推送消息。


            http协议规定:
                - 请求体请求体
                - 一次请求一次响应(无状态短链接)
            websocket协议规定:
                - 握手
                    - base64(sha1(key + magic string ))
                - 收发数据(加密)
                    -  =127
                    -  =126
                    -  <=125
                - 连接创建不断开(持久连接)

        b. 使用
            - flask: werkzurg / geventwebsocket
            - django: wsgiref / channel
            - tornado: 自己写全支持:http和ws


    2. flask上下文管理

        前戏:
            a. threading.local

                # 创建threading.local对象
                val = threading.local()

                def task(arg):
                    # threading.local对象.xxx = 123
                    # 内部,获取当前线程ID
                    #   {
                    #         7800:{'x1':1}
                    #         7180:{'x1':2}
                    #   }
                    val.x1 = arg


                for i in range(10):
                    t = threading.Thread(target=task,args=(i,))
                    t.start()

                # ####### flask中搞了一个升级版的threading.local() #######
                # 创建threading.local对象
                val = threading.local()

                def task(arg):
                    # threading.local对象.xxx = 123
                    # 内部,获取当前协程ID
                    #   {
                    #         7800:{'x1':1}
                    #         7180:{'x1':2}
                    #   }
                    val.x1 = arg


                for i in range(10):
                    t = threading.Thread(target=task,args=(i,))
                    t.start()
            b. 栈
                后进先出的数据结构

            c. 偏函数
                保留已知参数

            d. 全局变量,flask程序启动只有一份数据
                _request_ctx_stack = LocalStack()
                _app_ctx_stack = LocalStack()
                current_app = LocalProxy(_find_app)
                request = LocalProxy(partial(_lookup_req_object, 'request'))
                session = LocalProxy(partial(_lookup_req_object, 'session'))
                g = LocalProxy(partial(_lookup_app_object, 'g'))

        正文:图


重点总结:
    1. flask路由:装饰器   *****
    2. flask的session,默认写在浏览器cookie中。 ***
    3. websocket协议       *****
    4. flask请求上下文管理 *****


作业:
    请求上下文类关系图
未完待续...