9 使用案例
9.1 创建分区表
1. 创建 分区表 testdb.worker
create table testdb.worker
(
id Int32,
name String,
gender Int16,
birthday Date,
cert_num String,
department_id Int32
)
ENGINE = MergeTree()
primary key id
partition by department_id
ORDER BY id;
2. 插入数据
insert into testdb.worker(id, name, gender, birthday, cert_num, department_id)
VALUES
(1, 'amy', 0, '1990-01-01 00:00:00', '000000', 1),
(2, 'bob', 1, '1991-01-01 00:00:00', '000001', 1),
(3, 'tom', 1, '1992-01-01 00:00:00', '000002', 2),
(4, 'ted', 1, '1993-01-01 00:00:00', '000003', 2),
(5, 'lily', 0, '1992-01-01 00:00:00', '000005', 3),
(6, 'jack', 1, '1993-01-01 00:00:00', '000006', 3);
在数据插入后,分区可以自动创建。
3. 查看所有表 worker 的所有分区
select partition,name,database,table,engine,path from system.parts where table='worker';
┌─partition─┬─name────┬─database─┬─table──┬─path──────────────────────────────────────────┐
│ 1 │ 1_1_1_0 │ testdb │ worker │/var/lib/clickhouse/data/testdb/worker/1_1_1_0/ │
│ 2 │ 2_2_2_0 │ testdb │ worker │/var/lib/clickhouse/data/testdb/worker/2_2_2_0/ │
│ 3 │ 3_3_3_0 │ testdb │ worker │/var/lib/clickhouse/data/testdb/worker/3_3_3_0/ │
└───────────┴─────────┴──────────┴────────┴───────────────────────────────────────────────┘
上面的结果展示了这张表的3个分区的信息。
4. 其他操作
4.1 剥离分区2:
alter table testdb.worker detach partition 2;
4.2 查看被剥离的分区:
select database,table,partition_id,name from system.detached_parts where table = 'worker';
┌─database─┬─table──┬─partition_id─┬─name────┐
│ testdb │ worker │ 3 │ 2_2_2_0 │
└──────┴────┴───────┴─────┘
分区2 被剥离后,在 /var/lib/clickhouse/data/testdb/worker/detached/ 中,会产生一个目录 2_2_2_0,分区2 的数据存放在这里。
4.3 将 partition 2 重新添加到表worker上:
alter table testdb.worker attach partition 2;
4.4 清空分区2:
alter table testdb.worker clear partition 2;
4.5 删除分区2:
alter table testdb.worker drop partition 2;
4.6 冻结分区2:
alter table testdb.worker freeze partition 2;
冻结分区是备份的一种方式。分区冻结后,在 /var/lib/clickhouse/shadow/ 中会新增一个名称为一个数字的目录。例如1,接下来的目录层级依次是 data/testdb/worker/2_2_2_0/。 数据存放在 2_2_2_0 中。
9.2 搭建 ZooKeeper 集群
ClickHouse 支持原生的分布式集群。ClicHouse集群的节点需要借助zookeeper 进行通信。要注意的是,ClickHouse 集群与 Zookeeper集群不是紧密耦合的。他们通过接口来通信。因此,Zookeeper 集群和Clickhouse 集群部署不要求部署在相同的服务器上,也不需要有相同数量的节点。
Zookeeper
ZooKeeper是一个分布式的,开放源码的分布式应用程序协调服务,是Google的Chubby一个开源的实现,是Hadoop和Hbase的重要组件。它是一个为分布式应用提供一致性服务的软件,提供的功能包括:配置维护、域名服务、分布式同步、组服务等。
ZooKeeper的目标就是封装好复杂易出错的关键服务,将简单易用的接口和性能高效、功能稳定的系统提供给用户。
ZooKeeper包含一个简单的原语集,提供Java和C的接口。
ZooKeeper代码版本中,提供了分布式独享锁、选举、队列的接口,代码在$zookeeper_homesrc ecipes。其中分布锁和队列有Java和C两个版本,选举只有Java版本。
下面我们介绍搭建zookeeper 集群的方法。我们将在 10.19.134.22,10.19.134.23,10.19.134.24以及10.19.134.27 这四个节点上安装zookeeper 。下面的操作需要在每个节点上单独完成。
1. 首先安装jdk。本文中,我们使用yum安装 jdk-11:
yum -y install java-11-openjdk.x86_64
2. 下载zookeeper二进制程序。本文我们下载的是 apache-zookeeper-3.5.8-bin.tar.gz。
注意,从 zookeeper-3.5.5 开始,只有名字带有 bin 的包才是我们可用的。而源码apache-zookeeper-3.5.8.tar.gz无法直接使用,编译也会出错。
3. 将下载后的源码解压到特定目录,本文中,这个目录是 /opt/:
tar ./apache-zookeeper-3.5.8-bin.tar.gz -c /opt/
4. 为方便使用,将解压后的目录 apache-zookeeper-3.5.8 重命名为 zookeeper-3.5.8:
mv apache-zookeeper-3.5.8 zookeeper-3.5.8
5. 进入解压后的目录 /opt/zookeeper-3.5.8,这里它也是安装目录:
cd /opt/zookeeper-3.5.8
6. 通过配置文件模板 zoo_sample.cfg 创建配置文件zoo.cfg:
cp ./conf/zoo_sample.cfg ./conf/zoo.cfg
7. 编辑 ./conf/zoo.cfg 文件,修改或添加如下参数:
dataDir=/home/zookeeper/data
dataLogDir=/home/zookeeper/log
clientPort=2181
server.1=10.19.134.22:2888:3888
server.2=10.19.134.23:2888:3888
server.3=10.19.134.24:2888:3888
server.3=10.19.134.27:2888:3888
这里,clientPort 表示客户端可连接的端口,默认是2181;
server.1,server.2,server.3以及server.4 分表表示我们zookeeper集群中的三个节点;
2888端口号是zookeeper服务之间通信的端口;
3888端口是zookeeper与其他应用程序通信的端口。
8. 创建zookeeper数据目录 /home/zookeeper/data 和日志目录 /home/zookeeper/log:
mkdir -p /home/zookeeper/data
mkdir -p /home/zookeeper/log
9. 创建 myid 文件
cd /home/zookeeper/data
vi myid
其内容是一个数字,对每个节点不同。建议它与 zoo.cfg 中对应配置项 server. 后面的数字相同。
10. 启动 zookeeper。
./bin/zkServer.sh start
如果zookeeper无法启动,你可以在
/opt/zookeeper-3.5.8/logs 和 /home/zookeeper/log 中查找日志。
如果各个zookeeper节点启动成功,则zookeeper 集群搭建完成。
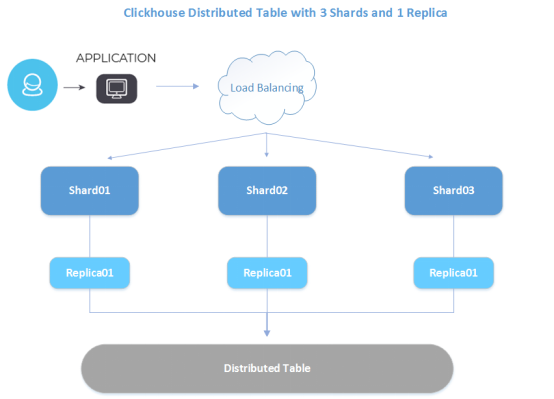
9.3 搭建 clickhouse 多分片集群并创建分布式表
本节中,我们要搭建的是三个数据节点的集群,数据有3个分片和1个副本。
三个节点的ip地址分别如下:
节点1:10.19.134.22
节点2:10.19.134.23
节点3:10.19.134.24
下面是集群的结构图:
下面我们介绍集群搭建的方法。
1. 参照9.2 节,搭建三个节点上的 zookeeper 集群。
2. 创建用于访问集群的用户。在本文中,用户名是clickhouse,密码是 “clickhouse”。 具体的方法是,编辑配置文件 /etc/clickhouse-server/users.xml中,在 yandex->users 中,添加下列内容:
<clickhouse> <password_sha256_hex>7e099f39b84ea79559b3e85ea046804e63725fd1f46b37f281276aae20f86dc3</password_sha256_hex>
<access_management>1</access_management>
<networks incl="networks" replace="replace">
<ip>::/0</ip>
</networks>
<profile>default</profile>
<quota>default</quota>
</clickhouse>
注意 <password_sha256_hex> 中的内容是你所设置密码的密文通过SHA256算法散列后的结果。获取散列结果的方法如下,这里明文密码是 “clickhouse”:
[root@node01 ~]# echo -n "clickhouse" | sha256sum | tr -d '-'
7e099f39b84ea79559b3e85ea046804e63725fd1f46b37f281276aae20f86dc3
3. 我们在 /etc/clickhouse-server/metrika.xml 中配置zookeeper 和 clickhouse集群信息。内容如下。
<!-- metrika.xml -->
<yandex>
<clickhouse_remote_servers>
<cluster_3shards_1replicas>
<shard>
<replica>
<host>10.19.134.22</host>
<port>9000</port>
<user>clickhouse</user>
<password>clickhouse</password>
</replica>
</shard>
<shard>
<replica>
<host>10.19.134.23</host>
<port>9000</port>
<user>clickhouse</user>
<password>clickhouse</password>
</replica>
</shard>
<shard>
<replica>
<host>10.19.134.24</host>
<port>9000</port>
<user>clickhouse</user>
<password>clickhouse</password>
</replica>
</shard>
</cluster_3shards_1replicas>
</clickhouse_remote_servers>
<zookeeper-servers>
<node index="1">
<host>10.19.134.22</host>
<port>2181</port>
</node>
<node index="2">
<host>10.19.134.23</host>
<port>2181</port>
</node>
<node index="3">
<host>10.19.134.24</host>
<port>2181</port>
</node>
</zookeeper-servers>
在上面的配置文件中,<cluster_3shards_1replicas> 表示集群的名称。在这个集群中, <shard> 标签和 <replica> 标签中分别配置了分片和副本的信息。同时,我们还配置了数据库的的用户clickhouse和它的明文密码(必须是明文,否则会出错)。
4. 重启clickhouse
systemctl start clickhouse-server
集群搭建成功后,我们可以使用用户 clickhouse 来创建分片表。
1. 登录任意clickhouse节点,在集群中创建全局数据库 testdb:
create database testdb on cluster cluster_3shards_1replicas;
2. 进入testdb,在集群中每个节点上创建本地表person。
create table testdb.person on cluster cluster_3shards_1replicas
(
id Int32,
name String,
gender Int16,
birthday Date,
cert_num String,
department_id Int32
)
ENGINE = MergeTree()
primary key id
ORDER BY id
SETTINGS index_granularity = 8192;
3. 接着创建分布式表 person_dist,分布式表不存放数据,而是作为读写本地表的接口:
create table testdb.person_dist on cluster cluster_3shards_1replicas
AS testdb.person
ENGINE = Distributed(cluster_3shards_1replicas, testdb, person, department_id);
在上面的sql语句中,
AS test.person 表示 testdb.person_dist 表结构与 test.person 一致,
Distributed(cluster_3shards_1replicas, testdb, person, department_id) 的四个参数依次表示 集群的名称,数据库的名称 ,本地表的名称,分片键,注意它们都没有引号。第四个参数如果指定为 rand(), 则表示随机分片。
4. 向分布式表中插入数据:
insert into testdb.person_dist(id, name, gender, birthday, cert_num, department_id)
VALUES
(1, 'amy', 0, '1990-01-01 00:00:00', '000000', 1),
(2, 'bob', 1, '1991-01-01 00:00:00', '000001', 1),
(3, 'tom', 1, '1992-01-01 00:00:00', '000002', 2),
(4, 'ted', 1, '1993-01-01 00:00:00', '000003', 2),
(5, 'lily', 0, '1994-01-01 00:00:00', '000004', 3),
(6, 'john', 1, '1995-01-01 00:00:00', '000005', 3);
5. 可以在分布式表 person_dist 中查看到所有数据。
node03 :) select * from testdb.person_dist;
SELECT *
FROM testdb.person_dist
┌─id─┬─name─┬─gender─┬───birthday─┬─cert_num─┬─department_id─┐
│ 3 │ tom │ 1 │ 1992-01-01 │ 000002 │ 2 │
│ 4 │ ted │ 1 │ 1993-01-01 │ 000003 │ 2 │
└────┴──────┴────────┴────────────┴──────────┴───────────────┘
┌─id─┬─name─┬─gender─┬───birthday─┬─cert_num─┬─department_id─┐
│ 1 │ amy │ 0 │ 1990-01-01 │ 000000 │ 1 │
│ 2 │ bob │ 1 │ 1991-01-01 │ 000001 │ 1 │
└────┴──────┴────────┴────────────┴──────────┴───────────────┘
┌─id─┬─name─┬─gender─┬───birthday─┬─cert_num─┬─department_id─┐
│ 5 │ lily │ 0 │ 1994-01-01 │ 000004 │ 3 │
│ 6 │ john │ 1 │ 1995-01-01 │ 000005 │ 3 │
└────┴──────┴────────┴────────────┴──────────┴───────────────┘
6 rows in set. Elapsed: 0.116 sec.
从上面的查询结果可以看出,插入到testdb.person 中的数据被划分到了三个分片中。
9.4 搭建 clickhouse 多分片多副本集群并创建分布式表
ClickHouse 支持集群中同一分片的多个节点之间的相互数据复制,也就是多副本。但它不支持在同一实例上的多副本。也就是说副本,必须位于不同的实例上,也就是不同节点或不同的端口上。
例如,如果要配置3分片2副本的集群,你可能需要在6台服务器上分别安装一个clickhouse 实例,或者在3台服务器上各安装两个 clickhouse 实例。
集群划分如下:
|
副本 分片 |
Replica01 |
Replica02 |
|
Shard01 |
10.19,134.22 |
10.19,134.25 |
|
Shard02 |
10.19.134.23 |
10.19.134.26 |
|
Shard03 |
10.19.134.24 |
10.19.134.27 |
下面我们介绍在6台服务器上搭建3分片2副本的集群的方法。
1. 参照9.2 节,搭建zookeeper 集群。注意不需要每个节点上都安装zookeeper。注意,Zookeeper 集群和Clickhouse 集群部署不要求部署在相同的服务器上,也不需要有相同数量的节点。
2. 创建用于访问集群的用户。在本文中,用户名是clickhouse,密码是 “clickhouse”。 具体的方法是,编辑配置文件 /etc/clickhouse-server/users.xml中,在 yandex->users 中,添加下列内容:
<clickhouse> <password_sha256_hex>7e099f39b84ea79559b3e85ea046804e63725fd1f46b37f281276aae20f86dc3</password_sha256_hex>
<access_management>1</access_management>
<networks incl="networks" replace="replace">
<ip>::/0</ip>
</networks>
<profile>default</profile>
<quota>default</quota>
</clickhouse>
注意 <password_sha256_hex> 中的内容是你所设置密码的密文通过SHA256算法散列后的结果。获取散列结果的方法如下,这里明文密码是 “clickhouse”:
[root@node01 ~]# echo -n "clickhouse" | sha256sum | tr -d '-'
7e099f39b84ea79559b3e85ea046804e63725fd1f46b37f281276aae20f86dc3
3. 需要在 metrika.xml 中添加类似下面的内容。
<!-- metrika.xml -->
<yandex>
<clickhouse_remote_servers>
<cluster_3shards_2replicas>
<shard>
<internal_replication>false</internal_replication>
<replica>
<host>10.19.134.22</host>
<port>9000</port>
<user>clickhouse</user>
<password>clickhouse</password>
</replica>
<replica>
<host>10.19.134.25</host>
<port>9000</port>
<user>clickhouse</user>
<password>clickhouse</password>
</replica>
</shard>
<shard>
<internal_replication>false</internal_replication>
<replica>
<host>10.19.134.23</host>
<port>9000</port>
<user>clickhouse</user>
<password>clickhouse</password>
</replica>
<replica>
<host>10.19.134.26</host>
<port>9000</port>
<user>clickhouse</user>
<password>clickhouse</password>
</replica>
</shard>
<shard>
<internal_replication>false</internal_replication>
<replica>
<host>10.19.134.24</host>
<port>9000</port>
<user>clickhouse</user>
<password>clickhouse</password>
</replica>
<replica>
<host>10.19.134.27</host>
<port>9000</port>
<user>clickhouse</user>
<password>clickhouse</password>
</replica>
</shard>
</cluster_3shards_2replicas>
</clickhouse_remote_servers>
<zookeeper-servers>
<node index="1">
<host>10.19.134.22</host>
<port>2181</port>
</node>
<node index="2">
<host>10.19.134.23</host>
<port>2181</port>
</node>
<node index="3">
<host>10.19.134.24</host>
<port>2181</port>
</node>
</zookeeper-servers>
在上面的配置文件中,<cluster_3shards_2replicas> 表示集群的名称。在这个集群中, <shard> 标签和 <replica> 标签中分别配置了分片和副本的信息。一个分片包含了两个副本。分片内 <internal_replication> 标签的含义是,数据库中的表本身是否是复制表。若它为false,则表示表不是复制表,而复制是集群级别的行为。
4. 重启clickhouse
systemctl start clickhouse-server
现在,我们创建多副本的分布式表。
1. 登录一个clickhouse节点,在集群中创建全局数据库 testdb2:
create database testdb2 on cluster cluster_3shards_2replicas;
2. 进入testdb2,在集群中每个节点上创建本地表person。
create table testdb2.person on cluster cluster_3shards_1replicas
(
id Int32,
name String,
gender Int16,
birthday Date,
cert_num String,
department_id Int32
)
ENGINE = MergeTree()
primary key id
ORDER BY id
SETTINGS index_granularity = 8192;
3. 接着创建分布式表 person_dist,分布式表不存放数据,而是作为读写本地表的接口:
create table testdb2.person_dist on cluster cluster_3shards_1replicas
AS testdb2.person
ENGINE = Distributed(cluster_3shards_1replicas, testdb2, person, department_id);
上面的sql语句中,
AS testdb2.person 表示 testdb2.person_dist 表结构与 testdb2.person 一致。
Distributed(cluster_3shards_1replicas, testdb2, person, department_id) 的四个参数依次表示 集群的名称,数据库的名称 ,本地表的名称,分片键。注意它们都没有引号。
第四个参数如果指定为 rand(), 则表示随机分片。
4. 向分布式表中插入数据:
insert into testdb2.person_dist(id, name, gender, birthday, cert_num, department_id)
VALUES
(1, 'amy', 0, '1990-01-01 00:00:00', '000000', 1),
(2, 'bob', 1, '1991-01-01 00:00:00', '000001', 1),
(3, 'tom', 1, '1992-01-01 00:00:00', '000002', 2),
(4, 'ted', 1, '1993-01-01 00:00:00', '000003', 2),
(5, 'lily', 0, '1994-01-01 00:00:00', '000004', 3),
(6, 'john', 1, '1995-01-01 00:00:00', '000005', 3);
可以在分布式表 person_dist 中查看到所有数据。
5. 验证多副本。在10.19.134.22 和 10.19.134.25 上,分别查看表testdb2.person。
在 10.19.134.22 上:
node01 :) select * from testdb2.person;
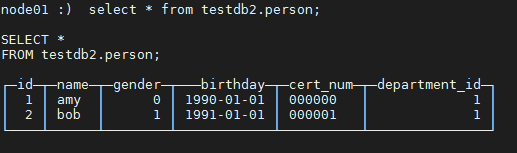
在 10.19.134.25 上:
node04 :) select * from testdb2.person;
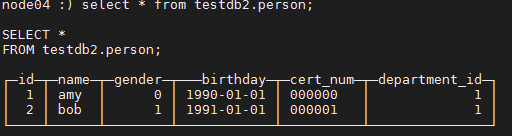
可以发现两张表的数据完全相同。
9.5 创建复制表
仅MergeTree系列中的表支持复制:
- ReplicatedMergeTree
- ReplicatedSummingMergeTree
- ReplicatedReplacingMergeTree
- ReplicatedAggregatingMergeTree
- ReplicatedCollapsingMergeTree
- ReplicatedVersionedCollapsingMergeTree
- ReplicatedGraphiteMergeTree
复制在单个表而不是整个服务器上进行。服务器可以同时存储复制表和非复制表。
复制不依赖于分片。每个分片都有自己的独立复制。
我们以在两个节点上的复制表为例。
这里两个节点的ip地址分别为 10.19.134.24 和 10.19.134.27。
1. 参照9.2 节,搭建zookeeper 集群。
2. 在两个节点上分别配置 metrika.xml,首先配置如下内容:
<!-- metrika.xml -->
<yandex>
<clickhouse_remote_servers>
<cluster_1shards_2replicas>
<shard>
<internal_replication>true</internal_replication>
<replica>
<host>10.19.134.24</host>
<port>9000</port>
<user>clickhouse</user>
<password>clickhouse</password>
</replica>
<replica>
<host>10.19.134.27</host>
<port>9000</port>
<user>clickhouse</user>
<password>clickhouse</password>
</replica>
</shard>
</cluster_1shards_2replicas>
</clickhouse_remote_servers>
<zookeeper-servers>
<node index="2">
<host>10.19.134.24</host>
<port>2181</port>
</node>
<node index="3">
<host>10.19.134.27</host>
<port>2181</port>
</node>
</zookeeper-servers>
</yandex>
这里,<internal_replication>true</internal_replication> 表示集群中的表支持自我复制。这是1分片2副本的集群,但它的复制是表级别的行为。
3. 分别编辑两个节点的 metrika.xml, 在 <yandex>…</yandex> 内部,分别添加如下内容,并保存:
在节点 10.19.134.24的 metrika.xml上,添加:
<macros>
<shard>01</shard>
<replica>01</replica>
</macros>
在节点 10.19.134.27的 metrika.xml上,添加:
<macros>
<shard>01</shard>
<replica>02</replica>
</macros>
4. 重启clickhouse
systemctl restart clickhouse-server.service
现在,我们创建多副本的分布式表。
1. 登录任意clickhouse节点,创建全局的数据库 testdb3
create database testdb3 on cluster cluster_1shards_2replicas;
2. 在节点 10.19.134.24 上创建全局的复制表,引擎为 ReplicatedMergeTree:
create table testdb3.person ON cluster cluster_1shards_2replicas
(
id Int32,
name String,
gender Int16,
birthday Date,
cert_num String,
department_id Int32
)
ENGINE = ReplicatedMergeTree('/clickhouse/tables/{shard}/testdb3/person’, '{replica}')
ORDER BY id
SETTINGS index_granularity = 8192;
注意,这里 /clickhouse/tables/{shard}/testdb3/person是这张表在zookeeper中的节点路径(请百度zookeeper-znode)。开头是 /clickhouse/tables/;{shard} 会被自动映射为 metrika.xml 中配置的 macros->shard 的值;testdb3 是数据库名;person 是表名;{replica} 是它在zookeeper中的复制(replica)的名称,会被自动映射为 metrika.xml 中配置的 macros->shard 的值。
我们可以在zookeeper 中看到这张表的路径:
[root@node04 bin]# ./zkCli.sh -server 127.0.0.1
[zk: 127.0.0.1(CONNECTED) 1] ls /clickhouse/tables
[01]
[zk: 127.0.0.1(CONNECTED) 3] ls /clickhouse/tables/01/testdb3/person
Node does not exist: /clickhouse/tables/01/testdb2/person
[zk: 127.0.0.1(CONNECTED) 4] ls /clickhouse/tables/01/testdb3/
Path must not end with / character
[zk: 127.0.0.1(CONNECTED) 5] ls /clickhouse/tables/01/testdb3
[person]
[zk: 127.0.0.1(CONNECTED) 8] ls /clickhouse/tables/01/testdb3/person/replicas
[01, 02]
3. 节点 10.19.134.24 上向 testdb3.person 再插入数据:
insert into testdb3.person (id, name, gender, birthday, cert_num, department_id)
VALUES
(1, 'amy', 0, '1990-01-01 00:00:00', '000000', 1),
(2, 'bob', 1, '1991-01-01 00:00:00', '000001', 1);
4. 在10.19.134.24 上查看表 testdb3.person:
node03 :) select * from testdb3.person;
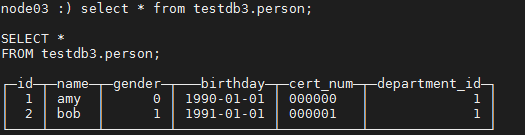
5. 在 10.19.134.27 上查看表 testdb3.person:
node06 :) select * from testdb3.person;

小知识
Replicated 系列的引擎的复制是表自身的行为,与集群无关。
事实上,我们可以在 metrika.xml 中不配置 <clickhouse_remote_servers>标签,只配置<zookeeper-servers>,就可以实现表之间的复制。
例如,我们在两个节点上分别创建表 person,他们的复制路径相同。
在节点1上创建:
create table testdb.person
(
id Int32,
name String,
……
)
ENGINE = ReplicatedMergeTree('/clickhouse/tables/testdb/person’,'replica1')
ORDER BY id
SETTINGS index_granularity = 8192;
在节点2上创建:
create table testdb.person
(
id Int32,
name String,
……
)
ENGINE = ReplicatedMergeTree('/clickhouse/tables/testdb/person’,'replica2')
ORDER BY id
SETTINGS index_granularity = 8192;
这样即可实现两个表之间的复制
9.6 clickhouse 集群扩容
在8.3 节中,我们创建了包含3个节点的集群。如果我们想在这个集群中添加一个新的节点,该如何操作?
下面是在集群中添加一个新节点(10.19.134.27)的方法。
1. 首先在新的节点 10.19.134.27 上安装 clickhouse,方法与相同。
2. 修改新节点上的目录 /etc/clickhouse-server/ 中的各个 xml文件。其内容和原集群中每个节点上相同位置的文件相同。
3. 在每个新旧节点上,修改文件 /etc/clickhouse-server/metrika.xml ,将标签 <cluster_3shards_1replicas></cluster_3shards_1replicas> 修改为
<cluster_4shards_1replicas></cluster_4shards_1replicas>
这里,cluster_4shards_1replicas 是扩容后集群的名称。
同时在路径 yandex -> clickhouse_remote_servers-> cluster_4shards_1replicas 内部添加新节点的信息:
<shard>
<replica>
<host>10.19.134.27</host>
<port>9000</port>
<user>clickhouse</user>
<password>clickhouse</password>
</replica>
</shard>
4. 在每个节点上,重启 clickhouse
systemctl restart clickhouse-server
5. 在新节点上创建数据库,表等数据库对象。使新节点和与老节点上的数据库结构相同。
6. 在集群上重建分布式表。这里以 testdb.person_dist
drop table testdb.person_dist on cluster cluster_4shards_1replicas;
create table testdb.person_dist on cluster cluster_4shards_1replicas
AS testdb.person
ENGINE = Distributed(cluster_4shards_1replicas, testdb, person, department_id);
7. 完成上面的操作后,person_dist 中新增的数据就会分布到四个节点的 person 表中。注意,ClickHouse 不提供数据重分布功能。