一、升级系统内核
目前,CentOS 仅发行版本中的内核支持 Docker。
Docker 运行在 CentOS 7 上,要求系统为64位、系统内核版本为 3.10 以上。
Docker 运行在 CentOS-6.5 或更高的版本的 CentOS 上,要求系统为64位、系统内核版本为 2.6.32-431 或者更高版本。
.
笔者当前环境为centos6.5,内核2.6.32
使用elrepo软件源进行升级,升级之路简单且快速
elrepo是CentOS十分有用的稳定的软件源,与其他软件源不一样的是,这个第三方源主要是提供硬件驱动、内核更新方面的支持,如显卡、无线网卡、内核等等,现在已经支持centos7.x+,更新较快。
1.1 查看centos版本
[root@localhost ~]# cat /etc/centos-release
CentOS release 6.5 (Final)
1.2 导入public key
rpm --import https://www.elrepo.org/RPM-GPG-KEY-elrepo.org
1.3 安装ELRepo到CentOS-6.5中
rpm -ivh http://www.elrepo.org/elrepo-release-6-8.el6.elrepo.noarch.rpm
1.4 安装 kernel-lt(lt=long-term)
yum --enablerepo=elrepo-kernel install kernel-lt -y
1.5 编辑grub.conf文件,修改Grub引导顺序
vim /etc/grub.conf
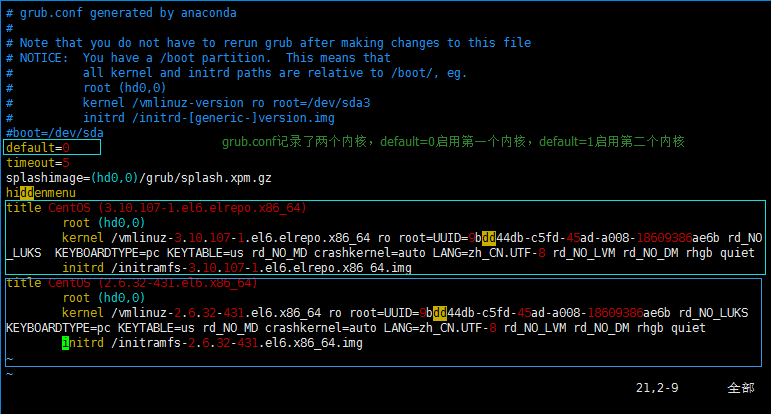
确认刚安装好的内核在哪个位置,然后设置default值(从0开始),一般新安装的内核在第一个位置,所以设置default=0。
1.6 重启,查看内核版本号
[root@localhost ~]# reboot
[root@localhost ~]# uname -r
3.10.107-1.el6.elrepo.x86_64 #升级成功
二、Docker安装
需要注意的是CentOS 6.5与7.0的安装是有一点点不同的,CentOS-6上docker的安装包叫docker-io,并且来源于Fedora epel库,这个仓库维护了大量的没有包含在发行版中的软件,所以先要安装EPEL,而CentOS-7的docker直接包含在官方镜像源的Extras仓库(CentOS-Base.repo下的[extras]节enable=1启用)。前提是都需要联网
2.1 安装epel数据源
yum -y install http://dl.fedoraproject.org/pub/epel/6/x86_64/epel-release-6-8.noarch.rpm
2.2 安装docker
yum install docker-io -y
2.3 启动docker
service docker start
2.4 查看docker版本
[root@localhost ~]# docker version
Client version: 1.7.1
Client API version: 1.19
Go version (client): go1.4.2
Git commit (client): 786b29d/1.7.1
OS/Arch (client): linux/amd64
Server version: 1.7.1
Server API version: 1.19
Go version (server): go1.4.2
Git commit (server): 786b29d/1.7.1
OS/Arch (server): linux/amd64
2.5 查看docker日志
cat /var/log/docker
2.6 测试运行hello-world


[root@localhost ~]# docker run hello-world
Unable to find image 'hello-world:latest' locally
latest: Pulling from hello-world
3619f633e2e6: Pull complete
bef02f2f6467: Pull complete
Digest: sha256:a69dda95faa021234ab2d92118e9539d0175b46587803e32435ea2e534f2db06
Status: Downloaded newer image for hello-world:latest

Hello from Docker!
This message shows that your installation appears to be working correctly.

To generate this message, Docker took the following steps:
 1. The Docker client contacted the Docker daemon.
 2. The Docker daemon pulled the "hello-world" image from the Docker Hub.
 3. The Docker daemon created a new container from that image which runs the
    executable that produces the output you are currently reading.
 4. The Docker daemon streamed that output to the Docker client, which sent it
    to your terminal.

To try something more ambitious, you can run an Ubuntu container with:
 $ docker run -it ubuntu bash

Share images, automate workflows, and more with a free Docker ID:
 https://cloud.docker.com/

For more examples and ideas, visit:
 https://docs.docker.com/engine/userguide/
由于本地没有hello-world这个镜像,所以会下载一个hello-world的镜像,并在容器内运行。
三、卸载docker
[root@localhost ~]# yum list installed|grep docker
docker-io.x86_64                     1.7.1-2.el6               @epel
[root@localhost ~]# yum -y remove docker-io.x86_64
[root@localhost ~]# rm /var/lib/docker -rf
参考:
http://www.iyeele.com/582.html
http://www.runoob.com/docker/centos-docker-install.html
https://docs.docker.com/engine/installation/linux/docker-ee/centos/#os-requirements
https://yeasy.gitbooks.io/docker_practice/content/install/centos.html