一、开发背景介绍:
1. 要开发什么工具?
最近和公司里的几位同事凑钱买了个的士发票打印机(报销用,你懂的^_^),内容可自己写,比如金额,时间,路程等等。发票内容的输出位置和文字样式要跟真实发票的一样,否则容易穿帮(嘻嘻...)。但位置、样式要手工调,非常麻烦。所以如果有个工具能够帮助我们调好位置和文字样式的话,那就方便省事多了!!
2. 为什么强调要快速开发?
其实已经有个同事开发出这样的工具了,所以一开始我也没想过再造一个出来。但是当我好奇的问他用什么语言开发的时候,他来了句“你可以自己开发一个嘛!我用C#啊!”!我如果没理解错,这是向我宣战了。而我接受了这个挑战。那天是周五快下班的时候,我决定下周一给他看看我的版本!
3.我为什么选择SWT,而不选择Swing?
Swing有太深的Java UI的烙印--UI控件的风格过于简陋。既然要PK,起码外观上不能输。而SWT的好处是它会调用底层操作系统提供的UI控件,因此UI风格比较友好,用户觉得亲切熟悉。还有一个好处是可在Eclipse上进行SWT可视化开发,这能极大提高开发速度!就它了!
终于说到正题了。
二、准备工作
1.Eclipse我用的是3.5 Galileo。
2.可视化工具:WindowBuilder ,可通过Eclipse在线安装,这里不多说了,可google下。
3.jar包转exe工具:Jsmooth。
三、 实际开发
1. 先看看成果
2. 开发要点
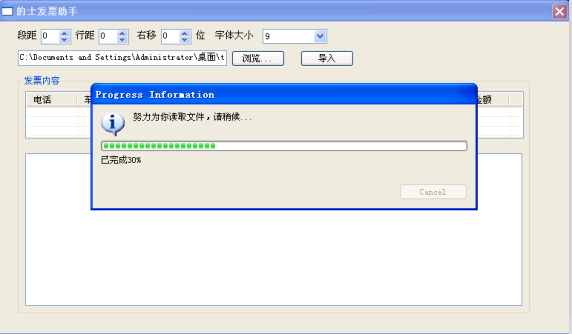
2.1读取Excel文件将内容显示到表格中
核心代码如下:
2.1.1 “导入”按钮的触发动作
- Button button_1 = new Button(shell, SWT.NONE);
- button_1.addSelectionListener(new SelectionAdapter() {
- @Override
- public void widgetSelected(SelectionEvent selectionevent) {
- String filePath = text.getText();
- showProgressDialog(filePath);
- }
- });
- private void showProgressDialog(final String filePath) {
- try {
- final Display display = Display.getCurrent();
- ProgressMonitorDialog progressDialog = new ProgressMonitorDialog(display.getActiveShell());
- final List<String[]> contents = new ArrayList<String[]>();
- IRunnableWithProgress progRunnable = new IRunnableWithProgress() {
- public void run(IProgressMonitor iprogressmonitor)
- throws InvocationTargetException, InterruptedException {
- int totalRow = 0;
- try {
- InputStream in = ExcelUtils.readExcelFile(filePath);
- // IProgressMonitor 为监视器,可监控任务进度,此处设定任务总量为100个单位
- iprogressmonitor.beginTask("努力为你读取文件,请稍候...", 100);
- Sheet sheet = ExcelUtils.retreiveSheet(in, 0);
- totalRow = sheet.getRows();
- int totalCol = sheet.getColumns();
- int rowStart = 0;
- int rowEnd = 0;
- int temp = totalRow / 10;
- int segLength = temp > 0 ? temp : 1;
- // 把任务人为的分成10端
- for(int seg = 1; seg <= 10 && !iprogressmonitor.isCanceled(); seg++) {
- rowStart = rowEnd;
- rowEnd += segLength;
- for(int row = rowStart; row < rowEnd; row++) {
- List<String> rowContent = new ArrayList<String>();
- for(int c = 0; c < totalCol; c++) {
- Cell cell = sheet.getCell(c, row);
- rowContent.add(cell.getContents());
- }
- contents.add(rowContent.toArray(new String[0]));
- }
- //每完成一段监视器增加10个单位
- iprogressmonitor.worked(10);
- iprogressmonitor.subTask("已完成"+seg*10+"%");
- if(rowEnd >= totalRow) {
- break;
- }
- }
- // 完成剩余的记录(如果有的话)
- for(int k = rowEnd; k < totalRow; k++) {
- List<String> rowContent = new ArrayList<String>();
- for(int c = 0; c < totalCol; c++) {
- Cell cell = sheet.getCell(c, k);
- rowContent.add(cell.getContents());
- }
- contents.add(rowContent.toArray(new String[0]));
- }
- // 在非UI线程中更新UI,必须利用asyncExec 或者 syncExec
- display.asyncExec(new Runnable() {
- public void run() {
- // 向表格控件添加数据
- addTableItems(table,contents);
- }
- });
- iprogressmonitor.done();
- // 如果此时为用户取消的操作
- if (iprogressmonitor.isCanceled()) {
- throw new InterruptedException("用户已取消操作");
- }
- }catch(Exception ex) {
- ex.printStackTrace();
- showMessgeBox(shell,ex.getMessage());
- }
- // showMessgeBox(shell,"已成功为你读取" + totalRow + "条记录.");
- }
- };
- progressDialog.run(true, false, progRunnable);
- }catch(Exception ex) {
- ex.printStackTrace();
- }
- }
- private void addTableItems(Table table,List<String[]> contents) {
- for(String[] rowContents : contents) {
- TableItem tableItem = new TableItem(table, SWT.NONE);
- tableItem.setText(rowContents);
- }
- }
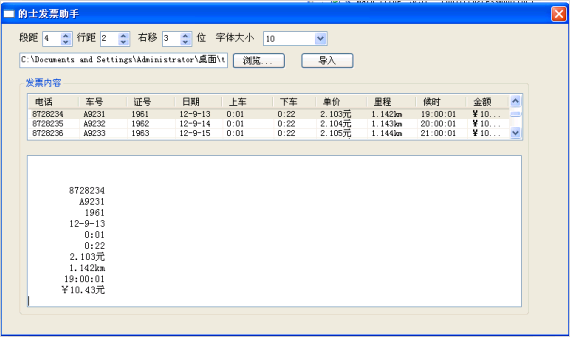
2.2 选中某一行数据后将数据格式化显示
2.2.1效果如下:
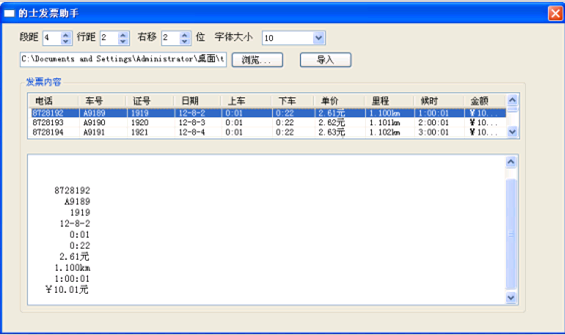
2.2.2 核心代码如下
- table.addListener(SWT.MouseUp, new Listener() {
- public void handleEvent(Event event) {
- int sTextWidth = initStyledText(Integer.parseInt(combo.getItem(combo
- .getSelectionIndex())),Integer.parseInt(spinner_3.getText()), Integer.parseInt(spinner_1
- .getText()));
- int charsNum = new Double(Math.ceil(sTextWidth/8.0)).intValue();
- int colCount = table.getColumnCount();
- TableItem[] selectedItems= table.getSelection();
- StringBuffer sb = new StringBuffer();
- int topLine = Integer.parseInt(spinner.getText());
- for(int line = 0; line < topLine; line++) {
- sb.append(LINE_SEPARATOR);
- }
- for(int i = 0; i < selectedItems.length; i++) {
- TableItem item = selectedItems[i];
- for(int j=0;j<colCount;j++) {
- String realText = item.getText(j);
- if(realText.length() < charsNum) {
- int spaces = charsNum - realText.getBytes().length;
- for(int k = 0;k < spaces;k++) {
- sb.append(" ");
- }
- }
- sb.append(item.getText(j)).append(LINE_SEPARATOR);
- }
- }
- styledText.setText(sb.toString());
- }
- });
- }
- /**
- * 文本样式,如字体大小,行距,对齐等用StyledText来控制。
- * @param fontSize 字体大小
- * @param rightMove 右移位数
- * @param lineSpacing 行距
- * @return
- * @version: v1.0.0
- * @author: <a href="mailto:flysqrlboy@gmail.com">flysqrlboy</a>
- * @date: 2013-1-27
- */
- private int initStyledText(int fontSize,int rightMove,int lineSpacing) {
- styleTextFont = SWTResourceManager.getFont("宋体", fontSize, SWT.NORMAL);
- styledText.setFont(styleTextFont);
- styledText.setAlignment(SWT.LEFT);
- styledText.setJustify(true);
- styledText.setLineSpacing(lineSpacing);
- return styledTextSrcWidth + rightMove * 8;
- }
四、jar包转成Exe执行文件
打成Exe可执行文件的目的是双击即可运行,当然运行目前这个版本的exe文件要求用户的电脑中要有Java 运行时环境(JRE)。如果要在没有JRE的电脑中运行,则在转exe时把jre包一起打进exe文件中即可。
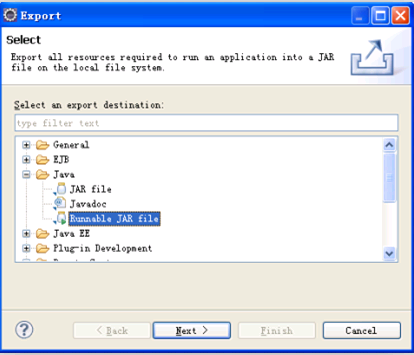
1.打jar包
这里要注意的是,我们的目标是双击exe即可运行,无需依赖外部的资源,所以打jar包时要把所有依赖的jar都打进一个jar里。
如下图操作:

2. 用Jsmooth转成EXE
这里只说Application的配置,如下图:
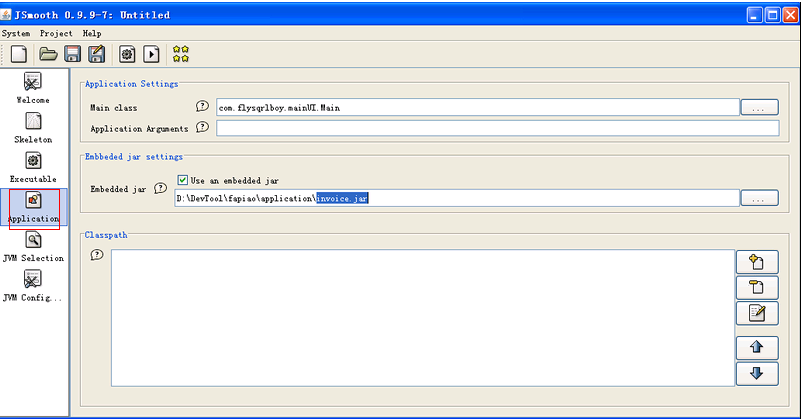
由于invoice.jar已经是可运行的jar(双击运行),所以上图中的Classpath无需任何设置,即不必依赖外部资源。
至此,工具开发完成。周末两天去除生活上一些杂七杂八的琐事,开发时间应该在18小时内。
工具本身很轻巧没什么难度,不过把一个想法鼓捣出来的过程还是挺爽的!
本文出自 “鼯鼠男孩” 博客,请务必保留此出处http://flysqrlboy.blog.51cto.com/5027074/1129782