一、实验目的
(1)通过实验学习日志采集工具 Flume 的安装和使用方法;
(2)掌握采用 Flume 作为 Spark Streaming 数据源的编程方法。
二、实验平台
操作系统: Ubuntu16.04
Spark 版本:2.1.0
Flume 版本:1.7.0
三、实验内容和要求
1.安装 Flume
Flume 是 Cloudera 提供的一个分布式、可靠、可用的系统,它能够将不同数据源的海量日志数据进行高效收集、聚合、移动,最后存储到一个中心化数据存储系统中。Flume 的核心是把数据从数据源收集过来,再送到目的地。请到 Flume 官网下载 Flume1.7.0 安装文件,下载地址如下:http://www.apache.org/dyn/closer.lua/flume/1.7.0/apache-flume-1.7.0-bin.tar.gz或者也可以直接到本教程官网的 “ 下 载 专 区 ” 中 的 “ 软 件 ” 目 录 中 下 载apache-flume-1.7.0-bin.tar.gz。下载后,把 Flume1.7.0 安装到 Linux 系统的“/usr/local/flume”目录下,具体安装和使用方法可以参考教程官网的“实验指南”栏目中的“日志采集工具 Flume 的安装与使用方法”。

2. 使用 Avro 数据源测试 Flume
Avro 可以发送一个给定的文件给 Flume,Avro 源使用 AVRO RPC 机制。请对 Flume的相关配置文件进行设置,从而可以实现如下功能:在一个终端中新建一个文件helloworld.txt(里面包含一行文本“Hello World”),在另外一个终端中启动 Flume 以后,可以把 helloworld.txt 中的文本内容显示出来。
创建agent配置文件
在/flume/conf/下创建文件avro.conf,内容如下:
a1.sources = r1
a1.sinks = k1
a1.channels = c1

# Describe/configure the source
a1.sources.r1.type = avro
a1.sources.r1.channels = c1
a1.sources.r1.bind = 0.0.0.0
a1.sources.r1.port = 4141

# Describe the sink
a1.sinks.k1.type = logger

# Use a channel which buffers events in memory
a1.channels.c1.type = memory
a1.channels.c1.capacity = 1000
a1.channels.c1.transactionCapacity = 100

# Bind the source and sink to the channel
a1.sources.r1.channels = c1
a1.sinks.k1.channel = c1
将helloworld.txt放在flume的主目录路径下。
启动agent
./bin/flume-ng agent agent -c conf -f ./conf/avro.conf -n a1 -Dflume.root.logger=INFO,console
新建一个命令终端,使用avro-client发送文件
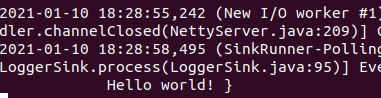
./bin/flume-ng avro-client -H localhost -p 4141 -F ./helloworld.txt
这是就可以在第一个命令终端中看到输出的“hello world!”了
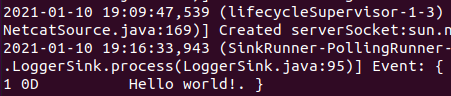
3. 使用 netcat 数据源测试 Flume
请对 Flume 的相关配置文件进行设置,从而可以实现如下功能:在一个 Linux 终端(这里称为“Flume 终端”)中,启动 Flume,在另一个终端(这里称为“Telnet 终端”)中,输入命令“telnet localhost 44444”,然后,在 Telnet 终端中输入任何字符,让这些字符可以顺利地在 Flume 终端中显示出来。
在“conf”目录下创建“flume-conf.properties.example”文件并编辑:
# example.conf: A single-node Flume configuration

# Name the components on this agent
a1.sources = r1
a1.sinks = k1
a1.channels = c1

# Describe/configure the source
a1.sources.r1.type = netcat
a1.sources.r1.bind = localhost
a1.sources.r1.port = 44444

# Describe the sink
a1.sinks.k1.type = logger

# Use a channel which buffers events in memory
a1.channels.c1.type = memory
a1.channels.c1.capacity = 1000
a1.channels.c1.transactionCapacity = 100

# Bind the source and sink to the channel
a1.sources.r1.channels = c1
a1.sinks.k1.channel = c1
启动一个agent:
./bin/flume-ng agent --conf conf --conf-file conf/flume-conf.properties.example --name a1 -Dflume.root.logger=INFO,console
新打开一个终端(Tenlent终端),输入命令:
telnet localhost 44444
终端响应:
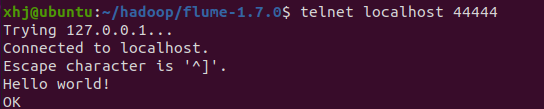
telnet localhost 44444
Trying 127.0.0.1...
Connected to localhost.
Escape character is '^]'.
Hello world!
OK
输入“Hello world!”后tenlent终端输出ok,同时在Flume终端也会显示Hello world!
4.使用 Flume 作为 Spark Streaming 数据源
Flume 是非常流行的日志采集系统,可以作为 Spark Streaming 的高级数据源。请把 FlumeSource 设置为 netcat 类型,从终端上不断给 Flume Source 发送各种消息,Flume 把消息汇集到 Sink,这里把 Sink 类型设置为 avro,由 Sink 把消息推送给 Spark Streaming,由自己编写的 Spark Streaming 应用程序对消息进行处理。