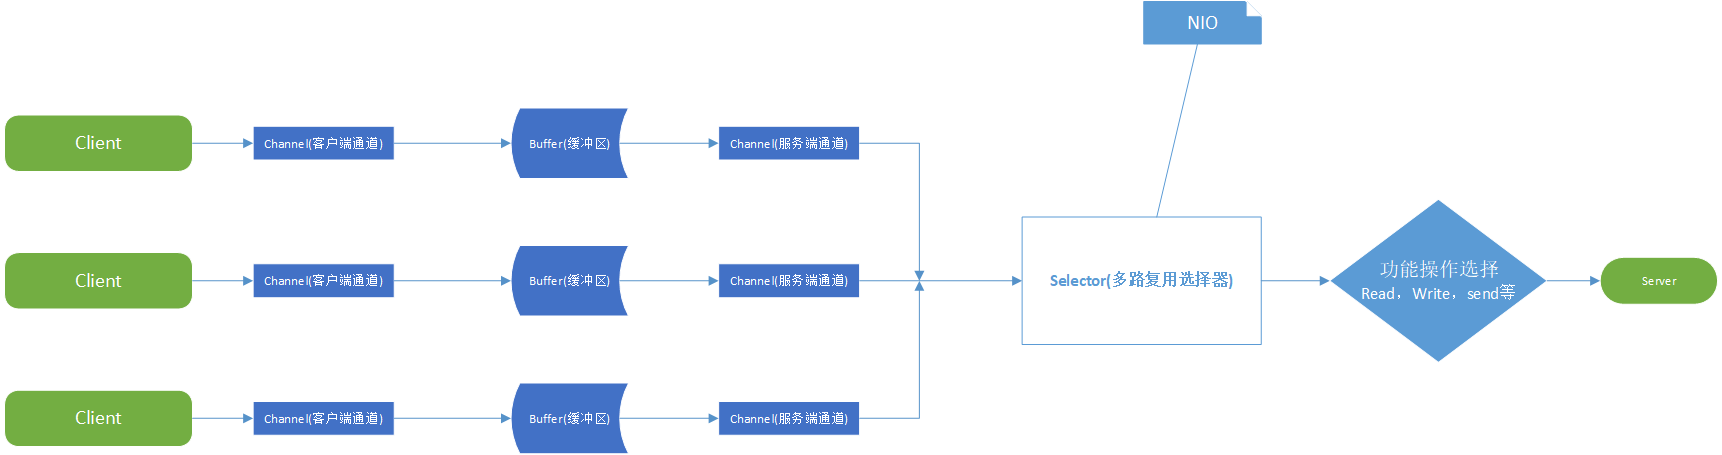
1.简单画的NIO流程图
2.代码实现编程:
Client:
package nio;

import java.io.IOException;
import java.net.InetSocketAddress;
import java.nio.ByteBuffer;
import java.nio.channels.SocketChannel;

/**
 *
 * @Description:同步非阻塞
 * @date 2018年8月4日,下午4:07:30
 */
public class Client {

    //需要一个Selector
    public static void main(String[] args) {

        //创建连接的地址
        InetSocketAddress address = new InetSocketAddress("127.0.0.1", 8765);

        //声明连接通道
        SocketChannel sc = null;

        //建立缓冲区
        ByteBuffer buf = ByteBuffer.allocate(1024);

        try {
            //打开通道
            sc = SocketChannel.open();
            //进行连接
            sc.connect(address);

            while(true){
                //定义一个字节数组,然后使用系统录入功能:
                byte[] bytes = new byte[1024];
                //读取控制台写入的数据
                System.in.read(bytes);

                //把数据放到缓冲区中
                buf.put(bytes);
                //对缓冲区进行复位
                buf.flip();
                //写出数据
                sc.write(buf);
                //清空缓冲区数据
                buf.clear();
            }
        } catch (IOException e) {
            e.printStackTrace();
        } finally {
            if(sc != null){
                try {
                    sc.close();
                } catch (IOException e) {
                    e.printStackTrace();
                }
            }
        }

    }

}
Server:
package nio;

import java.io.IOException;
import java.net.InetSocketAddress;
import java.nio.ByteBuffer;
import java.nio.channels.ClosedChannelException;
import java.nio.channels.SelectionKey;
import java.nio.channels.Selector;
import java.nio.channels.ServerSocketChannel;
import java.nio.channels.SocketChannel;
import java.util.Iterator;

public class Server implements Runnable{
    //1 多路复用器(管理所有的通道)
    private Selector seletor;
    //2 建立缓冲区
    private ByteBuffer readBuf = ByteBuffer.allocate(1024);
    //3
    private ByteBuffer writeBuf = ByteBuffer.allocate(1024);
    public Server(int port){
        try {
            //1 打开路复用器
            this.seletor = Selector.open();
            //2 打开服务器通道
            ServerSocketChannel ssc = ServerSocketChannel.open();
            //3 设置服务器通道为非阻塞模式
            ssc.configureBlocking(false);
            //4 绑定地址
            ssc.bind(new InetSocketAddress(port));
            //5 把服务器通道注册到多路复用器上,并且监听阻塞事件
            ssc.register(this.seletor, SelectionKey.OP_ACCEPT);

            System.out.println("Server start, port :" + port);

        } catch (IOException e) {
            e.printStackTrace();
        }
    }

    @Override
    public void run() {
        while(true){
            try {
                //1 必须要让多路复用器开始监听
                this.seletor.select();
                //2 返回多路复用器已经选择的结果集
                Iterator<SelectionKey> keys = this.seletor.selectedKeys().iterator();
                //3 进行遍历
                while(keys.hasNext()){
                    //4 获取一个选择的元素
                    SelectionKey key = keys.next();
                    //5 直接从容器中移除就可以了
                    keys.remove();
                    //6 如果是有效的
                    if(key.isValid()){
                        //7 如果为阻塞状态
                        if(key.isAcceptable()){
                            this.accept(key);
                        }
                        //8 如果为可读状态
                        if(key.isReadable()){
                            this.read(key);
                        }
                        //9 写数据
                        if(key.isWritable()){
                            this.write(key); //ssc
                        }
                    }

                }
            } catch (IOException e) {
                e.printStackTrace();
            }
        }
    }

    private void write(SelectionKey key){
        ServerSocketChannel ssc =  (ServerSocketChannel) key.channel();
        try {
            ssc.register(this.seletor, SelectionKey.OP_WRITE);
        } catch (ClosedChannelException e) {
            e.printStackTrace();
        }
    }

    private void read(SelectionKey key) {
        try {
            //1 清空缓冲区旧的数据
            this.readBuf.clear();
            //2 获取之前注册的socket通道对象
            SocketChannel sc = (SocketChannel) key.channel();
            //3 读取数据
            int count = sc.read(this.readBuf);
            //4 如果没有数据
            if(count == -1){
                key.channel().close();
                key.cancel();
                return;
            }
            //5 有数据则进行读取 读取之前需要进行复位方法(把position 和limit进行复位)
            this.readBuf.flip();
            //6 根据缓冲区的数据长度创建相应大小的byte数组,接收缓冲区的数据
            byte[] bytes = new byte[this.readBuf.remaining()];
            //7 接收缓冲区数据
            this.readBuf.get(bytes);
            //8 打印结果
            String body = new String(bytes).trim();
            System.out.println("Server : " + body);

            // 9..可以写回给客户端数据

        } catch (IOException e) {
            e.printStackTrace();
        }

    }

    private void accept(SelectionKey key) {
        try {
            //1 获取服务通道
            ServerSocketChannel ssc =  (ServerSocketChannel) key.channel();
            //2 执行阻塞方法
            SocketChannel sc = ssc.accept();
            //3 设置阻塞模式
            sc.configureBlocking(false);
            //4 注册到多路复用器上,并设置读取标识
            sc.register(this.seletor, SelectionKey.OP_READ);
        } catch (IOException e) {
            e.printStackTrace();
        }
    }

    public static void main(String[] args) {

        new Thread(new Server(8765)).start();;
    }


}