三方登录微博
-
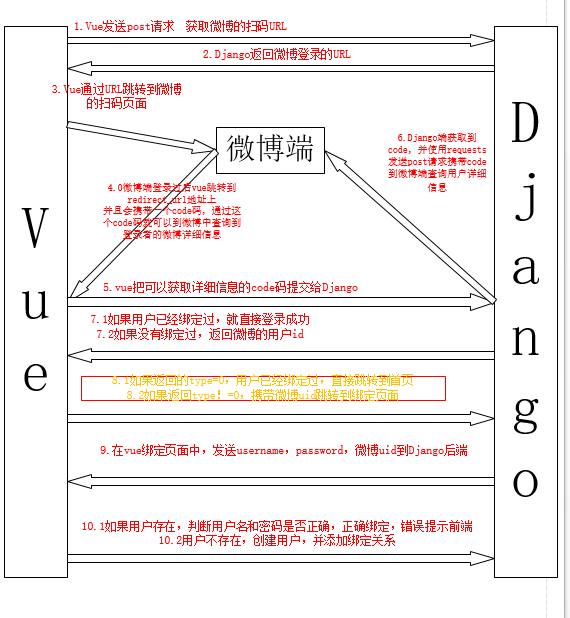
流程图 必会
-
生成微博授权URL接口
-
创建apps/oauth模块进行oauth认证
-
'''2.1 在apps文件夹下新建应用: oauth'''
cd syl/apps
python ../manage.py startapp oauth # 切换到apps文件夹下执行创建命令

'''2.2 添加子路由: oauth/urls.py'''
from django.urls import path
from . import views
urlpatterns = [

]

'''2.3 在syl/settings.py中添加应用'''
INSTALLED_APPS = [
	'oauth.apps.OauthConfig',
]

'''2.4 在syl/urls.py主路由中添加'''
urlpatterns = [
path('oauth/', include('oauth.urls')),
-
-
添加子路由: oauth/urls.py
-
urlpatterns = [
		path('weibo/', views.WeiboUrl.as_view()),
		# /oauth/weibo/ 返回微博登录地址
]
-
-
syl/settings.py 中配微博地址
-
-
1.3 视图函数: oauth/views.py
-
import requests
from django.shortcuts import render

# Create your views here.
from rest_framework.permissions import AllowAny
from rest_framework.response import Response
from rest_framework.views import APIView
from urllib.parse import urlencode
from .models import OauthUser
from rest_framework_jwt.serializers import jwt_payload_handler, jwt_encode_handler
from apps.user.utils import jwt_response_payload_handler
from apps.user.models import User

# 生成前端跳转到微博扫码页面的url
class WeiboUrl(APIView):
    '''
    生成微博的登陆页面路由地址
    https://api.weibo.com/oauth2/authorize? # 微博oauth认证地址
    client_id=4152203033& # 注册开发者id
    response_type=code&
    redirect_uri=http://127.0.0.1:8888/oauth/callback/ # 获取code后将code回
    调给后端地址
    '''
    # 自定义权限类
    permission_classes = (AllowAny,)

    def post(self, request):
        url = 'https://api.weibo.com/oauth2/authorize?'  # 微博授权的url地址
        data = {
            'client_id': '3757426334',  # WEIBO_APP_KEY,
            'response_type': 'code',
            'redirect_uri': 'http://127.0.0.1:8888/oauth/callback/',  # VUE的回调,微博后台授权的回调地址
        }
        weibo_url = url + urlencode(data)
        # https://api.weibo.com/oauth2/authorize? client_id = 4152203033 & response_type = code & redirect_uri = http://127.0.0.1:8000/api/ weibo_back /
        # return Response({'weibo_url': weibo_url})
        return Response({'code': '0', 'msg': '成功', 'data': {'url': weibo_url}})
-
-
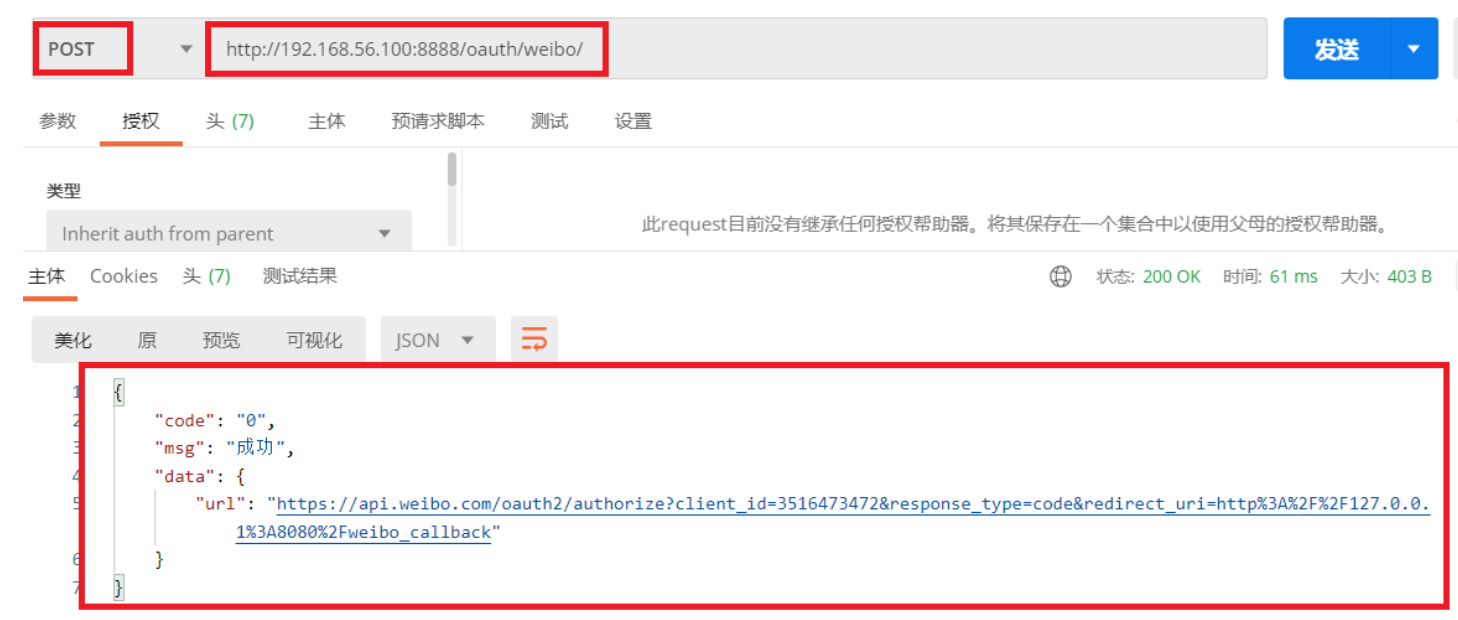
测试生成微博售前URL接口
-
http://192.168.56.100:8888/oauth/weibo/ -
-
在浏览器访问返回地址即可回到新浪扫码界面
-

-
-
-
微博回调接口
-
oauth/urls.py 中添加路由
-
urlpatterns = [
	path('weibo/callback/',views.OauthWeiboCallback.as_view()), #/oauth/weibo/callback/
]
-
-
oauth/views.py 中添加试图函数
-
# 通过vue前端传入的code,微博身份验证
class OauthWeiboCallback(APIView):
    # 自定义权限类
    permission_classes = (AllowAny,)

    def post(self, request):
        # 接收vue端传过来的code(微博的用户code)
        # 1.使用微博用户code+微博开发者账号信息换取微博的认证access_token
        code = request.data.get('code')
        data = {
            'client_id': '3757426334',
            'client_secret': 'c1a95726376bddd06de0143818b35cc6',
            'grant_type': 'authorization_code',
            'code': code,
            'redirect_uri': 'http://127.0.0.1:8888/oauth/callback/',
        }
        url = 'https://api.weibo.com/oauth2/access_token'
        data = requests.post(url=url, data=data).json()  # 拿取请求的返回结果
        # access_token = data.get('uid')  # 获取到的微博token
        weibo_uid = data.get('uid')  # 获取到少码用户的id
        # 2. 根据uid 查询绑定情况
        try:
            oauth_user = OauthUser.objects.get(uid=weibo_uid, oauth_type='1')
        except Exception as e:
            oauth_user = None
        # 返回动作, 登录成功/需要绑定用户 type 0 登录成功, 1, 授权成功, 需要绑定
        if oauth_user:
            # 4. 如果绑定了, 返回token, 登录成功
            user = oauth_user.user
            payload = jwt_payload_handler(user)
            token = jwt_encode_handler(payload)
            # jwt_response_payload_handler为user模块定义的jwt返回的信息
            data = jwt_response_payload_handler(token, user)
            data['type'] = '0'  # 指定为登录成功
            return Response({'code': 0, 'msg': '登录成功', 'data': data})
        else:
            # 5. 如果没绑定, 返回标志, 让前端跳转到绑定页面
            return Response({'code': 0, 'msg': '授权成功', 'data': {'type': '1',
                                                                'uid': weibo_uid}})
-
-
oauth/models.py 中添加用户绑定模型
-
from django.db import models # Create your models here. # 把三方的用户信息,和本地的用户信息进行绑定 class OauthUser(models.Model): OAUTHTYPE = ( ('1', 'weibo'), ('2', 'weixin'), ) uid = models.CharField('三方用户id', max_length=64) # 三方用户id user = models.ForeignKey('user.User', on_delete=models.CASCADE) # 本地用户外键,关联User表 oauth_type = models.CharField('认证类型', max_length=10, choices=OAUTHTYPE) # 1,2 ... -
迁移数据库
-
python manager.py makemigrations
python manager.py migrate
-
-
-
4. ## 微博绑定用户接口
-
oauth/urls.py 中添加路由
-
urlpatterns = [
	path('weibo/binduser/',views.OauthWeiboBindUser.as_view()), #/oauth/weibo/callback/
]
-
-
oauth/views.py 中添加试图函数
-
class OauthWeiboBindUser(APIView):
    permission_classes = (AllowAny,)

    def post(self, request):

        # 绑定用户, 1. 已注册用户, 2. 未注册用户
        # 1.1 获取用户名, 密码, weibo_uid
        username = request.data.get('username')
        password = request.data.get('password')
        weibo_uid = request.data.get('weibo_uid')
        if not all([username, password, weibo_uid]):
            return Response({'code': 999, 'msg': '参数不全'})
        # 0.判断是否存在此用户
        try:
            user = User.objects.get(username=username)
        except Exception as e:
            user = None
        # 1. 已注册用户
        if user:
            # 1.2 , 如果存在就验证 密码, 验证通过,就绑定, 返回token,登录成功
            if user.check_password(password):
                ou = OauthUser(uid=weibo_uid, user=user, oauth_type='1')
                ou.save()
                payload = jwt_payload_handler(user)  # 通过user对象获取到jwt的                payload信息
                token = jwt_encode_handler(payload)  # 生成token
                data = jwt_response_payload_handler(token, user)
                data['type'] = '0'  # 指定为登录成功
                return Response({'code': 0, 'msg': '登录成功', 'data': data})
            else:
                return Response({'code': 999, 'msg': '密码错误'})
        else:
            # 2. 未注册用户
            # 2.1 生成新用户, 设置用户名密码, 保存, 然后绑定, 返回token, 登录成功
            user = User(username=username)
            user.set_password(password)
            user.save()
            ou = OauthUser(uid=weibo_uid, user=user, oauth_type='1')
            ou.save()
            payload = jwt_payload_handler(user)
            token = jwt_encode_handler(payload)
            data = jwt_response_payload_handler(token, user)
            data['t y p e'] = '0'  # 指定为登录成功
            returnResponse({'code': 0, 'msg': '登录成功', 'data': data})
-