1. spring整合struts的基本操作见我的上一篇博文:https://www.cnblogs.com/wyhluckdog/p/10140588.html,这里面将spring与struts2框架整合起来,并且实现了action获取service,说明spring与struts2框架已经建立联系,互通了,但是这种使用web工厂的方式太麻烦了,在开发中并不会使用这种方法,所以我就要介绍spring整合struts2框架的另外一种方法。目前有两种方法,现在介绍第一种方式,第二种方式见我的下一篇博文:https://www.cnblogs.com/wyhluckdog/p/10144175.html。
2. 因为导入的struts2-spring-plugin-2.3.24.jar 包自带一个配置文件 struts-plugin.xml ,该配置文件中有如下代码:<constant name="struts.objectFactory" value="spring" /> 开启一个常量,如果该常量开启,那么下面的常量就可以使用struts.objectFactory.spring.autoWire = name,该常量是可以让Action的类来自动装配Bean对象!!
3.更改CustomerAction代码,不是通过原来的web工厂的方式,而是通过数据封装的方式(使用了里面的模型封装),代码如下:
package com.huida.web;

import org.apache.struts2.ServletActionContext;
import org.springframework.context.ApplicationContext;
import org.springframework.context.support.ClassPathXmlApplicationContext;
import org.springframework.web.context.WebApplicationContext;
import org.springframework.web.context.support.WebApplicationContextUtils;

import com.huida.domain.Customer;
import com.huida.service.CustomerService;
import com.opensymphony.xwork2.ActionSupport;
import com.opensymphony.xwork2.ModelDriven;

public class CustomerAction extends ActionSupport implements ModelDriven<Customer>{

    //手动实例化对象
    //private Customer customer=new Customer();

    private CustomerService customerService;
    public void setCustomerService(CustomerService customerService) {
        this.customerService = customerService;
    }

    /*
     * 保存客户的方法
     */
    public String save(){
        System.out.println("Action中执行了save方法");
        customerService.save();
        return NONE;
    }

    @Override
    public Customer getModel() {

        return null;
    }
}
4.action由struts2创建,所以需要在strutsx.xml中配置action,配置内容为:
<?xml version="1.0" encoding="UTF-8" ?>
<!DOCTYPE struts PUBLIC
    "-//Apache Software Foundation//DTD Struts Configuration 2.3//EN"
    "http://struts.apache.org/dtds/struts-2.3.dtd">

<struts>
    <package name="crm" namespace="/" extends="struts-default">
        <action name="customer_*" class="com.huida.web.CustomerAction" method="{1}">
            <result name=""></result>
        </action>
    </package>
</struts>
5.在applicationContext.xml中配置service,这样在加载配置文件的时候会扫描到CustomerService,然后为其创建对象,配置内容为:
<?xml version="1.0" encoding="UTF-8"?>
<beans xmlns="http://www.springframework.org/schema/beans"
    xmlns:xsi="http://www.w3.org/2001/XMLSchema-instance"
    xmlns:context="http://www.springframework.org/schema/context"
    xmlns:aop="http://www.springframework.org/schema/aop"
    xmlns:tx="http://www.springframework.org/schema/tx"
    xsi:schemaLocation="http://www.springframework.org/schema/beans
    http://www.springframework.org/schema/beans/spring-beans.xsd
    http://www.springframework.org/schema/context
    http://www.springframework.org/schema/context/spring-context.xsd
    http://www.springframework.org/schema/aop
    http://www.springframework.org/schema/aop/spring-aop.xsd
    http://www.springframework.org/schema/tx
    http://www.springframework.org/schema/tx/spring-tx.xsd">

    <bean id="customerService" class="com.huida.service.CustomerServiceImpl">

    </bean>
</beans>
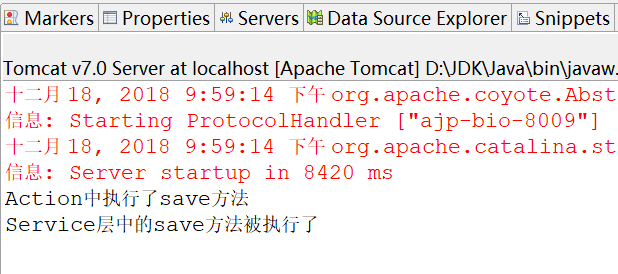
6. 我们可以验证一下struts与spring整合是否成功。
启动服务器-->在浏览器中输入http://localhost:8080/ssh1-->在页面中点击客户管理-->新增客户-->点击保存按钮。在控制台上输出如下内容:
通过以上步骤我们便将struts与spring通过传统的方法整合起来了。但是这种整合不是我推荐的方法,所以在下一篇博文中我就对将我推荐的方法进行总结。