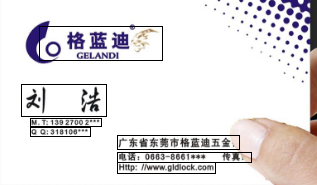
在获取文字识别数据之后,对数据进行wx:for循环加了边框如图效果:
|
需求:点击不同边框获取不同文字,再次点击取消选中;选中背景为#999;
<view wx:for="{{img_dataVal}}" wx:for-item="item" class='text_list {{item.is_hide?"change_bg":""}}' style='left:{{item.location.left/bili}}px;top:{{item.location.top/bili}}px;{{item.location.width/bili}}px;height:{{item.location.height/bili}}px' data-numid="{{index}}" bindtap='get_numid'>

  </view>
当然是通过三目运算符了,但是在对其进行操作后,所有样式都会改变;所有我们需要一个唯一的属性来判断其是否被选中;
img_dataVal的数据结构为
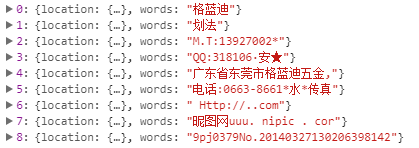
|
因为是第三方接口无法添加多余返回数据属性,那只好自己添加啦;
具体这样操作:每次点击时我在img_dataVal的每条数据里新增一个is_hide属性;
if (this.data.img_dataVal[numid].is_hide){
      this.data.img_dataVal[numid].is_hide = !this.data.img_dataVal[numid].is_hide;
    }else{
      this.data.img_dataVal[numid].is_hide = true;
    }
不要忘了存储数据:
this.setData({ img_dataVal: this.data.img_dataVal})
每次点击时进行判断,然后在dom中对is_hide进行状态进行判断,来动态添加class名
class='text_list {{item.is_hide?"change_bg":""}}'
实现效果为:
|
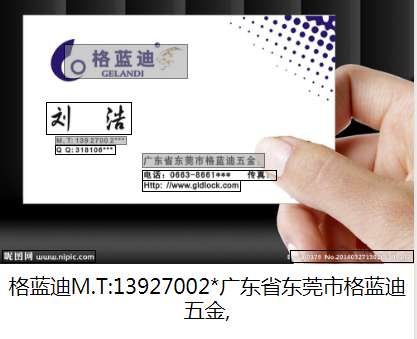
再次点击会取消选中状态;
因为拍照和选择相册等,图片尺寸不一致;
怎么让图片进行全屏放置,又不失真呢,当然就是等比缩放了;
wx.chooseImage({
      count: 1,
      sizeType: ['compressed'],
      sourceType: ['album', 'camera'],
      success: function (res) {
        that.setData({ img_url: res.tempFilePaths[0] })
        wx.getImageInfo({
          src: res.tempFilePaths[0],
          success: function (res) {
            that.setData({ img_w: res.width})
            that.setData({ img_h: res.height})
            that.setData({ bili: res.width / wx.getSystemInfoSync().windowWidth})
            that.setData({ wx_wx.getSystemInfoSync().windowWidth })
          }
        })
选择图片以后获取屏幕宽度wx.getSystemInfoSync().windowWidth,图片宽度设置为屏幕宽度;
计算图片实际宽度与屏幕宽度的比例,根据这个比例来控制高度等信息。
思路给你们,操作在于你们了。