.NET Hash 简单实例(新手教程)
.NET框架中提供了许多Hash类,每种算法的实现方式不同,但是在使用层面上,.NET为我们提供了几乎一致的操作,所谓一通百通。在本节不打算把所有的算法都做演示,因为这样既没必要性也鄙视读者的智商。
关于SHA1我们选用托管实现SHA1Managed类做演示。在实际应用中,我建议各位读者尽可能的使用托管实现,因为基于加密服务的实现对特定的操作系统环境有依赖性。
代码清单1-1演示了简单的Hash应用,将一个字符串散列之后保存散列值,然后对字符串做验证操作。
代码清单 1-1 SHA1Managed类的简单应用
class Program
{
static SHA1Managed sha1M = new SHA1Managed();
static void Main(string[] args)
{
string testString = "大家好,我是xuanhun,欢迎阅读我的文章!";
byte[] hashY = GetHashData(testString,testString);
string testString1 = "大家好,我是xuanhun,欢迎阅读我的文章!";
byte[] hashY1 = GetHashData(testString1,testString1);
string ChangedString = "大家好,我是xuanhun,欢迎阅读我的文章";
byte[] hashChange = GetHashData(ChangedString,ChangedString);
Console.Read();
}
private static byte[] GetHashData(string s,string ys)
{
Console.WriteLine("{0}:",ys);
byte[] buffer = Encoding.UTF8.GetBytes(s);
byte[]hashBytes= sha1M.ComputeHash(buffer);
OutHash(hashBytes);
return hashBytes;
}
private static void OutHash(byte[] hashBytes)
{
foreach (byte b in hashBytes)
{
Console.Write("{0} ", b);
}
Console.WriteLine();
Console.WriteLine();
}
}
现在我们简单分析代码清单1-1。先看GetHashData方法,它的主要工作是对传入的字符串s做处理,获取它的hash值。第一步通过 Encoding.UTF8.GetBytes(s)把字符串转成byte数组,然后对该byte数组进行散列操作。完成操作的是下面这条语句。
byte[]hashBytes= sha1M.ComputeHash(buffer)
sha1M是SHA1Managed的实例,这里我们使用ComputeHash方法返回byte数组的Hash值。
OutHash方法用来输出散列值。
Main方法中我定义了三个字符串,第一个和第二个字符串完全一样,第三个字符串只少了一个叹号("!")。下面我们看一下这段程序的运行结果,如图1-1所示。
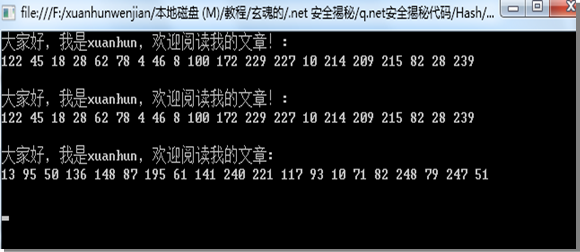
图1-1 代码清单1-1的运行结果
从图6-22中我们很容易看出,改掉一个字符,hash值发生了很大的变化。
在实际应用中,为了增强安全性,我们更倾向于使用键控Hash,.NET中的每个Hash加密算法都有对应的键控Hash类。针对于上个例子,我们演示如何使用HMACSHA1类。实例程序如代码清单1-2所示。
代码清单1-2 HMACSHA1类应用实例
class Program
{
public static void Encript(byte[] key, String sourceFile, String destFile)
{
HMACSHA1 myhmacsha1 = new HMACSHA1(key);
FileStream inStream = new FileStream(sourceFile, FileMode.Open);
FileStream outStream = new FileStream(destFile, FileMode.Create);
byte[] hashValue = myhmacsha1.ComputeHash(inStream);
inStream.Position = 0;
outStream.Write(hashValue, 0, hashValue.Length);
int bytesRead;
byte[] buffer = new byte[1024];
do
{
bytesRead = inStream.Read(buffer, 0, 1024);
outStream.Write(buffer, 0, bytesRead);
} while (bytesRead > 0);
myhmacsha1.Clear();
inStream.Close();
outStream.Close();
return;
}
public static bool Decript(byte[] key, String sourceFile)
{
HMACSHA1 hmacsha1 = new HMACSHA1(key);
byte[] storedHash = new byte[hmacsha1.HashSize / 8];
FileStream inStream = new FileStream(sourceFile, FileMode.Open);
inStream.Read(storedHash, 0, storedHash.Length);
byte[] computedHash = hmacsha1.ComputeHash(inStream);
for (int i = 0; i < storedHash.Length; i++)
{
if (computedHash[i] != storedHash[i])
{
Console.WriteLine("Hash值验证失败文件被篡改!");
return false;
}
}
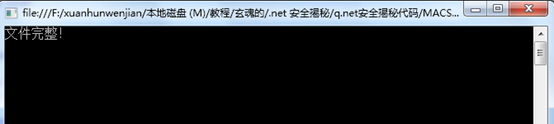
Console.WriteLine("文件完整!");
return true;
}
public static void Main(string[] Fileargs)
{
string file1 = @"f:\1.txt";
string file2 = @"f:\2.txt";
try
{
byte[] secretkey = new Byte[64];
RNGCryptoServiceProvider rng = new RNGCryptoServiceProvider();
rng.GetBytes(secretkey);
Encript(secretkey, file1, file2);
Decript(secretkey, file2);
}
catch (IOException e)
{
Console.WriteLine(e.Message);
}
Console.Read();
}
}
}
看代码清单1-2,在Main方法中,我定义了file1和file2两个变量,file1为本地磁盘的一个已经存在的文件,file2是未存在的文件,将由程序创建。下面注意Main方法中的这两句代码:
RNGCryptoServiceProvider rng = new RNGCryptoServiceProvider();
rng.GetBytes(secretkey);
RNGCryptoServiceProvider类提供方法用来生成高强度随机数,这里我们用来生成作为HMACSHA1类的加密和解密的密钥。
Encript方法用来使用HMACSHA1类生成文件file1的加密Hash值。我们首先创建了两个文件流inStream和 outStream分别对应file1和file2,然后读取file1的内容,使用myhmacsha1.ComputeHash方法获取加密的 Hash值,并将该值写入file2。
Decript方法用来验证文件完整性。验证文件完整性的方法很简单,我们读出保存在file2中key的Hash数据,然后使用之前的Key对该数据执行Hash,如果得到的Hash值和取出的KeyHash值相同,则数据完整。
执行加密Hash的过程后,file1和file2的文件内容如图1-2所示。

图1-2 执行加密Hash的过程后,file1和file2的文件内容
从图中1-2我们可以看出,加密Hash值被添加在原文内容的前边。
验证结果如图1-3所示。