一、流程:
1、这个场景需要使用到的依赖是什么?
2、如何编写自动配置
@Configuration  //指定这个类是一个配置类
@ConditionalOnXXX  //在指定条件成立的情况下自动配置类生效
@AutoConfigureAfter  //指定自动配置类的顺序
@Bean  //给容器中添加组件

@ConfigurationPropertie结合相关xxxProperties类来绑定相关的配置
@EnableConfigurationProperties //让xxxProperties生效加入到容器中

自动配置类要能加载
将需要启动就加载的自动配置类,配置在META-INF/spring.factories
org.springframework.boot.autoconfigure.EnableAutoConfiguration=
org.springframework.boot.autoconfigure.admin.SpringApplicationAdminJmxAutoConfiguration,
org.springframework.boot.autoconfigure.aop.AopAutoConfiguration,
3、模式:
启动器只用来做依赖导入;
专门来写一个自动配置模块;
启动器依赖自动配置;别人只需要引入启动器(starter)
mybatis-spring-boot-starter;自定义启动器名-spring-boot-starter
二、开发步骤:
1.先创建一个空项目,在这个空项目创建两个模块
2.创建starter模块和autoconfig模块
在starter模块中引入autoconfig模块,下面是starter模块的pom文件
<?xml version="1.0" encoding="UTF-8"?>
<project xmlns="http://maven.apache.org/POM/4.0.0"
         xmlns:xsi="http://www.w3.org/2001/XMLSchema-instance"
         xsi:schemaLocation="http://maven.apache.org/POM/4.0.0 http://maven.apache.org/xsd/maven-4.0.0.xsd">
    <modelVersion>4.0.0</modelVersion>

    <groupId>com.atguigu.starter</groupId>
    <artifactId>atguigu-springboot-starter</artifactId>
    <version>1.0-SNAPSHOT</version>
    <!--启动器-->
    <dependencies>
        <!--引入自动配置模块-->
        <dependency>
            <groupId>com.atguigu.starter</groupId>
            <artifactId>atguigu-springboot-starter-autoconfigurer</artifactId>
            <version>0.0.1-SNAPSHOT</version>
        </dependency>
    </dependencies>

</project>
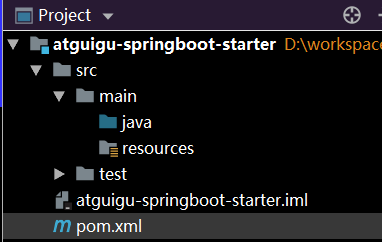
下面是starter模块的完整目录
3.修改autoconfig模块
(1)pom文件
<?xml version="1.0" encoding="UTF-8"?>
<project xmlns="http://maven.apache.org/POM/4.0.0" xmlns:xsi="http://www.w3.org/2001/XMLSchema-instance"
         xsi:schemaLocation="http://maven.apache.org/POM/4.0.0 https://maven.apache.org/xsd/maven-4.0.0.xsd">
    <modelVersion>4.0.0</modelVersion>
    <parent>
        <groupId>org.springframework.boot</groupId>
        <artifactId>spring-boot-starter-parent</artifactId>
        <version>2.2.5.RELEASE</version>
        <relativePath/> <!-- lookup parent from repository -->
    </parent>
    <groupId>com.atguigu.starter</groupId>
    <artifactId>atguigu-springboot-starter-autoconfigurer</artifactId>
    <version>0.0.1-SNAPSHOT</version>
    <name>atguigu-springboot-starter-autoconfigurer</name>
    <description>Demo project for Spring Boot</description>

    <properties>
        <java.version>1.8</java.version>
    </properties>

    <dependencies>
        <!--引入spring-boot-starter,这是所有starter必须引入的基本配置-->
        <dependency>
            <groupId>org.springframework.boot</groupId>
            <artifactId>spring-boot-starter</artifactId>
        </dependency>
    </dependencies>
</project>
(2)编写HellServer类
package com.atguigu.starter;

public class HelloService {
    HelloProperties helloProperties;

    public HelloProperties getHelloProperties() {
        return helloProperties;
    }

    public void setHelloProperties(HelloProperties helloProperties) {
        this.helloProperties = helloProperties;
    }

    public String sayHelloAtGuigu(String name){
        return helloProperties.getPrefix()+"-"+name+"-"+helloProperties.getSuffix();
    }
}
(3)编写HelloProperties类
package com.atguigu.starter;

import org.springframework.boot.context.properties.ConfigurationProperties;

@ConfigurationProperties(prefix = "atguigu.hello")//表示读取配置文件
public class HelloProperties {
    private String prefix;//atguigu.hello.prefix
    private String suffix;//atguigu.hello.suffix

    public String getPrefix() {
        return prefix;
    }

    public void setPrefix(String prefix) {
        this.prefix = prefix;
    }

    public String getSuffix() {
        return suffix;
    }

    public void setSuffix(String suffix) {
        this.suffix = suffix;
    }
}
(4)编写HelloServiceAutoConfiguration类
package com.atguigu.starter;

import org.springframework.beans.factory.annotation.Autowired;
import org.springframework.boot.autoconfigure.condition.ConditionalOnWebApplication;
import org.springframework.boot.context.properties.EnableConfigurationProperties;
import org.springframework.context.annotation.Bean;
import org.springframework.context.annotation.Configuration;

@Configuration//表示这是一个配置类
@ConditionalOnWebApplication//表示web应用才生效
@EnableConfigurationProperties(HelloProperties.class)//使@ConfigruationProperties注解的类生效,只有配加上这个注解,HelloProperties才会生效
public class HelloServiceAutoConfiguration {
    @Autowired
    HelloProperties helloProperties;
    @Bean
    public HelloService helloService(){
        HelloService helloService = new HelloService();
        helloService.setHelloProperties(helloProperties);
        return helloService;
    }
}
(5)在resources文件夹下创建META-INF文件夹,在META-INF文件夹下创建spring.factories文件
下面是spring.factories文件的内容
org.springframework.boot.autoconfigure.EnableAutoConfiguration=
com.atguigu.starter.HelloServiceAutoConfiguration
#这里配置的是自动配置类的全路径
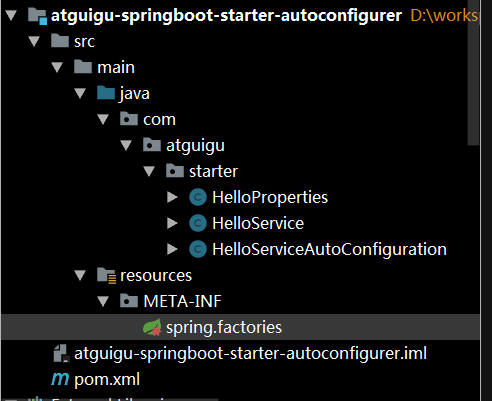
(6)下面是autoconfig模块的完整目录图:
4.先将autoconfig模块执行install命令,再将starter模块执行install命令
5.在需要引用此starter的项目中引用此starter
<!--引入自定义的starter-->
        <dependency>
            <groupId>com.atguigu.starter</groupId>
            <artifactId>atguigu-springboot-starter</artifactId>
            <version>1.0-SNAPSHOT</version>
        </dependency>
6.写Controller
package com.atguigu.controller;

import com.atguigu.starter.HelloService;
import org.springframework.beans.factory.annotation.Autowired;
import org.springframework.web.bind.annotation.GetMapping;
import org.springframework.web.bind.annotation.PathVariable;
import org.springframework.web.bind.annotation.RestController;

@RestController
public class HelloController {
    @Autowired
    HelloService helloService;
    @GetMapping("/hello/{name}")
    public String hello(@PathVariable("name") String name){
        String s = helloService.sayHelloAtGuigu(name);
        System.err.println(s);
        return s;
    }
}
7.在application.properties文件中进行配置属性
atguigu.hello.prefix=Are you
atguigu.hello.suffix=?
8.启动项目进行测试即可