Spring提供了非常好用的JavaMailSender接口实现邮件发送。在Spring Boot中也提供了相应的自动化配置。
这篇文章主要讲如何在Spring Boot中使用JavaMailSender发送邮件。
发送邮件
1,在pom.xml中引入spring-boot-starter-mail依赖:
<dependency>

    <groupId>org.springframework.boot</groupId>

    <artifactId>spring-boot-starter-mail</artifactId>

</dependency>
2,在application.properties中配置相应的属性:(我这里模拟的是163邮箱给QQ邮箱发送邮件)
spring.mail.host=smtp.163.com

spring.mail.username=邮箱用户名 so****@163.com

spring.mail.password=邮箱密码

spring.mail.default-encoding=UTF-8
3,写发送邮件的测试类
import org.slf4j.Logger;

import org.slf4j.LoggerFactory;

import org.springframework.beans.factory.annotation.Autowired;

import org.springframework.mail.SimpleMailMessage;

import org.springframework.mail.javamail.JavaMailSender;

import org.springframework.web.bind.annotation.RequestMapping;

import org.springframework.web.bind.annotation.RestController;


@RestController

@RequestMapping("/mail")

public class MailController {


private final Logger logger = LoggerFactory.getLogger(this.getClass());


@Autowired

    private JavaMailSender mailSender;


@RequestMapping("/send")

public void sendMail(){

        SimpleMailMessage message = new SimpleMailMessage();

        message.setFrom("so****@163.com");

        message.setTo("239****@qq.com");

        message.setSubject("it is a test for spring boot");

        message.setText("你好,我是小黄,我正在测试发送邮件。");


        try {

            mailSender.send(message);

            logger.info("小黄的测试邮件已发送。");

        } catch (Exception e) {

            logger.error("小黄发送邮件时发生异常了!", e);

        }

    }

}
4,运行启动类
import org.mybatis.spring.annotation.MapperScan;

import org.springframework.boot.SpringApplication;

import org.springframework.boot.autoconfigure.EnableAutoConfiguration;

import org.springframework.boot.autoconfigure.SpringBootApplication;

import org.springframework.boot.autoconfigure.jdbc.DataSourceAutoConfiguration;


@SpringBootApplication(exclude = {DataSourceAutoConfiguration.class})

@EnableAutoConfiguration

@MapperScan("cn.yideng.*.dao")

public class DemoApplication {


public static void main(String[] args) {

SpringApplication.run(DemoApplication.class, args);

}

}
5,浏览器运行 http://localhost:8080/mail/send
6,登录163邮箱,在发送箱里查看

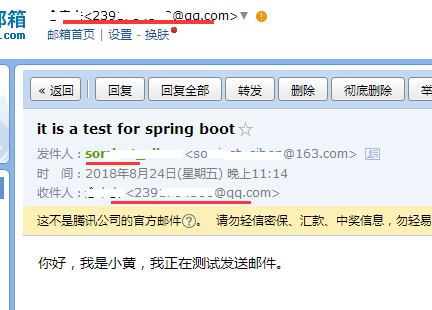
7,登录QQ邮箱,在收件箱里查看,如下图
可以看出Spring Boot的starter模块提供了自动化配置,在引入了spring-boot-starter-mail依赖之后,会根据配置文件中的内容去创建JavaMailSender实例,因此我们可以直接在需要使用的地方直接@Autowired来引入 JavaMailSender 邮件发送对象。
当然在实际使用过程中,不会这么简单,我们可能会要求带上附件、或使用邮件模块等。这时我们就需要使用MimeMessage来设置更复杂的右键内容,下面就来看看怎么实现它。
发送带附件的邮件
测试类 : 还是模拟 163邮箱 给QQ邮箱发送邮件
import java.io.File;


import javax.mail.MessagingException;

import javax.mail.internet.MimeMessage;


import org.slf4j.Logger;

import org.slf4j.LoggerFactory;

import org.springframework.beans.factory.annotation.Autowired;

import org.springframework.core.io.FileSystemResource;

import org.springframework.mail.javamail.JavaMailSender;

import org.springframework.mail.javamail.MimeMessageHelper;

import org.springframework.web.bind.annotation.RequestMapping;

import org.springframework.web.bind.annotation.RestController;


/**

 *  发送有附件的邮件

 *

 */

@RestController

@RequestMapping("/mail")

public class AttachmentsMailController {

private final Logger logger = LoggerFactory.getLogger(this.getClass());


@Autowired

    private JavaMailSender mailSender;


@RequestMapping("/att")

public void sendMail() throws MessagingException{


MimeMessage mimeMessage = mailSender.createMimeMessage();

MimeMessageHelper helper = new MimeMessageHelper(mimeMessage, true);


helper.setFrom("so****@163.com");

helper.setTo("239****@qq.com");

helper.setSubject("主题:发送有附件的邮件");

helper.setText("你好,我是小黄,我正在测试发送一封有附件的邮件。");


FileSystemResource file1 = new FileSystemResource(new File("d:\cat.jpg"));

FileSystemResource file2 = new FileSystemResource(new File("d:\java-1.jpg"));

helper.addAttachment("附件-1.jpg", file1);

helper.addAttachment("附件-2.jpg", file2);


        try {

            mailSender.send(mimeMessage);

            logger.info("小黄的测试带附件的邮件已发送。");

        } catch (Exception e) {

            logger.error("小黄发送带附件邮件时发生异常了!", e);

        }

    }

}
2,需要 在D盘下准备两张图片cat.jpg java-1.jpg,

3,浏览器运行 http://localhost:8080/mail/att
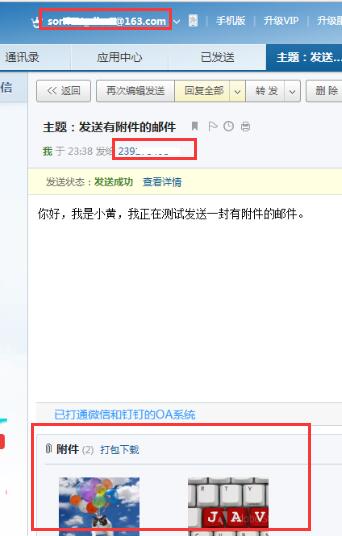
4,登录163邮箱,在发送箱里查看,如下图
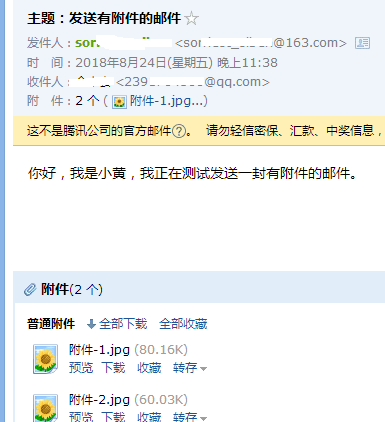
5,登录QQ邮箱,在收件箱里查看,如下图
嵌入静态资源的邮件
还有一种是通过嵌入图片等静态资源,可以直接看到图片,而不用从附近中查看具体的图片,来看看吧。
测试类:
import java.io.File;

import javax.mail.MessagingException;

import javax.mail.internet.MimeMessage;

import org.slf4j.Logger;

import org.slf4j.LoggerFactory;

import org.springframework.beans.factory.annotation.Autowired;

import org.springframework.core.io.FileSystemResource;

import org.springframework.mail.javamail.JavaMailSender;

import org.springframework.mail.javamail.MimeMessageHelper;

import org.springframework.web.bind.annotation.RequestMapping;

import org.springframework.web.bind.annotation.RestController;


/**

 *  嵌入静态资源

 */

@RestController

@RequestMapping("/mail")

public class StaticResourceMailController {

private final Logger logger = LoggerFactory.getLogger(this.getClass());


@Autowired

    private JavaMailSender mailSender;


@RequestMapping("/static")

public void sendMail() throws MessagingException{


MimeMessage mimeMessage = mailSender.createMimeMessage();

MimeMessageHelper helper = new MimeMessageHelper(mimeMessage, true);


helper.setFrom("so****@163.com");

helper.setTo("239****@qq.com");

helper.setSubject("主题:嵌入静态资源");

helper.setText("<html><body><img src="cid:hello" ></body></html>", true);


// 注意addInline()中资源名称 hello 必须与 text正文中cid:hello对应起来

FileSystemResource file1 = new FileSystemResource(new File("d:\cat.jpg"));

helper.addInline("hello", file1);


        try {

            mailSender.send(mimeMessage);

            logger.info("小黄的测试嵌入静态资源的邮件已发送。");

        } catch (Exception e) {

            logger.error("小黄发送嵌入静态资源的邮件时发生异常了!", e);

        }

    }

}
要特别注意addInline()中资源名称 hello 必须与 text正文中cid:hello对应。
2,需要 在D盘下准备两张图片cat.jpg
3,浏览器运行 http://localhost:8080/mail/static
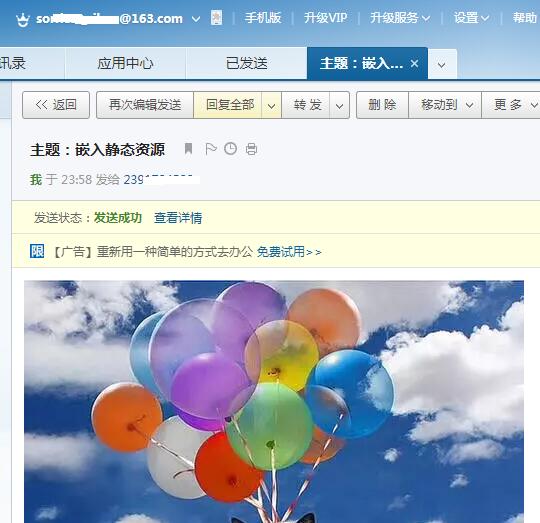
4,登录163邮箱,在发送箱里查看,如下图
5,登录QQ邮箱,在收件箱里查看,如下图

好了,Spring Boot使用JavaMailSender发送邮件就到这里了。