Spring Bean 定义
被称作 bean 的对象是构成应用程序的支柱也是由 Spring IoC 容器管理的。bean 是一个被实例化,组装,并通过 Spring IoC 容器所管理的对象。这些 bean 是由用容器提供的配置元数据创建的,例如,已经在先前章节看到的,在 XML 的表单中的 定义。
bean 定义包含称为配置元数据的信息,下述容器也需要知道配置元数据:
-
如何创建一个 bean
-
bean 的生命周期的详细信息
- bean 的依赖关系
上述所有的配置元数据转换成一组构成每个 bean 定义的下列属性。
| 属性 | 描述 |
|---|---|
| class | 这个属性是强制性的,并且指定用来创建 bean 的 bean 类。 |
| name | 这个属性指定唯一的 bean 标识符。在基于 XML 的配置元数据中,你可以使用 ID 和/或 name 属性来指定 bean 标识符。 |
| scope | 这个属性指定由特定的 bean 定义创建的对象的作用域,它将会在 bean 作用域的章节中进行讨论。 |
| constructor-arg | 它是用来注入依赖关系的,并会在接下来的章节中进行讨论。 |
| properties | 它是用来注入依赖关系的,并会在接下来的章节中进行讨论。 |
| autowiring mode | 它是用来注入依赖关系的,并会在接下来的章节中进行讨论。 |
| lazy-initialization mode | 延迟初始化的 bean 告诉 IoC 容器在它第一次被请求时,而不是在启动时去创建一个 bean 实例。 |
| initialization 方法 | 在 bean 的所有必需的属性被容器设置之后,调用回调方法。它将会在 bean 的生命周期章节中进行讨论。 |
| destruction 方法 | 当包含该 bean 的容器被销毁时,使用回调方法。它将会在 bean 的生命周期章节中进行讨论。 |
Bean 与 Spring 容器的关系
下图表达了Bean 与 Spring 容器之间的关系:
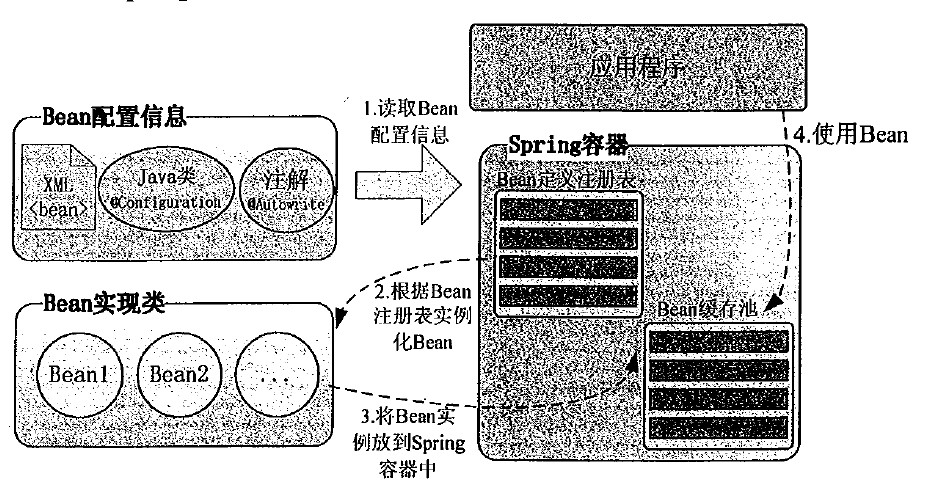
Spring 配置元数据
Spring IoC 容器完全由实际编写的配置元数据的格式解耦。有下面三个重要的方法把配置元数据提供给 Spring 容器:
-
基于 XML 的配置文件
-
基于注解的配置
- 基于 Java 的配置
提示:对于基于 XML 的配置,Spring 2.0 以后使用 Schema 的格式,使得不同类型的配置拥有了自己的命名空间,是配置文件更具扩展性。
你已经看到了如何把基于 XML 的配置元数据提供给容器,但是让我们看看另一个基于 XML 配置文件的例子,这个配置文件中有不同的 bean 定义,包括延迟初始化,初始化方法和销毁方法的:
 1 <?xml version="1.0" encoding="UTF-8"?>
 2
 3 <beans xmlns="http://www.springframework.org/schema/beans"
 4     xmlns:xsi="http://www.w3.org/2001/XMLSchema-instance"
 5     xsi:schemaLocation="http://www.springframework.org/schema/beans
 6     http://www.springframework.org/schema/beans/spring-beans-3.0.xsd">
 7
 8    <!-- A simple bean definition -->
 9    <bean id="..." class="...">
10        <!-- collaborators and configuration for this bean go here -->
11    </bean>
12
13    <!-- A bean definition with lazy init set on -->
14    <bean id="..." class="..." lazy-init="true">
15        <!-- collaborators and configuration for this bean go here -->
16    </bean>
17
18    <!-- A bean definition with initialization method -->
19    <bean id="..." class="..." init-method="...">
20        <!-- collaborators and configuration for this bean go here -->
21    </bean>
22
23    <!-- A bean definition with destruction method -->
24    <bean id="..." class="..." destroy-method="...">
25        <!-- collaborators and configuration for this bean go here -->
26    </bean>
27
28    <!-- more bean definitions go here -->
29
30 </beans>
在上述示例中:
①xmlns="http://www.springframework.org/schema/beans",默认命名空间:它没有空间名,用于Spring Bean的定义;
②xmlns:xsi="http://www.w3.org/2001/XMLSchema-instance",xsi命名空间:这个命名空间用于为每个文档中命名空间指定相应的Schema样式文件,是标准组织定义的标准命名空间。
Spring Bean 作用域
Bean 的作用域
当在 Spring 中定义一个 bean 时,你必须声明该 bean 的作用域的选项。例如,为了强制 Spring 在每次需要时都产生一个新的 bean 实例,你应该声明 bean 的作用域的属性为 prototype。同理,如果你想让 Spring 在每次需要时都返回同一个bean实例,你应该声明 bean 的作用域的属性为 singleton。
Spring 框架支持以下五个作用域,分别为singleton、prototype、request、session和global session,5种作用域说明如下所示,
注意,如果你使用 web-aware ApplicationContext 时,其中三个是可用的。
| 作用域 | 描述 |
|---|---|
| singleton |
在spring IoC容器仅存在一个Bean实例,Bean以单例方式存在,默认值 |
| prototype | 每次从容器中调用Bean时,都返回一个新的实例,即每次调用getBean()时,相当于执行newXxxBean() |
| request | 每次HTTP请求都会创建一个新的Bean,该作用域仅适用于WebApplicationContext环境 |
| session | 同一个HTTP Session共享一个Bean,不同Session使用不同的Bean,仅适用于WebApplicationContext环境 |
| global-session | 一般用于Portlet应用环境,该运用域仅适用于WebApplicationContext环境 |
本章将讨论前两个范围,当我们将讨论有关 web-aware Spring ApplicationContext 时,其余三个将被讨论。
singleton 作用域:
singleton 是默认的作用域,也就是说,当定义 Bean 时,如果没有指定作用域配置项,则 Bean 的作用域被默认为 singleton。
当一个bean的作用域为Singleton,那么Spring IoC容器中只会存在一个共享的bean实例,并且所有对bean的请求,只要id与该bean定义相匹配,则只会返回bean的同一实例。
也就是说,当将一个bean定义设置为singleton作用域的时候,Spring IoC容器只会创建该bean定义的唯一实例。
Singleton是单例类型,就是在创建起容器时就同时自动创建了一个bean的对象,不管你是否使用,他都存在了,每次获取到的对象都是同一个对象。
注意,Singleton作用域是Spring中的缺省作用域。你可以在 bean 的配置文件中设置作用域的属性为 singleton,如下所示:
1 <!-- A bean definition with singleton scope -->
2 <bean id="..." class="..." scope="singleton">
3     <!-- collaborators and configuration for this bean go here -->
4 </bean>
例子
这里是 HelloWorld.java 文件的内容:
 1 package com.tutorialspoint;
 2 public class HelloWorld {
 3    private String message;
 4    public void setMessage(String message){
 5       this.message  = message;
 6    }
 7    public void getMessage(){
 8       System.out.println("Your Message : " + message);
 9    }
10 }
下面是 MainApp.java 文件的内容:
 1 package com.tutorialspoint;
 2 import org.springframework.context.ApplicationContext;
 3 import org.springframework.context.support.ClassPathXmlApplicationContext;
 4 public class MainApp {
 5    public static void main(String[] args) {
 6       ApplicationContext context = new ClassPathXmlApplicationContext("Beans.xml");
 7       HelloWorld objA = (HelloWorld) context.getBean("helloWorld");
 8       objA.setMessage("I'm object A");
 9       objA.getMessage();
10       HelloWorld objB = (HelloWorld) context.getBean("helloWorld");
11       objB.getMessage();
12    }
13 }
下面是 singleton 作用域必需的配置文件 Beans.xml:
 1 <?xml version="1.0" encoding="UTF-8"?>
 2
 3 <beans xmlns="http://www.springframework.org/schema/beans"
 4     xmlns:xsi="http://www.w3.org/2001/XMLSchema-instance"
 5     xsi:schemaLocation="http://www.springframework.org/schema/beans
 6     http://www.springframework.org/schema/beans/spring-beans-3.0.xsd">
 7
 8    <bean id="helloWorld" class="com.tutorialspoint.HelloWorld"
 9       scope="singleton">
10    </bean>
11 </beans>
一旦你创建源代码和 bean 配置文件完成后,我们就可以运行该应用程序。如果你的应用程序一切都正常,将输出以下信息:
Your Message : I'm object A
Your Message : I'm object A
prototype 作用域
当一个bean的作用域为Prototype,表示一个bean定义对应多个对象实例。Prototype作用域的bean会导致在每次对该bean请求(将其注入到另一个bean中,或者以程序的方式调用容器的getBean()方法)
时都会创建一个新的bean实例。Prototype是原型类型,它在我们创建容器的时候并没有实例化,而是当我们获取bean的时候才会去创建一个对象,而且我们每次获取到的对象都不是同一个对象。
根据经验,对有状态的bean应该使用prototype作用域,而对无状态的bean则应该使用singleton作用域。
为了定义 prototype 作用域,你可以在 bean 的配置文件中设置作用域的属性为 prototype,如下所示:
1 <!-- A bean definition with singleton scope -->
2 <bean id="..." class="..." scope="prototype">
3    <!-- collaborators and configuration for this bean go here -->
4 </bean>
例子
这里是 HelloWorld.java 文件的内容:
 1 package com.tutorialspoint;
 2
 3 public class HelloWorld {
 4    private String message;
 5
 6    public void setMessage(String message){
 7       this.message  = message;
 8    }
 9
10    public void getMessage(){
11       System.out.println("Your Message : " + message);
12    }
13 }
下面是 MainApp.java 文件的内容:
 1 package com.tutorialspoint;
 2 import org.springframework.context.ApplicationContext;
 3 import org.springframework.context.support.ClassPathXmlApplicationContext;
 4 public class MainApp {
 5    public static void main(String[] args) {
 6       ApplicationContext context = new ClassPathXmlApplicationContext("Beans.xml");
 7       HelloWorld objA = (HelloWorld) context.getBean("helloWorld");
 8       objA.setMessage("I'm object A");
 9       objA.getMessage();
10       HelloWorld objB = (HelloWorld) context.getBean("helloWorld");
11       objB.getMessage();
12    }
13 }
下面是 prototype 作用域必需的配置文件 Beans.xml:
 1 <?xml version="1.0" encoding="UTF-8"?>
 2
 3 <beans xmlns="http://www.springframework.org/schema/beans"
 4     xmlns:xsi="http://www.w3.org/2001/XMLSchema-instance"
 5     xsi:schemaLocation="http://www.springframework.org/schema/beans
 6     http://www.springframework.org/schema/beans/spring-beans-3.0.xsd">
 7
 8    <bean id="helloWorld" class="com.tutorialspoint.HelloWorld"
 9       scope="prototype">
10    </bean>
11
12 </beans>
一旦你创建源代码和 Bean 配置文件完成后,我们就可以运行该应用程序。如果你的应用程序一切都正常,将输出以下信息:
Your Message : I'm object A
Your Message : null
Spring Bean 生命周期
理解 Spring bean 的生命周期很容易。当一个 bean 被实例化时,它可能需要执行一些初始化使它转换成可用状态。同样,当 bean 不再需要,并且从容器中移除时,可能需要做一些清除工作。
尽管还有一些在 Bean 实例化和销毁之间发生的活动,但是本章将只讨论两个重要的生命周期回调方法,它们在 bean 的初始化和销毁的时候是必需的。
为了定义安装和拆卸一个 bean,我们只要声明带有 init-method 和/或 destroy-method 参数的 。init-method 属性指定一个方法,在实例化 bean 时,立即调用该方法。同样,destroy-method 指定一个方法,只有从容器中移除 bean 之后,才能调用该方法。
Bean的生命周期可以表达为:Bean的定义——Bean的初始化——Bean的使用——Bean的销毁
初始化回调
org.springframework.beans.factory.InitializingBean 接口指定一个单一的方法:
1 void afterPropertiesSet() throws Exception;
因此,你可以简单地实现上述接口和初始化工作可以在 afterPropertiesSet() 方法中执行,如下所示:
1 public class ExampleBean implements InitializingBean {
2    public void afterPropertiesSet() {
3       // do some initialization work
4    }
5 }
在基于 XML 的配置元数据的情况下,你可以使用 init-method 属性来指定带有 void 无参数方法的名称。例如:
1 <bean id="exampleBean"
2          class="examples.ExampleBean" init-method="init"/>
下面是类的定义:
1 public class ExampleBean {
2    public void init() {
3       // do some initialization work
4    }
5 }
销毁回调
org.springframework.beans.factory.DisposableBean 接口指定一个单一的方法:
void destroy() throws Exception;因此,你可以简单地实现上述接口并且结束工作可以在 destroy() 方法中执行,如下所示:
1 public class ExampleBean implements DisposableBean {
2    public void destroy() {
3       // do some destruction work
4    }
5 }
在基于 XML 的配置元数据的情况下,你可以使用 destroy-method 属性来指定带有 void 无参数方法的名称。例如:
1 <bean id="exampleBean"
2          class="examples.ExampleBean" destroy-method="destroy"/>
下面是类的定义:
1 public class ExampleBean {
2    public void destroy() {
3       // do some destruction work
4    }
5 }
如果你在非 web 应用程序环境中使用 Spring 的 IoC 容器;例如在丰富的客户端桌面环境中;那么在 JVM 中你要注册关闭 hook。这样做可以确保正常关闭,为了让所有的资源都被释放,可以在单个 beans 上调用 destroy 方法。
建议你不要使用 InitializingBean 或者 DisposableBean 的回调方法,因为 XML 配置在命名方法上提供了极大的灵活性。
例子
我们在适当的位置使用 Eclipse IDE,然后按照下面的步骤来创建一个 Spring 应用程序:
| 步骤 | 描述 |
|---|---|
| 1 | 创建一个名称为 SpringExample 的项目,并且在创建项目的 src 文件夹中创建一个包 com.tutorialspoint。 |
| 2 | 使用 Add External JARs 选项,添加所需的 Spring 库,解释见 Spring Hello World Example 章节。 |
| 3 | 在 com.tutorialspoint 包中创建 Java 类 HelloWorld 和 MainApp。 |
| 4 | 在 src 文件夹中创建 Beans 配置文件 Beans.xml。 |
| 5 | 最后一步是创建的所有 Java 文件和 Bean 配置文件的内容,并运行应用程序,解释如下所示。 |
这里是 HelloWorld.java 的文件的内容:
 1 package com.tutorialspoint;
 2
 3 public class HelloWorld {
 4    private String message;
 5
 6    public void setMessage(String message){
 7       this.message  = message;
 8    }
 9    public void getMessage(){
10       System.out.println("Your Message : " + message);
11    }
12    public void init(){
13       System.out.println("Bean is going through init.");
14    }
15    public void destroy(){
16       System.out.println("Bean will destroy now.");
17    }
18 }
下面是 MainApp.java 文件的内容。在这里,你需要注册一个在 AbstractApplicationContext 类中声明的关闭 hook 的 registerShutdownHook() 方法。它将确保正常关闭,并且调用相关的 destroy 方法。
 1 package com.tutorialspoint;
 2 import org.springframework.context.support.AbstractApplicationContext;
 3 import org.springframework.context.support.ClassPathXmlApplicationContext;
 4 public class MainApp {
 5    public static void main(String[] args) {
 6       AbstractApplicationContext context = new ClassPathXmlApplicationContext("Beans.xml");
 7       HelloWorld obj = (HelloWorld) context.getBean("helloWorld");
 8       obj.getMessage();
 9       context.registerShutdownHook();
10    }
11 }
下面是 init 和 destroy 方法必需的配置文件 Beans.xml 文件:
 1 <?xml version="1.0" encoding="UTF-8"?>
 2
 3 <beans xmlns="http://www.springframework.org/schema/beans"
 4     xmlns:xsi="http://www.w3.org/2001/XMLSchema-instance"
 5     xsi:schemaLocation="http://www.springframework.org/schema/beans
 6     http://www.springframework.org/schema/beans/spring-beans-3.0.xsd">
 7
 8    <bean id="helloWorld"
 9        class="com.tutorialspoint.HelloWorld"
10        init-method="init" destroy-method="destroy">
11        <property name="message" value="Hello World!"/>
12    </bean>
13 </beans>
一旦你创建源代码和 bean 配置文件完成后,我们就可以运行该应用程序。如果你的应用程序一切都正常,将输出以下信息:
Bean is going through init.
Your Message : Hello World!
Bean will destroy now.
默认的初始化和销毁方法
如果你有太多具有相同名称的初始化或者销毁方法的 Bean,那么你不需要在每一个 bean 上声明初始化方法和销毁方法。框架使用 元素中的 default-init-method 和 default-destroy-method 属性提供了灵活地配置这种情况,如下所示:
 1 <beans xmlns="http://www.springframework.org/schema/beans"
 2     xmlns:xsi="http://www.w3.org/2001/XMLSchema-instance"
 3     xsi:schemaLocation="http://www.springframework.org/schema/beans
 4     http://www.springframework.org/schema/beans/spring-beans-3.0.xsd"
 5     default-init-method="init"
 6     default-destroy-method="destroy">
 7
 8    <bean id="..." class="...">
 9        <!-- collaborators and configuration for this bean go here -->
10    </bean>
11
12 </beans>