上一篇:Windows不分区VHD装Linux多系统(四):VM虚拟机里Ubuntu18引导修改
下一篇:Windows不分区VHD装Linux多系统(六):优化 & 安装NVIDIA 920MX独显驱动
########################################################################################
这里要先感谢
无忧论坛 和 论坛里niumao
我将niumao的教程做进一步实践整理,避免新人踩坑。
#########################################################################################
准备文件:上篇教程里从ubuntu虚拟机里传出来的文件
文件一,在ubuntu虚拟机的Home(家)目录下的“initrd.img-5.4.0-42-generic”
文件二,在ubuntu虚拟机的/boot目录下的“vmlinuz-5.4.0-42-generic”
文件三,安装好系统的vhd文件,“ubuntu.vhd”
引导方式介绍:
grub4dos、g2ldr、grub2-efi(EFI-GPT)、grub2ia32(仅能在32位UEFI下引导系统,所以不常用,这里不介绍了)
方式一:GRub4dos启动,只需要三个文件 grldr、grldr.mbr、menu.lst与一个目录grub
方式二:g2ldr启动,只需要两个文件 g2ldr、g2ldr.mbr与一个目录grub2
方式三:grub2-efi启动,只需要 EFI、grub2 两个目录
选引导方式:
对于BIOS-MBR结构,可以选择 grub4dos(推荐) 或 g2ldr
对于EFI-GPT结构,选择grub2-efi方式
安装引导:
选择上面对应方式的文件,这里选择grub4dos方式,
将grldr、 grldr.mbr、menu.lst、目录grub 文件放在系统盘根目录下(我的win7系统在C盘,所以放C盘下面)。
下面是menu.lst文本的内容
注意:不要用WIN自带的“记事本”编辑文件(会给文件自动加BOM头),用notepad、notepad++、Emedit等软件编辑。
timeout 5
default 0
font   /grub/ufont.gz
color normal=0x0F highlight=0x0E helptext=0x0A heading=0x02 standard=0x02 border=0x77
graphicsmode -1 800 600 24:32
splashimage /grub/bg.lzma
MINI_MENUSETTING 1 5 2 22 15 7 64 13
hotkey -nb
write 0x8274 0x2001

iftitle [ find --set-root --ignore-floppies --ignore-cd  /ubuntu/ubuntu.vhd ]启动ubuntu.vhd
find --set-root --ignore-floppies --ignore-cd  /ubuntu/ubuntu.vhd
uuid ()
kernel /ubuntu/vmlinuz  root=UUID=%?%  kloop=/ubuntu/ubuntu.vhd  kroot=/dev/mapper/loop0p1
initrd  /ubuntu/initrd.img

iftitle [ find --set-root --ignore-floppies --ignore-cd  /casper/vmlinuz ] 启动UBT-small.squashfs
find --set-root --ignore-floppies --ignore-cd  /casper/vmlinuz
kernel /casper/vmlinuz boot=casper
initrd  /casper/initrd.img

iftitle [ find --set-root --ignore-floppies --ignore-cd  /ubuntu/UBT-small.iso ] 启动 UBT-small.iso
find --set-root --ignore-floppies --ignore-cd  /ubuntu/UBT-small.iso
kernel  /ubuntu/vmlinuz boot=casper iso-scan/filename=/ubuntu/UBT-small.iso locale=zh_CN.UTF-8  quiet splash
initrd   /ubuntu/initrd.img

iftitle [ find --set-root --ignore-floppies --ignore-cd  /vmlinuz ] 启动硬盘UBUNTU
find --set-root --ignore-floppies --ignore-cd /vmlinuz
uuid ()
kernel /vmlinuz root=UUID=%?%
initrd /initrd.img

iftitle [ find --set-root /bootmgr ] 启动硬盘Win7或win8
find --set-root /bootmgr
chainloader /bootmgr

iftitle [ find --set-root /ntldr ] 启动硬盘WINXP
find --set-root /ntldr
chainloader /ntldr

title  启动G2LDR
find --set-root /g2ldr
kernel /g2ldr

title 自动ISO菜单
command (bd)/grub/automenu

title 重启
reboot

title 关机
halt
修改BCD文件:
系统从硬件启动,先引导扇区-->BCD文件看要启动的列表。
在BCD里添加刚才放到C盘根目录下的grldr文件,grldr会列出menu.lst的启动列表。
注意要先备份BCD文件,一下内容保存成"bcd-backUP.bat"批处理文件(bcd-backUP名字随便,后缀.bat不能变)
@ECHO off
Color 3e

::时间不是两位补0
if "%date:~5,2%" lss "10" (set mm=0%date:~6,1%) else (set mm=%date:~5,2%)
if "%date:~8,2%" lss "10" (set dd=0%date:~9,1%) else (set dd=%date:~8,2%)
if "%time:~0,2%" lss "10" (set hh=0%time:~1,1%) else (set hh=%time:~0,2%)
if "%time:~3,2%" lss "10" (set nn=0%time:~4,1%) else (set nn=%time:~3,2%)

::备份BCD文件,并按备份时间改名,年月日_时分秒
bcdedit /export BCD_backUP_%date:~0,4%%mm%%dd%_%hh%%nn%%time:~6,2%
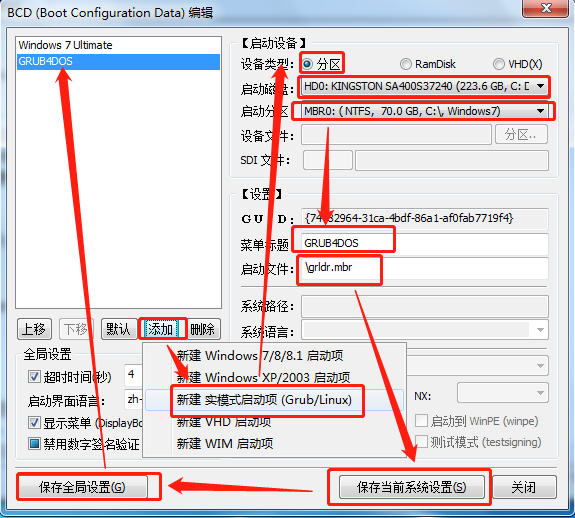
添加引导 ,启动磁盘选择你系统所在的盘,启动分区选C盘,菜单标题随意写(不要有特殊字符)
这里用BOOTICE v1.3.4 x64(64位)文件编辑

如果是win7系统,使用bootice软件。
编辑BCD---本地BCD--增加启动项---实模式--在boot/locate之处点击一下,选择一下启动硬盘和启动分区(这里填选grldr所在分区)--启动文件处填写grldr.mbr---启动项的名字可以自己起,例如GRUB4DOS.
改变一下显示时间设置(timeout)为10秒或者20秒(时间设置至少5秒以上,否则都没有显示出来就跳过了)。
记得要保存设置。有两个保存按钮都要点击到。
重启后在BCD菜单选择GRUB4DOS。
建立存放VHD文件的目录
在磁盘任意分区根目录下建立一个ubuntu文件夹(最好不要在C盘)
将“initrd.img-5.4.0-42-generic改名initrd.img”、“vmlinuz-5.4.0-42-generic改名vmlinuz”、“ubuntu.vhd”这三个文件放到ubuntu文件夹下。
这些名字和上面的menu.lst文件的第一个 iftitle 段对应。先这样设置,能用后,在修改自己喜欢的路径。
为什么把引导文件放到其他目录?是为了限制访问范围,保护系统目录。物理机引导不小心弄坏了,系统就起不来了。你懂的。
如果是winXP系统,编辑boot.ini, 加入一行 C:grldr.mbr=GRUB4DOS.
重启系统。选择GRUB4DOS。
注意 GRub4dos启动只需要三个文件 grldr grldr.mbr menu.lst与一个目录grub.
########################
g2ldr方式的引导设置:
把两个文件g2ldr g2ldr.mbr grub2目录 复制到系统盘或C盘根目录下。
如果是win7系统,使用bootice软件。
编辑BCD---本地BCD--增加启动项---实模式--在boot/locate之处点击一下,选择一下启动硬盘和启动分区(这里填选g2ldr所在分区)--启动文件处填写g2ldr.mbr (或者 gr2dr.mbr)---启动项的名字可以自己起,例如G2LDR.
改变一下显示时间设置(timeout)为10秒或者20秒。
记得要保存设置。有两个保存按钮都要点击到。
重启后在BCD菜单选择G2LDR。
如果是winXP系统,编辑boot.ini,加入一行 C:g2ldr.mbr=G2LDR.(或者 C:gr2dr.mbr=G2LDR)
重启系统。选择G2LDR。
注意 G2ldr启动只需要两个文件 g2ldr g2ldr.mbr 与一个目录grub2.
注意 使用grub2efi 或 g2ldr时候原则上只需要一个VHD文件.
未完,待续…………