写在前面
本文承接https://www.cnblogs.com/wushenjiang/p/12944345.html
本篇来学习Retrofit框架
Retrofit简介
在我们之前学习SSM框架的过程,发现很多操作都是通过注解来完成的。其实我们在网络请求中也可以做到,Retrofit框架是对Okhttp框架的一个二次封装,通过注解的方式将API转换成接口来二次简化网络请求的操作。
Retrofit入门
首先要到导包,这里贴一个Retrofit的官方文档地址:https://square.github.io/retrofit/,链接是国外的,访问起来会有点慢。这里面教了我们如何使用Retrofit.我们首先按照常理,还是要导包:
implementation 'com.squareup.retrofit2:retrofit:2.9.0'
implementation 'com.squareup.retrofit2:converter-gson:2.9.0'
这里导入了两个包,一个是retrofit的本体一个是gson的转换器,用于自动把我们的结果转换成javaBean类型。转换器有很多种,如下:
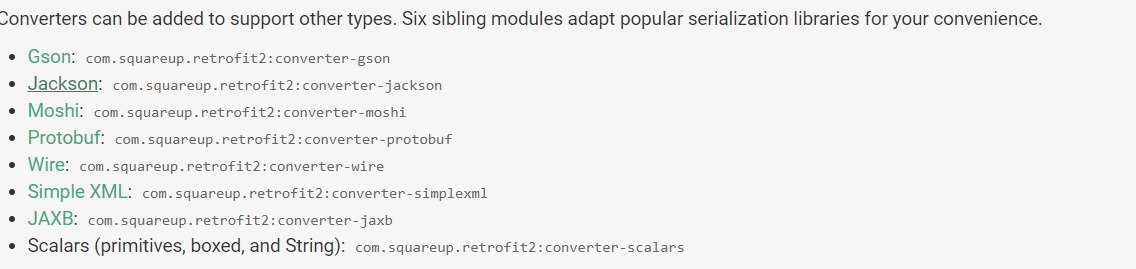
有很多可供选择,可以转xml也可以转json.这里就使用常见的gson了。
下面我们就开始写入门代码吧!
首先是定义一个API接口
public interface API {
    @GET("/get/text")
    Call<JsonResult> getJson();
}
这里的JsonResult是一个bean类,我们直接用GsonFormat生成即可。这里的GET注解表示为GET请求,括号里为url。具体的BASE_URL我们可以在程序中添加。
public void getRequest(View v){
       Retrofit retrofit = new Retrofit.Builder()
            .baseUrl("http://10.0.2.2:9102")
            .addConverterFactory(GsonConverterFactory.create())
            .build();
        API api = retrofit.create(API.class);
        Call<JsonResult> task = api.getJson();
        task.enqueue(new Callback<JsonResult>() {
            @Override
            public void onResponse(Call<JsonResult> call, Response<JsonResult> response) {
                Log.d(TAG,"onResponse -->"+response.code());
                if(response.code() == HttpURLConnection.HTTP_OK){
                    JsonResult body = response.body();
                    Log.d(TAG,"body -->"+body);
                }
            }

            @Override
            public void onFailure(Call<JsonResult> call, Throwable t) {
                Log.d(TAG,"onFailure -->"+t.toString());
            }
        });
    }
我们来研究一下这段入门代码
首先定义一个Retrofit,在里面设置好我们的baseUrl和转换器,build()即可。之后我们通过API接口来创建一个API类,直接调用API类中的方法,返回一个Call对象,对Call对象进行异步请求(与okhttp类型),之后就是一样的处理流程了,失败怎么做,成功怎么做。
可以看到,使用Retrofit可以让我们的操作更加简化,通过注解的方式也让我们的配置更加简易。
初步简单封装
我们发现,每次都要创建一个一模一样的Retrofit,那不是很麻烦吗,还很重复。我们可以建一个RetrofitMannager类,将其封装:
public class RetrofitManager {
    private  static  Retrofit retrofit = new Retrofit.Builder()
            .baseUrl("http://10.0.2.2:9102")
            .addConverterFactory(GsonConverterFactory.create())
            .build();
    public static Retrofit getRetrofit(){
        return retrofit;
    }
}
这里只是最基本的封装,实际上我们应该将其封装成单例对象。这里为了方便只做了简单的get方法。
带参数的get请求注解
使用@Query注解
先来看看API接口定义的代码吧:
    @GET("/get/param")
    Call<GetWithParamsResult> getWithParams(@Query("keyword") String keyword,@Query("page") int page,@Query("order") String order);
可以看到,我们每一个参数都用了@Query来表示参数,这里要严格和后台对上,不能多空格或者少字母什么的。那么我们要在代码中使用这个接口呢?
    public void getWithParams(View v){
        Call<GetWithParamsResult> call = mApi.getWithParams("我是搜索关键字", 10, "1");
        call.enqueue(new Callback<GetWithParamsResult>() {
            @Override
            public void onResponse(Call<GetWithParamsResult> call, Response<GetWithParamsResult> response) {
                Log.d(TAG,"onResponse -->"+response.body());
            }

            @Override
            public void onFailure(Call<GetWithParamsResult> call, Throwable t) {
                Log.d(TAG,"onFailure -->"+t.toString());
            }
        });
    }
这里我把API定义成了一个成员变量:
mApi = RetrofitManager.getRetrofit().create(API.class);
后文都会这么写,请注意.
可以看到,只要在方法里加入该输入的参数即可。会发现真是非常的简单啊。
使用@QueryMap注解
但我们发现,当我们做需求的时候,有时候需要输入的变量很多,挨个写太麻烦也容易出错。Retrofit提供了@QueryMap注解,输入时放入map即可,如下接口定义:
    @GET("/get/param")
    Call<GetWithParamsResult> getWithParams(@QueryMap Map<String,Object> params);
在代码中使用:
    public  void getWithParamsMap(View v){
        Map<String,Object> params = new HashMap<>();
        params.put("keyword","我是搜索关键字哦!");
        params.put("page",5);
        params.put("order","0");
        Call<GetWithParamsResult> call = mApi.getWithParams(params);
        call.enqueue(new Callback<GetWithParamsResult>() {
            @Override
            public void onResponse(Call<GetWithParamsResult> call, Response<GetWithParamsResult> response) {
                Log.d(TAG,"onResponse -->"+response.body());
            }

            @Override
            public void onFailure(Call<GetWithParamsResult> call, Throwable t) {
                Log.d(TAG,"onFailure -->"+t.toString());
            }
        });
    }
可以看到我们只要把键值对挨个放入map然后导入即可。
带参数的post请求
这个和上面基本一模一样,来看下API接口:
    @POST("/post/string")
    Call<PostWithParamsResult> postWithParam(@Query("string") String content);
@POST注解,和@GET基本是同样的用法。@Query,也和上文一样,就不贴实际使用的代码了。
@Url注解
@Url注解主要是用来拼接url使用的。其实和上面一样,因为我们带参的请求本就需要拼接一下字符串这里不过是把上面的参数放到了改成了String型。直接看API接口:
    @POST
    Call<PostWithParamsResult> postWithUrl(@Url String url);
接下来看看实际使用:
        String url = "/post/string?string=测试内容";
        Call<PostWithParamsResult> call = mApi.postWithUrl(url);
下面的就不贴了,操作是一样的。
@Body注解
@Body注解主要用于Post请求中的请求体内容,先来看API接口定义:
    @POST("/post/comment")
    Call<PostWithParamsResult> postWithBody(@Body CommentItem commentItem);
可以看到,我们只需要封装一个请求体bean类即可。如下实际操作:
        CommentItem commentItem = new CommentItem("23333","我爱淫荡");
        Call<PostWithParamsResult> task = mApi.postWithBody(commentItem);
剩下的操作也基本一模一样了。
@Part和@MultiPart注解来实现post文件上传
单文件
先来看API定义:
    @POST("/file/upload")
    @Multipart
    Call<PostFileResult> postFile(@Part  MultipartBody.Part part);
@Part就是我们的文件请求内容,@Multipart用来标记为文件上传
接下来看看实际操作:
    public void postFile(View v){
        MultipartBody.Part part = createPartByPathAndKey("/storage/emulated/0/Download/shop-ad.png","file");
        Call<PostFileResult> task = mApi.postFile(part);
        task.enqueue(new Callback<PostFileResult>() {
            @Override
            public void onResponse(Call<PostFileResult> call, Response<PostFileResult> response) {
                int code = response.code();
                Log.d(TAG,"code -->"+code);
                if(code == HttpURLConnection.HTTP_OK){
                    Log.d(TAG,"result -->"+response.body());
                }
            }

            @Override
            public void onFailure(Call<PostFileResult> call, Throwable t) {
                Log.d(TAG,"onFailure -->"+t.toString());
            }
        });

    private MultipartBody.Part createPartByPathAndKey(String path,String key){
        File file = new File(path);
        RequestBody body = RequestBody.create(MediaType.parse("image/jpeg"),file);
        MultipartBody.Part part = MultipartBody.Part.createFormData(key,file.getName(),body);
        return part;
    }
可以看到,我们首先要构建一个MultipartBody.Part类,具体操作看自己定义的方法,然后即可直接调用API了。
多文件上传
要做多文件上传,其实也很简单,如下API接口定义:
    @Multipart
    @POST("/files/upload")
    Call<PostFileResult> postFiles(@Part List<MultipartBody.Part> parts);
直接定义成一个集合即可,在代码中我们往list里add即可:
        List<MultipartBody.Part> parts = new ArrayList<>();
        MultipartBody.Part partOne = createPartByPathAndKey("/storage/emulated/0/Download/rBsADV64ILeAfwQMAAdBpy-0H04021.png", "files");
        parts.add(partOne);
        MultipartBody.Part partTwo = createPartByPathAndKey("/storage/emulated/0/Download/rBsADV64HDWAI6i_AAhJfxL8eXE287.png", "files");
        parts.add(partTwo);
        Call<PostFileResult> task = mApi.postFiles(parts);
带参数的文件上传
先来看接口:
    @Multipart
    @POST("/file/params/upload")
    Call<PostFileResult> postFileWithParams(@Part MultipartBody.Part part, @PartMap Map<String,String> params);
这里多了一个新注解,@PartMap,主要用于存放文件的信息,我们来看看实际操作:
        MultipartBody.Part part = createPartByPathAndKey("/storage/emulated/0/Download/shop-ad.png","file");
        Map<String,String> params = new HashMap<>();
        params.put("description","这是一张长方形的轮播图,哎卧槽");
        params.put("isFree","true");
        Call<PostFileResult> task = mApi.postFileWithParams(part, params);
也很简单,就不再细说了。
@FieldMap和@FormUrlEncoded和@Field注解来实现表单提交
@Field和@FormUrlEncoded
惯例,先来看看API接口定义:
    @FormUrlEncoded
    @POST("/login")
    Call<LoginResult> doLogin(@Field("userName") String userName,@Field("password") String password);
@FormUrlEncoded用来标识为提交表单,@Field作用类似@Query,用来写好对应的key,也要和后台对上。
来看实际使用:
Call<LoginResult> task = mApi.doLogin("王大锤", "fuck");
剩下的不细说了,很简单。
@FieldMap
@FieldMap,类似@QueryMap,来看接口定义:
    @FormUrlEncoded
    @POST("/login")
    Call<LoginResult> doLogin(@FieldMap Map<String,String> params);
实际使用也很类似:
        Map<String,String> loginInfo = new HashMap<>();
        loginInfo.put("userName","刘某");
        loginInfo.put("password","cao");
        Call<LoginResult> task = mApi.doLogin(loginInfo);
文件下载
先来看API接口定义:
    @Streaming
    @GET
    Call<ResponseBody> downloadFile(@Url String url);
@Streaming用来标识为文件下载,@Url用来指定下载的文件路径。
实际操作:
    public void downloadFile(View v){
        String url = "/download/8";
        Call<ResponseBody> task = mApi.downloadFile(url);
        task.enqueue(new Callback<ResponseBody>() {
            @Override
            public void onResponse(Call<ResponseBody> call, Response<ResponseBody> response) {
                int code = response.code();
                Log.d(TAG, "code -->"+code);
                if (code == HttpURLConnection.HTTP_OK) {
                    Log.d(TAG, "current thread name : " + Thread.currentThread().getName());
                    //知道文件名称 --header里
                    Headers headers = response.headers();
                    String fileNameHeader = headers.get("Content-disposition");
                    String fileName = "未命名.jpg";
                    if (fileNameHeader != null) {
                        fileName = fileNameHeader.replace("attachment; filename=","");
                        Log.d(TAG, "fileName: " + fileName);
                    }
                    //写文件,但这里是UI线程,不可以写
                    writeString2Disk(response,fileName);
                }
            }

            @Override
            public void onFailure(Call<ResponseBody> call, Throwable t) {
                Log.d(TAG,"onFailure -->"+t.toString());
            }
        });
    }

 private void writeString2Disk(Response<ResponseBody> response, String fileName) {
        new Thread(new Runnable() {
            @Override
            public void run() {
                InputStream inputStream = response.body().byteStream();
                File baseOutFile = getExternalFilesDir(Environment.DIRECTORY_PICTURES);
                File outFile = new File(baseOutFile+"/"+fileName);
                try {
                    FileOutputStream fos = new FileOutputStream(outFile);
                    byte[] buffer = new byte[1024];
                    int len;
                    while((len = inputStream.read(buffer)) != -1){
                        fos.write(buffer,0,len);
                    }
                    fos.close();
                } catch (Exception e) {
                    e.printStackTrace();
                }
            }
        }).start();

    }
这里其实操作还是很类似,主要就是获取到文件后进行解析下载,都是固定操作。这里不再赘述了。
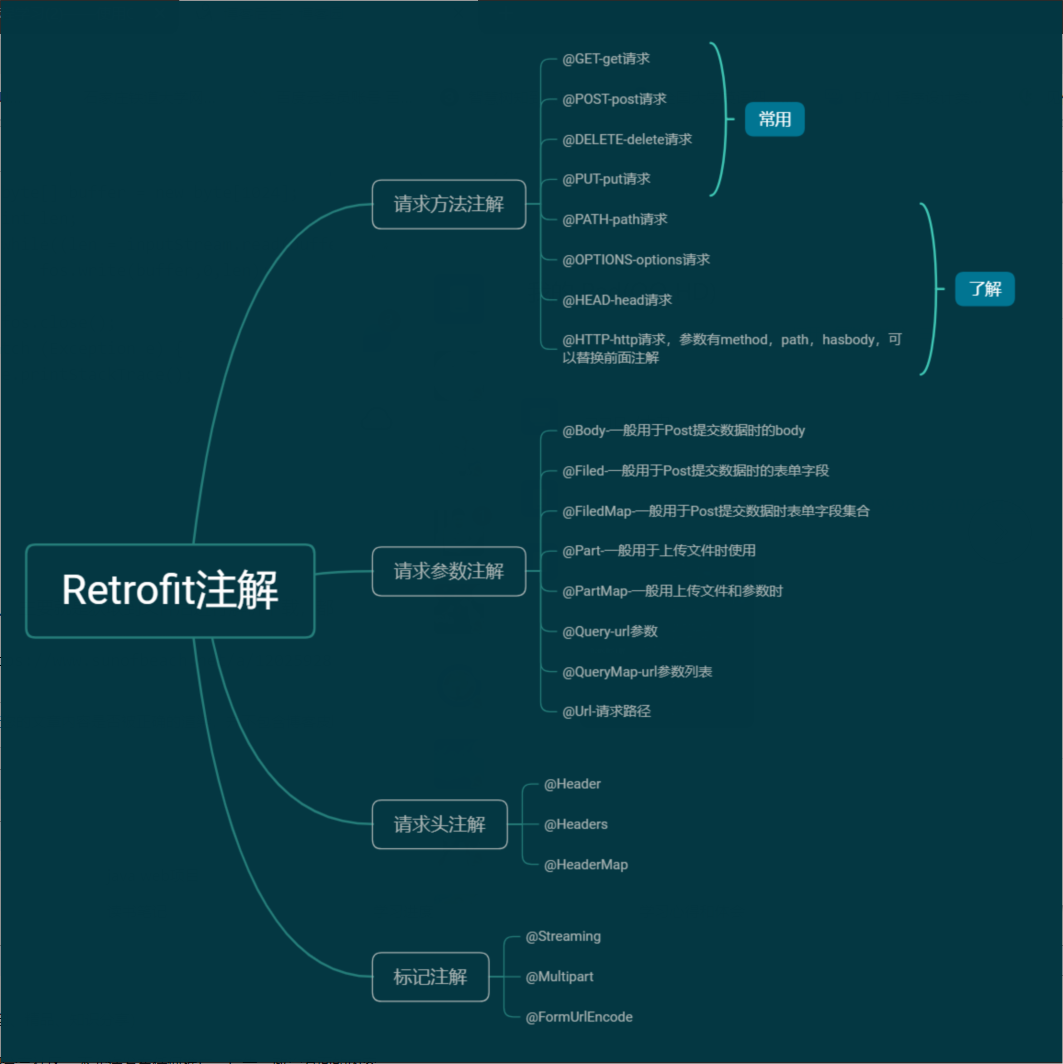
总结
最后放上一张转载自https://www.sunofbeach.net/a/1202592838370578432的Retrofit注解思维导图: