---------------------------------------------------------------本文基于sdk30----------------------------------------------------------------------
安卓中视图基本上都是通过布局创建的,个人在实际开发中总会产生一些疑问, 如:
1、View的构造方法中各参数究竟起到什么作用?2、自定义View为什么要写全路径,而TextView、ImageView等不需要?3、merge、include标签如何工作的?
下面就通过跟踪具体的源码来分析“从布局到View”的整个流程。
1、LayoutInflater基本用法
LayoutInflater对象可以通过LayoutInflater的from方法获取:
public static LayoutInflater from(Context context) {
    LayoutInflater LayoutInflater =
            (LayoutInflater) context.getSystemService(Context.LAYOUT_INFLATER_SERVICE);
    if (LayoutInflater == null) {
        throw new AssertionError("LayoutInflater not found.");
    }
    return LayoutInflater;
}
从布局文件加载View的方法有两个:
public View inflate(@LayoutRes int resource, @Nullable ViewGroup root) {
    return inflate(resource, root, root != null);
}

public View inflate(@LayoutRes int resource, @Nullable ViewGroup root, boolean attachToRoot) {
        ...
    }
其中resource是布局文件的id, root表示父View,attachToRoot表示是否将布局表示的View作为子View,添加到root中,返回值见分析。
2、LayoutInflater的inflate(int, ViewGroup, boolean)方法分析
inflate(int, ViewGroup, boolean)方法源码如下:
public View inflate(@LayoutRes int resource, @Nullable ViewGroup root, boolean attachToRoot) {
    final Resources res = getContext().getResources();
    ...
    XmlResourceParser parser = res.getLayout(resource);
    try {
        return inflate(parser, root, attachToRoot);
    } finally {
        parser.close();
    }
}
首先是获取Context相关联的Resources,然后根据布局文件的id将布局文件加载成XmlResourceParser对象,用于解析布局文件,再调用inflate(XmlPullParser, ViewGroup, boolean)方法:
(去除了部分调试代码)
public View inflate(XmlPullParser parser, @Nullable ViewGroup root, boolean attachToRoot) {
    synchronized (mConstructorArgs) {

        final Context inflaterContext = mContext;
        final AttributeSet attrs = Xml.asAttributeSet(parser);
        Context lastContext = (Context) mConstructorArgs[0];
        mConstructorArgs[0] = inflaterContext;
        View result = root;
        try {
            ...
            if (TAG_MERGE.equals(name)) {
                ...
                rInflate(parser, root, inflaterContext, attrs, false);
            } else {
                // Temp is the root view that was found in the xml
                final View temp = createViewFromTag(root, name, inflaterContext, attrs);
                ...
                if (root == null || !attachToRoot) {
                    result = temp;
                }
            }

        } catch (XmlPullParserException e) {
            ...
        } catch (Exception e) {
            ...
        } finally {
            ...
        }

        return result;
    }
}
该方法最后返回值为result, 首先赋值为root,当root为null或者attachToRoot为false时,result赋值为temp,也就是布局文件对应的View,意思是root不为null且attachToRoot为true时该方法将返回root,其他情况返回布局文件解析得到的View。
try代码块中节点name为最外层的节点名称,根据name不同共有两个分支:1、根节点name是merge:2、根节点name不是merge,分别从这两种情况分析。
2.1、根节点是否是merge
两个分支最后都调用了rInflate(XmlPullParser, View, Context,AttributeSet, boolean),该方法分析见2.2节
(1) 根节点是merge时分支代码如下:
    if (root == null || !attachToRoot) {
        throw new InflateException("<merge /> can be used only with a valid "
          + "ViewGroup root and attachToRoot=true");
    }

    rInflate(parser, root, inflaterContext, attrs, false);
当root为null或者attachToRoot为false时,将抛出异常。
rInflate(XmlPullParser, View, Context,AttributeSet, boolean)继续解析xml中布局,以root作为根节点,于是merge标签中的布局被合并到root中去(merge标签中高度、宽度、线性布局的方向等参数被舍弃),所以要求root不为null, attachToRoot为true。
(2) 根节点不是merge时分支主要代码如下:
    final View temp = createViewFromTag(root, name, inflaterContext, attrs);
    ViewGroup.LayoutParams params = null;

    if (root != null) {
        params = root.generateLayoutParams(attrs);
        if (!attachToRoot) {
            temp.setLayoutParams(params);
        }
    }

    rInflateChildren(parser, temp, attrs, true);

    if (root != null && attachToRoot) {
        root.addView(temp, params);
    }

    if (root == null || !attachToRoot) {
        result = temp;
    }
主要步骤如下:
(1)调用createViewFromTag方法(方法分析见2.3节)根据最外层标签name创建对应的View,即temp;
(2)如果root不为null,调用root的generateLayoutParams生成LayoutParams, 获取temp的layout_width、layout_height、layout_weight等参数(generateLayoutParams方法在LinearLayout、RelativeLayout等ViewGroup中都有具体实现,生成对应的LayoutParams),如果attachToRoot为false,则设置temp的LayoutParams参数;
(3)调用rInflateChildren方法,继续解析子节点,该方法调用rInflate方法,见2.2节;
(4)如果root不为null,布局文件解析成的View,添加到root中。
(5)如果root为null或者attachRoot,整个方法返回值置为temp, 不然就是root。
2.2、rInflate(XmlPullParser, View, Context, AttributeSet, boolean)方法分析
rInflate相关代码如下:
void rInflate(XmlPullParser parser, View parent, Context context,
        AttributeSet attrs, boolean finishInflate) throws XmlPullParserException, IOException {

    final int depth = parser.getDepth();
    int type;
    boolean pendingRequestFocus = false;

    while (((type = parser.next()) != XmlPullParser.END_TAG ||
            parser.getDepth() > depth) && type != XmlPullParser.END_DOCUMENT) {

        if (type != XmlPullParser.START_TAG) {
            continue;
        }

        final String name = parser.getName();

        if (TAG_REQUEST_FOCUS.equals(name)) {
            pendingRequestFocus = true;
            consumeChildElements(parser);
        } else if (TAG_TAG.equals(name)) {
            parseViewTag(parser, parent, attrs);
        } else if (TAG_INCLUDE.equals(name)) {
            if (parser.getDepth() == 0) {
                throw new InflateException("<include /> cannot be the root element");
            }
            parseInclude(parser, context, parent, attrs);
        } else if (TAG_MERGE.equals(name)) {
            throw new InflateException("<merge /> must be the root element");
        } else {
            final View view = createViewFromTag(parent, name, context, attrs);
            final ViewGroup viewGroup = (ViewGroup) parent;
            final ViewGroup.LayoutParams params = viewGroup.generateLayoutParams(attrs);
            rInflateChildren(parser, view, attrs, true);
            viewGroup.addView(view, params);
        }
    }
    ......
}
主要看节点为include、merge以及正常节点,主要逻辑如下:1、节点为include,不能为布局根节点;2、节点为merge,则抛出异常,提示merge必须为布局根节点;3、节点为正常节点,则调用createViewFromTag创建对应的View,然后rInflateChildrend方法迭代继续解析节点内的节点,最后将节点对应的View添加到parent中去。
2.3、createViewFromTag(View, String, Context, AttributeSet ,boolean)方法分析
该方法主要代码如下:
View createViewFromTag(View parent, String name, Context context, AttributeSet attrs,
            boolean ignoreThemeAttr) {
        ...
        try {
            View view = tryCreateView(parent, name, context, attrs);

            if (view == null) {
                final Object lastContext = mConstructorArgs[0];
                mConstructorArgs[0] = context;
                try {
                    if (-1 == name.indexOf('.')) {
                        view = onCreateView(context, parent, name, attrs);
                    } else {
                        view = createView(context, name, null, attrs);
                    }
                } finally {
                    mConstructorArgs[0] = lastContext;
                }
            }

            return view;
        } catch (InflateException e) {
            ...
        } catch (ClassNotFoundException e) {
            ...
        } catch (Exception e) {
            ...
        }
    }
其中主要流程是:1、首先调用tryCreateView创建View,该方法根据mFactory、mFactory2、mPrivateFactory三个View创建Factory类来创建View,然后根据name是否是类名(是否有 . 分隔)来判断调用onCreateView还是createView,而onCreateView实质上也是调用了createView, 中间加了类名前缀 ”android.view.“,这也是xml布局中部分View类不需要加全路径的原因,如View、ViewStub、SurfaceView类等(这些类实际上被Factory2拦截生成了)。
2.4、LayoutInflater实例的mFactory属性(Factory实例)、mFactory2属性(Factory2实例):拦截与处理View类的创建
查找LayoutInflater的setFactory2方法使用, LayoutInflater.setFactory2 -> LayoutInflaterCompat.setFactory2 -> AppCompatDelegateImpl.installViewFactory()
于是找到LayoutInflater.Factory2的接口具体实现为AppCompatDelegateImpl类,AppCompatActivity的setContentView也是由该类负责具体实现的。AppCompatDelegateImpl类中Factory类的onCreateView是调用Factory2类的onCreateView实现的,Factory2.onCreateView最后调用createView方法,最终由AppCompatViewInflater类的createView创建View,部分代码如下:
    final View createView(View parent, final String name, @NonNull Context context,
            @NonNull AttributeSet attrs, boolean inheritContext,
            boolean readAndroidTheme, boolean readAppTheme, boolean wrapContext) {
        final Context originalContext = context;

        // We can emulate Lollipop's android:theme attribute propagating down the view hierarchy
        // by using the parent's context
        if (inheritContext && parent != null) {
            context = parent.getContext();
        }
        if (readAndroidTheme || readAppTheme) {
            // We then apply the theme on the context, if specified
            context = themifyContext(context, attrs, readAndroidTheme, readAppTheme);
        }
        if (wrapContext) {
            context = TintContextWrapper.wrap(context);
        }

        View view = null;

        switch (name) {
            case "TextView":
                view = createTextView(context, attrs);
                verifyNotNull(view, name);
                break;

            ...

        }

        if (view == null && originalContext != context) {
            // If the original context does not equal our themed context, then we need to manually
            // inflate it using the name so that android:theme takes effect.
            view = createViewFromTag(context, name, attrs);
        }
        ...
        return view;
    }
于是TextView标签解析成AppCompatTextView,ImageView标签解析成AppCompatImageView等等, 其他View由createViewFromTag创建:
   private View createViewFromTag(Context context, String name, AttributeSet attrs) {
        if (name.equals("view")) {
            name = attrs.getAttributeValue(null, "class");
        }

        try {
            mConstructorArgs[0] = context;
            mConstructorArgs[1] = attrs;

            if (-1 == name.indexOf('.')) {
                for (int i = 0; i < sClassPrefixList.length; i++) {
                    final View view = createViewByPrefix(context, name, sClassPrefixList[i]);
                    if (view != null) {
                        return view;
                    }
                }
                return null;
            } else {
                return createViewByPrefix(context, name, null);
            }
        } catch (Exception e) {
            // We do not want to catch these, lets return null and let the actual LayoutInflater
            // try
            return null;
        } finally {
            // Don't retain references on context.
            mConstructorArgs[0] = null;
            mConstructorArgs[1] = null;
        }
    }
createViewFromTag根据View的名称name以及"android.widget."、"android.view."、"android.webkit."这三个前缀尝试生成View,生成View则返回, 如android.widget包名下LinearLayout、RelativeLayout、ListView等,android.view下的View、ViewStub、SurfaceView等(拦截了LayoutInflater中部分View的创建),android.webkit包名下的WebView。
2.5、LayoutInflater类的mPrivateFactory属性
断点调试, 查看LayoutInflater的实例属性,如下:
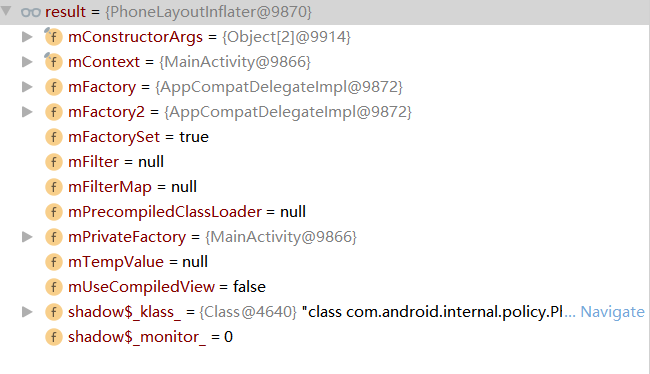
可以看到mPrivateFactory属性为MainActivity的实例(该属性在Activity的attach方法中设置), 一步步查找MainActivity的父类,最终在Activity类中看到了LayoutInflater.Factory2的实现,在FragmentActivity中进行了重写。
(1)Activity中逻辑
Activity中Factory2接口实现如下:
    public View onCreateView(@Nullable View parent, @NonNull String name,
            @NonNull Context context, @NonNull AttributeSet attrs) {
        if (!"fragment".equals(name)) {
            return onCreateView(name, context, attrs);
        }

        return mFragments.onCreateView(parent, name, context, attrs);
    }
于是,当标签是fragment时交给mFragments进行处理, 最终由FragmentManagerImpl实现fragment标签的创建。
    @Override
    public View onCreateView(View parent, String name, Context context, AttributeSet attrs) {
        if (!"fragment".equals(name)) {
            return null;
        }

        String fname = attrs.getAttributeValue(null, "class");
        TypedArray a =
                context.obtainStyledAttributes(attrs, com.android.internal.R.styleable.Fragment);
        if (fname == null) {
            fname = a.getString(com.android.internal.R.styleable.Fragment_name);
        }
        int id = a.getResourceId(com.android.internal.R.styleable.Fragment_id, View.NO_ID);
        String tag = a.getString(com.android.internal.R.styleable.Fragment_tag);
        a.recycle();

        int containerId = parent != null ? parent.getId() : 0;
        if (containerId == View.NO_ID && id == View.NO_ID && tag == null) {
            throw new IllegalArgumentException(attrs.getPositionDescription()
                    + ": Must specify unique android:id, android:tag, or have a parent with"
                    + " an id for " + fname);
        }

        // If we restored from a previous state, we may already have
        // instantiated this fragment from the state and should use
        // that instance instead of making a new one.
        Fragment fragment = id != View.NO_ID ? findFragmentById(id) : null;
        if (fragment == null && tag != null) {
            fragment = findFragmentByTag(tag);
        }
        if (fragment == null && containerId != View.NO_ID) {
            fragment = findFragmentById(containerId);
        }

        if (FragmentManagerImpl.DEBUG) Log.v(TAG, "onCreateView: id=0x"
                + Integer.toHexString(id) + " fname=" + fname
                + " existing=" + fragment);
        if (fragment == null) {
            fragment = mContainer.instantiate(context, fname, null);
            fragment.mFromLayout = true;
            fragment.mFragmentId = id != 0 ? id : containerId;
            fragment.mContainerId = containerId;
            fragment.mTag = tag;
            fragment.mInLayout = true;
            fragment.mFragmentManager = this;
            fragment.mHost = mHost;
            fragment.onInflate(mHost.getContext(), attrs, fragment.mSavedFragmentState);
            addFragment(fragment, true);
        } else if (fragment.mInLayout) {
            // A fragment already exists and it is not one we restored from
            // previous state.
            throw new IllegalArgumentException(attrs.getPositionDescription()
                    + ": Duplicate id 0x" + Integer.toHexString(id)
                    + ", tag " + tag + ", or parent id 0x" + Integer.toHexString(containerId)
                    + " with another fragment for " + fname);
        } else {
            // This fragment was retained from a previous instance; get it
            // going now.
            fragment.mInLayout = true;
            fragment.mHost = mHost;
            // If this fragment is newly instantiated (either right now, or
            // from last saved state), then give it the attributes to
            // initialize itself.
            if (!fragment.mRetaining) {
                fragment.onInflate(mHost.getContext(), attrs, fragment.mSavedFragmentState);
            }
        }

        // If we haven't finished entering the CREATED state ourselves yet,
        // push the inflated child fragment along. This will ensureInflatedFragmentView
        // at the right phase of the lifecycle so that we will have mView populated
        // for compliant fragments below.
        if (mCurState < Fragment.CREATED && fragment.mFromLayout) {
            moveToState(fragment, Fragment.CREATED, 0, 0, false);
        } else {
            moveToState(fragment);
        }

        if (fragment.mView == null) {
            throw new IllegalStateException("Fragment " + fname
                    + " did not create a view.");
        }
        if (id != 0) {
            fragment.mView.setId(id);
        }
        if (fragment.mView.getTag() == null) {
            fragment.mView.setTag(tag);
        }
        return fragment.mView;
    }
主要逻辑是: 依次根据fragment的id、tag、containerId来获取已经存在的fragment,没有就创建,然后设置xml中配置的id、tag、containerId,调用addFragment将fragment添加到Activity中,最后返回fragment的View。
(2)FragmentActivity中
LayoutInflater.Factory2的两个方法均由FragmentLayoutInflaterFactory来负责具体View的创建:
    @Override
    public View onCreateView(@NonNull String name, @NonNull Context context,
            @NonNull AttributeSet attrs) {
        return onCreateView(null, name, context, attrs);
    }

    @Nullable
    @Override
    public View onCreateView(@Nullable View parent, @NonNull String name, @NonNull Context context,
            @NonNull AttributeSet attrs) {
        if (FragmentContainerView.class.getName().equals(name)) {
            return new FragmentContainerView(context, attrs, mFragmentManager);
        }

        if (!"fragment".equals(name)) {
            return null;
        }

        ...

        return fragment.mView;
    }
对fragment标签的处理与Activity中流程大体相同,拓展了对androidx.fragment.app.FragmentContainerView的处理。
3、总结
LayoutInflater中加载xml为布局,首先通过mFactory2、mFactory属性创建TextView、Button等常用控件,可以借此对这些常用的控件进行拓展(如MaterialComponentsViewInflater创建这些控件的拓展类MaterialTextView、MaterialRadioButton等), mPrivateFactory(Activity、FragmentActivity中实现)解析fragment的标签,最后由LayoutInflater的onCreateView和createView来负责可能遗漏的View创建。
附: 项目依赖
由于appcompat相关包更新较为频繁, 这里给出本文分析相关的依赖包:
implementation 'androidx.appcompat:appcompat:1.2.0'
implementation 'com.google.android.material:material:1.2.1'
implementation 'androidx.constraintlayout:constraintlayout:2.0.4'
implementation 'androidx.navigation:navigation-fragment:2.3.2'
implementation 'androidx.navigation:navigation-ui:2.3.2'
implementation 'androidx.lifecycle:lifecycle-livedata-ktx:2.2.0'
implementation 'androidx.lifecycle:lifecycle-viewmodel-ktx:2.2.0'