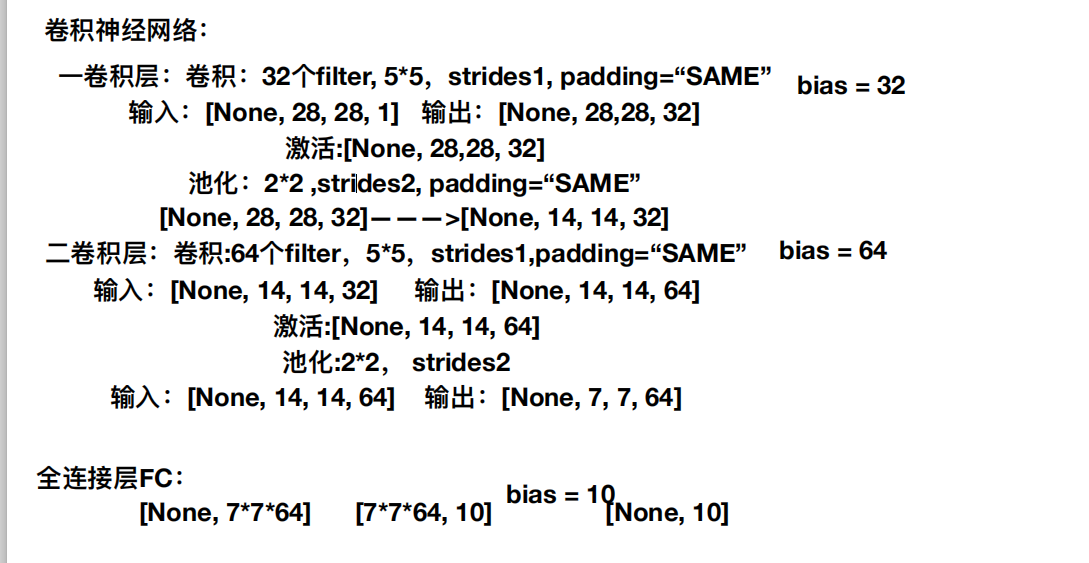
卷积网络的结构为:

代码:
# coding=utf-8
import tensorflow as tf
from tensorflow.examples.tutorials.mnist import input_data


def weight_variable(shape):
    """
    权重初始化函数
    :param shape:
    :return:
    """
    weight = tf.Variable(tf.random_normal(shape,seed=0.0,stddev=1.0))
    return weight

def bias_variable(shape):
    """
    偏置初始化函数
    :param shape:
    :return:
    """
    bias = tf.Variable(tf.random_normal(shape, seed=0.0, stddev=1.0))
    return bias


def model():

    """
    定义卷积网络模型
    :return:
    """

    # 1、准备数据
    with tf.variable_scope("pre_data"):
        x = tf.placeholder(tf.float32,[None,784])
        y_true = tf.placeholder(tf.int64,[None,10])

    # 2、定义第一层卷积网络
    # 卷积层为:[5*5*1] 大小的过滤器,有32个,步长为1
    # 池化层为 [2*2] 大小的,步长为2
    with tf.variable_scope("conv1"):

        # 卷积层输入的格式为[batch,heigth,width,channel],所以x的形状需要修改
        x_reshape1 = tf.reshape(x,[-1,28,28,1])
        # 初始化过滤器,为[5*5]大小的,设置32个
        filter1 = weight_variable([5,5,1,32])
        bias1 = bias_variable([32])

        # 卷积层定义,将数据变为[None,28,28,32]
        x_jjc1 = tf.nn.conv2d(input=x_reshape1,filter=filter1,strides=[1,1,1,1],padding="SAME")

        # 激活层
        x_relu1 = tf.nn.relu(x_jjc1) + bias1

        # 池化层,将数据[None,28,28,32] 变为 [None,14,14,32]
        x_pool1 = tf.nn.max_pool(x_relu1,ksize=[1,2,2,1],strides=[1,2,2,1],padding="SAME")


    # 3、定义第二层卷积网络
    # 卷积层为[5*5*32],64个,步长为1
    # 池化层为[2*2],步长为2
    with tf.variable_scope("conv2"):

        # 定义第二个卷积层的过滤器
        filter2 = weight_variable([5,5,32,64])
        bias2 = bias_variable([64])

        # 卷积层定义,将数据变为[None,14,14,64]
        x_jjc2 = tf.nn.conv2d(input=x_pool1,filter=filter2,strides=[1,1,1,1],padding="SAME")

        # 激活层
        x_relu2 = tf.nn.relu(x_jjc2) + bias2

        # 池化层,将数据变为[None,7,7,64]
        x_pool2 = tf.nn.max_pool(value=x_relu2,ksize=[1,2,2,1],strides=[1,2,2,1],padding="SAME")

    # 4、定义全连接层
    with tf.variable_scope("fc"):

        # 定义权重和偏置
        weight = weight_variable([7 * 7 * 64 ,10])
        bias_fc = bias_variable([10])

        x_pool2_reshape = tf.reshape(x_pool2,[-1,7*7*64])

        # 预测值
        y_predict = tf.matmul(x_pool2_reshape,weight) + bias_fc

    return x,y_true,y_predict


def convolution():
    mnist = input_data.read_data_sets("../data/day06/",one_hot=True)

    # 1、定义模型
    x,y_true,y_predict = model()

    # 3、模型参数计算
    with tf.variable_scope("model_soft_corss"):
        # 计算交叉熵损失
        softmax = tf.nn.softmax_cross_entropy_with_logits(labels=y_true, logits=y_predict)
        # 计算损失平均值
        loss = tf.reduce_mean(softmax)

    # 4、梯度下降(反向传播算法)优化模型
    with tf.variable_scope("model_better"):
        tarin_op = tf.train.GradientDescentOptimizer(0.0001).minimize(loss)

    # 5、计算准确率
    with tf.variable_scope("model_acc"):
        # 计算出每个样本是否预测成功,结果为:[1,0,1,0,0,0,....,1]
        equal_list = tf.equal(tf.argmax(y_true, 1), tf.argmax(y_predict, 1))

        # 计算出准确率,先将预测是否成功换为float可以得到详细的准确率
        acc = tf.reduce_mean(tf.cast(equal_list, tf.float32))

    # 6、准备工作
    # 定义变量初始化op
    init_op = tf.global_variables_initializer()
    # 定义哪些变量记录
    tf.summary.scalar("losses", loss)
    tf.summary.scalar("acces", acc)
    merge = tf.summary.merge_all()

    # 开启会话运行
    with tf.Session() as sess:
        # 变量初始化
        sess.run(init_op)

        # 开启记录
        filewriter = tf.summary.FileWriter("../summary/day08/", graph=sess.graph)

        for i in range(1000):
            # 准备数据
            mnist_x, mnist_y = mnist.train.next_batch(50)

            # 开始训练
            sess.run([tarin_op], feed_dict={x: mnist_x, y_true: mnist_y})

            # 得出训练的准确率,注意还需要将数据填入
            print("第%d次训练,准确率为:%f" % ((i + 1), sess.run(acc, feed_dict={x: mnist_x, y_true: mnist_y})))

            # 写入每步训练的值
            summary = sess.run(merge, feed_dict={x: mnist_x, y_true: mnist_y})
            filewriter.add_summary(summary, i)


    return None


if __name__ == '__main__':
    convolution()
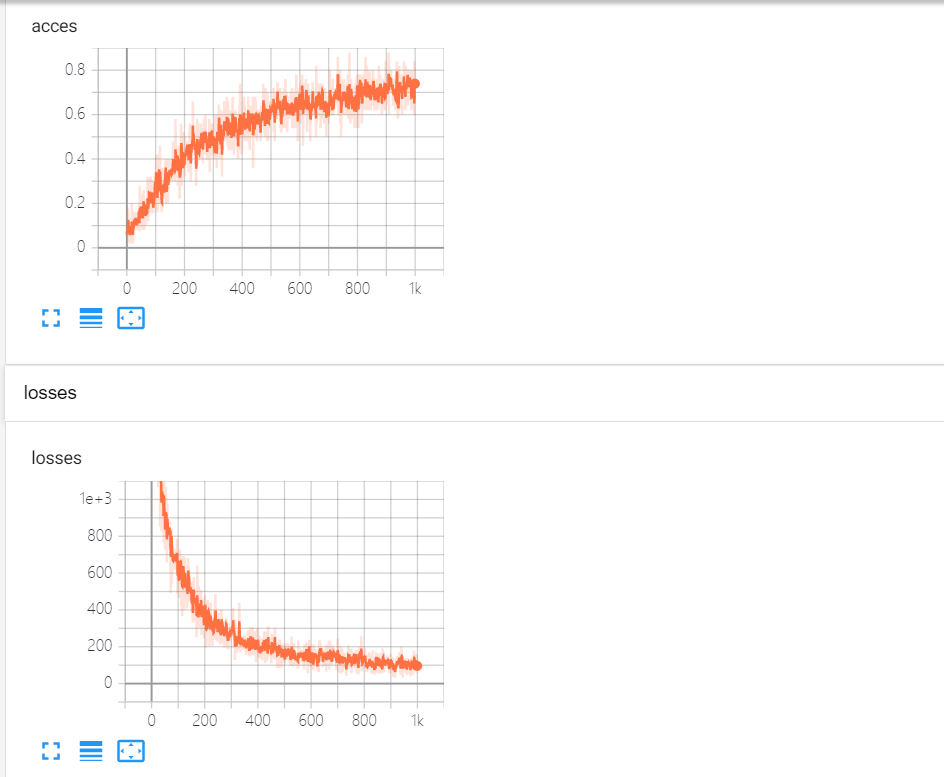
结果为:
