一、五大布局
Android的界面是有布局和组件协同完成的,布局好比是建筑里的框架,而组件则相当于建筑里的砖瓦。组件按照布局的要求依次排列,就组成了用户所看见的界面。Android的五大布局分别是LinearLayout(线性布局)、FrameLayout(单帧布局)、RelativeLayout(相对布局)、AbsoluteLayout(绝对布局)和TableLayout(表格布局)。
二、布局详解
1、LinearLayout:
LinearLayout按照垂直或者水平的顺序依次排列子元素,每一个子元素都位于前一个元素之后。如果是垂直排列,那么将是一个N行单列的结构,每一行只会有一个元素,而不论这个元素的宽度为多少;如果是水平排列,那么将是一个单行N列的结构。如果搭建两行两列的结构,通常的方式是先垂直排列两个元素,每一个元素里再包含一个LinearLayout进行水平排列。
LinearLayout的常用属性:
android:layout_gravity 本元素相对于父元素的重力方向
android:gravity 本元素所有子元素的重力方向
android:orientation 线性布局以列或行来显示内部子元素
android:layout_weight 子元素对未占用空间水平或垂直分配权重值
当 android:orientation="vertical" 时, 只有水平方向的设置才起作用,垂直方向的设置不起作用。即:left,right, center_horizontal 是生效的。!!!!
当 android:orientation="horizontal" 时, 只有垂直方向的设置才起作用,水平方向的设置不起作用。即:top,bottom,center_vertical 是生效的。!!!!
android:layout_gravity 和 android:gravity 的区别
android:gravity对元素本身起作用-本身元素显示在什么位置
android:layout_gravity相对与它的父元素-元素显示在父元素的什么位置。
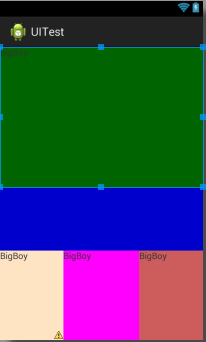
LinearLayout中的子元素属性android:layout_weight生效,它用于描述该子元素在剩余空间中占有的大小比例。加入一行只有一个文本框,那么它的默认值就为0,如果一行中有两个等长的文本框,那么他们的android:layout_weight值可以是同为1。如果一行中有两个不等长的文本框,那么他们的android:layout_weight值分别为1和2,那么第一个文本框将占据剩余空间的三分之二,第二个文本框将占据剩余空间中的三分之一。android:layout_weight遵循数值越小,重要度越高的原则。显示效果如下


 1 <LinearLayout xmlns:android="http://schemas.android.com/apk/res/android"
 2     android:layout_width="match_parent"
 3     android:layout_height="match_parent"
 4     android:orientation="vertical" >
 5
 6     <TextView
 7         android:id="@+id/textView1"
 8         android:layout_width="match_parent"
 9         android:layout_height="wrap_content"
10         android:layout_weight="0.50"
11         android:background="#006400"
12         android:text="@string/boy" />
13
14     <TextView
15         android:id="@+id/textView2"
16         android:layout_width="match_parent"
17         android:layout_height="wrap_content"
18         android:layout_weight="0.2"
19         android:background="#0000CD" />
20     <LinearLayout
21         android:layout_width="match_parent"
22         android:layout_height="wrap_content"
23         android:layout_weight="0.3"
24         android:orientation="horizontal" >
25
26         <TextView
27             android:id="@+id/textView3"
28             android:layout_width="wrap_content"
29             android:layout_height="match_parent"
30             android:layout_weight="0.3"
31             android:background="#FFE4C4"
32             android:text="@string/boy" />
33
34         <TextView
35             android:id="@+id/textView4"
36             android:layout_width="wrap_content"
37             android:layout_height="match_parent"
38             android:layout_weight="0.4"
39             android:background="#FF00FF"
40             android:text="@string/boy" />
41
42         <TextView
43             android:id="@+id/textView5"
44             android:layout_width="wrap_content"
45             android:layout_height="match_parent"
46              android:layout_weight="0.3"
47              android:background="#CD5C5C"
48             android:text="@string/boy" />
49
50     </LinearLayout>
51
52 </LinearLayout>
2、RelativeLayout:
RelativeLayout按照各子元素之间的位置关系完成布局。在此布局中的子元素里与位置相关的属性将生效。例如android:layout_below, android:layout_above等。子元素就通过这些属性和各自的ID配合指定位置关系。注意在指定位置关系时,引用的ID必须在引用之前,先被定义,否则将出现异常。
RelativeLayout里常用的位置属性如下:
第一类:属性值为true或false
android:layout_alignParentLeft —— 该组件是否对齐父组件的左端
android:layout_alignParentRight —— 该组件是否齐其父组件的右端
android:layout_alignParentTop —— 该组件是否对齐父组件的顶部
android:layout_alignParentBottom —— 该组件是否对齐父组件的底部
android:layout_centerInParent —— 该组件是否相对于父组件居中
android:layout_centerHorizontal —— 该组件是否横向居中
android:layout_centerVertical —— 该组件是否垂直居中
第二类:属性值必须为id的引用名“@id/id-name”
android:layout_below 在某元素的下方
android:layout_above 在某元素的的上方
android:layout_toLeftOf 在某元素的左边
android:layout_toRightOf 在某元素的右边
第三类:属性值为具体的像素值,如30dip,40px
android:layout_marginBottom 离某元素底边缘的距离
android:layout_marginLeft 离某元素左边缘的距离
android:layout_marginRight 离某元素右边缘的距离
android:layout_marginTop 离某元素上边缘的距离
 1 <LinearLayout xmlns:android="http://schemas.android.com/apk/res/android"
 2     android:layout_width="match_parent"
 3     android:layout_height="match_parent"
 4     android:orientation="vertical" >
 5
 6     <TextView
 7         android:id="@+id/textView1"
 8         android:layout_width="match_parent"
 9         android:layout_height="wrap_content"
10         android:layout_weight="0.50"
11         android:background="#006400"
12         android:text="@string/boy" />
13
14     <TextView
15         android:id="@+id/textView2"
16         android:layout_width="match_parent"
17         android:layout_height="wrap_content"
18         android:layout_weight="0.2"
19         android:background="#0000CD" />
20     <LinearLayout
21         android:layout_width="match_parent"
22         android:layout_height="wrap_content"
23         android:layout_weight="0.3"
24         android:orientation="horizontal" >
25
26         <TextView
27             android:id="@+id/textView3"
28             android:layout_width="wrap_content"
29             android:layout_height="match_parent"
30             android:layout_weight="0.3"
31             android:background="#FFE4C4"
32             android:text="@string/boy" />
33
34         <TextView
35             android:id="@+id/textView4"
36             android:layout_width="wrap_content"
37             android:layout_height="match_parent"
38             android:layout_weight="0.4"
39             android:background="#FF00FF"
40             android:text="@string/boy" />
41
42         <TextView
43             android:id="@+id/textView5"
44             android:layout_width="wrap_content"
45             android:layout_height="match_parent"
46              android:layout_weight="0.3"
47              android:background="#CD5C5C"
48             android:text="@string/boy" />
49
50     </LinearLayout>
51
52 </LinearLayout>
这次的代码稍微复杂一点,不过仍然是有规律可循的。android:layout_above 属性可以让一个控件位于另一个控件的上方,需要为这个属性指定相对控件 id 的引用,这里我们填入了@id/button3 ,表示让该控件位于 Button 3 的上方。其他的属性也都是相似的,android:layout_below 表示让一个控件位于另一个控件的下方,android:layout_toLeftOf 表示让一个控件位于另一个控件的左侧,android:layout_toRightOf 表示让一个控件位于另一个控件的右侧。注意,当一个控件去引用另一个控件的 id 时,该控件一定要定义在引用控件的后面,不然会出现找不到 id 的情况。
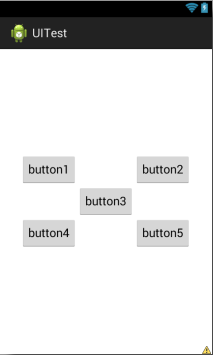
效果图
3、FrameLayout:
FrameLayout是五大布局中最简单的一个布局,在这个布局中,整个界面被当成一块空白备用区域,所有的子元素都不能被指定放置的位置,它们统统放于这块区域的左上角,并且后面的子元素直接覆盖在前面的子元素之上,将前面的子元素部分和全部遮挡。这种布局没有任何的定位方式,所有的控件都会摆放在布局的左上角。显示效果如下,按钮和图片都是位于布局的左上角。由于图片是在按钮之后添加的,因此图片压在了按钮的上面。
<FrameLayout xmlns:android="http://schemas.android.com/apk/res/android"
android:layout_width="match_parent"
android:layout_height="match_parent">

<Button
android:id="@+id/button"
android:layout_width="wrap_content"
android:layout_height="wrap_content"
android:text="Button"/>

<ImageView
android:id="@+id/image_view"
android:layout_width="wrap_content"
android:layout_height="wrap_content"
android:src="@drawable/ic_launcher" />


</FrameLayout>
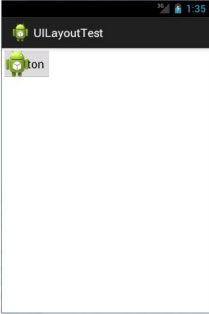
效果图
4、TableLayout
有多少个TableRow对象就有多少行,
列数等于最多子控件的TableRow的列数
直接在TableLayout加控件,控件会占据一行
TableLayout属性(也叫全局属性):*代表所有列
android:shrinkColumns -------设置可收缩的列,(内容过多,则收缩,扩展到第二行,控件没布满TableLayout时不起作用)
android:stretchColumns ------设置可伸展的列,(有空白则填充)
列可以同时具备stretchColumns及shrinkColumns属性
android:collapseColumns ------设置要隐藏的列(索引列从0开始)
内部控件属性:
android:layout_column -------该单元格在第几列显示
android:layout_span -------该单元格占据列数,默认为1
案列:
MainActivity:
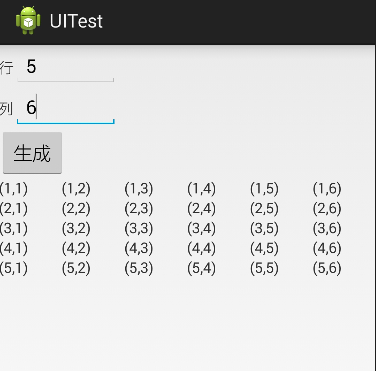
 1 public class MainActivity extends Activity {
 2     private final int WC = ViewGroup.LayoutParams.WRAP_CONTENT;
 3     private final int MP = ViewGroup.LayoutParams.MATCH_PARENT;
 4     private EditText row;
 5     private EditText column;
 6     private Button bt1;
 7     private TableLayout tableLayout;
 8
 9     @Override
10     protected void onCreate(Bundle savedInstanceState) {
11         super.onCreate(savedInstanceState);
12         setContentView(R.layout.activity_main);
13         //获取控件Button
14         bt1=(Button) findViewById(R.id.button1);
15         //获取文本输入框控件
16         row=(EditText) findViewById(R.id.editText1);
17         column=(EditText) findViewById(R.id.editText2);
18
19         //给button按钮绑定单击事件
20         bt1.setOnClickListener(new OnClickListener() {
21
22             @Override
23             public void onClick(View v) {
24
25                 if(row.getText().length()>0&&column.getText().length()>0){
26                     //把输入的行和列转为整形
27                     int row_int=Integer.parseInt(row.getText().toString());
28                     int col_int=Integer.parseInt(column.getText().toString());
29
30
31                      //获取控件tableLayout
32                     tableLayout = (TableLayout)findViewById(R.id.table1);
33                     //清除表格所有行
34                     tableLayout.removeAllViews();
35                     //全部列自动填充空白处
36                     tableLayout.setStretchAllColumns(true);
37                     //生成X行,Y列的表格
38                     for(int i=1;i<=row_int;i++)
39                     {
40                         TableRow tableRow=new TableRow(MainActivity.this);
41                         for(int j=1;j<=col_int;j++)
42                         {
43                             //tv用于显示
44                             TextView tv=new TextView(MainActivity.this);
45                             //Button bt=new Button(MainActivity.this);
46                             tv.setText("("+i+","+j+")");
47
48                             tableRow.addView(tv);
49                         }
50                         //新建的TableRow添加到TableLayout
51
52                         tableLayout.addView(tableRow, new TableLayout.LayoutParams(MP, WC,1));
53
54                     }
55                 }else{
56                     Toast.makeText(MainActivity.this,"请输入行和列",1).show();
57                 }
58             }
59         });
60
61
62     }
63
64 }
 1 <LinearLayout xmlns:android="http://schemas.android.com/apk/res/android"
 2     android:layout_width="match_parent"
 3     android:layout_height="match_parent"
 4     android:orientation="vertical" >
 5
 6     <LinearLayout
 7         android:layout_width="match_parent"
 8         android:layout_height="wrap_content"
 9         android:orientation="horizontal" >
10
11         <TextView
12             android:id="@+id/textView1"
13             android:layout_width="wrap_content"
14             android:layout_height="wrap_content"
15             android:text="行" />
16
17         <EditText
18             android:id="@+id/txtrow"
19             android:layout_width="100dp"
20             android:layout_height="wrap_content"
21             android:ems="10"
22             android:inputType="textPersonName" >
23
24             <requestFocus />
25         </EditText>
26     </LinearLayout>
27
28     <LinearLayout
29         android:layout_width="match_parent"
30         android:layout_height="wrap_content"
31         android:orientation="horizontal" >
32
33              <TextView
34                 android:id="@+id/textView2"
35                 android:layout_width="wrap_content"
36                 android:layout_height="wrap_content"
37                 android:text="列" />
38
39              <EditText
40                  android:id="@+id/txtlist"
41                  android:layout_width="100dp"
42                  android:layout_height="wrap_content"
43                  android:ems="10"
44                  android:inputType="textPersonName" />
45
46       </LinearLayout>
47
48
49     <Button
50         android:id="@+id/btncreate"
51         android:layout_width="wrap_content"
52         android:layout_height="wrap_content"
53         android:text="生成" />
54
55     <TableLayout
56         android:id="@+id/tablelayout1"
57         android:layout_width="match_parent"
58         android:layout_height="wrap_content" >
59
60
61     </TableLayout>
62
63 </LinearLayout>
效果图:
5、瀑布布局